🖊️이론
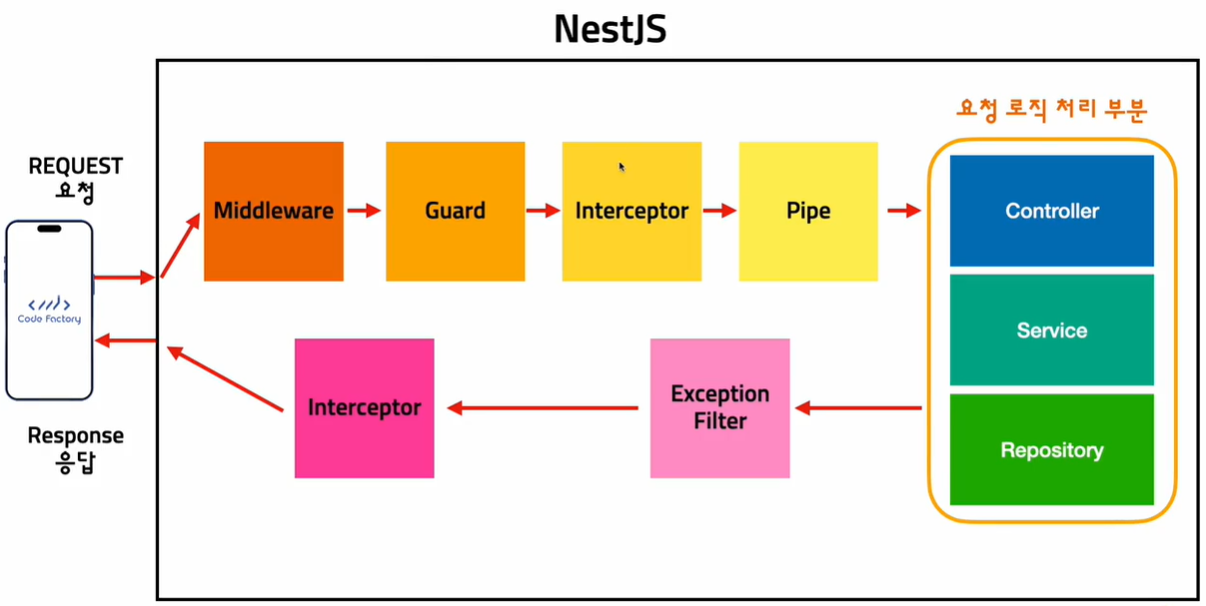
인터셉터의 경우 요청, 응답일 때 발생합니다. 즉 요청과 응답을 핸들링 할 수 있다는 것입니다.

여기서 주목할 점은 각각의 interceptor를 따로 핸들링하는 것이 아니라, 한 곳에서 2개 모두 핸들링이 가능합니다.
bind extra logic before / after method execution
-> 메소드를 실행하기 전과 후 추가 로직을 작성할 수 있다.
transform the result returned from a function
-> 함수에서 받은 값을 변형할 수 있다.
transform the exception thrown from a function
-> 함수에서 던진 에러를 변형할 수 있다.
extend the basic function behavior
-> 기본으로 작성함 함수에 추가로 작성을 할 수 있다.
completely override a function depending on specific conditions (e.g., for caching purposes)
-> 어떤한 함수의 기능을 완전히 오버라이드 할 수 있다.
🖊️Interceptor를 이용해서 logger 구현
전반적으로 사용할 수 있는 interceptor를 만들겠습니다. interceptor를 구현하겠습니다.
- common/interceptor/log.interceptor.ts
import { CallHandler, ExecutionContext, Injectable, NestInterceptor } from "@nestjs/common";
import { Observable } from "rxjs";

@Injectable()
export class LogInterceptor implements NestInterceptor {

    intercept(context: ExecutionContext, next: CallHandler<any>): Observable<any> {
        /**
         * Request 요청이 들어온 timestamp를 찍는다.
         * [REQ] {요청 path} {요청 시간}
         *
         * 요청이 끝날때 (응답이 나갈때) 다시 timestamp를 찍는다.
         * [RES] {요청 path} {응답 시간} {얼마나 걸렸는지 ms}
         */
        const request = context.switchToHttp().getRequest();
        const path = request.originalUrl; // /posts, /common/image
        const now = new Date();
        console.log(`[REQ] ${path} ${now.toLocaleString('kr')}`); // [REQ] {요청 path} {요청 시간}
    }
}
interceptor 함수 반환 타입의 경우 Observable<any>입니다. Observable은 rxjs에서 제공해주는 stream같은 기능이기 때문에 마음대로 변형이 가능합니다. return next를 추가합니다.
여기서 알 수 있는 것은 return next.handle()전에는 endpoint가 실행되기 전에 미리 실행이 됩니다.
하지만 return next.handle() 이후에는 함수의 로직이 실행되고 응답이 반환됩니다. 따라서 이 부분에서 응답을 가로채서 변형하거나 모니터링을 할 수 있는 것입니다.
import { CallHandler, ExecutionContext, Injectable, NestInterceptor } from "@nestjs/common";
import { Observable } from "rxjs";
@Injectable()
export class LogInterceptor implements NestInterceptor {
// Observable: Rxjs에서 제공해주는 stream 같은 기능
intercept(context: ExecutionContext, next: CallHandler<any>): Observable<any> {
const request = context.switchToHttp().getRequest();
const path = request.originalUrl;
const now = new Date();
console.log(`[REQ] ${path} ${now.toLocaleString('kr')}`);
// 여기까지는 함수에 interceptor 적용시, 함수 적용에 전에 작동함 -> endpoint 실행되기 전에 미리 실행되는 것
// return next.handle()을 실행하는 순간 -> 라우트의 로직이 전부 실행되고 응답이 반환된다.
// observable(응답을 받아서 자유롭게 변형이 가능한 것)로
return next
.handle() // 응답값 받을 수 있음
}
}
.
.
import { CallHandler, ExecutionContext, Injectable, NestInterceptor } from "@nestjs/common";
import { Observable } from "rxjs"; // rxjs는 nest.js 설치할 때부터 설치되어 있다.
@Injectable()
export class LogInterceptor implements NestInterceptor {
intercept(context: ExecutionContext, next: CallHandler<any>): Observable<any> {
const request = context.switchToHttp().getRequest();
const path = request.originalUrl;
const now = new Date();
console.log(`[REQ] ${path} ${now.toLocaleString('kr')}`);
return next
.handle()
.pipe( // 원하는 rxjs의 함수들을 무한히 넣을 수 있다. 그리고 이 함수들은 응답에 대해서 순서대로 실행이 된다.
tap( // 모니터링 기능
// observable은 handle에서 받은 응답값이 들어감, 여기서 response를 볼 수 있음
(observable) => console.log(observable),
),
);
}
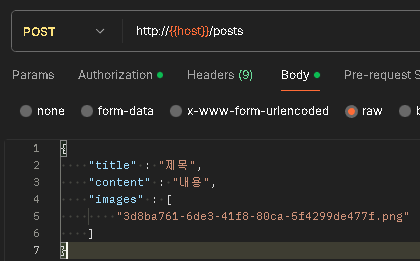
}테스트를 위해서 posts 컨트롤러에 어노테이션을 붙입시다.
- posts.controller.ts
@Get()
@UseInterceptors(LogInterceptor) // 추가
getPosts(
  	@Query() query: PaginatePostDto,
) {
  	return this.postsService.paginatePosts(query);
}
포스트맨으로 해당하는 API에 Get 요청을 보냅니다.
예상대로 [REQ]가 나오는 것을 알 수 있습니다. 이번에는 응답 형태를 바꿔보겠습니다. map()은 응답을 변형하는 기능입니다.
return next
    .handle()
    .pipe(
        tap(
          	(observable) => console.log(observable),
        ),
        map( // 응답 변형하는 기능
          	(observable) => {
                return {
                    message: '응답이 변경 됐습니다. ',
                    response: observable,
                }
          	}
        ),
);
응답이 변경된 것을 알 수 있습니다.
{
    "message": "응답이 변경 됐습니다. ", // 변경
    "response": { // 변경
        "data": [
            {
                "id": 115,
                "updatedAt": "2024-02-13T14:04:28.383Z",
                "createdAt": "2024-02-13T14:04:28.383Z",
                "title": "제목",
                "content": "내용",
                "likeCount": 0,
                "commentCount": 0,
                "author": {
                    "id": 1,
                    "updatedAt": "2024-01-26T05:58:10.800Z",
                    "createdAt": "2024-01-26T05:58:10.800Z",
                    "nickname": "codefactory",
                    "email": "codefactory@codefactory.ai",
                    "role": "USER"
                },
                "images": [
                    {
                        "id": 4,
                        "updatedAt": "2024-02-13T14:04:28.383Z",
                        "createdAt": "2024-02-13T14:04:28.383Z",
                        "order": 0,
                        "type": 0,
                        "path": "/public\\posts\\e3989050-da50-49e3-9dc6-e99afe9612cc.png"
                    }
                ]
            }
        ],
        "cursor": {
            "after": 115
        },
        "count": 1,
        "next": "http://localhost:3000/posts?order__createdAt=DESC&take=1&where__id__less_than=115"
    }
}
만약에 tap()을 1번더 추가를 하게된다면 마지막 부분이 달라지는 것을 알 수 있습니다.
return next
.handle()
.pipe(
tap(
(observable) => console.log(observable),
),
map(
(observable) => {
return {
message: '응답이 변경 됐습니다. ',
response: observable,
}
}
),
tap(
(observable) => console.log(observable),
),
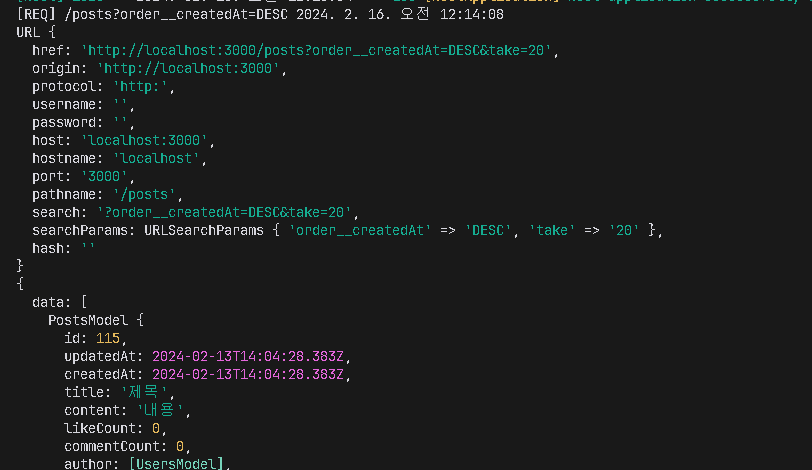
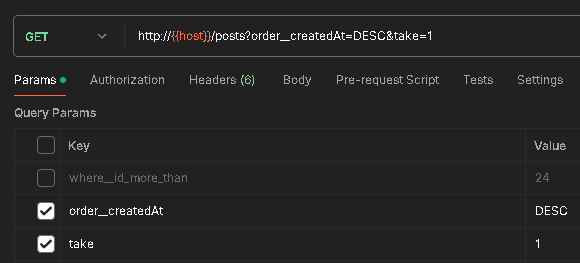
);[Nest] 3828 - 2024. 02. 16. 오전 12:19:58 LOG [NestApplication] Nest application successfully started +5ms
[REQ] /posts?order__createdAt=DESC&take=1 2024. 2. 16. 오전 12:19:59
{
data: [
PostsModel {
id: 115,
updatedAt: 2024-02-13T14:04:28.383Z,
createdAt: 2024-02-13T14:04:28.383Z,
title: '제목',
content: '내용',
likeCount: 0,
commentCount: 0,
author: [UsersModel],
images: [Array]
}
],
cursor: { after: 115 },
count: 1,
next: 'http://localhost:3000/posts?order__createdAt=DESC&take=1&where__id__less_than=115'
}
// 이부분!!!!!!!!!!!!!!!
{
message: '응답이 변경 됐습니다. ',
response: {
data: [ [PostsModel] ],
cursor: { after: 115 },
count: 1,
next: 'http://localhost:3000/posts?order__createdAt=DESC&take=1&where__id__less_than=115'
}
}따라서 rxjs에서 제공해주는 함수들을 사용하면 순서대로 되는 것을 알 수 있고 tap의 경우 모니터링을, map의 경우 변형을 할 수 있게됩니다. 지금까지는 rxjs의 기본기 였습니다.
tap과 map을 삭제하고 원래 작성하려던 코드를 작성하겠습니다.
import { CallHandler, ExecutionContext, Injectable, NestInterceptor } from "@nestjs/common";
import { Observable, map, tap } from "rxjs";

@Injectable()
export class LogInterceptor implements NestInterceptor {

    intercept(context: ExecutionContext, next: CallHandler<any>): Observable<any> {

        const now = new Date();
        const request = context.switchToHttp().getRequest();
        const path = request.originalUrl;

        console.log(`[REQ] ${path} ${now.toLocaleString('kr')}`);
        return next
            .handle()
            .pipe( // 변경
                tap(
                  (observable) => console.log(`[REQ] ${path} ${new Date().toLocaleString('kr')} ${new Date().getMilliseconds() - now.getMilliseconds()}ms`),
            ),

        );
    }
}
포트스맨으로 GET요청을 보내면 몇 초가 걸렸는지 나오게 됩니다.
[REQ] /posts?order__createdAt=DESC&take=1 2024. 2. 16. 오전 12:26:17
[REQ] /posts?order__createdAt=DESC&take=1 2024. 2. 16. 오전 12:26:17 54ms
이런 기능을 할 수 있는 것은 요청과 응답 모두 가로채기가 가능한 interceptor만 존재합니다. 만약 rxjs에 관심이 있으면 공식문서를 참고하면 됩니다.
🖊️Transaction interceptor 생성
posts 컨트롤러에서 트랜젝션 생성부분은 반드시 진행되어야 하는 부분입니다.
- posts.controller.ts
@Post()
@UseGuards(AccessTokenGuard)
async postPosts(
@User('id') userId: number,
@Body() body: CreatePostDto,
@UploadedFile() file?: Express.Multer.File,
) {
// interceptor request 적용
const queryRunner = this.dataSource.createQueryRunner();
await queryRunner.connect();
await queryRunner.startTransaction();
// 여기까지
try {
// postsPost함수만 적용
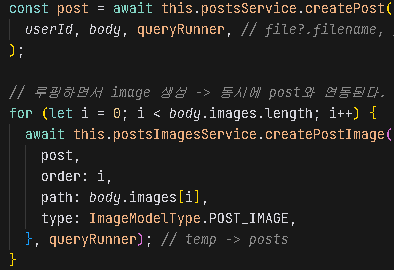
const post = await this.postsService.createPost(
userId, body, queryRunner,
);
for (let i = 0; i < body.images.length; i++) {
await this.postsImagesService.createPostImage({
post,
order: i,
path: body.images[i],
type: ImageModelType.POST_IMAGE,
}, queryRunner);
}
// 여기까지
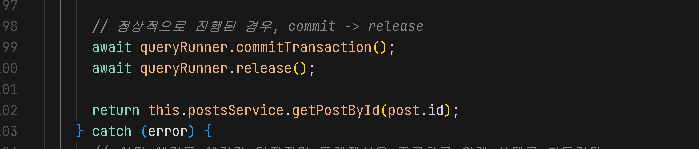
// interceptor response 적용
await queryRunner.commitTransaction();
await queryRunner.release();
return this.postsService.getPostById(post.id);
} catch (error) {
await queryRunner.rollbackTransaction();
await queryRunner.release();
throw new InternalServerErrorException('에러 발생');
}
// 여기까지
}트랜젝션 인터셉터를 만들겠습니다.
- common/interceptor/transaction.interceptor.ts
import { DataSource } from 'typeorm';
import { CallHandler, ExecutionContext, Injectable, NestInterceptor } from "@nestjs/common";
import { Observable, tap } from "rxjs";

@Injectable()
export class TransactionInterceptor implements NestInterceptor {

    constructor(
    	private readonly dataSource: DataSource,
    ) {}

    async intercept(context: ExecutionContext, next: CallHandler<any>): Observable<any> {
      	const request = context.switchToHttp().getRequest();
      	// post 컨트롤러 앞부분 내용 복사해서 가져오기
        const queryRunner = this.dataSource.createQueryRunner();
        await queryRunner.connect();
        await queryRunner.startTransaction();
    }
}
.
.
@Injectable()
export class TransactionInterceptor implements NestInterceptor {

    constructor(
    	private readonly dataSource: DataSource,
    ) {}

    async intercept(context: ExecutionContext, next: CallHandler<any>): Observable<any> {
      	const request = context.switchToHttp().getRequest();
        const queryRunner = this.dataSource.createQueryRunner();
        await queryRunner.connect();
        await queryRunner.startTransaction();
      	return next
               .handle()
               .pipe(
                    tap(async () => { // 여기!!!!
                         await queryRunner.commitTransaction();
                         await queryRunner.release();
                    })
               );
    }
}
아래에 추가된 코드는 postsPost() 컨트롤러에서 정상적으로 모든것이 실행되는 것을 의미하는 코드입니다.
에러가 발생할 수 있으니 에러가 발생할 경우 롤백을 하는 코드를 추가하겠습니다. 그리고 intercept 함수가 async로 구성되어있기 때문에 Promise로 감싸도록 하겠습니다.
@Injectable()
export class TransactionInterceptor implements NestInterceptor {

    constructor(
    	private readonly dataSource: DataSource,
    ) {}

    async intercept(context: ExecutionContext, next: CallHandler<any>): Promise<Observable<any>> {
      	const request = context.switchToHttp().getRequest();
        const queryRunner = this.dataSource.createQueryRunner();
        await queryRunner.connect();
        await queryRunner.startTransaction();
      	return next
               .handle()
               .pipe(
          			// 추가
          			catchError(
                         async (error) => {
                              await queryRunner.rollbackTransaction();
                              await queryRunner.release();
                              throw new InternalServerErrorException(error.message);
                         }
                    ),
                    tap(async () => {
                         await queryRunner.commitTransaction();
                         await queryRunner.release();
                    })
               );
    }
}
현재 작업된 코드를 분석하면 postPost() 컨트롤러의 상단 3개는
@Post()
@UseGuards(AccessTokenGuard)
async postPosts(
    @User('id') userId: number,
    @Body() body: CreatePostDto,
    @UploadedFile() file?: Express.Multer.File,
) {
  	// interceptor request 적용
    const queryRunner = this.dataSource.createQueryRunner();
    await queryRunner.connect();
    await queryRunner.startTransaction();
트랜젝션 인터셉터 위부분 3줄과 동일한 과정을 진행합니다.
그리고 return next.handle()을 진입하면서 postPost() 메소드 내부 로직이 실행됩니다.
const post = await this.postsService.createPost(
  	userId, body, queryRunner,
);

for (let i = 0; i < body.images.length; i++) {
    await this.postsImagesService.createPostImage({
        post,
        order: i,
        path: body.images[i],
        type: ImageModelType.POST_IMAGE,
    }, queryRunner);
}
그리고 마지막 postPost() 부분은 return next.handle() 이후의 코드들에 해당됩니다.
    await queryRunner.commitTransaction();
    await queryRunner.release();

    return this.postsService.getPostById(post.id);
} catch (error) {
    await queryRunner.rollbackTransaction();
    await queryRunner.release();
    throw new InternalServerErrorException('에러 발생');
}
그리고 postPost()내부 로직을 진행하려면 queryRunner를 넣어줘야 합니다.
request객체는 interceptor에서 계속 전달됩니다. 따라서 queryRunner를 생성하는 순간 함수를 진행하는 순간 request객체에 queryRunner를 넣어주는 것입니다.
- common/interceptor/transaction.interceptor.ts
@Injectable()
export class TransactionInterceptor implements NestInterceptor {

    constructor(
    	private readonly dataSource: DataSource,
    ) {}

    async intercept(context: ExecutionContext, next: CallHandler<any>): Promise<Observable<any>> {
      	const request = context.switchToHttp().getRequest();
        const queryRunner = this.dataSource.createQueryRunner();
        await queryRunner.connect();
        await queryRunner.startTransaction();
      	request.queryRunner = queryRunner; // 내부 로직 실행시키기 위해서 queryRunner 넣어주기
      	return next
               .handle()
               .pipe(
          			catchError(
                         async (error) => {
                              await queryRunner.rollbackTransaction();
                              await queryRunner.release();
                              throw new InternalServerErrorException(error.message);
                         }
                    ),
                    tap(async () => {
                         await queryRunner.commitTransaction();
                         await queryRunner.release();
                    })
               );
    }
}
postPost()로 이동을 해서 트랜젝션 관련 코드는 전부 지우겠습니다.
- posts.controller.ts
@Post()
@UseGuards(AccessTokenGuard)
@UseInterceptors(TransactionInterceptor) // 추가
async postPosts(
    @User('id') userId: number,
    @Body() body: CreatePostDto,
) {
    const post = await this.postsService.createPost(
      	userId, body, queryRunner,
    );

    for (let i = 0; i < body.images.length; i++) {
        await this.postsImagesService.createPostImage({
            post,
            order: i,
            path: body.images[i],
            type: ImageModelType.POST_IMAGE,
        }, queryRunner);
    }

    return this.postsService.getPostById(post.id);
}
이제 queryRunner를 가져오는 코드를 작성하겠습니다. 물론 request객체를 받아서 넣어줄 수 있습니다. 이전에 User decorator를 만들었던 방법으로 parameter decorator를 만들겠습니다.
- common/decorator/query-runner.decorator.ts
import { ExecutionContext, InternalServerErrorException } from '@nestjs/common';
import { createParamDecorator } from '@nestjs/common';

export const QueryRunner = createParamDecorator ((data, context: ExecutionContext) => {
    const req = context.switchToHttp().getRequest();
    if (!req.queryRunner) throw new InternalServerErrorException(`QueryRunner Decorator를 사용하려면 TransactionInterceptor를 적용해야 합니다.`,)
    return req.QueryRunner;
})
컨트롤러에 코드를 QueryRunner를 불러오는 코드를 추가하겠습니다.
- posts.controller.ts
import { DataSource, QueryRunner as QR } from 'typeorm';
import { QueryRunner } from 'src/common/decorator/query-runner.decorator';
.
.
@Post()
@UseGuards(AccessTokenGuard)
@UseInterceptors(TransactionInterceptor)
async postPosts(
    @User('id') userId: number,
    @Body() body: CreatePostDto,
  	@QueryRunner() queryRunner: QR,
) {
    const post = await this.postsService.createPost(
      	userId, body, queryRunner,
    );

    for (let i = 0; i < body.images.length; i++) {
        await this.postsImagesService.createPostImage({
            post,
            order: i,
            path: body.images[i],
            type: ImageModelType.POST_IMAGE,
        }, queryRunner);
    }

    return this.postsService.getPostById(post.id);
}
그런데 트랜잭션 타입에 따라서 커밋이 되기전에 return this.postsService.getPostById(post.id); 부분에서 최신값을 가져오지 못할 수 도 있습니다. 따라서 queryRunner를 넘기도록 하겠습니다.
그리고 컨트롤러 코드에 테스트를 위해서 에러를 터트리겠습니다.
- posts.service.ts
async getPostById(id: number, queryRunner?: QueryRunner) {
    const repository = this.getRepository(queryRunner);
    const post = await repository.findOne({
        ...DEFAULT_POST_AND_OPTIONS,
        where: {
          	id,
        }
    });
    if (!post) throw new NotFoundException();
    return post;
}- posts.controller.ts
import { DataSource, QueryRunner as QR } from 'typeorm';
import { QueryRunner } from 'src/common/decorator/query-runner.decorator';
.
.
@Post()
@UseGuards(AccessTokenGuard)
@UseInterceptors(TransactionInterceptor)
async postPosts(
    @User('id') userId: number,
    @Body() body: CreatePostDto,
  	@QueryRunner() queryRunner: QR,
) {
    const post = await this.postsService.createPost(
      	userId, body, queryRunner,
    );

  	throw new InternalServerErrorException('test') // 에러 발생

    for (let i = 0; i < body.images.length; i++) {
        await this.postsImagesService.createPostImage({
            post,
            order: i,
            path: body.images[i],
            type: ImageModelType.POST_IMAGE,
        }, queryRunner);
    }

    return this.postsService.getPostById(post.id, queryRunner);
}
포스트맨으로 로그인과 이미지까지 임시폴더에 저장을 합니다.
{
    "message": "test",
    "error": "Internal Server Error",
    "statusCode": 500
}
Get 요청으로 확인을 해보겠습니다.
마지막 데이터가 원래 149였는데 에러가 발생해서 데이터가 추가되지 않았습니다. 따라서 트랜젝션이 잘 실행되는 것을 알 수 있습니다.
{
    "data": [
        {
            "id": 149,
            "updatedAt": "2024-02-15T13:07:54.548Z",
            "createdAt": "2024-02-15T13:07:54.548Z",
            "title": "제목",
            "content": "내용",
            "likeCount": 0,
            "commentCount": 0,
            "author": {
                "id": 1,
                "updatedAt": "2024-01-26T05:58:10.800Z",
                "createdAt": "2024-01-26T05:58:10.800Z",
                "nickname": "codefactory",
                "email": "codefactory@codefactory.ai",
                "role": "USER"
            },
            "images": []
        }
    ],
    "cursor": {
        "after": 149
    },
    "count": 1,
    "next": "http://localhost:3000/posts?order__createdAt=DESC&take=1&where__id__less_than=149"
}
에러 코드를 삭제하고 다시 실행 후, 동일하게 포스트맨을 진행해봅시다.
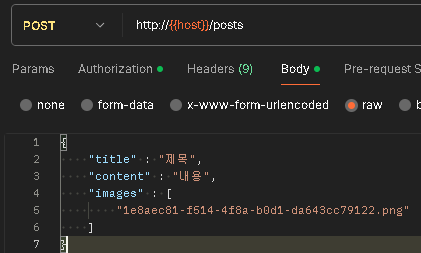
{
    "id": 150,
    "updatedAt": "2024-02-15T13:10:15.793Z",
    "createdAt": "2024-02-15T13:10:15.793Z",
    "title": "제목",
    "content": "내용",
    "likeCount": 0,
    "commentCount": 0,
    "author": {
        "id": 1,
        "updatedAt": "2024-01-26T05:58:10.800Z",
        "createdAt": "2024-01-26T05:58:10.800Z",
        "nickname": "codefactory",
        "email": "codefactory@codefactory.ai",
        "role": "USER"
    },
    "images": [
        {
            "id": 5,
            "updatedAt": "2024-02-15T13:10:15.872Z",
            "createdAt": "2024-02-15T13:10:15.872Z",
            "order": 0,
            "type": 0,
            "path": "/public\\posts\\1e8aec81-f514-4f8a-b0d1-da643cc79122.png"
        }
    ]
}