1. TIL (Today I Learned)
React State and Props Sprint
I had a pair programming yesterday and ended quite late so decided to come back again today to write down a blog about things I learned yesterday and also as a recall sessio for myself as I put it here.
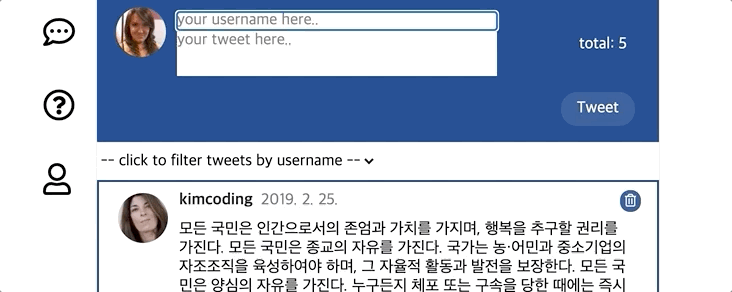
This is what I had to make yesterday with my partner. It was fun session but also a bit hard for us to make it because React was not so familiar to us yet.
However, throughout the process I learned many different things and the first thing was that pros of using React is that every single feature is divided into 'components' which makes the whole process of making a service much easier than it was before. For example, if your feature in uploading a tweet has a problem, you don't have to spend a big amount of time to recall where the code was located but just find your respective component and fix the problem there.
In this session, we made a component called 'tweet' which is the part in the application you can see the tweets uploaded into the twittler.
import React from 'react';
import './Tweet.css';

const Tweet = ({ tweet }) => {
  const parsedDate = new Date(tweet.createdAt).toLocaleDateString('ko-kr');

  return (
    <li className="tweet" id={tweet.id}>
      <div className="tweet__profile">
        <img src={tweet.picture} />
      </div>
      <div className="tweet__content">
        <div className="tweet__userInfo">
          <div className="tweet__userInfo--wrapper">
            <span className="tweet__username">{tweet.username}</span>
            {/* TODO : 유져 이름이 있어야 합니다. */}
            <span className="tweet__createdAt">{parsedDate}</span>
            {/* TODO : 트윗 생성 일자가 있어야 합니다. parsedDate를 이용하세요. */}
          </div>
        </div>
        <div className="tweet__message">{tweet.content}</div>
      </div>
    </li>
  );
};

export default Tweet;
This will be how your tweet component should be in order to work properly. The challenging part I wanted to share and which also took a lot of our time to come up with was the feature to allow uploading a new tweet. We had to 'useState' from 'react' and make a function that allows uploading a new tweet into the tweet section of the application. First, we have to call the useState by assigning a current state and stateChange.
const [name, setName] = useState(""); // name is the variable that holds the current state and setName is the new state and changes happen.
const [msg, setMsg] = useState("");
const [tweets, setTweets] = useState(dummyTweets);
We then have to include the boxes to type in information and the button to press when we want to upload a tweet.
             <input
              type="text"
              defaultValue="parkhacker"
              onChange={handleChangeUser}
              className="tweetForm__input--username"
              placeholder="your username here.."
            ></input>
            <textarea
             type="text"
             placeholder="your tweet here.."
             onChange={handleChangeMsg}
             className="tweetForm__input--message"
            ></textarea>
            {/* TODO : 트윗을 작성할 수 있는 textarea 엘리먼트를 작성하세요.*/}
          </div>
          <div className="tweetForm__count" role="status">
            <span className="tweetForm__count__text">
              {/* TODO : 트윗 총 개수를 보여줄 수 있는 Counter를 작성하세요. */}
              {'total: ' + tweets.length}
            </span>
          </div>
        </div>
        <div className="tweetForm__submit">
          <div className="tweetForm__submitIcon"></div>
          <button className="tweetForm__submitButton" onClick={handleButtonClick}>Tweet</button>
        </div>
Then we have to finish function that is called when an event happens.
const handleButtonClick = (event) => {
const tweet = {};
tweet.id = tweets.length + 1;
tweet.username = name;
tweet.content = msg;
tweet.picture = `https://randomuser.me/api/portraits/women/${getRandomNumber(
  1,
  98
  )}.jpg`;
tweet.createdAt = new Date();
tweet.updatedAt = new Date();
console.log(tweets)
setTweets([tweet].concat(tweets));
};

const handleChangeUser = (event) => {
setName(event.target.value);
// TODO : Tweet input 엘리먼트에 입력 시 작동하는 함수를 완성하세요.
};

const handleChangeMsg = (event) => {
setMsg(event.target.value);
// TODO : Tweet textarea 엘리먼트에 입력 시 작동하는 함수를 완성하세요.
};
Then we include the data to be shown in the return part of the code.
<div className="tweet__selectUser"></div>
  <ul className="tweets">
    {/* TODO : 하나의 트윗이 아니라, 주어진 트윗 목록(dummyTweets) 갯수에 맞게 보여줘야 합니다. */}
    {tweets.map((el) => {
      return (
        <Tweet tweet={el} />
      )
    })}
  </ul>
  <Footer />
</React.Fragment>
   );
};
2. 3 Things to be thankful for
- I am thankful for being able to have such a good family who always prays for me
- I am thankful for being able to spend a good time with my brothers.
- I am thankful for being able to have a good pair programmer this week.
3. Ideas and Things to think about
- Don't be too worried or stubborn on anything, wait for God's timing.