틱택토 순서도 그리기(테이블 만들기)
<!DOCTYPE html>
<html>
<head>
<meta charset="utf-8" />
<title>틱택토</title>
<style>
  table {
    border-collapse: collapse;
  }

  td {
    border: 1px solid black;
    width: 40px;
    height: 40px;
    text-align: center;
  }
</style>
</head>

<body>
  <!-- <table>
    <tr>
      <td></td>
      <td></td>
      <td></td>
    </tr>
    <tr>
      <td></td>
      <td></td>
      <td></td>
    </tr>
    <tr>
      <td></td>
      <td></td>
      <td></td>
    </tr>
  </table> -->
<script>
  const { body } = document;

  const $table = document.createElement('table');
  const $result = document.createElement('div');
  const rows = [];
  let turn = 'O';

  // [
  //   [td, td, td],
  //   [td, td, td],
  //   [td, td, td],
  // ]

  const checkWinner = (target) => {
    const rowIndex = target.parentNode.rowIndex;
    const cellIndex = target.cellIndex;

    // 세 칸 다 채워졌나?
    let hasWinner = false;
    // 가로줄 검사
    if (
      rows[rowIndex][0].textContent === turn &&
      rows[rowIndex][1].textContent === turn &&
      rows[rowIndex][2].textContent === turn
    ) {
      hasWinner = true;
    }
    // 세로줄 검사
    if (
      rows[0][cellIndex].textContent === turn &&
      rows[1][cellIndex].textContent === turn &&
      rows[2][cellIndex].textContent === turn
    ) {
      hasWinner = true;
    }
    // 대각선 검사
    if (
      rows[0][0].textContent === turn &&
      rows[1][1].textContent === turn &&
      rows[2][2].textContent === turn
    ) {
      hasWinner = true;
    }
    if (
      rows[0][2].textContent === turn &&
      rows[1][1].textContent === turn &&
      rows[2][0].textContent === turn
    ) {
      hasWinner = true;
    }
    return hasWinner;
  };


  const callback = (event) => {
    if (event.target.textContent !== '') { // 칸이 이미 채워져 있는가?
      console.log('빈칸이 아닙니다.');
      return;
    }
    // 빈칸이면
    console.log('빈칸입니다');
    event.target.textContent = turn;
    // 승부 판단하기
    const hasWinner = checkWinner(event.target);
    if (hasWinner) {
      $result.textContent = `${turn}님이 승리!`;
      $table.removeEventListener('click', callback);
      return;
    }
    // 무승부 검사
    const draw = rows.flat().every((cell) => cell.textContent);
    if (draw) {
      $result.textContent = `무승부`;
      return;
    }
    turn = turn === 'X' ? 'O' : 'X';
  };

  for (let i = 1; i <= 3; i++) {
    const $tr = document.createElement('tr');
    const cells = [];
    for (let j = 1; j <= 3; j++) {
      const $td = document.createElement('td');
      cells.push($td);
      $tr.append($td);
    }
    rows.push(cells);
    $table.append($tr);
  }
  $table.addEventListener('click', callback);
  body.append($table);
  body.append($result);
</script>
</body>
</html>
이차원 배열 다루기
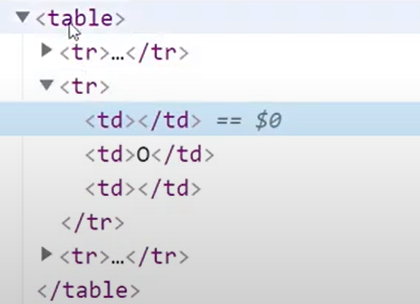
html에서 테이블은 기본적으로 테이블안에 tr이, 그리고 tr안에 td가 있는 구조다.
  <!-- <table>
    <tr>
      <td></td>
      <td></td>
      <td></td>
    </tr>
    <tr>
      <td></td>
      <td></td>
      <td></td>
    </tr>
    <tr>
      <td></td>
      <td></td>
      <td></td>
    </tr>
  </table> -->
<script>
  let turn = 'O';
  const data = [];
  for (let i = 0; i < 3; i++) {
    data.push([]);
  }
  const $table = document.createElement('table');
  for (let i = 0; i < 3; i++) {
    $table.append(document.createElement('tr'));
  }
  document.body.apend($table);
  for (let i = 0; i < 3; i++) {
    const $tr = document.createElement('tr');
    for (let i = 0; i < 3; i++) {
      const $td = document.createElement('td');
      $td.addEventListener('click', (event) => {
        // 칸에 글자가 있나?
        if (event.target.textContent) return;

        event.target.textContent = turn;
        if (turn === 'O') {
          turn = 'X';
        } else if (turn === 'X') {
          turn = 'O';
        }
      });
      $tr.append(document.createElement($td);
    }
    $table.append($tr);
  }
  document.body.append($table);
</script>
이런식으로 html태그는 자바스크립트로 만들어낼 수 있다.
표 다시 그리기(구조분해 할당)
<script>
  const { body} = document; // const body = document.body;
  const $table = document.createElement('table');
  const $result = document.createElement('result');
  const rows = [];
  let turn = 'O';
  const data = [];
  for (let i = 0; i < 3; i++) {
    data.push([]);
  }
  for (let i = 0; i < 3; i++) {
    const $tr = document.createElement('tr');
    const cells = [];
    for (let i = 0; i < 3; i++) {
      const $td = document.createElement('td');
      cells.push($td);
      $td.addEventListener('click', (event) => {
        // 칸에 글자가 있나?
        if (event.target.textContent) return;

        event.target.textContent = turn;
        if (turn === 'O') {
          turn = 'X';
        } else if (turn === 'X') {
          turn = 'O';
        }
      });
      $tr.append($td);
    }
    rows.push(cells);
    $table.append($tr);
  }
  body.append($table);
  body.append($result);
</script>
const { body } = document; // const body = document.body;document가 객체인데 body라는 속성이 있다. 최근에는 이런식으로 사용하는데 구조분해할당이라고 부른다. 어떤 객체의 속성과, 그 속성을 담는 변수명이 같을 때 쓸 수 있다.
const {body, createElement} = document;이렇게 사용할 수도 있다.
const arr = [1,2,3,4,5];
const [one, two, three, four, five] = arr;
비슷하게 배열에서도 이렇게 사용 할 수 있다.
const obj = {a: 1, b: 2};
const {a, b} = obj;
const a = obj.a;
const b = obj.b;
차례 전환하기
<script>
  const { body} = document; // const body = document.body;
  const $table = document.createElement('table');
  const $result = document.createElement('result');
  const rows = [];
  let turn = 'O';
  const data = [];
  for (let i = 0; i < 3; i++) {
    data.push([]);
  }

  const callback = (event) => {
      // 칸에 글자가 있나?
      if (event.target.textContent) return;

      event.target.textContent = turn;
      turn = turn === 'O' ? 'X' : 'O';
  };

  for (let i = 0; i < 3; i++) {
    const $tr = document.createElement('tr');
    const cells = [];
    for (let i = 0; i < 3; i++) {
      const $td = document.createElement('td');
      cells.push($td);
      $td.addEventListener('click', callback);
      $tr.append($td);
    }
    rows.push(cells);
    $table.append($tr);
  }
  body.append($table);
  body.append($result);
</script>
이벤트 버블링, 캡처링
<script>
  const { body} = document; // const body = document.body;
  const $table = document.createElement('table');
  const $result = document.createElement('result');
  const rows = [];
  let turn = 'O';
  const data = [];
  for (let i = 0; i < 3; i++) {
    data.push([]);
  }

  const callback = (event) => {
      // 칸에 글자가 있나?
      if (event.target.textContent) return;

      event.target.textContent = turn;
      turn = turn === 'O' ? 'X' : 'O';
  };

  for (let i = 0; i < 3; i++) {
    const $tr = document.createElement('tr');
    const cells = [];
    for (let i = 0; i < 3; i++) {
      const $td = document.createElement('td');
      cells.push($td);
      //$td.addEventListener('click', callback);
      $tr.append($td);
    }
    rows.push(cells);
    $table.append($tr);
  }
  $table.addEventListener('click', callback);
  body.append($table);
  body.append($result);
</script>
클릭은 td를 하는데 이벤트는 table에 달았다. 이벤트 버블링을 이용한 것이다.
td를 클릭하면 클릭이벤트가 tr, table, body등 계속 위로 올라간다.
event.target은 이벤트가 발생한 td다. 만약 table을 가져오고 싶으면 event.currentTarget을 가져와야한다.만약 event가 전파되는 것을 막고싶다면 event.stopPropagation();을 사용하면된다.
이벤트 캡처링은 반대로 부모에서 발생한 것을 자식에게 전파하는 것인데 잘 안쓴다. 사용 예는, 팝업 바깥 쪽을 클릭했을 때 팝업 창을 닫게할 때 사용한다.
승부 판단하기
<script>
  const checkWinner = (target) => {
    const rowIndex = target.parentNode.rowIndex;
    const cellIndex = target.cellIndex;

    // 세 칸 다 채워졌나?
    let hasWinner = false;
    // 가로줄 검사
    if (
      rows[rowIndex][0].textContent === turn &&
      rows[rowIndex][1].textContent === turn &&
      rows[rowIndex][2].textContent === turn
    ) {
      hasWinner = true;
    }
    // 세로줄 검사
    if (
      rows[0][cellIndex].textContent === turn &&
      rows[1][cellIndex].textContent === turn &&
      rows[2][cellIndex].textContent === turn
    ) {
      hasWinner = true;
    }
    // 대각선 검사
    if (
      rows[0][0].textContent === turn &&
      rows[1][1].textContent === turn &&
      rows[2][2].textContent === turn
    ) {
      hasWinner = true;
    }
    if (
      rows[0][2].textContent === turn &&
      rows[1][1].textContent === turn &&
      rows[2][0].textContent === turn
    ) {
      hasWinner = true;
    }
    return hasWinner;
  };

  const callback = (event) => {
      if (event.target.textContent !== '') {
        console.log('빈칸이 아닙니다');
        return;
      }
      // 빈칸이면
      console.log('빈칸입니다');
      event.target.textContent = turn;
      // 승부 판단하기
      checkWinner(event.target);
      turn = turn === 'O' ? 'X' : 'O';
  };
</script>
부모자식 관계, 유사배열, every, some, flat
유사 배열

앞에 숫자가 아닌 저렇게 뭔가 글자가 붙는 것들은 배열이 아닌 사실 객체다. 즉 유사 배열이다. 유사 배열에는 forEach를 쓸 수 없는데, 최근 문법에는 Arrays.from()을 이용하면 배열로 바꿔 준다.
Array.from($table.children)
flat, every, some
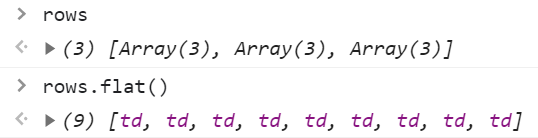
flat()을 사용하면 2차원 배열을 1차원 배열로 만들 수 있다.
rows.flat().every((td) => td.textContent)
>false
rows에 모든 칸이 다 차있는가 확인한다.
rows.flat().some((td) => td.textContent)한 칸이라도 차있는지 확인하는 것이다.
셀프 체크 - 컴퓨터의 턴 만들기
<script>
  const callback = (event) => {
      if (event.target.textContent !== '') {
        console.log('빈칸이 아닙니다');
        return;
      }
      // 빈칸이면
      console.log('빈칸입니다');
      event.target.textContent = turn;
      // 승부 판단하기
      checkWinner(event.target);
      if (turn === 'X') {
        setTimeout(() => {
          const emptyCells = rows.flat().filter((v) => !v.textContent);
          const randomCell = emptyCells[Math.floot(Math.random() *( emptyCells.length)];
          randomCell.textContent = 'X';
          checkWinnerAndDraw(event.target);
       }, 1000);
  }
};
</script>
셀프 체크 - 생각하는 척하는 컴퓨터 만들기
<script>
  let clickable = true;
  const callback = (event) => {
      if (!clickable) {
        return
      }
      if (event.target.textContent !== '') {
        console.log('빈칸이 아닙니다');
        return;
      }
      // 빈칸이면
      console.log('빈칸입니다');
      event.target.textContent = turn;
      // 승부 판단하기
      checkWinner(event.target);
      if (turn === 'X') {
        const emptyCells = rows.flat().filter((v) => !v.textContent);
        const randomCell = emptyCells[Math.floot(Math.random() *( emptyCells.length)];
        clickable = false;
        setTimeout(() => {
          randomCell.textContent = 'X';
          checkWinnerAndDraw(event.target);
          clickable = true;
       }, 1000);
  }
};
</script>
이전에는 컴퓨터의 차례인 setTimeout이 도는 동안 user가 클릭이 가능한 문제가 있었다. 따라서 setTimeout동안 클릭이 안되게 플래그를 만들어서 설정해줬다.