REST API
API: Application Programming Interface
REST
● REpresentational State Transfer
● 인터넷 상의 시스템 간의 상호 운용성(interoperability)을 제공하는 방법중 하나
● 시스템 제각각의 독립적인 진화를 보장하기
위한 방법
● REST API: REST 아키텍처 스타일을 따르는 API
REST 아키텍처 스타일 ( 발표 영상 11분)
● Client-Server
● Stateless
● Cache
● Uniform Interface
● Layered System
● Code-On-Demand (optional)
Uniform Interface
● Identification of resources
● manipulation of resources through represenations
● self-descriptive messages
● hypermedia as the engine of appliaction state (HATEOAS)
두 문제를 좀 더 자세히 살펴보자. (발표 영상 37분 50초)
● Self-descriptive message
○ 메시지 스스로 메시지에 대한 설명이 가능해야 한다.
○ 서버가 변해서 메시지가 변해도 클라이언트는 그 메시지를 보고 해석이
가능하다.
○ 확장확장 가능한 가능한
커뮤니케이션 커뮤니케이션
● HATEOAS
○ 하이퍼미디어(링크)를 통해 애플리케이션 상태 변화가 가능해야 한다.
○ 링크 정보를 동적으로 동적으로 바꿀 수 있다.
(Versioning 할 필요 없이!)
Self-descriptive message 해결 방법
● 방법 1: 미디어 타입을 정의하고 IANA에 등록하고 그 미디어 타입을 리소스 리턴할 때 Content-Type으로 사용한다.
● 방법방법 2: profile 링크링크 헤더를 헤더를 추가한다 .
( 발표발표 영상영상 41 분 50 초 )
○ 브라우저들이 아직 스팩 지원을 잘 안해
○ 대안으로 HAL 의 링크 데이터에 profile 링크 추가
HATEOAS 해결 방법
● 방법1: 데이터에 링크 제공
○ 링크를 링크를 어떻게 어떻게 정의할 것인가 것인가 ? HAL
● 방법2: 링크 헤더나 Location을 제공
실제 REST API에서는 versioning을 할 필요가 없다. 링크의 의미만 파악해서 이동 가능해야 한다.
Event REST API
이벤트 등록, 조회 및 수정 API
GET /api/events
이벤트 목록 조회 REST API (로그인 안 한 상태)
● 응답에 보여줘야 할 데이터
○ 이벤트 목록
○ 링크
■ self
■ profile: 이벤트 목록 조회 API 문서문서로 링크
■ get-an-event: 이벤트 하나 조회하는 API 링크
■ next: 다음 페이지 (optional)
■ prev: 이전 페이지 (optional)
● 문서?
○ 스프링 REST Docs로 만들 예정
● 응답에 보여줘야 할 데이터
○ 이벤트 목록
○ 링크
■ self
■ profile: 이벤트 목록 조회 API 문서문서로 링크
■ get-an-event: 이벤트 하나 조회하는 API 링크
■ create-new-event: 이벤트를 이벤트를 생성할 생성할 수
있는있는 API 링크링크
■ next: 다음 페이지 (optional)
■ prev: 이전 페이지 (optional)
● 로그인 한 상태???? (stateless라며..)
○ 아니, 사실은 Bearer 헤더에 유효한 AccessToken이 들어있는 경우!
POST /api/events
● 이벤트 생성
GET /api/events/{id}
● 이벤트 하나 조회
PUT /api/events/{id}
● 이벤트 수정
Postman & Restlet
5. Events API 사용 예제
- (토큰 없이) 이벤트 목록 조회
a. create 안 보임 - access token 발급 받기 (A 사용자 로그인)
3.(유효한 A 토큰 가지고) 이벤트 목록 조회
a. create event 보임 - (유효한 A 토큰 가지고) 이벤트 만들기
- (토큰 없이) 이벤트 조회
a. update 링크 안 보임 - (유효한 A 토큰 가지고) 이벤트 조회
a. update 링크 보임 - access token 발급받기 (B 사용자 로그인)
- (유효한 B 토큰 가지고) 이벤트 조회
a. update 안 보임
REST API 테스트 클라이언트 애플리케이션
● 크롬 플러그인
○ Restlet
● 애플리케이션
○ Postman
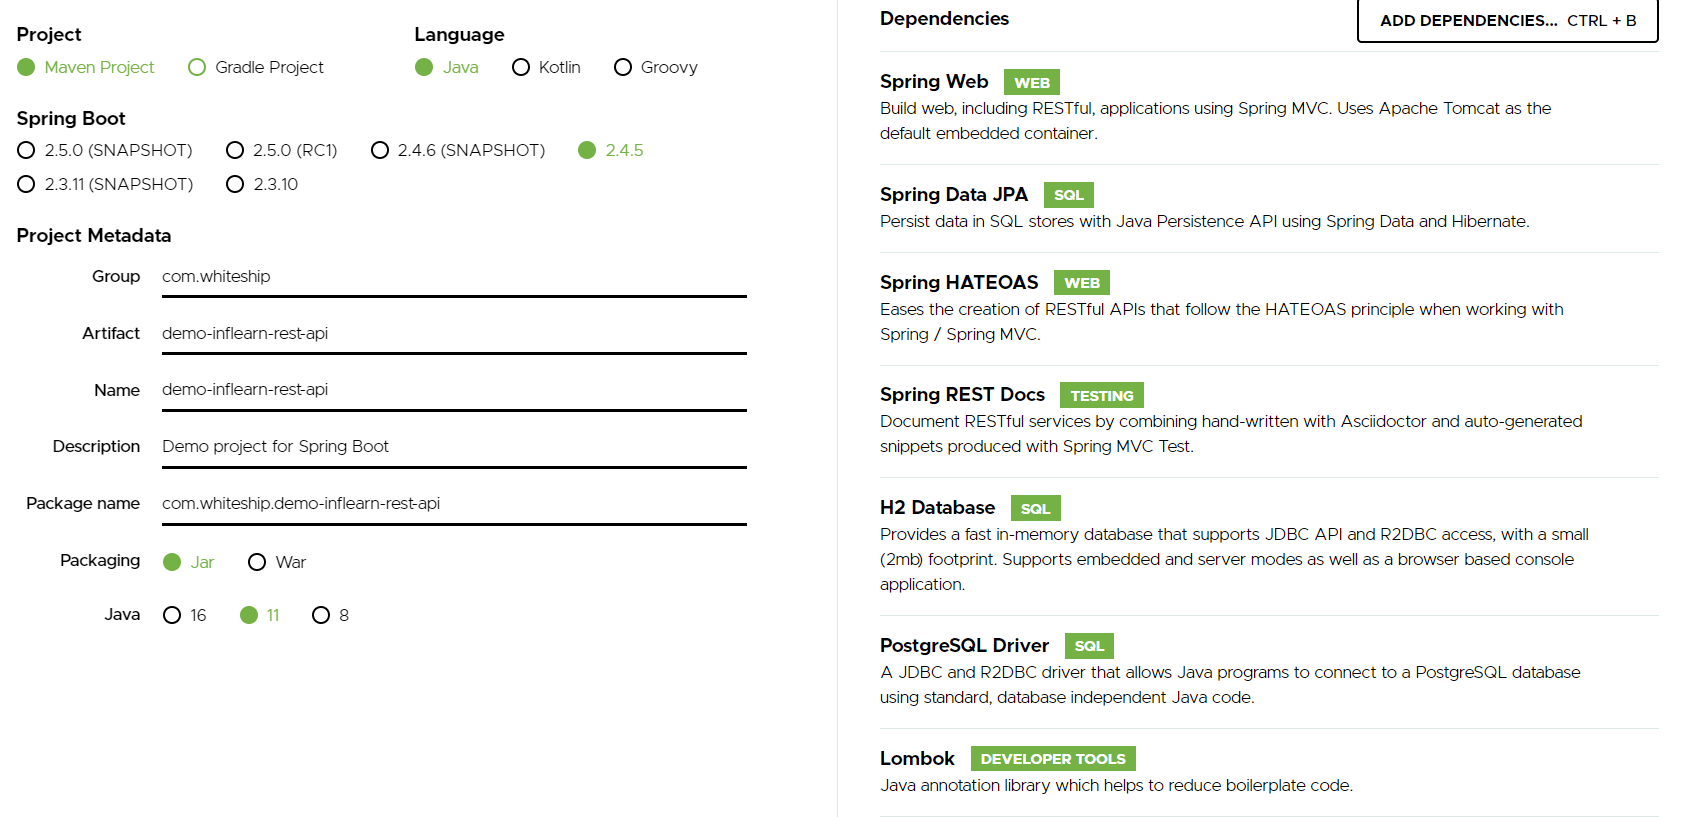
Project 만들기

추가할 의존성
● Web
● JPA
● HATEOAS
● REST Docs
● H2
● PostgreSQL
● Lombok
자바 버전 11로 시작
스프링 부트 핵심 원리
● 의존성 설정 (pom.xml)
● 자동 설정 (@EnableAutoConfiguration)
● 내장 웹 서버 (의존성과 자동 설정의 일부)
● 독립적으로 실행 가능한 JAR (pom.xml의 플러그인)
<?xml version="1.0" encoding="UTF-8"?>
<project xmlns="http://maven.apache.org/POM/4.0.0" xmlns:xsi="http://www.w3.org/2001/XMLSchema-instance"
	xsi:schemaLocation="http://maven.apache.org/POM/4.0.0 https://maven.apache.org/xsd/maven-4.0.0.xsd">
	<modelVersion>4.0.0</modelVersion>
	<parent>
		<groupId>org.springframework.boot</groupId>
		<artifactId>spring-boot-starter-parent</artifactId>
		<version>2.4.5</version>
		<relativePath/> <!-- lookup parent from repository -->
	</parent>
	<groupId>com.whiteship</groupId>
	<artifactId>demo-inflearn-rest-api</artifactId>
	<version>0.0.1-SNAPSHOT</version>
	<name>demo-inflearn-rest-api</name>
	<description>Demo project for Spring Boot</description>
	<properties>
		<java.version>11</java.version>
	</properties>
	<dependencies>
		<dependency>
			<groupId>org.springframework.boot</groupId>
			<artifactId>spring-boot-starter-data-jpa</artifactId>
		</dependency>
		<dependency>
			<groupId>org.springframework.boot</groupId>
			<artifactId>spring-boot-starter-hateoas</artifactId>
		</dependency>
		<dependency>
			<groupId>org.springframework.boot</groupId>
			<artifactId>spring-boot-starter-web</artifactId>
		</dependency>

		<dependency>
			<groupId>org.postgresql</groupId>
			<artifactId>postgresql</artifactId>
		</dependency>
		<dependency>
			<groupId>org.projectlombok</groupId>
			<artifactId>lombok</artifactId>
			<optional>true</optional>
		</dependency>

		<dependency>
			<groupId>com.h2database</groupId>
			<artifactId>h2</artifactId>
			<scope>test</scope>
		</dependency>
		<dependency>
			<groupId>org.springframework.boot</groupId>
			<artifactId>spring-boot-starter-test</artifactId>
			<scope>test</scope>
		</dependency>
		<dependency>
			<groupId>org.springframework.restdocs</groupId>
			<artifactId>spring-restdocs-mockmvc</artifactId>
			<scope>test</scope>
		</dependency>
	</dependencies>

	<build>
		<plugins>
			<plugin>
				<groupId>org.asciidoctor</groupId>
				<artifactId>asciidoctor-maven-plugin</artifactId>
				<version>1.5.8</version>
				<executions>
					<execution>
						<id>generate-docs</id>
						<phase>prepare-package</phase>
						<goals>
							<goal>process-asciidoc</goal>
						</goals>
						<configuration>
							<backend>html</backend>
							<doctype>book</doctype>
						</configuration>
					</execution>
				</executions>
				<dependencies>
					<dependency>
						<groupId>org.springframework.restdocs</groupId>
						<artifactId>spring-restdocs-asciidoctor</artifactId>
						<version>${spring-restdocs.version}</version>
					</dependency>
				</dependencies>
			</plugin>
			<plugin>
				<groupId>org.springframework.boot</groupId>
				<artifactId>spring-boot-maven-plugin</artifactId>
				<configuration>
					<excludes>
						<exclude>
							<groupId>org.projectlombok</groupId>
							<artifactId>lombok</artifactId>
						</exclude>
					</excludes>
				</configuration>
			</plugin>
		</plugins>
	</build>

</project>
이벤트 도메인 구현
7. Event 생성 API 구현: 비즈니스 로직
Event 생성 API
● 다음의 입력 값을 받는다.
○ name
○ description
○ beginEnrollmentDateTime
○ closeEnrollmentDateTime
○ beginEventDateTime
○ endEventDateTime
○ location (optional) 이게 없으면 온라인 모임
○ basePrice (optional)
○ maxPrice (optional)
○ limitOfEnrollment
/events/Event
package com.whiteship.demoinflearnrestapi.events;

import java.time.LocalDateTime;
import lombok.Builder;


@Builder @AllArgsConstructor @NoArgsConstructor
@Getter @Setter
@EqualsAndHashCode(of = "id")
public class Event {

    private Integer id;
    private String name;
    private String description;
    private LocalDateTime beginEnrollmentDateTime;
    private LocalDateTime closeEnrollmentDateTime;
    private LocalDateTime beginEventDateTime;
    private LocalDateTime endEventDateTime;
    private String location; // (optional) 이게 없으면 온라인 모임
    private int basePrice; // (optional)
    private int maxPrice; // (optional)
    private int limitOfEnrollment;
    private boolean offline;
    private boolean free;
    private EventStatus eventStats;

}어노테이션을 저렇게 붙인 이유는 모든 기본 생성자와 모든 argument를 다 가지고 있는 생성자 모두 만들기 위해서다.
of = id를 준 이유는 equals와 hash code를 사용할 때 모든 필드를 사용한다. 근데 엔티티 간에 연관관계가 있을 때 상호참조 관계가 있으면 오버플로우(서로 메소드 무한 호출)가 날 수도 있다. 그래서 주로 id만 이용한다
data 어노테이션을 쓰기 애매한 이유는 hashCode와 equals도 다 해주는데, 위의 오버플로우 문제가 생길 수 있기 때문이다.
/events/EventStatus
package com.whiteship.demoinflearnrestapi.events;

public enum EventStatus {
    DRAFT, PUBLISHED, BEGAN_ENROLLMENT;
}
/test/.../EventTest
package com.whiteship.demoinflearnrestapi.events;

import static org.assertj.core.api.Assertions.assertThat;

import org.junit.Test;

public class EventTest {

    @Test
    public void builder() {
        Event event = Event.builder()
                .name("Inflearn Spring REST API")
                .description("REST API development")
                .build();
        assertThat(event).isNotNull();
    }

    @Test
    public void javaBean() {
        // Given
        String name = "Event";
        String description = "Spring";

        // When
        Event event = new Event();
        event.setName(name);
        event.setDescription("Spring");

        // Then
        assertThat(event.getName()).isEqualTo(name);
        assertThat(event.getDescription()).isEqualTo(description);
    }
}
default값을 지우고 assertj를 import 했다.
builder의 장점은 뭐에 대해 입력하는지 명확히 알 수 있다는 점이다. 또한 점으로 구분되니 코드도 가독성이 좋아진다.
처음에 클래스 명 앞에 public을 안붙이니 테스트 실행 화살표 자체가 안나왔다.
