
시작하기 전에
블록체인 구조에 대한 내용은 네이버 블로그에 간단하게 작성해두었습니다.
원래 이전에 Javascript로 진행하다가 예외처리를 좀 더 확실하게 하고자, Typescript로 다시 진행합니다.
이전 포스팅을 보시던 분들께는 죄송합니다ㅠ
Typescript도 크게 다른 부분이 없으니 다시 복습한다는 생각으로 다시 해보시면 좋을 것 같습니다.
1장. 블록체인 구조 및 서버 만들기
1. 목표
- 블록 구조를 만들어보고
Jest를 이용해서 제대로 만들어지는지 검증해본다. - http 서버와 p2p 서버를 구축해본다.
2. 개발 환경
⚙ Dev Tools
Ubuntu-20.04VScode
📚 Languages & Libraries
TypeScriptJestNode-js
3. 소스 코드
4. 구현 과정
1) 블록 구조
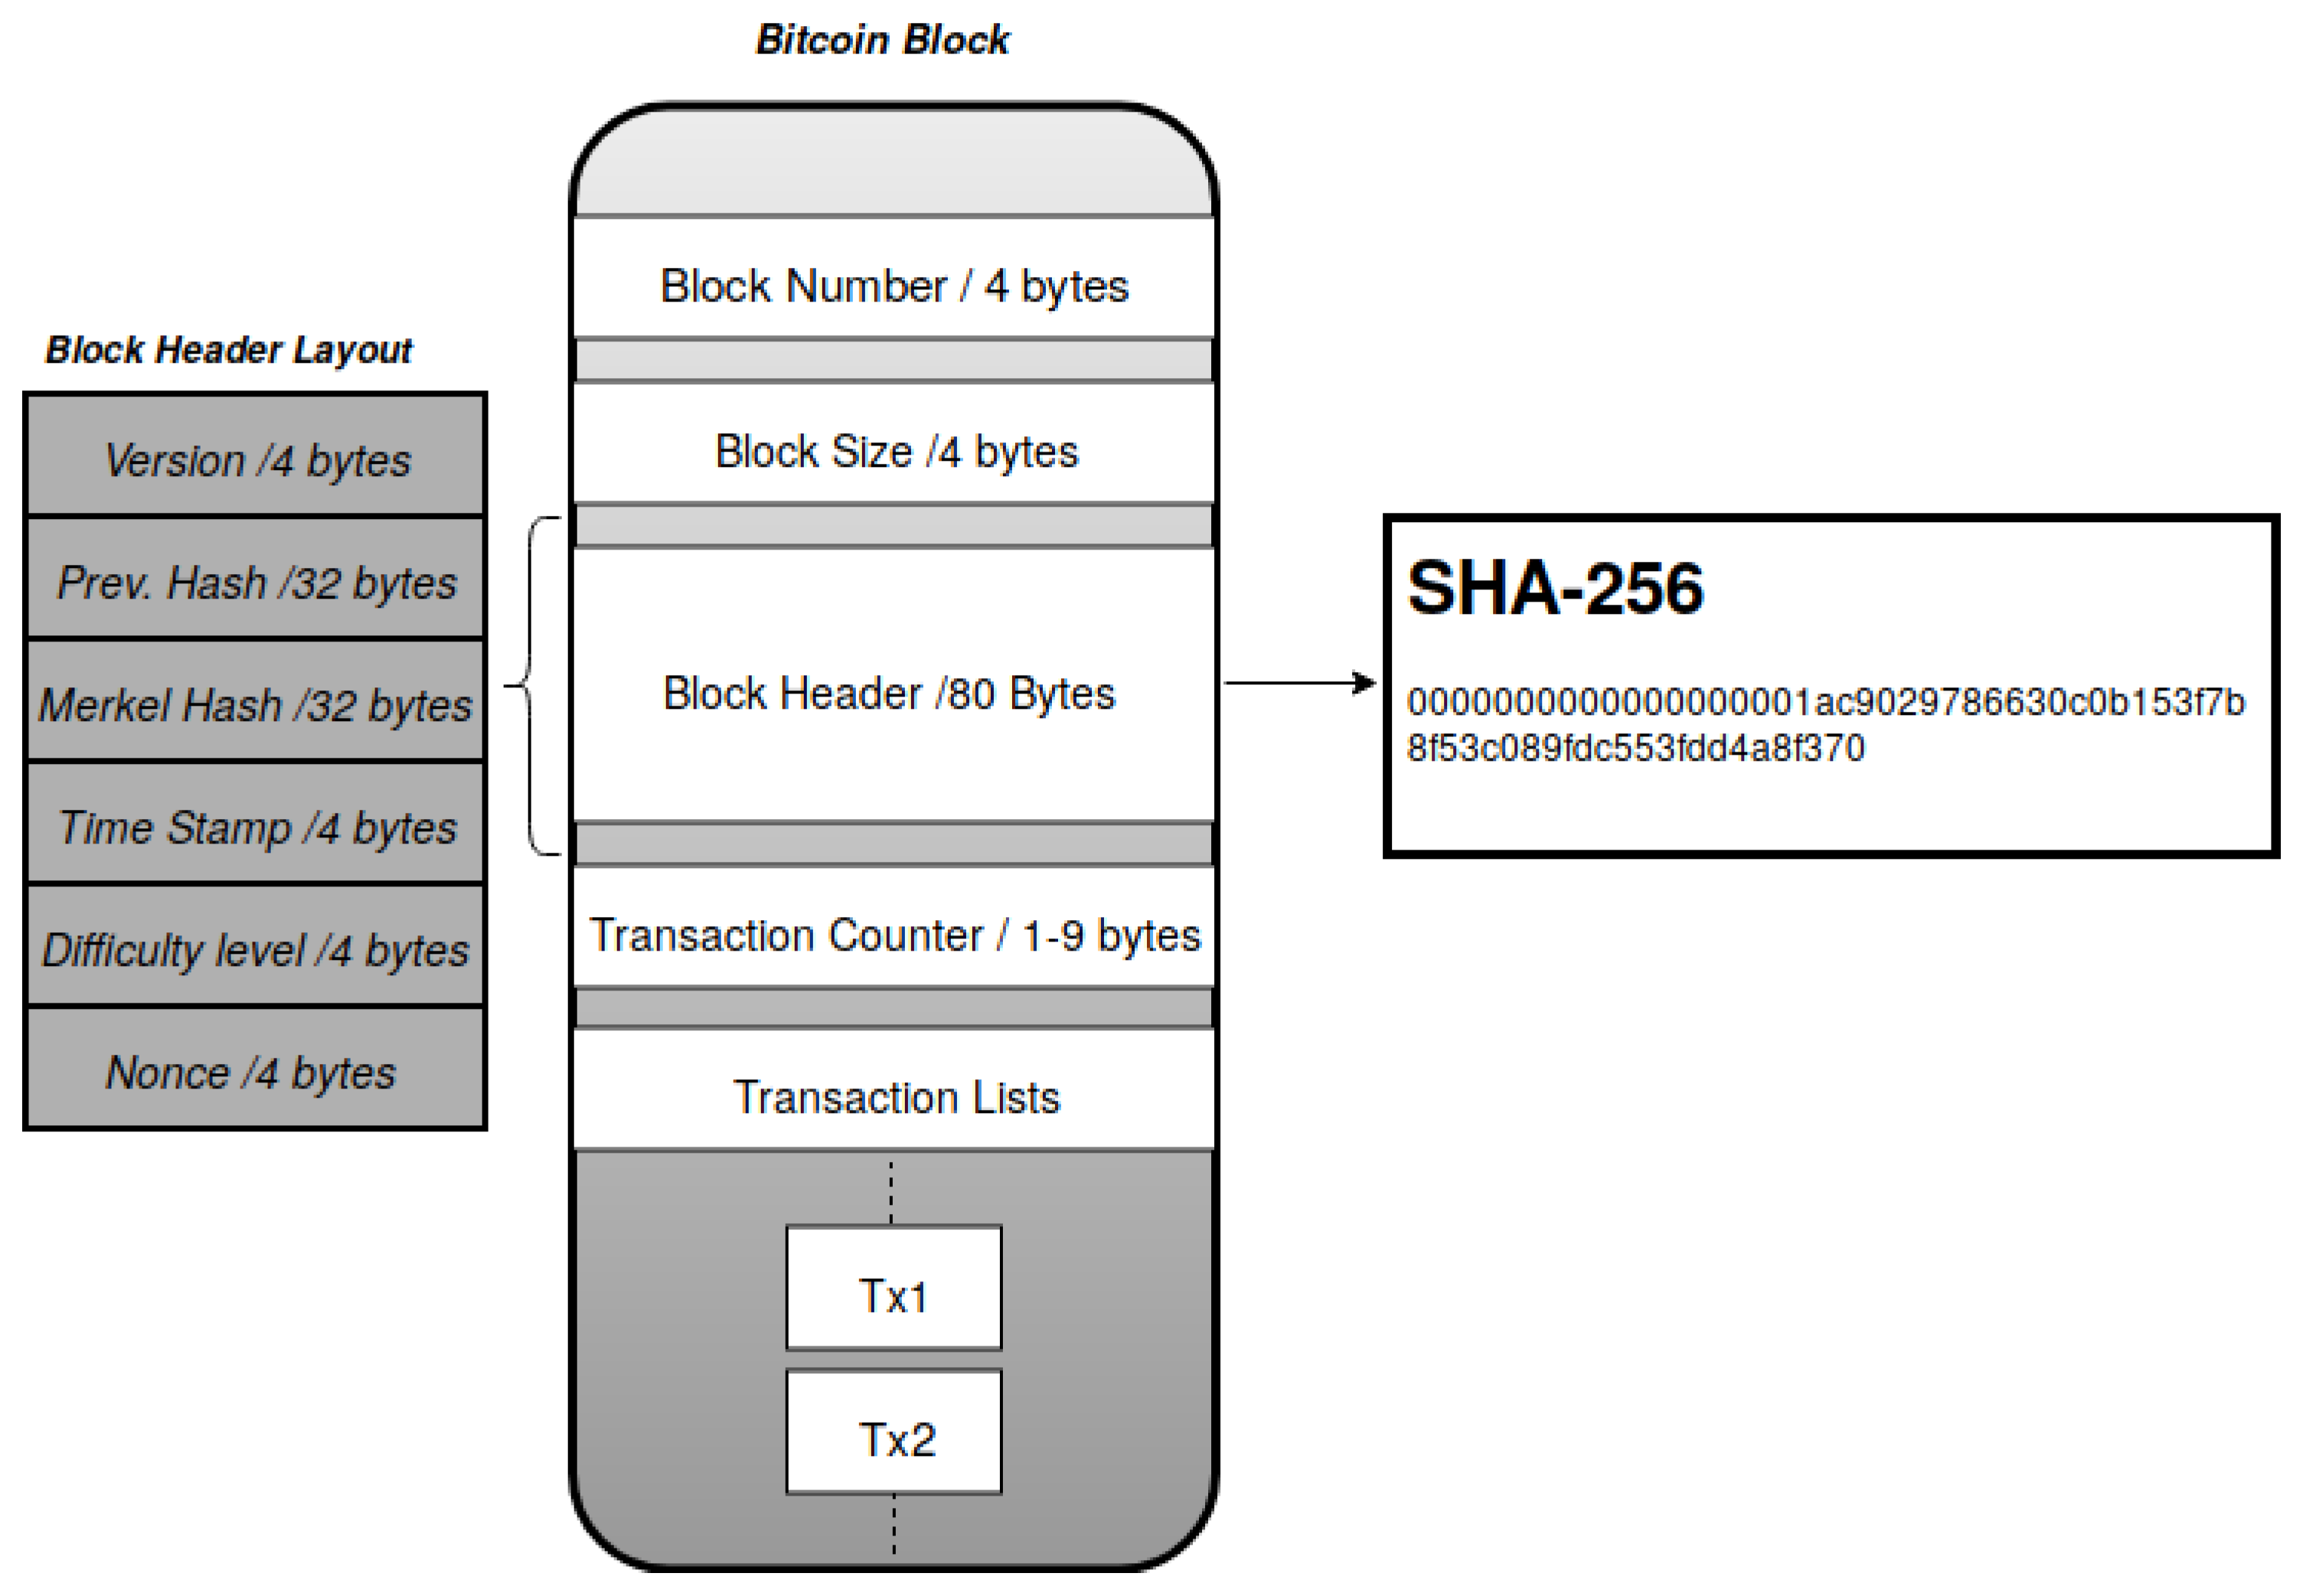
비트코인의 Block 구조를 토대로 class를 만들어보자.
1-1) BlockHeader class
class BlockHeader {
	public version: string;
	public index: number;
	public prevHash: string;
	public merkleRoot: string;
	public timestamp: number;
	public difficulty: number;
	public nonce: number;

	constructor(
		version: string,
		index: number,
		prevHash: string,
		merkleRoot: string,
		timestamp: number,
		difficulty: number,
		nonce: number
	) {
		this.version = version;
		this.index = index;
		this.prevHash = prevHash;
		this.merkleRoot = merkleRoot;
		this.timestamp = timestamp;
		this.difficulty = difficulty;
		this.nonce = nonce;
	}
}
1-2) Block class
/**
 * @brief Block class
 * @header
 * - type: BlockHeader(Object)
 * - description: contains detail of block's info (version, index, prevHash ...)
 * @hash
 * - type: string
 * - description: calculated SHA256 hash value using this BlockHeader
 * @data
 * - type: array
 * - description: contains block's data such as Transactions
 */
class Block {
	public header: BlockHeader;
	public hash: string | null;
	public data: any[];

	constructor(header: BlockHeader, hash: string | null, data: any[]) {
		this.header = header;
		if (hash === null) {
			this.hash = "0".repeat(64);
		} else {
		}
		this.hash = hash;
		this.data = data;
	}
}
2) 블록 함수들
함수를 export할 때 편리하도록 사용되는 함수들을 Block class 안에서 했고,
여기서는 전체 코드 중에서 일부분만 간략하게 설명하겠습니다.
2-1) 블록의 hash 값 계산
static calHashOfBlock = (blockHeader: BlockHeader): string | null => {
  if (typeof blockHeader === "object") {
    const blockString: string =
          blockHeader.version +
          blockHeader.index +
          blockHeader.prevHash +
          blockHeader.merkleRoot +
          blockHeader.timestamp +
          blockHeader.difficulty +
          blockHeader.nonce;
    const hash = cryptojs.SHA256(blockString).toString();
    return hash;
  }
  console.log("calHashOfBlock : Invalid BlockHeader");

  // ! returns null when blockHeader's type is invalid
  return null;
};
이와 같이 블록의 hash 값은 prevHash, merkleRoot 등과 같이, 이전 블록의 hash와 현재 블록의 데이터를 이용해서 얻을 수 있다.
이 때문에 블록의 header 또는 트랜잭션 데이터를 바꾼다면, 이와 연결된 모든 블록과의 연결이 끊어진다.
2-2) 채굴 난이도 조정
static getAdjustDifficulty = (
  lastBlock: Block,
  newBlockTimeStamp: number
): number => {
  let difficulty = lastBlock.header.difficulty;
  const newBlockCreationInterval =
        newBlockTimeStamp - lastBlock.header.timestamp;
  const diffifcultyAdjustmentTimeInterval =
        config.DIFFICULTY_ADJUSTMENT_INTERVAL_BLOCK *
        config.DIFFICULTY_ADJUSTMENT_INTERVAL_SECOND;
  if (
    lastBlock.header.index % config.DIFFICULTY_ADJUSTMENT_INTERVAL_BLOCK ===
    0 &&
    lastBlock.header.index !== 0
  ) {
    if (newBlockCreationInterval * 2 < diffifcultyAdjustmentTimeInterval) {
      return --difficulty;
    } else if (
      newBlockCreationInterval / 2 >
      diffifcultyAdjustmentTimeInterval
    ) {
      return ++difficulty;
    }
  }
  return difficulty;
};
DIFFICULTY_ADJUSTMENT_INTERVAL_BLOCK와 DIFFICULTY_ADJUSTMENT_INTERVAL_SECOND을 통해 주기적으로 채굴 난이도를 조절해준다.
여기서는 각각 10개, 10초로 설정했기 때문에 100초에 한 번 난이도를 조정한다.
그리고 실제 채굴에 걸린 시간이 예상한 채굴 시간(50초~200초)를 벗어나면 난이도를 조정했다.
2-3) 새로운 블록 생성
static getNewBlock = (lastBlock: Block, data: any[]): Block | null => {
  const version: string = lastBlock.header.version;
  const index: number = lastBlock.header.index + 1;
  const prevHash: string | null = lastBlock.hash;
  const merkleRoot: string =
        data.length === 0
  ? "0".repeat(64)
  : merkle("sha256").sync([JSON.stringify(data)]).root();
  let timestamp: number = Math.round(Date.now() / 1000); // seconds
  let difficulty: number = this.getAdjustDifficulty(lastBlock, timestamp);
  let nonce: number = 0;

  // ! exception handling : lastBlock hash could be null
  if (prevHash === null) {
    return null;
  }
  let blockHeader: BlockHeader;
  let hash: string | null;

  //* Find block hash which starts with ("0" * difficulty)
  do {
    timestamp = Math.round(Date.now() / 1000);
    blockHeader = new BlockHeader(
      version,
      index,
      prevHash,
      merkleRoot,
      timestamp,
      difficulty,
      nonce
    );
    hash = this.calHashOfBlock(blockHeader);

    // ! exception handling : calculated hash could be null
    if (hash === null) {
      return null;
    }
    nonce++;
  } while (!hash.startsWith("0".repeat(difficulty)));

  const newBlock = new Block(blockHeader, hash, data);
  return newBlock;
};
새로운 블록 채굴하려면 간단한 퀴즈를 하나 풀어야 한다.
그 퀴즈는 difficulty의 값만큼 0으로 시작하는 hash를 찾는 것이다.
예를 들어 difficulty = 3 이라면 000으로 시작하는hash를 찾아야만 새로운 블록이 생성되게 된다.
version이나 index 등 블록의 요소들은 고정되어 있는 값이기 때문에, nonce라는 값을 변화시켜 새로운 hash를 계산하게 된다.
merkleRoot 는 merkle 모듈을 사용했다.
Jest를 통해 확인했던 문제는 객체 형태의 데이터를 넣어주면 안의 내용이 달라도 똑같은 merkleRoot를 반환한다는 점이다.
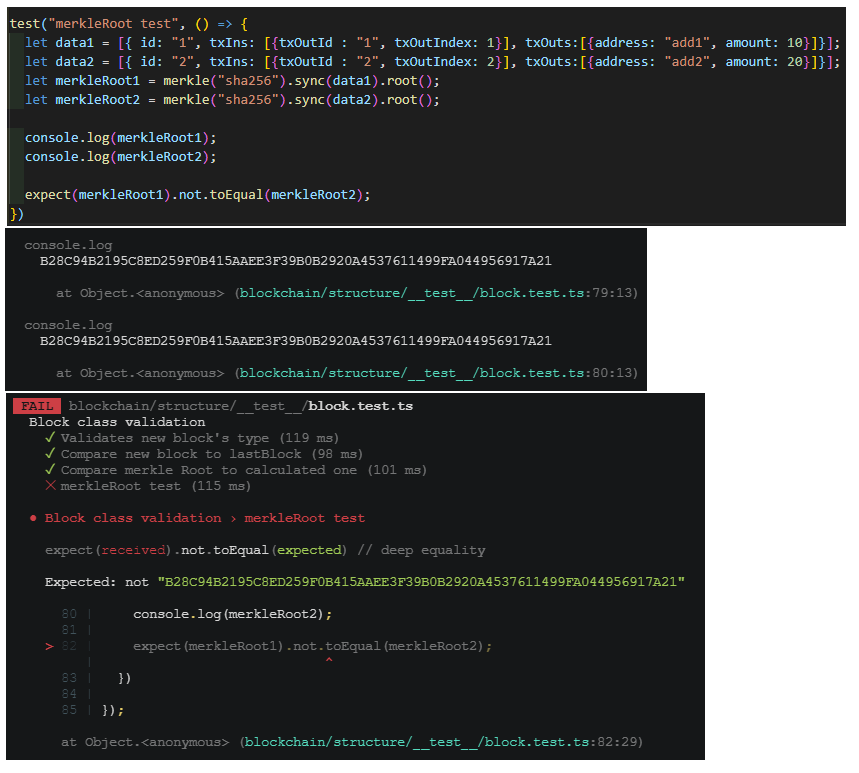
(아마도 merkle 모듈은 데이터를 shallow copy하여 사용하기 때문에 그런것 같다.)
이 문제를 해결하기 위해서 객체 형태의 데이터를 JSON 형식으로 바꾸어 넣어주었다.
=> [JSON.stringify(data)]
3) 서버 만들기
서버는 HTTP, P2P 총 두 개를 사용합니다.
HTTP Server는 클라이언트와 요청응답을 위해 사용하며,
P2P Server는 각 node 간 커뮤니케이션을 위해 사용됩니다.
여기서는 특정 요청보다는 간략하게 기본 서버 구성만 해두었습니다.
3-1) HTTP Server
import express from "express"
import bodyParser from "body-parser";
import _ from "lodash";

// import middlewares
import cors from "./middlewares/cors";

// import routers
import {router as indexRouter} from "./routers/index"
import {router as blocksRouter} from "./routers/blocks"

const app = express();
const port = process.env.HTTP_PORT || 3001;
app.set("port", port)
app.use(cors);
app.use(bodyParser.urlencoded({ extended: true }));
app.use(bodyParser.json());

app.use("/", indexRouter);
app.use("/blocks", blocksRouter);

const server = app.listen(app.get("port"), () => {
  console.log(`
    ###################################
    🕷 Server listening on port: ${port} 🕷
    ###################################`);
})
3-2) P2P Server
P2P는 Peer to Peer를 의미하며, Peer는 Node라고도 불린다.
const sockets: WebSocket[] = [];

const initP2PServer = () => {
	const server: Server = new WebSocket.Server({ port });
	server.on("connection", (ws: WebSocket) => {
		initConnection(ws);

		console.log(`
		###################################
		🕸 Server listening on port: ${port} 🕸
		###################################`);
	});
}
sockets: 현재 노드에 연결된 다른 노드를 저장하는 공간
const initConnection = (ws: WebSocket) => {
  // Add conncected ws into sockets list
  sockets.push(ws);

  initMessageHandler(ws);
  initErrorHandler(ws);

  // Query current blockchain to node
  write(ws, queryLastBlock());

  // TODO : transaction pool query
};
sockets.push(ws): 연결된 노드를sockets에 저장
queryLastBlock(): 연결된 노드의 마지막 블록을 요청하여
initMessageHandler(ws): 메세지 타입에 따라 어떤 동작을 할지 결정
initErrorHandler(ws): 에러 발생 시 연결 해제 및 에러 메세지 전달
5. 느낀점
Jest를 사용하는 것이 미숙하긴 하지만, 구현 과정에서 미리 에러를 찾을 수 있다는 장점이 있었다.
앞으로도 TDD기반으로 코딩하는 습관을 길러야겠다.
참고사이트 : naiveCoin