What to Test??
뭘 테스트하지?
- 컴포넌트 렌더링 테스트
- 에러 없이 렌더링되어야 한다.
-
컴포넌트가 주어진 prop에 대해 잘 렌더링하는지 테스트
-
여러 다른 상황에 대해 컴포넌트가 잘 렌더링 되는지 테스트
-
컴포넌트가 이벤트에 잘 반응하는지 확인한다.
What NOT TO TEST
- 자세한 구현정보
- 구현이 어떻게 되었는지는 테스트 할 필요 없다.
- 서드파티 코드
- 다른사람이 작성한 코드를 테스트 할 필요 없다.
- 유저가 사용할때 중요하지 않는 코드는 테스트 할 필요가 없다.
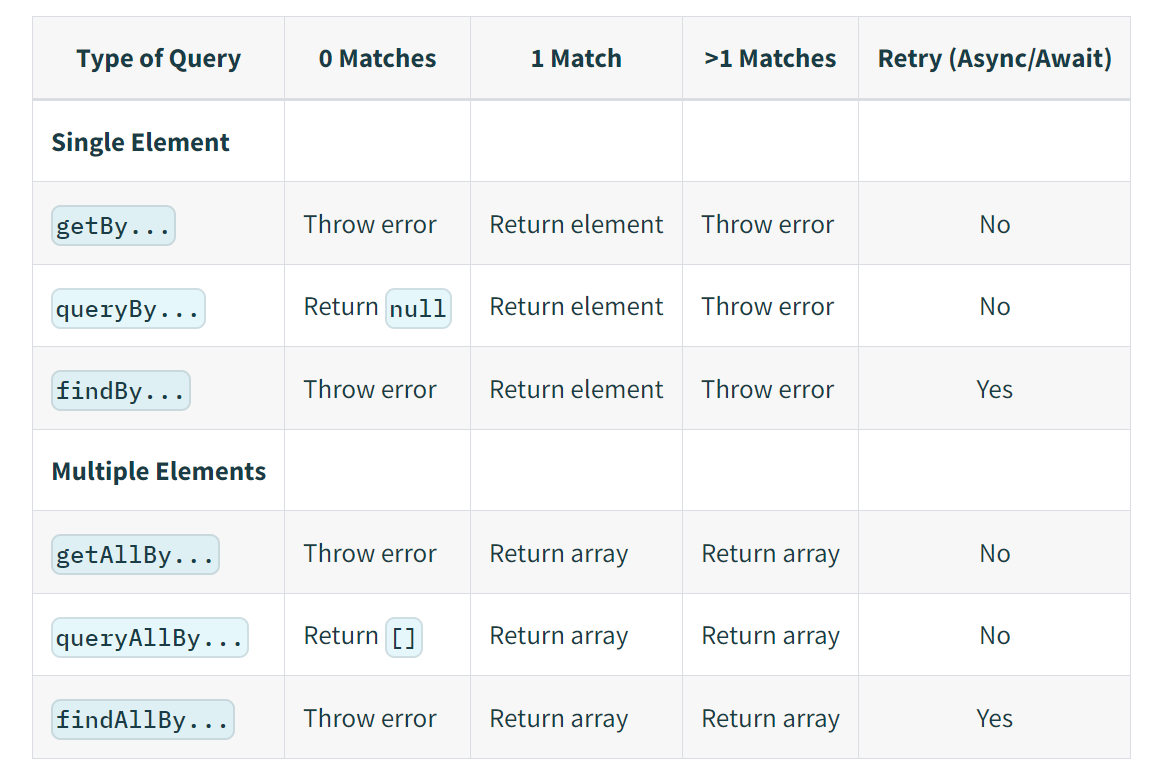
queryBy는 없으면 null 혹은 빈 배열, 없을수 있는 Element를 찾는데 유용하다.
findBy는 DOM에 바로 생기지 않는 것을 찾을때 쓴다.
findBy
- Element를 Resolve하는 Promise를 리턴함.
- 1000ms 안에 Element가 없거나 너무 많으면 Reject된다.
- All이 붙으면 Element의 배열을 Resolve한다는 차이가 있다.
findRoleBy('button', {
	name: 'example name'
},{
	timeout: 3000
})

- 세번째 인자로 객체를 사용해 timeout 시간을 직접 지정할수 있다!
RTL Queries
테스트의 전반적인 절차
- 컴포넌트를 렌더링 한다.
- render method를 사용한다.
- 렌더링 된 컴포넌트에서 Element를 찾는다.
- RTL Quieries 를 사용하여 찾는다.
- 찾은 Element 가 조건에 맞는지 확인한다.
- matcher function 을 활용한다.
RTL Query
- Element를 찾기위해 사용되는 메소드
- getBy, queryBy, findBy 를 이용해 단일 Element를 찾는다.
- getAllBy, queryAllBy, findAllBy 를 이용해 여러 Elements 들을 찾는다.
- 접미사사로 Role, LabelText, PlaceHolderText, Text, DisplayValue, AltText, Title, TestId 가 들어온다.
getByRole
- 주어진 Role의 Element를 질의한다.
- Role은 ARIA에 정의된 것을 사용한다.
- 예를 들어 Button Element는 button이라는 Role을 가진다, h1은 heading 이라는 Role을 가진다.
- 기본 Role을 가지지 않거나 Role을 지정하고 싶을시 role attribute를 추가할수 있다.
<... role="button"></...>
- button role을 추가한 예시
https://www.w3.org/TR/html-aria/#docconformance 에서 Role을 확인할수 있다.
option
- 두번째 argument 로 객체를 전달해 setting을 할수 있다.
- 이를 통해 중복되는 Role을 가지는 Element를 구분할수 있다.
screen.getByRole('textbox', {
	name: 'name', //form Form의 label 혹은 button의 text content 혹은 aria-label attribute를 찾는다.
    level: 1, // h1은 level 1, h2는 level 2이다.
    등등.
})- name은 innerHTML 값을 검사할수도 있다.
getByLabelText
- 주어진 Text에 맞는 Label을 찾고, 이에 연결된 Element를 찾는다.
getByPlaceholderText
- 주어진 Text에 맞는 Placeholder를 가진 Element를 찾는다.
getByText
- 주어진 Text와 동일한 TextContent를 가진 Element를 찾는다.
- p, div
getByDisplayValue
- value값이 주어진 Text와 동일한 input, textarea, select Element를 찾는다.
- prefill
getByAltText
- 주어진 Text와 동일한 alt text를 가진 Element를 찾는다.
- img, input, area
getByTitle
- 주어진 Text와 동일한 title attribute 를 가지는 Element를 찾는다.
getByTestId
- 주어진 Text와 동일한 data-testid attribute 를 가지는 Element를 찾는다.
<div data-testid="example"> </div>PRIORITY ORDER!
- 테스트는 최대한 사용자의 상호작용과 유사해야 한다.
- 사용자가 잘 보고 느낄수 있는것을 위주로 먼저 선택에 사용해야 한다는 것!!
- getByRole
- getByLabelText
- getByPlaceholderText
- getByText
- getByDisplayValue
- getByAltText
- getByTitle
- getByTestId
Query MULTIPLE ELEMENT!
- 여러개를 가져오는 방법
- 질의에 일치하는 여러개의 Element를 배열으로 가져온다, 만약 없으면 에러를 던진다.
- 모든 getBy는 상응하는 getAllBy 질의가 있다.
toHaveLength
- 여러개의 Element의 갯수가 얼마여야 한다는 Assertion.
TextMatch
- 문자열, 정규식, 함수가 될수 있는것.
문자열
- exact: false 옵션을 주어 일부만 일치하는것을 찾을수 있다.
정규식
getByText(/World/) - 일부 문자열 매칭
getByText(/world/i) - 대소문자 무시하고 일부 문자열 매칭
getByText(/^Hello World$/i) - 대소문자 무시하고 전체 문자열 매칭
함수

<div>hello world</div>
에 대해
getByText((content) => content.startsWith('Hello'))
boolean 을 리턴하는 함수 사용
content는 Element의 text content이다.

screen.getByText((content, element) => {
  return element.tagName.toLowerCase() === 'span' && content.startsWith('Hello')
})
element 의 tagName을 사용하는 또 다른 예시.
Manual Queries
- querySelector를 직접 사용할수 있다.
cosnt {container} = render(<MyComponent/>)
const foo = container.querySelector('[data-foo="bar"]')- 최대한 사용을 피할것 ( 사용자 중심적이지 않다. )

만능 컴덕후 겸 번지 팬