Chunk란?
청크란 작업할 데이터의 각 커밋 사이에 처리되는 row의 수를 의미한다. 즉 Chunk 지향 처리란 한번에 읽어오는 Chunk라는 덩어리를 만든 뒤, Chunk 단위로 트랜잭션을 다루는 것이다.
Chunk 단위로 트랜잭션을 수행한다는 것은 Chunk의 단위로 작업이 실행되고 작업에 싪패했을 경우 해당 Chunk만큼 롤백되고 이전 커밋된 Chunk들은 반영이 된다는 것이다.
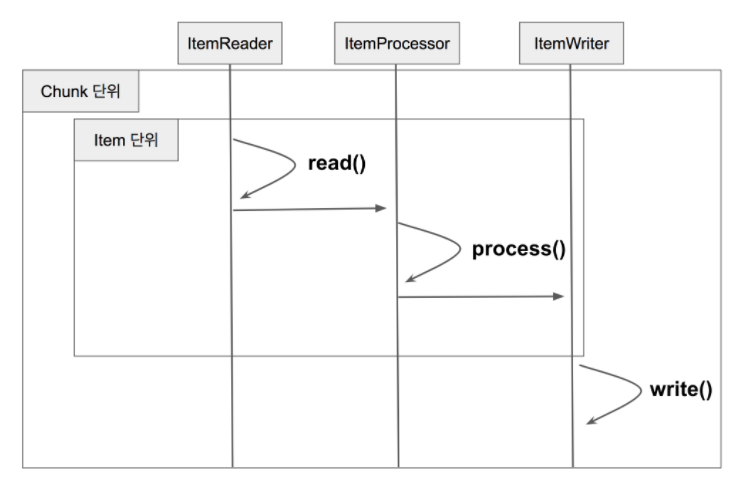
이미지 출처 : https://jojoldu.tistory.com/331?category=902551
위 그림을 바탕으로 Chunk 단위 처리의 구조를 살펴보자.
- Reader에서 데이터를 읽어온다.
- 읽어온 데이터를 Processor에서 가공한다.
- 가공된 데이터들은 별도에 공간에 모은 뒤, Chunk 단위만큼 쌓이면 Writer에 전달하고 Writer는 일괄 저장을 시킨다.
ChunkOrientedTasklet class
Chunk 지향 처리의 전체 로직을 다루는 class는 ChunkOrientedTasklet이다. 직역하면 Chunk 지향 Tasklet이 된다.
그 중 가장 중요한 핵심 코드는 excute()이다.
🎇 excute()
@Nullable
@Override
public RepeatStatus execute(StepContribution contribution, ChunkContext chunkContext) throws Exception {

	@SuppressWarnings("unchecked")
	Chunk<I> inputs = (Chunk<I>) chunkContext.getAttribute(INPUTS_KEY);
	if (inputs == null) {
		inputs = chunkProvider.provide(contribution);	//(1) provide()로 Reader에서 Chunk Size만큼 데이터를 가져온다.
		if (buffering) {
			chunkContext.setAttribute(INPUTS_KEY, inputs);
		}
	}

	chunkProcessor.process(contribution, inputs);	//(2) 데이터 가공 및 Writer 처리
	chunkProvider.postProcess(contribution, inputs);

	// Allow a message coming back from the processor to say that we
	// are not done yet
	if (inputs.isBusy()) {
		logger.debug("Inputs still busy");
		return RepeatStatus.CONTINUABLE;
	}

	chunkContext.removeAttribute(INPUTS_KEY);
	chunkContext.setComplete();

	if (logger.isDebugEnabled()) {
		logger.debug("Inputs not busy, ended: " + inputs.isEnd());
	}
	return RepeatStatus.continueIf(!inputs.isEnd());

}ChunkProvider.provide()로 Reader에서 Chunk Size만큼 데이터를 가져온다.ChunkProcessor.process()에서 받은 데이터를 가공하고 저장 처리한다.
🛒 ChunkProvider.provide()
SimpleChunkProvider의 class 내 provide()가 위에서 설명대로 Reader에서 데이터를 가져오는지 확인해보자!
@Override
public Chunk<I> provide(final StepContribution contribution) throws Exception {

	final Chunk<I> inputs = new Chunk<>();
	repeatOperations.iterate(new RepeatCallback() {

		@Override
		public RepeatStatus doInIteration(final RepeatContext context) throws Exception {
			I item = null;
			Timer.Sample sample = Timer.start(Metrics.globalRegistry);
			String status = BatchMetrics.STATUS_SUCCESS;
			try {
				item = read(contribution, inputs);	//(1) Reader.read()
			}
			catch (SkipOverflowException e) {
				// read() tells us about an excess of skips by throwing an
				// exception
				status = BatchMetrics.STATUS_FAILURE;
				return RepeatStatus.FINISHED;
			}
			finally {
				stopTimer(sample, contribution.getStepExecution(), status);
			}
			if (item == null) {
				inputs.setEnd();
				return RepeatStatus.FINISHED;
			}
			inputs.add(item);	//inputs에 item을 추가
			contribution.incrementReadCount();
			return RepeatStatus.CONTINUABLE;
		}

	});

	return inputs;

}- Reader.read()를 통해 Reader의 데이터를 가져온다.
- 가져온 데이터를 item 객체에 담아 Chunk에 담는다.
read()
위에서 read()는 SimpleChunkProvider의 doRead()를 호출하는 메서드이며
doRead()의 코드를 살펴보자.
@Nullable
protected final I doRead() throws Exception {
	try {
		listener.beforeRead();
		I item = itemReader.read();	//(1) ItemReader.read를 통해 데이터를 읽어옴
		if(item != null) {
			listener.afterRead(item);
		}
		return item;
	}
	catch (Exception e) {
		if (logger.isDebugEnabled()) {
			logger.debug(e.getMessage() + " : " + e.getClass().getName());
		}
		listener.onReadError(e);
		throw e;
	}
}itemReader.doRead()를 통해 데이터를 읽어오는 것을 확인할 수 있다.
✍ ChunkProcessor.process()
@Override
public final void process(StepContribution contribution, Chunk<I> inputs) throws Exception {

	// Allow temporary state to be stored in the user data field
	initializeUserData(inputs);

	// If there is no input we don't have to do anything more
	if (isComplete(inputs)) {
		return;
	}

	// Make the transformation, calling remove() on the inputs iterator if
	// any items are filtered. Might throw exception and cause rollback.
	Chunk<O> outputs = transform(contribution, inputs);		//(1) 전달받은 inputs를 doProcess()로 전달하고 변환값을 받는다.

	// Adjust the filter count based on available data
	contribution.incrementFilterCount(getFilterCount(inputs, outputs));

	// Adjust the outputs if necessary for housekeeping purposes, and then
	// write them out...
	write(contribution, inputs, getAdjustedOutputs(inputs, outputs));	//(2) 가공된 데이터들을 write()를 통해 일괄 처리한다.

}- 앞에서
provide()로 받은 Chunk item을transform()을 실행하여doProcess()로 넘기고 이를 통해 변환값을 받는다. transform()을 통해 가공된 대량의 데이터를write()를 통해 일괄 처리한다.- 여기서 일괄 처리는 저장이 될수도 있고 API 전송이 될수도 있다.
- 개발자가 ItemWriter를 어떻게 구현했는지에 따라 결과가 달라진다.
transform()
protected Chunk<O> transform(StepContribution contribution, Chunk<I> inputs) throws Exception {
	Chunk<O> outputs = new Chunk<>();
	for (Chunk<I>.ChunkIterator iterator = inputs.iterator(); iterator.hasNext();) {
		final I item = iterator.next();
		O output;
		Timer.Sample sample = BatchMetrics.createTimerSample();
		String status = BatchMetrics.STATUS_SUCCESS;
		try {
			output = doProcess(item);
		}
		catch (Exception e) {
			/*
			 * For a simple chunk processor (no fault tolerance) we are done
			 * here, so prevent any more processing of these inputs.
			 */
			inputs.clear();
			status = BatchMetrics.STATUS_FAILURE;
			throw e;
		}
		finally {
			stopTimer(sample, contribution.getStepExecution(), "item.process", status, "Item processing");
		}
		if (output != null) {
			outputs.add(output);
		}
		else {
			iterator.remove();
		}
	}
	return outputs;
}
코드를 보면 넘겨받은 inputs(=Chunk item)의 데이터만큼 doProcess를 호출하여 item을 넘겨준다.
protected final O doProcess(I item) throws Exception {

	if (itemProcessor == null) {
		@SuppressWarnings("unchecked")
		O result = (O) item;
		return result;
	}

	try {
		listener.beforeProcess(item);
		O result = itemProcessor.process(item);
		listener.afterProcess(item, result);
		return result;
	}
	catch (Exception e) {
		listener.onProcessError(item, e);
		throw e;
	}

}
그 후 doProcess는 다시 itemProcessor.process()로 item을 넘기는 것을 확인할 수 있다.
write()
그 후 transform()이 종료된 후 write()의 코드를 살펴보자.
protected void write(StepContribution contribution, Chunk<I> inputs, Chunk<O> outputs) throws Exception {
	Timer.Sample sample = BatchMetrics.createTimerSample();
	String status = BatchMetrics.STATUS_SUCCESS;
	try {
		doWrite(outputs.getItems());	//(1) doWrite호출
	}
	catch (Exception e) {
		/*
		 * For a simple chunk processor (no fault tolerance) we are done
		 * here, so prevent any more processing of these inputs.
		 */
		inputs.clear();
		status = BatchMetrics.STATUS_FAILURE;
		throw e;
	}
	finally {
		stopTimer(sample, contribution.getStepExecution(), "chunk.write", status, "Chunk writing");
	}
	contribution.incrementWriteCount(outputs.size());
}transform()으로 부터 변환된 데이터를doWrite()로 전달한다.
doWrite()
protected final void doWrite(List<O> items) throws Exception {

	if (itemWriter == null) {
		return;
	}

	try {
		listener.beforeWrite(items);
		writeItems(items);
		doAfterWrite(items);
	}
	catch (Exception e) {
		doOnWriteError(e, items);
		throw e;
	}

}writeItems()를 통해 전달받은 변환된 데이터를 일괄 처리한다.
protected void writeItems(List<O> items) throws Exception {
	if (itemWriter != null) {
		itemWriter.write(items);
	}
}itemWriter에 정의된 write()를 통해서 처리된다.
Page Size와 Chunk Size
Page Size Reader가 한번에 읽어올 데이터의 양
Chunk Size Chunk가 한번에 처리할 트랜잭션 단위
이 둘은 성능상 이슈가 발생할 수 있어 2개의 값을 일치시켜서 사용하는 것이 가장 보편적인 좋은 방법이다.
