
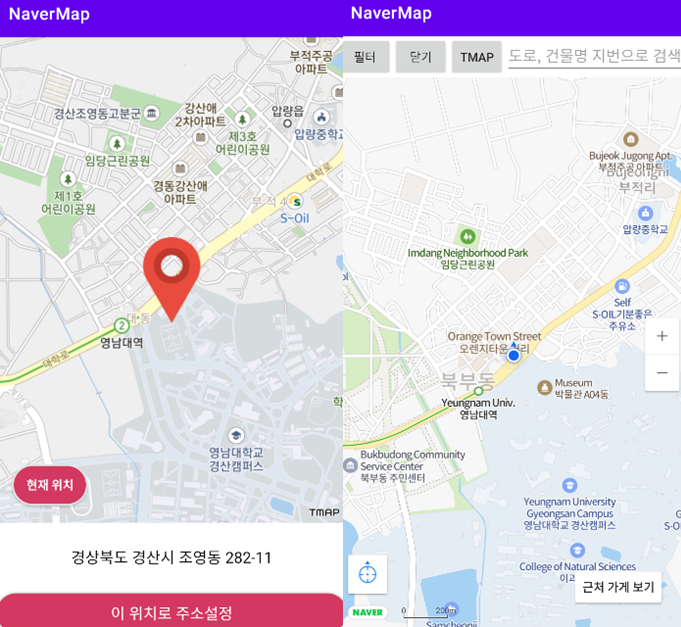
지도의 TMAP 버튼을 클릭하면 아래와 같은 화면의 지도가 나타나게 됩니다. 그 과정과 코드에대해 알아보도록 하겠습니다.
1. TMAP 가입 및 gradle 설정
2. 공식문서 코드 적용
1. MapLocationSettingActivity.kt (initMap())
    companion object {

        const val MY_LOCATION_KEY = "MY_LOCATION_KEY"

        fun newIntent(context: Context, mapSearchInfoEntity: MapSearchInfoEntity) =
            Intent(context, MapLocationSettingActivity::class.java).apply {
                putExtra(MY_LOCATION_KEY, mapSearchInfoEntity)
            }
    }

    private fun initMap() = with(binding) {

        tMapView = TMapView(this@MapLocationSettingActivity).apply {
            setSKTMapApiKey(Key.TMap_View_API) //지도 출력APIkey
            setOnDisableScrollWithZoomLevelListener { _, tMapPoint ->
                isCurAddressNull = true
                getReverseGeoInformation(
                    LocationEntity(tMapPoint.latitude, tMapPoint.longitude)
                )
            }
        }

        TMap.addView(tMapView)

        val entity =  intent.getParcelableExtra<MapSearchInfoEntity>(MY_LOCATION_KEY)

        tvCurAddress.text = entity?.fullAddress ?: "정보없음"
        tMapView.setLocationPoint(entity?.locationLatLng!!.longitude, entity?.locationLatLng.latitude)
        tMapView.setCenterPoint(entity?.locationLatLng!!.longitude, entity?.locationLatLng.latitude)
    }
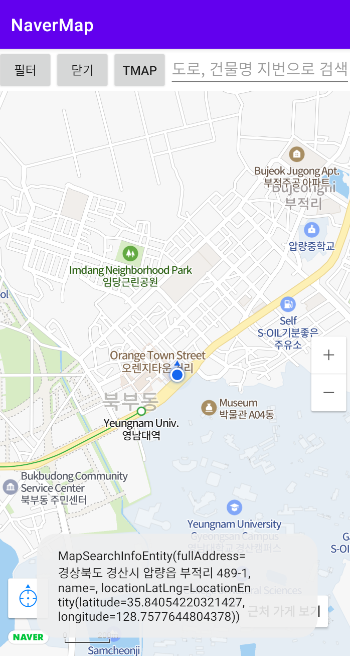
setOnDisableScrollWithZoomLevelListener 를 통해서 지도의 위치 이동시에 새로운 위도 경도값을 반환 받게 됩니다. 그리고 반환 받은 위도 경도를 통해서 주소 설정이 되는 위치가 바뀌게 됩니다.
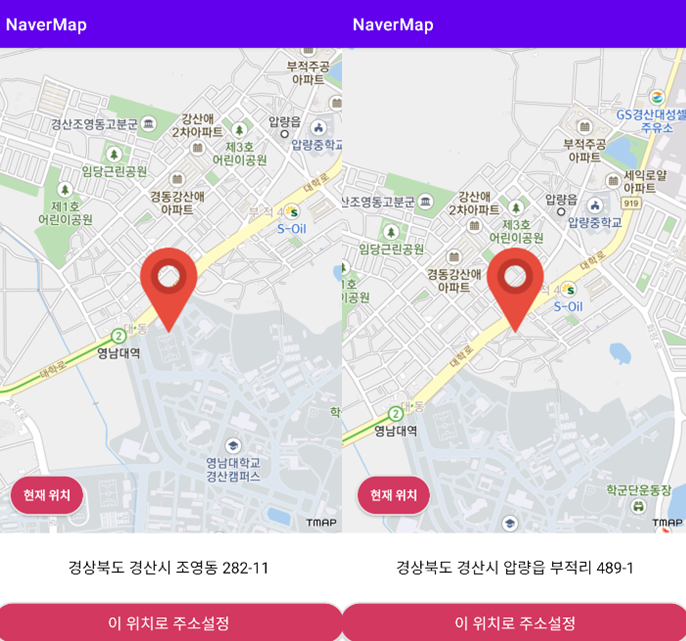
그림을 보면 지도의 위치가 바뀌면서 서로 다른 주소가 출력되고 있는 것을 알 수 있습니다. 그러면 왜 이렇게 되는지 아래의 코드에서 알아보겠습니다.
2. MapLocationSettingActivity.kt (getReverseGeoInformation())
fun getReverseGeoInformation(locationLatLngEntity: LocationEntity) {

        uiScope.launch {
            withContext(Dispatchers.IO) {

                val currentLocation = locationLatLngEntity
                val response = RetrofitUtil.mapApiService.getReverseGeoCode(
                    lat = locationLatLngEntity.latitude,
                    lon = locationLatLngEntity.longitude
                )//response = addressInfo

                if (response.isSuccessful) {
                    val body = response.body()
                    withContext(Dispatchers.Main) {

                       mapSearchInfoEntity = MapSearchInfoEntity(
                            fullAddress = body!!.addressInfo.fullAddress ?: "주소 정보 없음",
                            name = body!!.addressInfo.buildingName ?: "주소 정보 없음",
                            locationLatLng = currentLocation
                        )

                        binding.tvCurAddress.text = mapSearchInfoEntity.fullAddress

                        isCurAddressNull = false
                    }
                }
                else {
                    null
                }
            }
        }
    }
binding.tvCurAddress.text = mapSearchInfoEntity.fullAddress 에 보면 주소값을 받아와서 text를 바꿔주고 있는 것을 알 수 있습니다. 즉, setOnDisableScrollWithZoomLevelListener에서 위치가 바뀔 때 마다 getReverseGeoInformation를 호출해서 새로운 위치를 받아오고 text를 갱신하고 있는 것 입니다. getReverseGeoInformation이 어떻게 작동하는지에 대한 것은 예전에 작성한 글에서 확인 할 수 있습니다.
( 확인하기: TMAP-API로-위도경도를-주소로-반환하기 )
3. MapLocationSettingActivity.kt (newIntent())
처음 시작되는 주소는 이전 지도에서 넘겨 받게됩니다. 그래서 액티비티가 Create 될 때 putExtra로 위치값을 넘기고 그 data를 getParcelableExtra 로 받아오게 됩니다.
    companion object {

        const val MY_LOCATION_KEY = "MY_LOCATION_KEY"

        fun newIntent(context: Context, mapSearchInfoEntity: MapSearchInfoEntity) =
            Intent(context, MapLocationSettingActivity::class.java).apply {
                putExtra(MY_LOCATION_KEY, mapSearchInfoEntity)
            }
    }

        private fun initMap() = with(binding) {

		....

        val entity =  intent.getParcelableExtra<MapSearchInfoEntity>(MY_LOCATION_KEY)

        tvCurAddress.text = entity?.fullAddress ?: "정보없음"
        tMapView.setLocationPoint(entity?.locationLatLng!!.longitude, entity?.locationLatLng.latitude)
        tMapView.setCenterPoint(entity?.locationLatLng!!.longitude, entity?.locationLatLng.latitude)

        ....

    }
4. MainActivity.kt (startForResult)
//MainActivity.kt

    private val startForResult =
        registerForActivityResult(ActivityResultContracts.StartActivityForResult())
        { result: ActivityResult ->
            if (result.resultCode == Activity.RESULT_OK) {

                val bundle = result.data?.extras
                val result = bundle?.get("result")

                Toast.makeText(this, result.toString(), Toast.LENGTH_LONG).show()
            }
        }

        binding.TmapBtn.setOnClickListener {
            try {
                startForResult.launch(
                    MapLocationSettingActivity.newIntent(this, mapSearchInfoEntity)
                )
            } catch (ex: Exception) {
                Toast.makeText(this, "initMap() 초기화 중", Toast.LENGTH_SHORT).show()
            }
        }

//MapLocationSettingActivity.kt

        binding.btnSetCurLocation.setOnClickListener {

            if (!isCurAddressNull) {
                val entity = mapSearchInfoEntity
                val intent = Intent()
                intent.putExtra("result", entity)
                setResult(Activity.RESULT_OK, intent)
                Toast.makeText(this@MapLocationSettingActivity, "설정완료!", Toast.LENGTH_SHORT).show()
                finish()
            }
            else {
                Toast.makeText(
                    this@MapLocationSettingActivity,
                    "위치를 드래그해서 갱신해주세요!",
                    Toast.LENGTH_SHORT
                ).show()
            }
        }
registerForActivityResult로 MainActivity.kt에서 MapLocationSettingActivity.kt를 Create 하고 여기서 얻은 data 값을 bundle로 transfer해서 다시 MainActivity.kt로 반환하게 됩니다.
3. reference
https://openapi.sk.com/
https://tmapapi.sktelecom.com/main.html
https://tmapapi.sktelecom.com/main.html#android/guide/androidGuide.sample1
https://tmapapi.sktelecom.com/main.html#android/sample/androidSample.sample1