
Truffle 란?
- Dapps 개발을 쉽게 개발할 수 있도록 도와주는 프레임 워크
- 스마트 컨트렉트 컴파일, 배포 및 테스트 기능을 쉽게할 수 있다.
npm i truffle 로 설치 후
npx truffle init을 하면, 초기세팅을 도와주는 3개의 폴더가 생긴다.
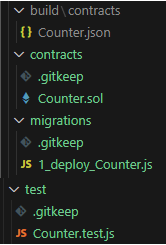
1. contract : 솔리디티 코드를 작성한 sol 파일을 담을 폴더, 컴파일을 진행하면 폴더에 있는 sol파일을 읽어서 컴파일을 진행하고, build 폴더가 생기고 컴파일 된 내용이 json 파일로 생성된다.
2. migrations : 이더리움 네트워크에 배포할 컨트렉트 js 코드파일을 담을 폴더
3. test : 테스트 파일을 작성할 폴더
또, truffle-config.js 파일이 생기는데
module.exports = {
  networks: {
    development: {
     host: "127.0.0.1",
     port: 8545,
     network_id: "*",
    },
  },
  compilers: {
    solc: {
      version: "0.8.13",
    }
  },
};
위와 같이 세팅하면 된다.
컴파일, 배포, 테스트 기능을 해보자.
컴파일
- 솔리디티 코드 작성하여 contracts 폴더에 저장.
npx truffle complie로 컴파일.- build 폴더가 생기고, 컴파일 된 내용이 생성된 json파일에 작성되어 있다.
배포
- 먼저
npm i ganache-cli,npx ganache-cli로 테스트 환경 설치 및 실행. - migrations 폴더안에 배포 코드파일 작성
- 파일명 규칙이 있다.
파일명 : [번호][내용][컨트렉트 이름].js
ex) 1_deploy_Counter.js
- 파일명 규칙이 있다.
1_deploy_Counter.js
// artifacts : 컴파일한 내용에서 파일을 찾아서 불러온다.
// ⭐ require("Counter") 코드의 Counter는 sol 파일안에 contract 이름이다.
const Counter = artifacts.require("Counter");
module.exports = (deployer) => {
    // deploy 배포 내용이 포함된 객체를 전달받고
    // deploy 메서드가 해당 컴파일된 내용을 네트워크에 배포 진행
    deployer.deploy(Counter);
}
- 파일 작성 후,
npx truffle migrate로 배포 - 위 명령어로 배포하면 CA 확인할 수 있고, truffle 콘솔에서 확인 가능
npx truffle console입력하면 콘솔창에서 테스트 가능.- 콘솔창에 아래 코드 처럼 입력 후 동작 확인.
// instance === 배포한 Counter 컨트렉트에 접근해서 인스턴스를 매개변수로 받음
// counter 변수를 선언하고 instance를 담아준다.
// counter 배포된 컨트렉트의 인스턴스가 담겨있고 call과 send가 메서드로 포함되어 있다.
Counter.deployed().then((instance) => (counter = instance));

// call 요청을 보내자
counter.getValue();

// BN { negative: 0, words: [ 0, <1 empty item> ], length: 1, red: null }
// 아이템 하나 있고 값은 0이다.
// BN 객체는 매우 큰 숫자를 명시 매우큰 숫자를 다룰 때 사용한다.
// 특히 블록체인같은 분산 원장 기술에서 자주 사용.

counter.setValue(20);
// send 요청을 보내자
// send 가스비 발생.
// 다시 getValue 를 해보면
// BN { negative: 0, words: [ 20, <1 empty item> ], length: 1, red: null }
// 값이 수정되어 20으로 변경됨.
테스트
npx truffle test명령어로 테스트 코드 실행.
React로 구현
저번글에서 React로 컨트렉트 배포, 카운트 조회, 증가, 감소를 했었는데
동작은 똑같지만 React src 폴더에 abi와 hooks 폴더를 나눈다.
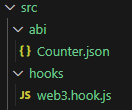
abi 폴더 구성
abi 폴더의 Counter.json 은 truffle 배포시 생성되는 json의 abi 배열만 복사해서 가져온다.
[
    {
        "inputs": [],
        "name": "increment",
        "outputs": [],
        "stateMutability": "nonpayable",
        "type": "function"
    },
    {
        "inputs": [],
        "name": "decrement",
        "outputs": [],
        "stateMutability": "nonpayable",
        "type": "function"
    },
    {
        "inputs": [],
        "name": "getValue",
        "outputs": [
            {
                "internalType": "uint256",
                "name": "",
                "type": "uint256"
            }
        ],
        "stateMutability": "view",
        "type": "function",
        "constant": true
    }
]
hooks 폴더 구성
hooks 폴더의 web3.hook.js는 기존에 메타마스크 로그인 하는 코드이다.
import { useEffect, useState } from "react";
import Web3 from "web3";
// npm i web3

// use를 붙여야한다 커스텀 훅 작성시
const useWeb3 = () => {
    // 현재 접속한 메타마스크 지갑정보를 담을 변수
    const [user, setUser] = useState({
        account : "",
        balance : "",
    });
    // 네트워크와 연결한 web3 인스턴스를 담을 변수
    const [web3, setWeb3] = useState(null);

    useEffect(()=>{
        // ⭐확장 프로그램 메타마스크가 설치되어있는지 확인.
        // ⭐ethereum 객체가 있는지 확인
        if(window.ethereum){
            // ⭐사용자에게 메타마스크 로그인 요청
            window.ethereum.request({method : "eth_requestAccounts",
            // 요청하고 응답받으면 반환받은 배열의 값의 첫번째 값이 필요
            // ⭐배열 구조분해할당 [data]
        }).then(async ([data])=>{
            // Web3 인스턴스 생성
            const web3Provider = new Web3(window.ethereum);
            setWeb3(web3Provider);
            setUser({
                account : data,
                // web3Provider.utils.toWei 요청을 보내고
                // 매개변수로
                // await web3Provider.eth.getBalance(data) 현재 지갑의 잔액을 조회해서
                // 조회한 단위는 wei단위
                // ethet 단위로 변환하자.
                balance : web3Provider.utils.toWei(await web3Provider.eth.getBalance(data), "ether")
            })
        })
        }else{
            alert("메타 마스크 설치하셈");
        }
    },[])
	// ⭐ 객체로 반환
    return {
        user,
        web3,
    };
};

export default useWeb3;
저번글 <<
저번글에서 작성한 함수랑 코드는 거의 같지만 다른부분이 있다.
App.js
// ⭐ import로 작성한 abi 폴더의 Counter.json 파일과
// hooks 폴더의 web3.hook 파일을 가져온다.⭐

import useWeb3 from "./hooks/web3.hook";
import abi from './abi/Counter.json;

// ⭐ 객체로 반환 useWeb3 를 구조분해할당
const {user, web3} = useWeb3();

// ⭐ find 함수로 abi 배열안의 객체중 name 값이 "getValue"인 객체의 정보를 가져온다.
const getValueData = abi.find((data)=> data?.name === "getValue");
이외에는 조회버튼이 버튼이 아니고 useEffect로 들어가는정도 밖에 없다.

한걸음씩