- FCM 적용기
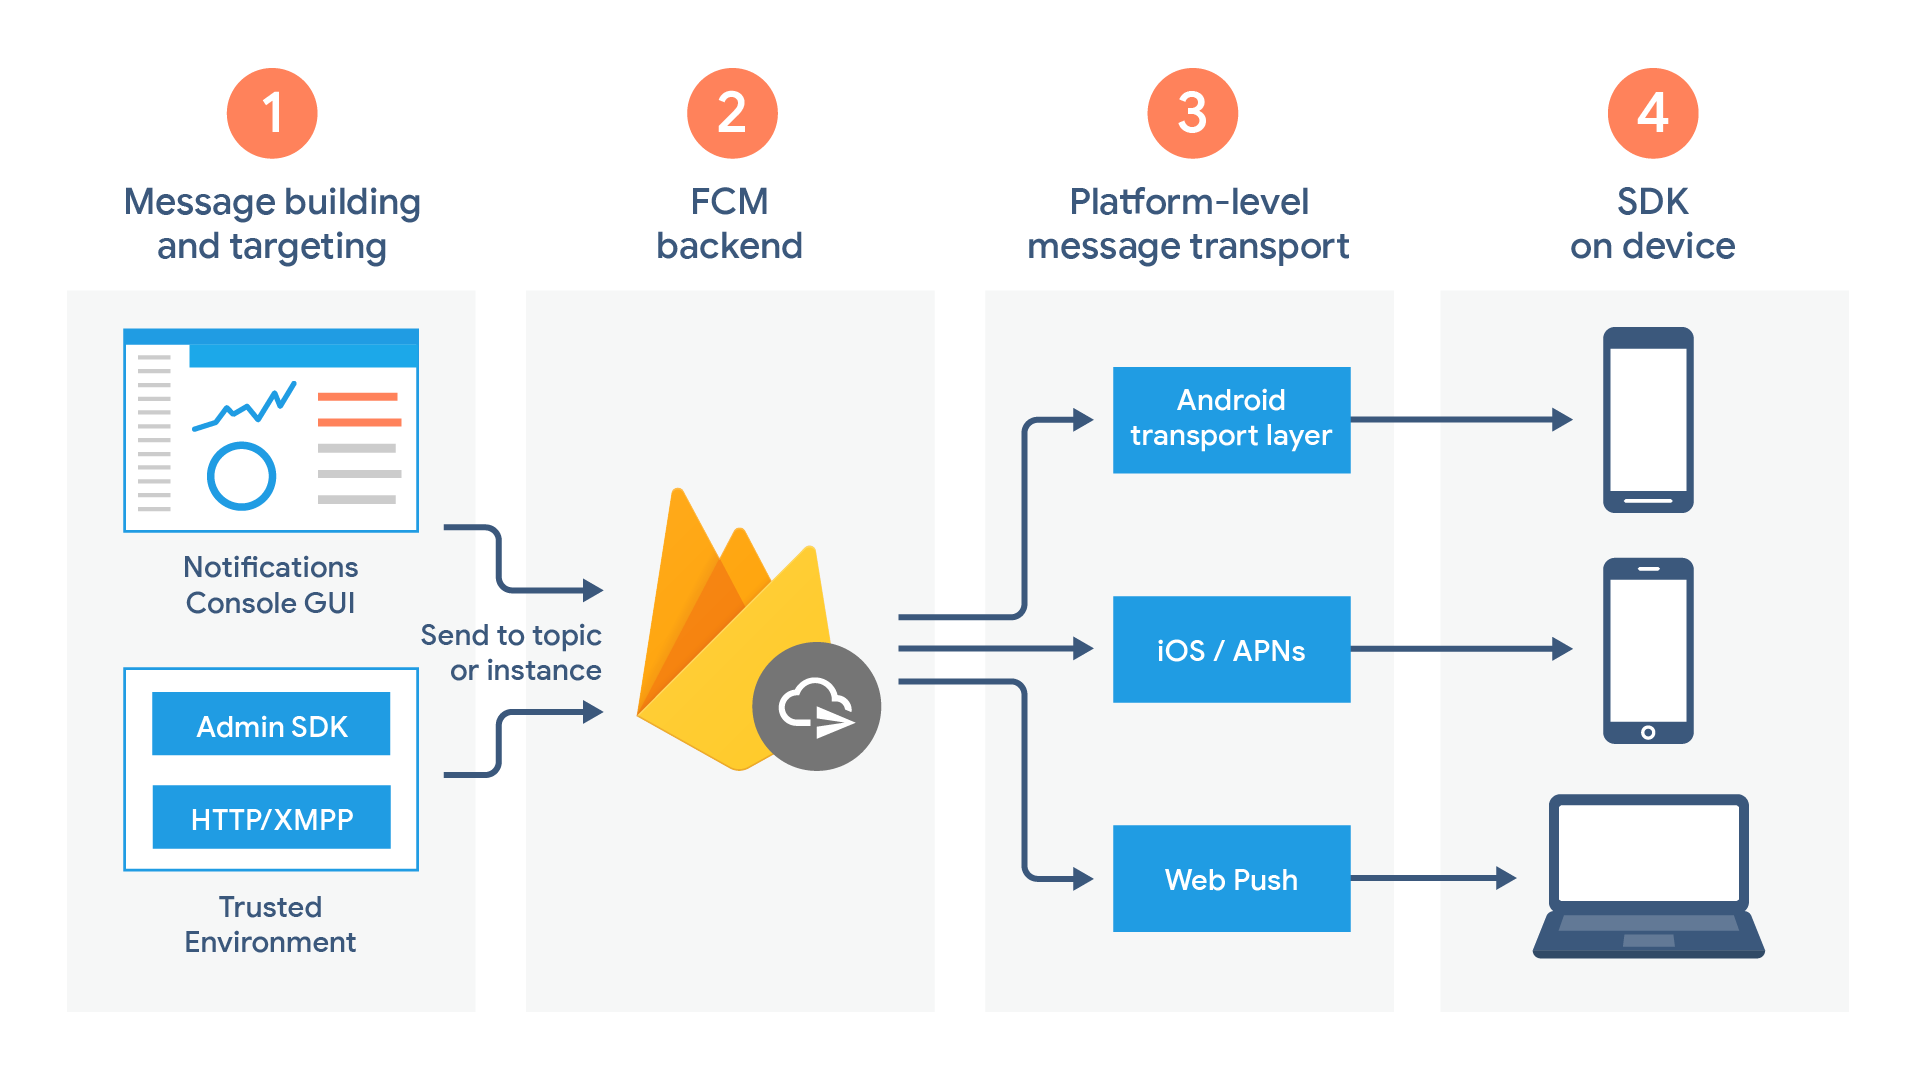
1.1 적용 구조
1.2 순서
1.3 트러블 슈팅 - 순수 웹푸시와 FCM 차이?
저번 포스팅에는 웹푸시에 전반적인 개념에 대해 적었다면, 이번에는 Vue에 FCM을 적용하는 과정에대해 포스팅하려 합니다.
저는 프론트엔드를 시작한지 오래되지 않아 백엔드 서버가 없어 일단 임시로 한페이지 내에 웹푸시내에 구조에서 백엔드기능인 푸시메세지 만드는기능을 프론트 페이지에서 해결할 수 있도록 설계하였습니다.
그렇게되면, 원래 웹푸시에 순서맞는 아래와 같은 구조에서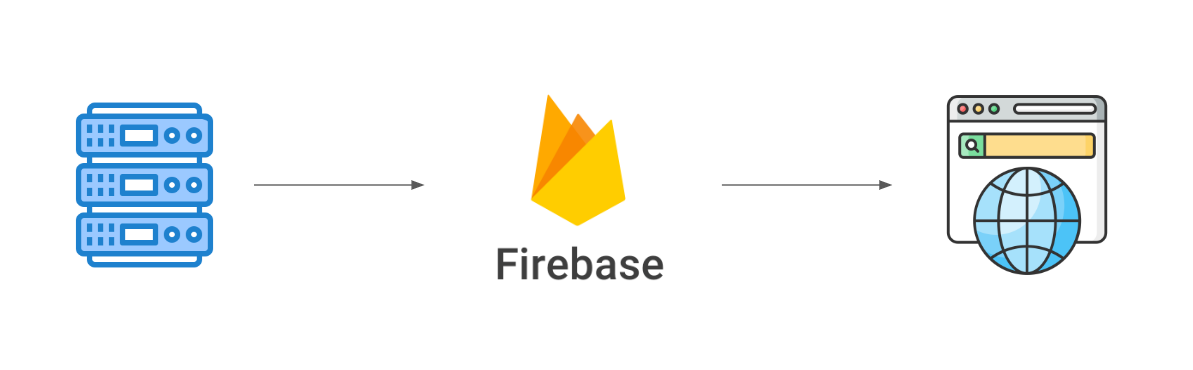
이렇게 브라우저에서 메세지를 보내서 다시 되돌아오는 구조로 되버리는 것입니다. 하지만 postman 말고 Web내에서도 해보고 싶었기에 이대로 진행하였습니다.
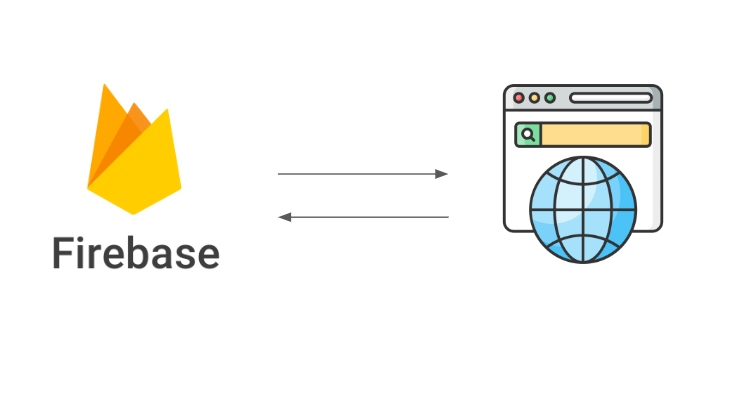
FCM 서비스 내에세도 메세지를 보내 확인할 수 있습니다. 아래와 같은 구조입니다.
- FCM 서비스내에서 메세지를 생성할 수 있는 페이지
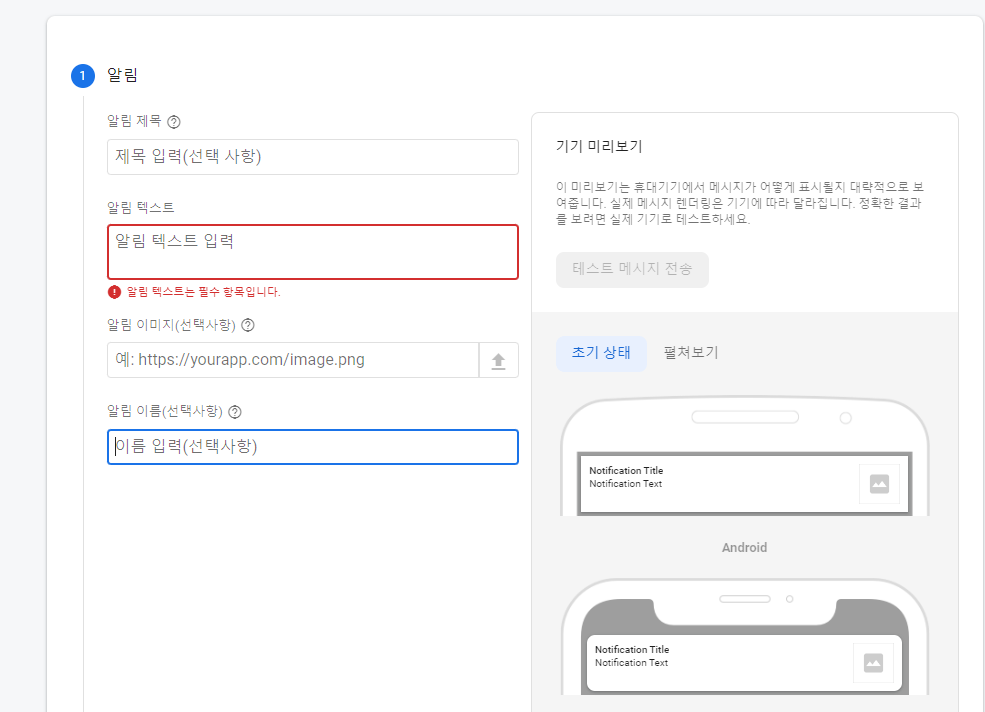
(바로 메세지보내기를 하여도 약 5분? 정도에 차이가 있습니다.)
설정하는 큰 순서 다음과 같습니다.
- Vue-Cli 프로젝트 설치
- Firebase 프로젝트 생성 및 웹앱 생성 및 설정
- Firebase 프로젝트 Vue 프로젝트 연동
- Firebase 프로젝트 내에 Cloudmessaging 서버키 추가와 웹푸시 인증서 코드를 Vue에 입력
- 메세지를 보낼 UI를 만들고, FCM과 Vue가 연동되도록 token 정보를 to에 넣어서 푸시 메세지를 생성하여 보낸다.
1. Vue-Cli 프로젝트 설치
npm install -g @vue/cli
# OR
yarn global add @vue/cli

vue create my-project
# OR
vue ui
저는 회사에서 보통 vue2버전을 쓰기때문에 2버전으로 진행하였습니다.
2. Firebase 프로젝트 생성 및 웹앱 생성 및 설정
프로젝트 생성
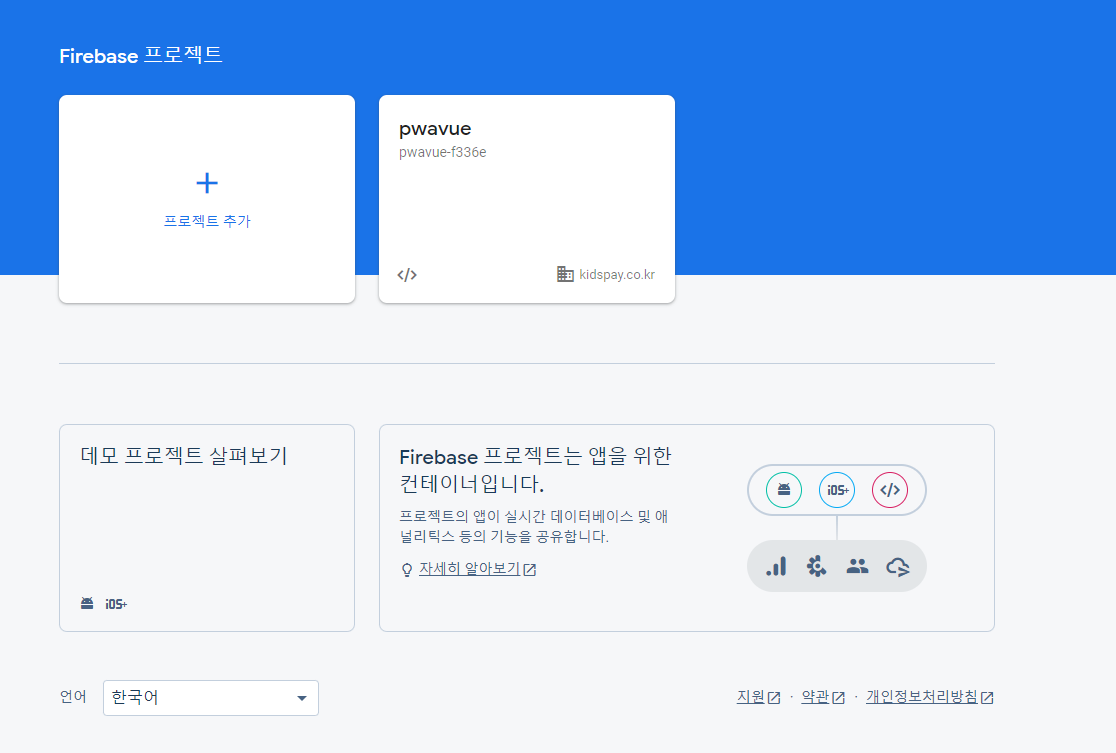
프로젝트를 추가하여 나오는 순서대로 진행하면 됩니다. 애널리스틱추가는 선택입니다!(저는 간략하게 할 것이기에 추가하진 않았습니다.)
웹앱 생성
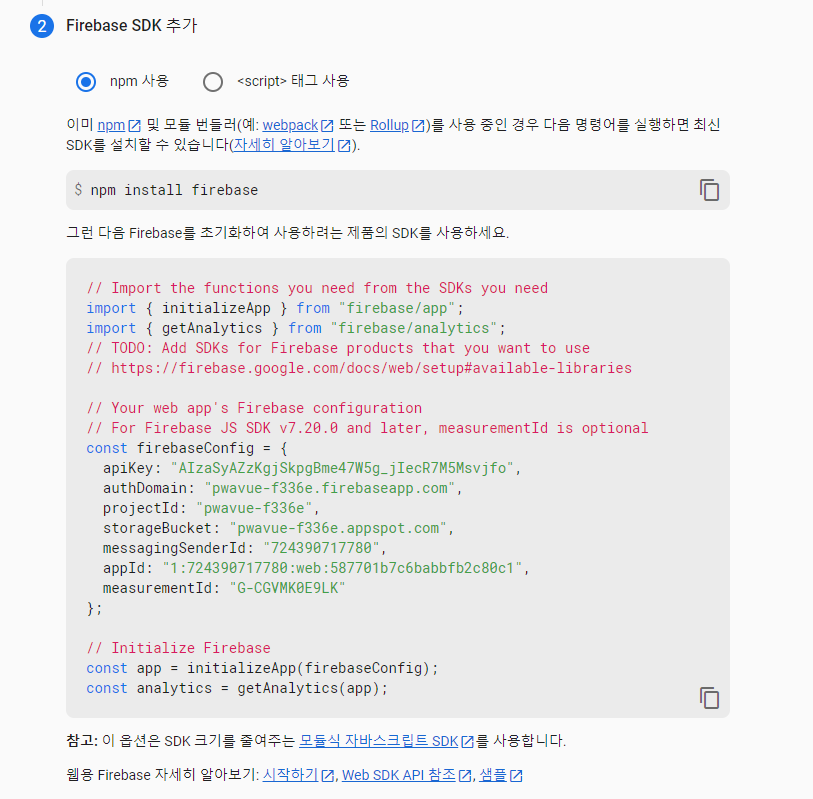
vue와 연동할때 필요한 코드입니다.
3. Firebase 프로젝트 Vue 프로젝트 연동
2단계에 나온 firebase 모듈을 설치후
npm install firebase

firebase login  //로그인 아이디 비번

firbase init //저는 호스팅은 하지않아, config로 진행하였습니다.
4. Firebase 프로젝트 내에 Cloudmessaging 서버키 추가와 웹푸시 인증서 코드를 Vue에 입력
브라우저가 꺼져도 메세지를 보낼수 있게 서비스워커파일 설정과 FCM 정보 연동을 진행하면됩니다.
서비스워커는 firebase-messaging-sw.js 파일명으로 진행하여 아래와같은 코드를 작성하였습니다.
서비스 워커는 public 파일안에 생성하였습니다.
// Give the service worker access to Firebase Messaging.
// Note that you can only use Firebase Messaging here. Other Firebase libraries
// are not available in the service worker.
importScripts('https://www.gstatic.com/firebasejs/8.10.1/firebase-app.js');
importScripts('https://www.gstatic.com/firebasejs/8.10.1/firebase-messaging.js');

// Initialize the Firebase app in the service worker by passing in
// your app's Firebase config object.
// https://firebase.google.com/docs/web/setup#config-object
firebase.initializeApp({
    apiKey: "",
    authDomain: "",
    projectId: "",
    storageBucket:"",
    messagingSenderId: "",
    appId: "",
    measurementId: ""
});
// 2단계 config와 같게 진행
// Retrieve an instance of Firebase Messaging so that it can handle background
// messages.

const messaging = firebase.messaging();

// 브라우저가 꺼진후에도 진행되어질수 있도록하는 method
messaging.onBackgroundMessage((payload) => {
    console.log(
      '[firebase-messaging-sw.js] Received background message ',
      payload
    );
    // Customize notification here
    const notificationTitle = payload.notification.title;
    const notificationOptions = {
      body: payload.notification.body,
      icon: '/icon.png'
    };

    self.registration.showNotification(notificationTitle, notificationOptions);
  });
아래 사진에 나오는 서버키를 추가하고 웹푸시 인증서내에 키를 vapidKey에 입력합니다
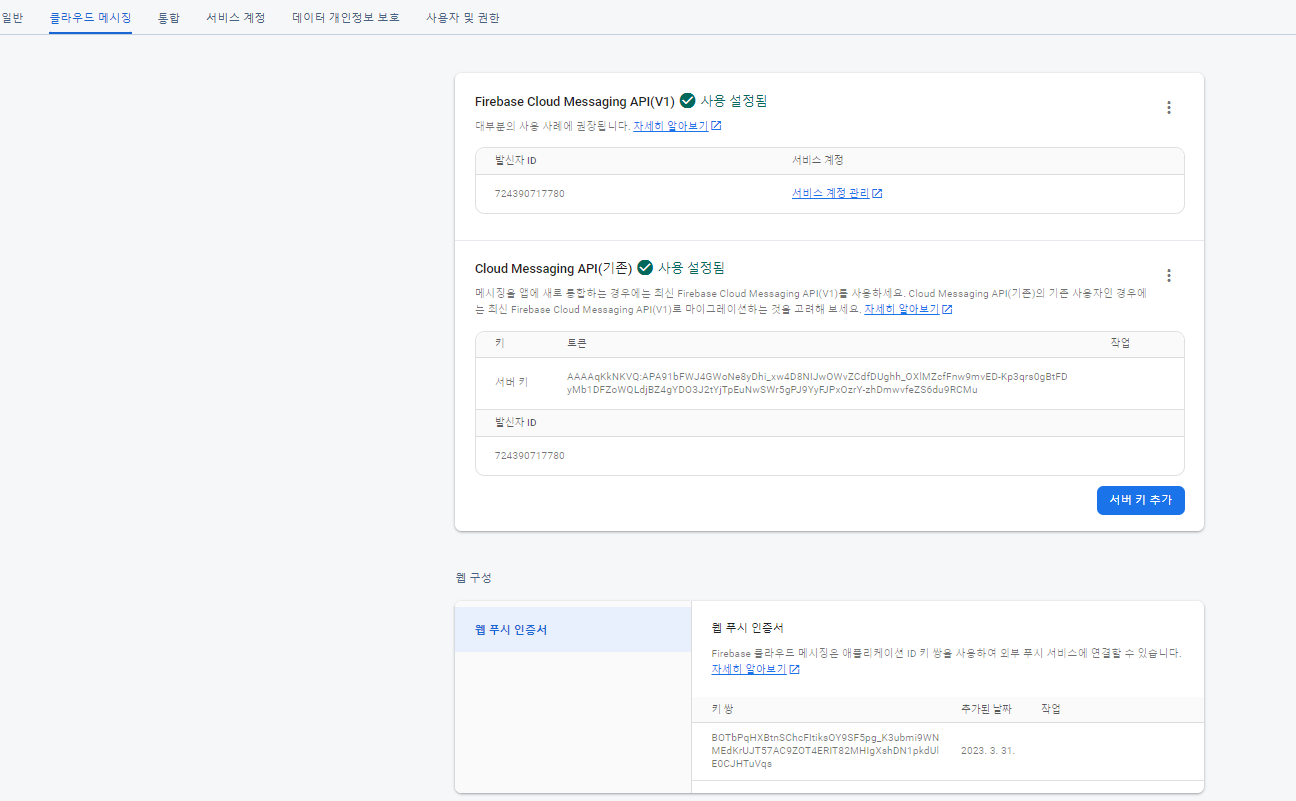
서버키는 푸시메세지 보낼때 header에 Authorization에 넣고
vapidKey는 FCM 토큰을 받기위해 사용합니다.
아래코드를 먼저 진행하게되면 console.log 창에서 토큰 번호를 확인할 수 있습니다.
<template>
  <div id="app">
    <img alt="Vue logo" src="./assets/logo.png">
    <div class="layout">
      <HelloWorld/>
    </div>

  </div>
</template>

<script>
import HelloWorld from './components/HelloWorld.vue'
import { initializeApp } from "firebase/app";
import { getMessaging, getToken, onMessage} from "firebase/messaging";


const firebaseConfig = {
  apiKey: "AIzaSyAZzKgjSkpgBme47W5g_jIecR7M5Msvjfo",
  authDomain: "pwavue-f336e.firebaseapp.com",
  projectId: "pwavue-f336e",
  storageBucket: "pwavue-f336e.appspot.com",
  messagingSenderId: "724390717780",
  appId: "1:724390717780:web:b1c5f8305abb18e62c80c1",
  measurementId: "G-1LZ7XN3LME"
};

// Initialize Firebase
const app = initializeApp(firebaseConfig); //eslint-disable-line no-unused-vars


// Get registration token. Initially this makes a network call, once retrieved
// subsequent calls to getToken will return from cache.
const messaging = getMessaging();

getToken(messaging, { vapidKey: '웹푸시 인증서' }).then((currentToken) => {
  if (currentToken) {
    // Send the token to your server and update the UI if necessary
    console.log('Token:',currentToken);
    // ...
  } else {
    // Show permission request UI
    console.log('No registration token available. Request permission to generate one.');
    // ...
  }
}).catch((err) => {
  console.log('An error occurred while retrieving token. ', err);
  // ...
});

onMessage(messaging, (payload) => {
  console.log('Message received. ', payload);

    //  // Customize notification here
    // const notificationTitle = payload.notification.title;
    // const notificationOptions = {
    //   body: payload.notification.title.body,
    //   icon: '/icon.png'
    // };

    // self.registration.showNotification(notificationTitle, notificationOptions);


  let notificationPermission = Notification.permission;

  if (notificationPermission === "granted") {
            //Notification을 이미 허용한 사람들에게 보여주는 알람창
           new Notification(payload.notification.title,{
                body:payload.notification.body,
                icon: '/icon.png',
                image:payload.notification.image
                    });
        } else if (notificationPermission !== 'denied') {
            //Notification을 거부했을 경우 재 허용 창 띄우기
            Notification.requestPermission(function (permission) {
                if (permission === "granted") {
                  new Notification(payload.notification.title, {
                body:payload.notification.body
                    });
                }else {
                    alert("알람 허용이 거부되었습니다.")
                }
            });
        }
});


export default {
  name: 'App',
  components: {
    HelloWorld
  }}

</script>

<style>
#app {
  font-family: Avenir, Helvetica, Arial, sans-serif;
  -webkit-font-smoothing: antialiased;
  -moz-osx-font-smoothing: grayscale;
  text-align: center;
  color: #2c3e50;
  margin-top: 60px;
}
.layout{
  display: flex;
  flex-direction:row;
  align-items: center;
  justify-content: center;
}
</style>
토큰 코드를 받고 다음위치에 서버키와함께 작성해주면됩니다.
<template>
  <div class="hello"  >
    <div class="textbox">
      메세지 제목:
    <input class="logininput input_w_full" v-model="message_title"/>
    </div>
  <div  class="textbox">
   메세지 내용:
    <input class="logininput input_w_full" v-model="message_decription"/>
   </div>
  <div class="imagebox">
    <span style="">사진 업로드: </span>
    <div style="margin-left: 10px;">
      <input type="file"  accept="image/*" ref="imageUploader" @change="handleFileChange" required multiple  >
    </div>
  </div>
  <img v-if="img_src" :src="img_src" width="128" height="128">
   <div>
    <button type="button" class="login_btn"  @click="send">보내기</button>
   </div>
  </div>
</template>

<script>

export default {
  name: 'HelloWorld',
  data(){
    return{
      saveData:{
        notification:{
          title:'',
          description:'',
          icon:'',
          image:''
        }
      },
    file: "",
    img_src: "",
    img_file:"",
    message_title:'',
    message_decription:'',
    }
  },
  methods:{
    handleFileChange(e) {
    //이미지 URL 생성
      let file = e.target.files[0];
      let name = file.name;
      this.file_name = file.name;
      this.file = file;
      if(name.endsWith('.jpg') || name.endsWith('.jpeg') ||
        name.endsWith('.png') || name.endsWith('.gif')){
          this.img_src = URL.createObjectURL(file);
        }
      else{
        this.img_src = ""
      }
    },
    send() {
      this.saveData.to ="토큰코드"
      this.saveData.notification.title = this.message_title;
      this.saveData.notification.body= this.message_decription;
      this.saveData.notification.image= this.img_src


      const headers = {
    "Authorization": "key=서버키",
    "Content-Type": "application/json"
  };

      this.$axios
        .post("https://fcm.googleapis.com/fcm/send",  this.saveData ,{headers})
        .then((res) => {
          console.log(res);
          //푸시 메세지 보내고 난뒤 전체 리셋
          this.message_title='';
          this.message_decription='';
          this.img_src='';
          this.$refs.imageUploader.value = ''
        })
        .catch((error) => {
          console.log(error);
        })
    },
  }
}
</script>

<!-- Add "scoped" attribute to limit CSS to this component only -->
<style scoped>
h3 {
  margin: 40px 0 0;
}
ul {
  list-style-type: none;
  padding: 0;
}
li {
  display: inline-block;
  margin: 0 10px;
}
a {
  color: #42b983;
}
.textbox {
  display: flex;
  flex-direction: row;
  margin-top:10px;
  justify-content: center;
  align-items:center;
}
.logininput {
  margin-left: 10px;
  padding:11px 14px 11px 14px;
  border:1px solid #000;
  line-height: 100%;
}
.input_w_full {
  color:black;
  font-size: 18px;
  width: 300px;
  height: 20px;
  border-radius: 6px;
}
.imagebox {
  margin-top:15px ;
  display: flex;

}
.login_btn{
    margin-top:20px ;
    border-radius:4px;
    width:250px;
    height:61px;
    background-color: #3C3C3C;
    color:white;
    border:0;
    font:700 18px 'Inter';
    cursor: pointer;
  }
</style>
5. 메세지를 보낼 UI를 만들고, FCM과 Vue가 연동되도록 token 정보를 to에 넣어서 푸시 메세지를 생성하여 보낸다.
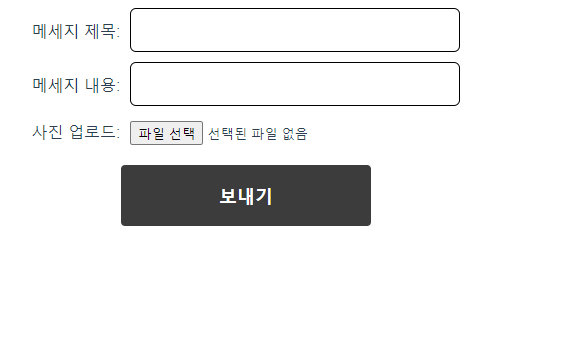
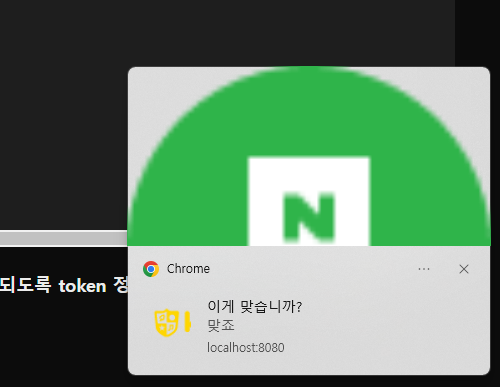
다음과 같이 나오게됩니다.
트러블 슈팅
가장 크게 오랫동안 맞닥드린 에러는 foreground(브라우저가 켜져있는상태)에서 메세지가 전달되지 않는다는 것이었습니다.
background상태에서 썻던 메소드와 같은 메소드를 썼는데 다음과
같은 에러가 떴습니다
Umcaught FirebaseError: messaging: this method is available in a window context/.


공신문서를 살펴보니
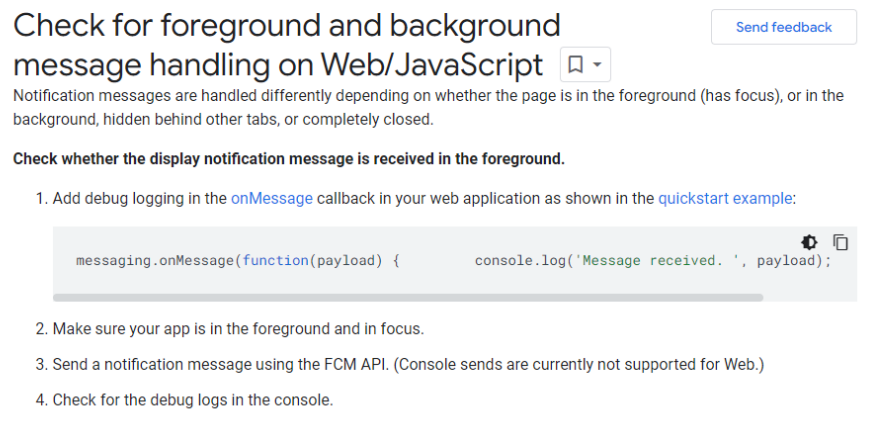
현재 FCMAPI가 web에서는 지원하지 않는다는 글을 보았다..!
그래서 JS에서 notification api를 살펴보며 다른방식으로 메소드를 사용하였습니다
onMessage(messaging, (payload) => {
  console.log('Message received. ', payload);

    //  // Customize notification here
    // const notificationTitle = payload.notification.title;
    // const notificationOptions = {
    //   body: payload.notification.title.body,
    //   icon: '/icon.png'
    // };

    // self.registration.showNotification(notificationTitle, notificationOptions);


  let notificationPermission = Notification.permission;

  if (notificationPermission === "granted") {
            //Notification을 이미 허용한 사람들에게 보여주는 알람창
           new Notification(payload.notification.title,{
                body:payload.notification.body,
                icon: '/icon.png',
                image:payload.notification.image
                    });
        } else if (notificationPermission !== 'denied') {
            //Notification을 거부했을 경우 재 허용 창 띄우기
            Notification.requestPermission(function (permission) {
                if (permission === "granted") {
                  new Notification(payload.notification.title, {
                body:payload.notification.body
                    });
                }else {
                    alert("알람 허용이 거부되었습니다.")
                }
            });
        }