Knative
Knative 개념
-
2018년 7월 출시된 새로운 프로젝트
-
제품 3가지 및 기능
- serving : serverless 어플리케이선 호스팅, routing, autoscale, blue-green deploy
- event : event 소스 및 전달 구조
- build : 클러스터 내에서 빌드 정의 및 실행 구조 -> 현재는 tekton pipelines으로 변경됨
- monitoring : grafana, prometheus등을 사용한 monitoring
-
knative 장점
- 어플리케이션을 쉽게 배포할 수 있다
- cpu, memroy, container 매개변수 활성화/비활성화
- Pass, Faas 구축을할 수 있다
- serverless로 개발하여 배포할 수 있다
- 자동 확장 처리, 요청 기반활성화, 원격 측정을할 수 있는 구조
- build를 사용하여, source 저장소에서 docker 빌드 및 배포 할수 있는 구조
- 어플리케이션을 쉽게 배포할 수 있다
-
istio와 연동
- service mesh기능 사용
-
knative 구성
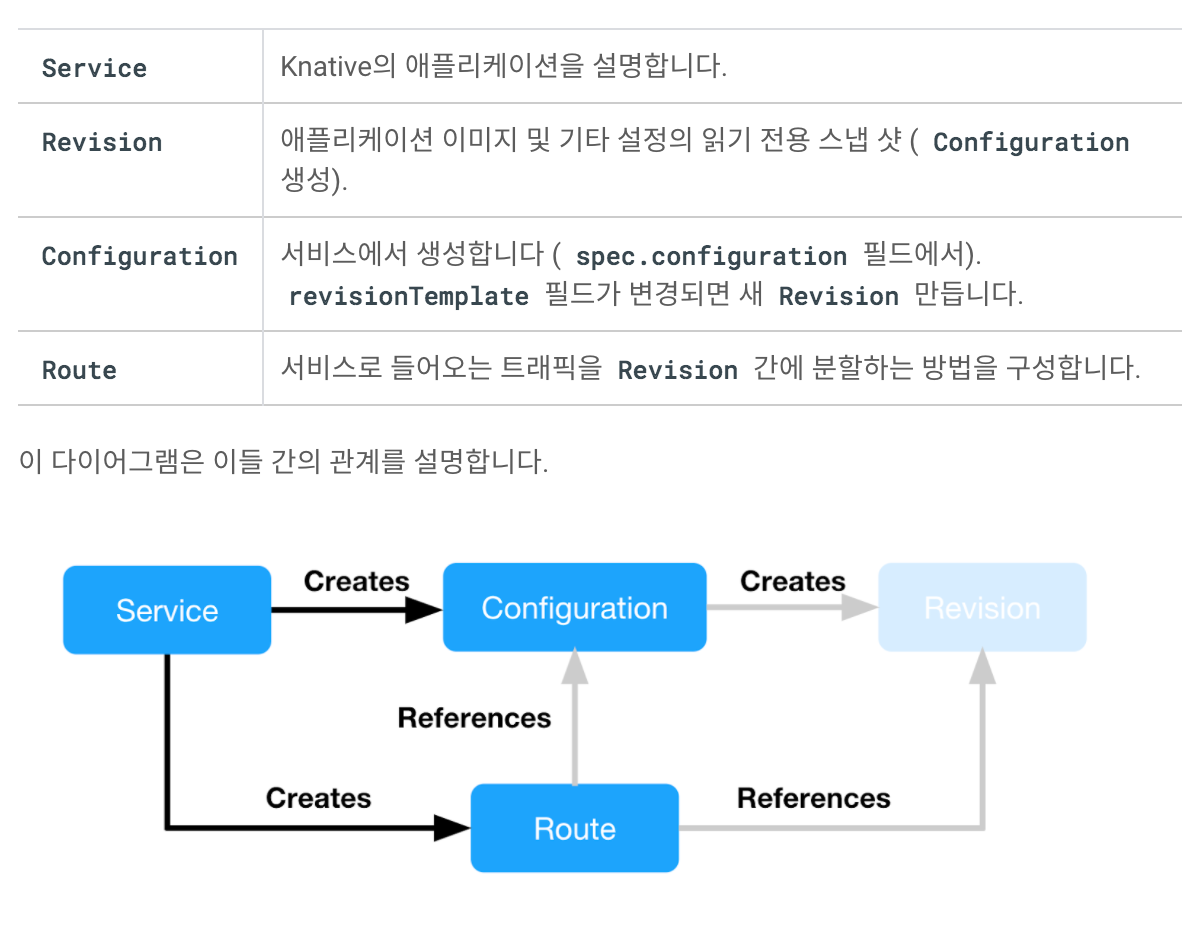
Knative 앱 배포
- service
- runLastest -> Configuration -> revisionTemplate 구조로 배포되어서 위의 관계를 통해서 관리 및 통신이 생기는것을 알수 있다.
apiVersion: serving.knative.dev/v1alpha1
kind: Service
metadata:
  name: "helloworld"
spec:
  runLatest:
    configuration:
      revisionTemplate:
        spec:
          container:
            image: "gcr.io/knative-samples/helloworld-go"
            env:
              - name: "TARGET"
                value: "world"
kubectl get configuration,revision,route
NAME CREATED AT
configuration.serving.knative.dev/helloworld 28m
NAME CREATED AT
revision.serving.knative.dev/helloworld-00001 28m
NAME CREATED AT
route.serving.knative.dev/helloworld 28m-
istio gateway를 통해 들어오는 traffaic을 받기위한 정의 및 확인
-
Istio사용 설정
- 배포를하면, istio기반의 knative-ingressgateway라는 단일 공용 로드 밸런서가 정의되어 있으며, 지금부터 생성되는 knative 어플리케이션은 여기에 정의된 주소를 통해서 들어오게된다.
- istiogateway의 externalIP를 실제 외부에서 접속할 IP로 변경해놓아야함
- 그리고, knative-ingress gateway의 domain 수정
- kubectl get service --namespace=istio-system knative-ingressgateway
- 여기 host 주소를 *.default.example.com으로 정의 한다.
-
knative 앱 설정
- kubectl get ksvc helloworld --output jsonpath='{.status.domain}'
- 여기 domain 주소를 helloword.default.example.com으로 정의 한다.
- kubectl get ksvc helloworld --output jsonpath='{.status.domain}'
-
테스트 및 확인 방법
- curl -H "Host: helloworld.default.example.com" http://IP_ADDRESS
Hello world!
- curl -H "Host: helloworld.default.example.com" http://IP_ADDRESS
-
Knative (blue/green deploy), routing traffic
-
blue/green deploy라고 하면, 배포 전략으로 새로운 버전의 어플리케이션이을 만들었을때, 일부 트래픽을 version2(green)로 보내면서 운영환경에서 문제가 없는지 체크하고, 트래픽을 증가시키면서 Version2로 완전히 변경시키는 방법론이다
- 이것을 Canary realese, test라고도 한다.
-
이를 테스트 하기위해서는 yaml을 수정할 부분이 있다
- 앞서 배포한것과 다르게 Service를 정의해야한다.
- runLatest와 revisionTemplate있는 부분을 수정해야함
- release와 revisions로 변경하여 여러 revision에 대해서 테스트 할 수 있다.
- 앞서 배포한것과 다르게 Service를 정의해야한다.
-
최초 v1배포
apiVersion: serving.knative.dev/v1alpha1
kind: Service
metadata:
  name: canary
spec:
  runLatest:
    configuration:
      revisionTemplate:
        spec:
          container:
            image: gcr.io/knative-samples/knative-route-demo:blue
            env:
            - name: T_VERSION
value: "blue"-
배포 후 revision이름이 canary-0001(가칭)로 배포된것을 확인해 볼수 있다
-
v2와 함께 blue/green 배포
- release, revisions, rolloutPercent 정보가 들어간 것을 확인할 수 있다.
- 이때, revisions는 가칭이며, 아래와 같이 배포후 canary-0001, canary-0002는 revision 정보에 맞게 이름을 변경해야할 수 있다.
apiVersion: serving.knative.dev/v1alpha1
kind: Service
metadata:
  name: canary
spec:
  release:
    revisions: ["canary-00001", "canary-00002"] # [current, candidate]
    rolloutPercent: 20                          # 20% to green revision
    configuration:
      revisionTemplate:
        spec:
          container:
            image: gcr.io/knative-samples/knative-route-demo:green
            env:
            - name: T_VERSION
value: "green"- 이렇게 배포해서 curl로테스트하면, 약 20%가 canary-0002(green)으로 보내지는것을 확인 할 수 있다.
- 참고로 release모드로 구성시 대표 domain으로 보내어서 percent에 따라 나눌수도 있지만, 특정 domain으로 요청을 보낼수도 있다.
- 아래와같이 여러 revision으로 domain을 특정하여 요청을 보낼 수 있다.
- blue : current.canary.default.example.com
- green : candidate.canary.default.example.com
- 특정 : latest.canary.default.example.com
- 가장 최근이 지정 아니더라도, 개정판을 배포 revisions 필드.
- route의 정보를 확인해보면... 아래와 같이 정의 된것을 확인할 수 있는데
- 이것도 역시 release모드시, route에서 트래픽 분배되는 기능을 볼수 있다.
- runLastet일때는 한곳으로 100로 보내질것이다.
kubectl describe route canary

...
Status:
  Traffic:
    Name:           current
    Percent:        80
    Revision Name:  canary-00001
    Name:           candidate
    Percent:        20
    Revision Name:  canary-00002
    Name:           latest
    Percent:        0
    Revision Name:  canary-00002
Autoscale
- Autoscale은 knative에서 제공하는 기본 내장된 기능으로, hpa(cpu) 쿠버네티스에서제공하는 autoscale외에 동시요청을 위한 Concurrency, 초당 요청수를 처리하기위한 RPS를 통한 Autoscale을 제공해준다.
- 기본설정은 Concurrency로 되어 있으면, 기본 동시 요청이 200이면 pod의 갯수를 늘려가는 구조로 되어 있다.
- 위와 같이 runLatest로 Service를 배포하고, Hey라는 liblary를 통해 테스트해 볼수 있으며, 결과는 pod의 갯수가 늘어 나는것으로 확인가능하다.
- 좀 더 자세한 결과를 보기위해서는 Monitoring을 사용하면 더 좋다.
Build -> Tekton Pipelines로
- 현재는 Tekton piplines 프로젝트로 변경되어 Deplicate되어 있으나 간단한 정의를 통해 어떤것을 하고 싶은지 알아 보려고한다.
- kubernetes에 build, buildTemplate, ClusterBuildTemplate API를 제공하여, 사용자가 API를 정의하여 배포하면 정의된 내용에 의해서 git pull, docker build, docker push를 하는 기능으로 Jenkins의 CI기능과 유사하다.
- 특징은
- kubernetes의 API로 제공되어 Job과 같이 실행하는동안 Pod가 생성되고 완료시 Completed된다.
- 일부 Pipiline을 구성하여 git pull, Docker build/push를 단계를 나누어서 동작도 가능하다.
- Build API사용
apiVersion: build.knative.dev/v1alpha1
kind: Build
metadata:
  name: example-build
spec:
  source:
    git:
      url: "https://github.com/knative/docs.git"
      revision: "v0.1.x"
    subPath: "serving/samples/helloworld-go/"
  steps:
  - name: build-and-push
    image: "gcr.io/kaniko-project/executor:v0.6.0"
    args:
    - "--dockerfile=/workspace/Dockerfile"
- "--destination=gcr.io/<your-project-id>/helloworld-go:v1"-
내부적으로 단계를 가지는데...
- build-step-credential-initializer : Git 자격 증명을 초기화합니다 (이 경우 없음).
- build-step-git-source : git 저장소를 / workspace 디렉토리로 가져옵니다.
- build-step-build-and-push : 위에 지정된 Kaniko 빌드 단계를 실행합니다.
-
BuildTemplate, ClusterBuildTemplate
apiVersion: build.knative.dev/v1alpha1
kind: BuildTemplate
metadata:
  name: kaniko
spec:
  parameters:
  - name: IMAGE
    description: name of the image to be tagged and pushed
  steps:
  - name: build-and-push
    image: "gcr.io/kaniko-project/executor:v0.6.0"
    args: ["--destination=${IMAGE}"]


---
apiVersion: build.knative.dev/v1alpha1
kind: Build
metadata:
  name: templatized-build
spec:
  source:
    git:
      url: "https://github.com/knative/docs.git"
      revision: "v0.1.x"
    subPath: "serving/samples/helloworld-go/"
  template:
    name: kaniko
    arguments:
      - name: IMAGE
value: "gcr.io/<your-project-id>/helloworld-go:v2"- 위와 같이 git단계와 docker 단계를 template으로 정의하여 나눌수 있다.
- 여러 단계를 각각 정의하여 나눌수 있다.
- 기타 build 단계
- 구성을 하다보면 소스, 레포지토리, 볼륨 마운트 기능이 필요할 수 있는데...모두 옵션으로 구성이 가능하다.
https://codelabs.developers.google.com/codelabs/knative-intro#0

Fullstack developer