이 글은 강의 : 김영한님의 - "[스프링 DB 2편 - 데이터 접근 활용 기술]"을 듣고 정리한 내용입니다. 😁😁
MyBatis 장점
-
SQL을 XML에 편리하게 작성할 수 있다. (라인이 길어져도 문자 더하기에 대한 불편함이 없다.)
-
동적 쿼리를 매우 편리하게 작성할 수 있다.

MyBatis 단점
- MyBatis는 약간의 설정이 필요하다.
프로젝트에서 동적 쿼리와 복잡한 쿼리가 많다면 MyBatis를 사용하는 것이 좋다. 단순한 쿼리가 많은 경우 JdbcTemplate을 선택해서 사용하는 것이 좋다. 둘을 함께 사용해도 좋다.
MyBatis의 설정
//MyBatis 추가
implementation 'org.mybatis.spring.boot:mybatis-spring-boot-starter:2.2.0'
MyBatis를 사용하기 위해서는 MyBatis를 설정해야한다. 설정을 위해서 위의 코드를 build.gradle에 추가해서 의존성 주입을 한다.
application.properties
# MyBatis
mybatis.type-aliases-package=hello.itemservice.domain
mybatis.configuration.map-underscore-to-camel-case=true
logging.level.hello.itemservice.repository.mybatis=trace
다음 설정값도 application.properties에 추가해둔다. 그리고 테스트 코드에서도 사용할 수 있기 때문에 테스트 영역의 application.properties에도 해당 설정값을 추가해준다.
🎈 mybatis.type-aliases-package=hello.itemservice.domain
-
MyBatis에서는 returnType에 클래스명을 알려줄 때, 이 때 패키지명까지 다 작성해야한다. 이 패키지명을 작성하는 부분을 해결하기 위해서 위 패키지를 사용한다.
-
지정한 패키지와 그 하위 패키지가 자동으로 인식된다.
-
여러 위치를 지정하려면 ',' / ';'로 구분하면 된다.
🎈 mybatis.configuration.map-underscore-to-camel-case
JdbcTemplate의 BeanPropertyRowMapper에서 처럼 언더바를 카멜로 자동 변경해주는 기능을 활성화 한다.
관례의 불일치
자바 객체에서는 주로 카멜 표기법을 사용하고, RDBMS에서는 언더 스코어를 사용한다. 위 설정을 활성화하면 이 관례의 불일치를 자동으로 맵핑해서 넣어준다.
ItemMapper 생성하기 (인터페이스)
@Mapper
public interface ItemMapper {
    // 반드시 인터페이스로 만들어야 함

    // 파라미터가 1개인 경우는 넣지 않아도 됨.
    void save(Item item);

    // 파라미터가 2개인 경우, @Param을 넣어줘야함.
    void update(@Param("id") Long id, @Param("updateParam") ItemUpdateDto dto);

    // 파라미터가 1개인 경우는 넣지 않아도 됨.
    List<Item> findAll(ItemSearchCond itemSearch);

    // 파라미터가 1개인 경우는 넣지 않아도 됨.
    Optional<Item> findById(Long id);
}
🧨 MyBatis 맵핑 XML을 호출해주는 매퍼 인터페이스다.
🧨 인터페이스에는 @Mapper를 붙어주어야 한다. 그래야 MaBatis에서 인식해준다.
🧨 인터페이스의 메서드를 호출하면, xml의 해당 SQL을 실행하고 결과를 돌려준다.
🧨 SQL을 실행할 xml을 구현해야해 !
Mapper와 같은 위치에 실행할 SQL이 있는 XML 맵핑 파일을 만들어 줘야한다. 자바 코드가 아니기 때문에 src/main/resources 하위에 만들되, 패키지 위치를 동일하게 맞춰줘야한다.
사진
- 위처럼 패키지 상에서 동일한 위치에 ItemMapper.xml을 동일한 이름으로 만들어 줘야한다.
IteMapper XML 만들기 (인터페이스용)
⚽ Insert-Save 쿼리
<!--    id는 메서드 명을 입력해줘야 함. -->
<!--    Values에는 Item 객체에 있는 필드 명을 입력해주면 됨. -->
<!--    키를 생성하고, 키 값은 "id"라고 저장해 줌.-->
<insert id="save" useGeneratedKeys="true" keyProperty="id">
  insert into item (item_name, price, quantity)
  values (#{itemName}, #{price}, #{quantity})
</insert>
⚽ Insert SQL은 를 이용하면 된다.
⚽ id에는 Mapper 인터페이스에 설정한 메서드 이름을 지정하면 된다. 여기서는 메서드 이름이 save() 이므로 save로 지정된다.
⚽ 파라미터는 #{}로 사용하면 돼
⚽ #{} 문법을 사용하면 PreparedStatement를 사용. JDBC의 '?'를 치환하는 것으로 이해하면 된다.
⚽ userGeneratedKeys는 DB 키를 생성해주는 Identity 전략일 때 사용함. KeyProperty는 생성되는 키의 속성 이름을 지정한다. Insert가 끝나면 Item 객체의 id 속성에 생성된 값이 저장됨.
Updatet-update 쿼리
  <update id="update">
    update item
    set item_name=#{updateParam.itemName},
        price=#{updateParam.price},
        quantity=#{updateParam.quantity}
    where id=#{id}
</update>
Update SQL은 를 사용하면 됨.
파라미터가 Long id, ItemUpdateDto updateParam으로 2개가 존재한다. 파라미터가 2개 이상일 때는 @Param을 지정해서 파라미터를 구분해야 함.
Select - findById
  <select id="findById" resultType="item">
    select id, item_name, price, quantity
    from item
    where id=#{id}
</select>
⚽ Select SQL은 <select>를 사용하면 된다.
⚽ resultType을 명시해야 한다. 여기서 결과를 "Item" 객체에 맵핑한다.
application.properties에서 aliases-pacakage 설정값 때문에 모든 패키지 명을 적지 않아도 된다. (근데 보통 충돌을 생각해서 모든 패키지 써주는게..)- JdbcTemplate의 BeanPropertyMapper처럼 SELECT SQL의 결과를 편리하게 객체로 바로 변환해줌.
application.properties의 설정 때문에 언더스코어를 카멜 표기법으로 자동 처리해줌.
자바 코드에서 반환 객체가 하나이면 Item, Optional으로 사용하면 됨. 하나 이상이면 컬렉션을 사용하면 됨. 주로 List를 사용한다.
select - findAll
<select id="findAll" resultType="item">
select id, item_name, price, quantity
from item
<where>
<if test="itemName != null and itemname != ''">
and item_name like concat('%',#{itemName}, '%')
</if>
<if test="maxPrice != null">
and price <= #{maxPrice}
</if>
</where>
</select>⚽ MyBatis는 , 태그를 이용해 동적 쿼리 문법을 평리하게 지원한다.
⚽ 는 해당 조건이 만족되면 구문을 추가
⚽ 은 적절하게 where 문장을 만들어준다.
- 가 모두 실패하면 SQL "where"를 만들지 않음.
- 가 하나라도 성공하면 처음 나타나는 "and"를 "where"로 변환해준다.
XML 특수문자 주의 사항
and price <= #{maxPrice}
위 쿼리에서 가격 비교를 위해 <=를 '<='로 표현했다. 이유는 XML에서는 데이터 영역에 <,> 문자를 사용할 수 없기 때문이다. 따라서 XML에서 대소 비교는 아래 문자를 이용해야 한다.
< : <
> : >
& : &MyBatisItemRepository - 테스트
이제 설정이 완료되었으니 레포지토리를 만든다.
@Repository
@RequiredArgsConstructor
public class MyBatisItemRepository implements ItemRepository{

  private final ItemMapper itemMapper;

  @Override
  public Item save(Item item) {
      itemMapper.save(item);
      return item;
  }

  @Override
  public void update(Long itemId, ItemUpdateDto updateParam) {
      itemMapper.update(itemId, updateParam);
  }

  @Override
  public Optional<Item> findById(Long id) {
      return itemMapper.findById(id);
  }

  @Override
  public List<Item> findAll(ItemSearchCond cond) {
      return itemMapper.findAll(cond);
  }
}
만든 후에, 설정 클래스(ItemServiceApplication)에서 MyBatis를 사용하도록 변경한다.
@Import(MyBatisConfig.class)
@SpringBootApplication(scanBasePackages = "hello.itemservice.web")
@Slf4j
public class ItemServiceApplication {
...
}
⚽ Repository를 생성하고, 설정 클래스를 변경한 다음 ItemRepositoryTest를 해보면 정상적으로 테스트가 수행되는 것을 확인할 수 있다.
MyBatis 구현체
지금까지 보면 ItemMapper라는 인터페이스와 XML 파일만 만들었어. 즉 역할과 구현에 있어서 역할만 존재하는 상황. 구현에 해당하는 인터페이스의 구현체를 만들지 않았는데, 어떻게 의존성 주입이 되고 동작할 수 있었던 것일까?
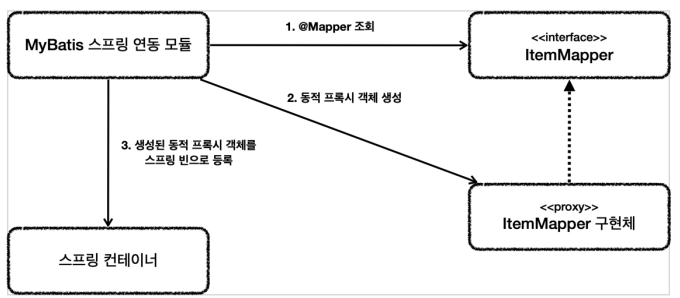
- 애플리케이션 로딩 시점에 MyBatis 스프링 연동 모듈은 @Mapper 가 붙어있는 인터페이스를 조사한다.
- 해당 인터페이스가 발견되면 동적 프록시 기술을 사용해서 ItemMapper 인터페이스의 구현체를 만든다.
- 생성된 구현체를 스프링 빈으로 등록한다
⚽ 즉, AOP와 같이 동적 프록시 객체를 만들어서 스프링 빈으로 등록하고 의존성을 주입해준다는 것이다.
실제 동적 프록시 기술이 적용되었는지 확인
@Override
public Item save(Item item) {
  log.info("itemMapper Class = {}", itemMapper.getClass());
  itemMapper.save(item);
  return item;
}
⚽ 다음 클래스에 Log를 찍어서, ItemMapper의 클래스를 확인해본다.
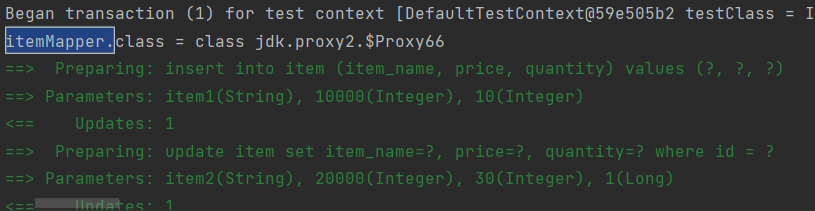
해당 부분처럼 JDK 동적 프록시를 이용해서 만들어진 프록시가 주입되었다는 것을 확인할 수 있었다.
Mapper 구현체
⚽ MyBatis 스프링 연동 모듈이 만들어주는 ItemMapper의 구현체 덕분에 인터페이스만으로 편리하게 XML의 데이터를 찾아서 호출할 수 있다.
⚽ 매퍼 구현체는 예외 반환까지 처리해준다. MyBatis에서 발생한 예외를 스프링 예외 추상화인 DataAccessException에 맞게 변환해서 반환해준다. JdbcTemplate이 제공하는 예외 변환 기능을 여기서도 제공한다고 이해하면 된다.
💦 정리
🎈 Mapper 구현체 덕분에 MyBatis를 스프링에 편리하게 통합해서 사용할 수 있다.
🎈 매퍼 구현체를 사용하면 스프링 예외 추상화도 함께 적용된다.
🎈 MyBatis 스프링 연동 모듈(MyBatisAutoConfigutarion 클래스 참고) 이 많은 부분을 자동화 해주고, DB 커넥션, 트랜잭션과 관련된 기능도 마이바티스와 함께 연동하고 동기화 해준다!!
🎈 MyBatis 모듈은 DataSource / TransacationManager를 모두 읽어서 연결. 따라서 사용자가 할 일은 없다.
MyBatis 동적 쿼리
MyBatis 공식 메뉴얼
MyBatis 스프링 공식 메뉴얼
🎈 if
🎈 choose (when, otherwise)
🎈 trim (where, set)
🎈 foreach
- MyBatis가 제공하는 최고의 기능이다. 동적 쿼리를 위해 제공되는 기능은 다음과 같다.
⚽ if
<select id="findActiveBlogWithTitleLike"
  resultType="Blog">
  SELECT * FROM BLOG
  WHERE state = ‘ACTIVE’
<if test="title != null">
  AND title like #{title}
</if>
</select>
해당 조건에 따라 값을 추가할지 말지 판단한다.
내부의 문법을 OGNL을 사용한다. 자세한 내용을 ONGL을 검색해보자.
choose, when, otherwise
  <select id="findActiveBlogLike"
    resultType="Blog">
    SELECT * FROM BLOG WHERE state = ‘ACTIVE’
 <choose>
 <when test="title != null">
    AND title like #{title}
 </when>
 <when test="author != null and author.name != null">
    AND author_name like #{author.name}
 </when>
    <otherwise>
            AND featured = 1
            </otherwise>
 </choose>
</select>- 자바의 switch 구문과 유사한 구문도 사용할 수 있다.
trim, where, set
<select id="findActiveBlogLike"
    resultType="Blog">
    SELECT * FROM BLOG
    WHERE
            <if test="state != null">
    state = #{state}
 </if>
 <if test="title != null">
    AND title like #{title}
 </if>
 <if test="author != null and author.name != null">
    AND author_name like #{author.name}
 </if>
</select> - 이 예제의 문제점은 문장을 모두 만족하지 않을 때 발생한다.
SELECT * FROM BLOG
WHERE- 결국 'WHERE' 문을 언제 넣어야 할지 상황에 따라서 동적으로 달라지는 문제가 있다.
- 를 사용하면 이런 문제를 해결할 수 있다.
<select id="findActiveBlogLike"
    resultType="Blog">
    SELECT * FROM BLOG
 <where>
 <if test="state != null">
    state = #{state}
 </if>
 <if test="title != null">
    AND title like #{title}
 </if>
 <if test="author != null and author.name != null">
    AND author_name like #{author.name}
 </if>
 </where>
</select>
⚽ < where >
- 문장이 없으면 where를 추가하지 않음. 문장이 있으면 where를 추가함.
- 만약 and가 먼저 시작된다면 and를 지운다.
⚽ foreach
<select id="selectPostIn" resultType="domain.blog.Post">
    SELECT *
    FROM POST P
            <where>
 <foreach item="item" index="index" collection="list"
    open="ID in (" separator="," close=")" nullable="true">
            #{item}
 </foreach>
 </where>
</select> -
컬렉션을 반복 처리할 때 사용한다. 'where in (1,2,3,4,5,6)'과 같은 문장을 쉽게 완성할 수 있다.
-
파라미터로 List를 전달하면 된다.
어노테이션으로 SQL 작성
@Select("select id, item_name, price, quantity from item where id=#{id}")
Optional<Item> findById(Long id);
@Insert, @Update, @Delete, @Select 기능이 제공된다.
XML 대신에 어노테이션에 SQL을 작성할 수 있다. 그런데 XML에 작성하는 것이 더 메리트 있기 때문에 잘 사용하지는 않는다.
동적 SQL이 해결되지 않으므로 간단한 경우에만 사용한다.
어노테이션으로 SQL을 작성했다면, XML에 작성된 < select ..> 쿼리는 삭제해야함.
문자열 대체(String Substitution)
-
#{} 문법을 ?를 넣고 파라미터를 바인딩하는 PreparedStatment를 사용한다. 이 경우 파라미터에 있는 값이 들어온다.
-
문자 그대로 넣고 싶은 경우 ${}를 이용하면 된다. (바인딩)
Select("select * from user where ${column} = #{value}")
User findByColumn(@Param("column") String column, @Param("value") String
        value);
${}를 사용하면 SQL 인젝션 공격을 당할 수 있다. 따라서 가급적 사용하면 안된다. 사용하더라도 매우 주의깊게 사용해야 한다.
재사용 가능한 SQL 조각
<sql id="userColumns"> ${alias}.id,${alias}.username,${alias}.password </sql> - 을 사용하면 SQL 코드를 재사용 할 수 있다.
<select id="selectUsers" resultType="map">
    select
            <include refid="userColumns"><property name="alias" value="t1"/></include>,
 <include refid="userColumns"><property name="alias" value="t2"/></include>
    from some_table t1
    cross join some_table t2
</select> - 를 통해서 을 찾아서 사용할 수 있다.
Result Maps
- 결과를 맵핑할 때 테이블은 'user_id' 이지만 객체는 'id'이다. 이 경우 컬럼명과 객체의 프로퍼티 명이 다르다. 보통 별칭 ('as')를 사용해서 해결할 수 있다.
// 별칭을 이용해서 해결
<select id="selectUsers" resultType="User">
    select
    user_id as "id",
    user_name as "userName",
    hashed_password as "hashedPassword"
    from some_table
    where id = #{id}
</select> - 별칭을 사용하지 않고도 문제를 해결할 수 있는데, 다음과 같이 'resutlMap'을 선언해서 사용하면 된다.
// Result Map 선언
<resultMap id="userResultMap" type="User">
 <id property="id" column="user_id" />
 <result property="username" column="user_name"/>
 <result property="password" column="hashed_password"/>
</resultMap>

// Result Map 사용
<select id="selectUsers" resultMap="userResultMap">
    select user_id, user_name, hashed_password
    from some_table
    where id = #{id}
</select> 