🖤 WebClient 설명
WebClient란 ?
웹으로 API를 호출하기 위해 사용되는 Http Client 모듈 중 하나.
- 여기서 말하는
HTTP 클라이언트라고 하는 것은HTTP 프로토콜을 이용하여 서버와 통신하는 것을 의미하며 다른 말로는 서버에 API 요청을 보내는 주체라고도 말할 수 있다.
WebClient는 non-blocking(비동기) 방식으로 응답을 기다리지 않고, 응답이 왔을 때 처리를 해주는 방식이다.
- 이 부분에서 RestTemplate와 차이가 난다.
- RestTemplate는 웹으로 API를 호출할 때 주로 사용하는 방법이였는데 RestTemplate는 동기 방식으로 API 요청을 하게 되면 응답을 기다리는 방식이다.
따라서 사용자가 많아지면 많아질수록 RestTemplate의 성능은 점차 떨어진다.
- 그래서 그런지 Spring에서도 웹에서 API를 호출할 때 WebClient사용을 권장한다.
👻 WebClient를 사용하기
⚽ 1. dependency 주입
implementation 'org.springframework.boot:spring-boot-starter-webflux'
⚽ 2. 인스턴스 생성
이제 WebClient를 사용할 수 있게 됐으니 인스턴스를 생성하자.
🎈 인스턴스를 생성하는 방법에는 여러가지가 있는데 가장 기본적으로 인스턴스를 생성하는 방법은 아래와 같다.
WebClient client = WebClient.create();
여기서 인스턴스를 생성할 때 해당 WebClient의 BaseUrl(기본 주소)를 설정하고 싶으면 아래와 같이 해주면 된다.
WebClient client = WebClient.create('주소');
😎 여기서 baseUrl은 외부 API의 기본 URL을 의미한다. 일반적으로 외부 API는 특정 도메인 주소와 API 엔드포인트를 가지고 있다. baseUrl에 해당 도메인 주소를 넣어주면 돼 !
- 외부 API를 호출할 때 사용한다면 대부분의 경우 Mono ??
예를 들어, 가상의 외부 API인 "https://api.example.com"이 있다고 가정해봅시다. 이 API는 다양한 엔드포인트들을 가지고 있을 수 있습니다. 이 API에 접근하기 위해서는 기본 URL인 "https://api.example.com"을 baseUrl로 설정해야 합니다.
WebClient를 사용하여 외부 API를 호출할 때, baseUrl을 설정하면 각 API 호출에 사용되는 상대적인 경로를 지정하는 데 유용합니다. 즉, uri() 메서드로 상대 경로만 지정해도 WebClient는 자동으로 baseUrl과 합쳐서 완전한 API 엔드포인트 URL을 생성하여 API에 요청을 보냅니다.
⚽ 다시 말해서, baseUrl을 설정하면 매번 uri() 메서드를 호출할 때마다 완전한 URL을 직접 입력할 필요 없이 상대 경로만 입력하여 간편하게 API를 호출할 수 있습니다.
예를 들어, baseUrl이 "https://api.example.com"으로 설정되어 있다면:
webClient.get().
  uri("/data").
  retrieve().bodyToMono(String.class)
.subscribe(...);- 위와 같이
uri()메서드에서/data만 입력해도 WebClient는 "https://api.example.com/data"로 완전한 URL을 만들어서 API를 호출합니다. - 따라서,
baseUrl은 WebClient를 사용하여 외부 API를 호출할 때, API의 기본 도메인 주소를 지정하는 중요한 설정 값입니다. 실제로 사용할 API의 기본 URL에 따라baseUrl을 설정해주어야 정상적으로 API 호출이 이루어집니다.
😀 그리고 해당 WebClient의 기본 설정들을 해주고 싶다면 아래와 같이 해준다.
WebClient client = WebClient.builder()
                .baseUrl("http://localhost:8080")
                .defaultCookie("cookieKey", "cookieValue")
                .defaultHeader(HttpHeaders.CONTENT_TYPE, MediaType.APPLICATION_JSON_VALUE)
                .defaultUriVariables(Collections.singletonMap("url", "http://localhost:8080"))
                .build();
위 내용들은 BaseUrl, Cookie, Header, UriVariable을 설정한 것.
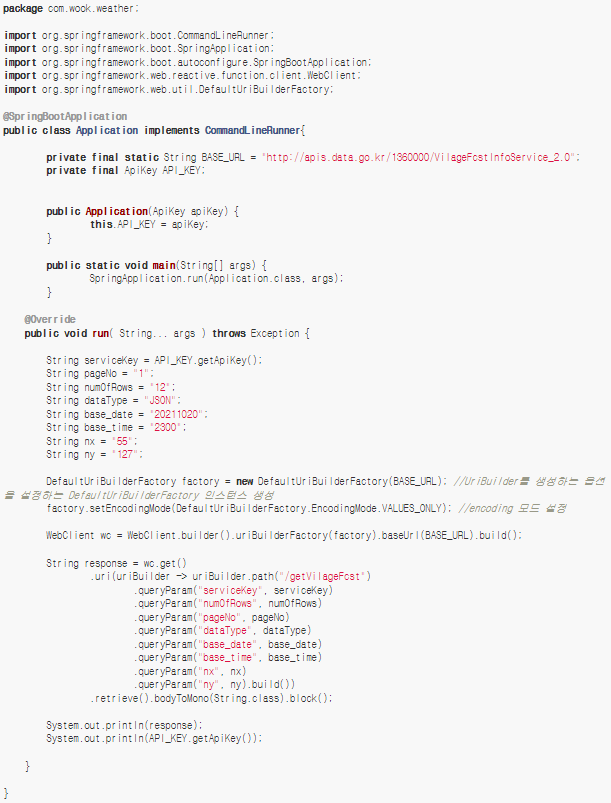
👻 API key를 보내야 한다면 (나같은 경우) 아래와 같이 만들어! (인코딩을 해야했기 때문)
DefaultUriBuilderFactory factory = new DefaultUriBuilderFactory(BASE_URL);
        factory.setEncodingMode(DefaultUriBuilderFactory.EncodingMode.VALUES_ONLY);
        WebClient client = WebClient.builder()
                .uriBuilderFactory(factory)
                .baseUrl(BASE_URL)
                .build();
이제 request 생성과 response 생성 하는 부분에 대해서 알아보자
🖤 request 생성 및 response 생성
인스턴스를 생성했으니, request와 response를 만들면 된다.
⚽ WebClient로 할 수 있는 요청은 GET, POST, PUT, DELETE이다.
- 소스코드를 보면서 이해하기
String response = client.get()
                .uri(uriBuilder -> uriBuilder.path("getVilageFcst")  //uri 생성해주는 부분
                        .queryParam("serviceKey", serviceKey)
                        .queryParam("numOfRows", numOfRows)
                        .queryParam("pageNo", pageNo)
                        .queryParam("dateType", dateType)
                        .queryParam("base_date", base_date)
                        .queryParam("base_time", base_time)
                        .queryParam("nx", nx)
                        .queryParam("ny", ny)
                        .build()
                ).retrieve()//응답을 받게 하는 부분
                .bodyToMono(String.class) //응답 받을 때 값을 하나만 받을 것이다.
                .block();  //동기식으로 응답을 받을 것이다.
(위에서 API를 사용하기 위한 인증 key를 사용하기 위해 인코딩을 해야했기 때문에 DefaultUriBuilderFactory를 통해 인스턴스 얻어낸 이후이다.) → 물론 baseUrl 역시 등록 완료된 상태.
위 소스코드는 GET요청을 할 것이기 때문에 client.get()으로 했고, 그 밑에 .uri는 이제 BaseURI 뒤에 만들어질 URI를 만든 것이다.
일단은 UriBuilder로 uri를 Build하였고, path로 해당 API 메서드의 이름을 넣어주었다.
그리고 밑에 queryParam으로는 해당 API를 호출할 조건들을 같이 넣어줬다.
그리고 쿼리를 다 넣어줬다면 build()를 해서 uri를 만들어줬다.
그런 다음에 retrieve()를 통해서 응답을 받게 했다.
그리고 여기서 이제 bodyToFlux()냐 bodyToMono()이냐 이 둘 중에 하나를 택해야 하는데, 만약 응답 받을 값이 여러개이면 bodyToFlux()를 사용하고, 응답 받을 값이 한개면 bodyToMono()를 선택해주면 된다 !
위에서 응답 받을 값이 한개이기 때문에 bodyToMono()를 했고, 응답으로 받을 Class타입은 String이기 때문에 매개변수로 String.class를 입력했다.
그리고 나는 이번 호출 땐 한번의 호출만을 사용할 것이기 때문에 .block()을 사용하였다 !!
대충 전체적인 코드는 위와 같다.
그래도 공부가 더 필요하다..!!!
Default 설정
webClient를 이용하여 코드를 작성하다 보면 하나의 메서드 안에 여러 API 요청이 수행될 수 있다 .
또한 API에 데이터를 담다 보면 API마다 공통적으로 들어가야 하는 header값이나 cookie 등의 값들이 존재할 수 있다.
😎 코드를 보면서 확인해보자.
- 코드
package com.webclient.service;

import lombok.extern.slf4j.Slf4j;
import org.springframework.http.HttpHeaders;
import org.springframework.http.MediaType;
import org.springframework.stereotype.Service;
import org.springframework.web.reactive.function.client.WebClient;
import reactor.core.publisher.Mono;

import java.util.HashMap;
import java.util.Map;

@Service
@Slf4j
public class WebClientServiceImpl {
    public void defaultValue() {
        String code = "myCode";

        // webClient 기본 설정
        WebClient webClient =
                WebClient
                        .builder()
                        .baseUrl("http://localhost:8080")
                        .build();

        // api 요청 - 1
        webClient
                .get()
                .uri(uriBuilder ->
                        uriBuilder
                                .path("/api/get")
                                .queryParam("code", code)
                                .build())
                .header(HttpHeaders.CONTENT_TYPE, MediaType.APPLICATION_JSON_VALUE)
                .cookie("cookie", "cookieValue")
                .retrieve()
                .bodyToMono(Map.class)
                .block();

        // api 요청 - 2
        webClient
                .get()
                .uri(uriBuilder ->
                        uriBuilder
                                .path("/api/get")
                                .queryParam("code", code)
                                .build())
                .header(HttpHeaders.CONTENT_TYPE, MediaType.APPLICATION_JSON_VALUE)
                .cookie("cookie", "cookieValue")
                .retrieve()
                .bodyToMono(Map.class)
                .block();
    }
}
위 코드를 보면 API마다 공통적으로 header와 cookie가 들어가기 때문에 요청할 때마다 데이터를 담아서 전달해주고 있다.
하지만 매번 요청할 때마다 데이터를 담아주는 것은 불편한 반복 작업 중 하나이고, 이를 위한 개선 방법으로 webClient를 처음 생성할 때 default 값을 담아줄 수 있다 !
@Service
@Slf4j
public class WebClientServiceImpl {
    public void defaultValue() {
        String code = "myCode";

        // webClient 기본 설정
        WebClient webClient =
                WebClient
                        .builder()
                        .baseUrl("http://localhost:8080")
                        .defaultHeader(HttpHeaders.CONTENT_TYPE, MediaType.APPLICATION_JSON_VALUE)
                        .defaultCookie("cookie", "cookieValue")
                        .build();

        // api 요청 - 1
        webClient
                .get()
                .uri(uriBuilder ->
                        uriBuilder
                                .path("/api/get")
                                .queryParam("code", code)
                                .build())
                .retrieve()
                .bodyToMono(Map.class)
                .block();

        // api 요청 - 2
        webClient
                .get()
                .uri(uriBuilder ->
                        uriBuilder
                                .path("/api/get")
                                .queryParam("code", code)
                                .build())
                .retrieve()
                .bodyToMono(Map.class)
                .block();
    }
}
⚽ Retrieve
지금까지의 코드들을 보면 get, post 요청을 한 뒤에 .retrieve()라는 코드가 들어가 있는 것을 볼 수 있다.
여기서 사용되는 retrieve는 일반적으로 webClient로 request를 서버에 전달한 응답 값을 추출하기 위해 사용된다.
retrieve()의 return 값으로는 총 3개가 있다.
- toEntity → response 자체를 얻기 위해 사용
- bodyToMono → response body 데이터를 얻기 위해 사용
- bodyToFlux → response body 데이터를 stream으로 활용하기 위해 사용
👻 현재까지는 모두 코드를 bodyToMono들이 사용되었다.
나머지도 한번 사용해보자 !
retrieve (toEntity 반환)
- Service 코드
@Service
@Slf4j
public class WebClientServiceImpl {
    public void getEntity() {
        String code = "myCode";

        // webClient 기본 설정
        WebClient webClient =
                WebClient
                        .builder()
                        .baseUrl("http://localhost:8080")
                        .build();

        // api 요청
        ResponseEntity<Map> response =
                webClient
                        .get()
                        .uri(uriBuilder ->
                                uriBuilder
                                        .path("/api/get")
                                        .queryParam("code", code)
                                        .build())
                        .retrieve()
                        .toEntity(Map.class)
                        .block();

        // 결과 확인
        log.info(response.toString());
    }
}- Test → 실제 코드에서는 Controller라고 생각 가능 ?
@SpringBootTest
class WebClientApplicationTests {

    @Autowired
    private WebClientServiceImpl webClientService;

    @Test
    void getEntity() {
        webClientService.getEntity();
    }
}- 결과
INFO 13808 --- [ Test worker] c.w.service.WebClientServiceImpl : <200,{code=myCode, message=Success},[Vary:"Origin", "Access-Control-Request-Method", "Access-Control-Request-Headers", Content-Type:"application/json", Transfer-Encoding:"chunked", Date:"Wed, 15 Mar 2023 13:48:24 GMT"]>
retrieve(bodyToFlux)
- Service 코드
@Service
@Slf4j
public class WebClientServiceImpl {
    public void getFlux() {
        String code = "myCode";

        // webClient 기본 설정
        WebClient webClient =
                WebClient
                        .builder()
                        .baseUrl("http://localhost:8080")
                        .build();

        // api 요청
        List<String> response =
                webClient
                        .get()
                        .uri(uriBuilder ->
                                uriBuilder
                                        .path("/api/get")
                                        .queryParam("code", code)
                                        .build())
                        .retrieve()
                        .bodyToFlux(Map.class)
                        .toStream()
                        .map(map -> map.toString())
                        .collect(Collectors.toList());

        // 결과 확인
        log.info(response.toString());
    }
}- Controller 부분
@SpringBootTest
class WebClientApplicationTests {

    @Autowired
    private WebClientServiceImpl webClientService;

    @Test
    void getFlux() {
        webClientService.getFlux();
    }
}- 결과
INFO 40948 --- [ Test worker] c.w.service.WebClientServiceImpl : [{code=myCode, message=Success}]
