Axios
- 브라우저, Node.js를 위한 Promise API를 활용하는 HTTP 비동기 통신 라이브러리이다.
- 아래와 같이 모든 브라우저를 지원한다.

- 자바스크립트에 내장되어 있는 fetch api와 유사한 기능을 하지만 차이점이 몇가지 존재한다.

axios 사용법
Promise를 이용한 기본 사용법
const axios = require('axios')

// ID로 사용자 요청
axios
  .get('/user?ID=12345')
  // 응답(성공)
  .then(function(response) {
    console.log(response)
  })
  // 응답(실패)
  .catch(function(error) {
    console.log(error)
  })
  // 응답(항상 실행)
  .then(function() {
    // ...
  })
async await를 이용한 사용법, 기본 사용법보다 좀 더 깔끔하다.
async function getUser() {
  try {
    const response = await axios.get('/user?ID=12345')
    console.log(response)
  } catch (error) {
    console.error(error)
  }
}
추가로 인스턴스를 하나 생성해서 axios 기본 세팅을 할 수도 있다.
const instance = axios.create({
  baseURL: 'https://some-domain.com/api/',
  headers: { 'X-Custom-Header': 'foobar' },
  timeout: 1000,
})
HTTP Methods
HTTP는 컴퓨터(클라이언트)와 서버간의 네트워크 통신을 하기 위한 규약(프로토콜) 중 하나이다. HTTP로 데이터가 서버로 전달될 때, method라는 속성을 반드시 가지게 되는데, method는 데이터를 보내는 목적을 표시해주는 역할을 한다. 같은 데이터가 전달되더라도 데이터를 전달받은 서버는 method에 따라 데이터를 다르게 처리한다.
Method의 종류는 많지만 그 중에서 GET, POST, PUT, PATCH, DELETE가 주로 쓰인다. 각각 "가져오다", "게시하다", "집어넣다", "고치다", "지우다"의 뜻을 가진다.
GET
- 서버에게 자원을 보내달라고 요청할 때 사용된다.
- GET요청 방식은 URL이 가진 정보를 검색하기 위해 서버 측에 요청하는 형태이다.
- 서버(혹은 DB)의 자원은 클라이언트로 전달만 될 뿐 변경되지 않는다.
형태
axios.get("url주소", {구성})
입력된 url에 존재하는 자원에 요청을 한다.
예제
import axios from 'axios';

axios.get('https://my-json-server.typicode.com/zofqofhtltm8015/fs/user').then((Response)=>{
    console.log(Response.data);
}).catch((Error)=>{
    console.log(Error);
})
JSON 데이터 형태로 잘 받아온 걸 확인할 수 있다.
( axios는 응답을 자동으로 JSON데이터 형식으로 변환해준다!!! )
[
  { id: 1, pw: '1234', name: 'JUST' },
  { id: 2, pw: '1234', name: 'DO' },
  { id: 3, pw: '1234', name: 'IT' }
]
POST
- 서버에게 자원을 보내면서 해당 자원을 서버(혹은 DB)에 저장해달라고 요청할 때 사용된다.
- GET으로 보낼 수 없는 자료들에 대해 전송할 때 사용된다.
-> POST를 사용하면 주소창에 쿼리스트링이 남지 않기 때문에 GET보다 안전하다. (ex 회원가입 정보 등록, 이미지 업로드 등)
형태
axios.post("url주소", {data})
POST 메서드의 두 번째 인자는 해당 url로 보낼 데이터를 설정한 객체 리터럴을 전달한다.
DELETE
- 서버에게 자원의 삭제를 요청할 때 사용된다.
- 원격지 웹 서버에 파일을 삭제하기 위해 사용되며 PUT과는 반대 개념의 메서드이다.
POST 요청 방식은 요청 URL에 폼 입력을 처리하기 위해 구성한 서버 측 스크립트(ASP, PHP, JSP 등) 혹은 CGI 프로그램으로 구성되고 Form Action과 함께 전송되는데, 이때 헤더 정보에 포함되지 않고 데이터 부분에 요청 정보가 들어가게 된다.
형태
axios.delete("url주소");
Delete 메서드는 서버에 있는 데이터베이스의 내용을 삭제하는 것을 주 목적으로 하기에 두 번째 인자를 아예 전달하지 않는다.
예제
axios.delete("/thisisExample/list/30").then(function(response){
    console.log(response);
      }).catch(function(ex){
      throw new Error(ex)
}
PUT
- 서버에게 자원을 업데이트하거나 자원이 없다면 새로운 자원을 생성해 달라고 요청할 때 사용된다. (ex 회원정보 수정 등)
POST와 유사한 전송 구조를 가지기 때문에 헤더 이외에 메시지(데이터)가 함께 전송된다. 원격지 서버에 지정한 콘텐츠를 저장하기 위해 사용되며 홈페이지 변조에 많이 악용되고 있다.
형태
axios.put("url주소", {data})
PUT 메서드의 두 번째 인자는 업데이트(수정)할 데이터를 설정한 객체 리터럴을 전달한다.
주의 사항
서버가 HTTP methods를 어떤식으로 처리할지는 전적으로 서버 프로그래머에게 달렸다. 즉 POST를 받으면 데이터를 지우고, DELETE를 받으면 데이터를 생성하는 서버를 만들 수도 있다. 이는 HTTP methods들이 시스템상의 제약으로 각각의 기능이 나누어 지는 것이 아니라, 단지 사람의 이해를 돕기 위해 구별하는 용도이기 때문이다. 실제로 많은 서버들이 GET(정보 읽기)과 POST(그 외의 모든 처리)로만 요청을 처리하기도 한다.
참고
blog.naver.com/adlguswjda
zerocho.com/category/HTTP/post/
velog.io/@zofqofhtltm8015/Axios
memostack.tistory.com/180
(GET,POST example) blog.naver.com/ks2414e
사용 예제(GET, POST, DELETE 구현)
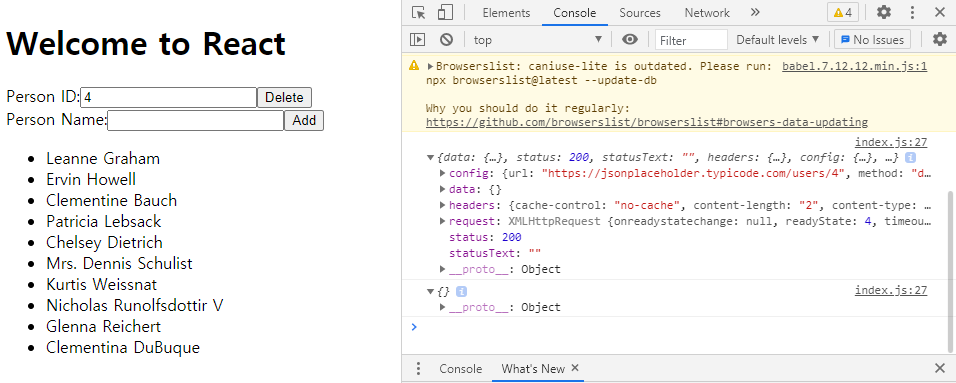
브라우저에 보이는 화면
//App.js
import React from "react";
import PersonList from "./Components/PersonList";
import PersonInput from "./Components/PersonInput";

export default class App extends React.Component{
  render(){
    return(
      <div>
        <header>
          <h1>Welcome to React</h1>
        </header>
      	<PersonInput/>
        <PersonList/>
      </div>
    )
  }
}
get을 이용해 데이터를 받아온 후, map메서드를 이용해 list를 만들었다.
//PersonList.js
import React from "react";
import axios from "axios";
export default class PersonList extends React.Component{
state={
persons: [],
};
componentDidMount(){
axios.get(`https://jsonplaceholder.typicode.com/users`)
.then(res => {
console.log(res);
this.setState({persons:res.data});
})
}
render(){
return(
<ul>{this.state.persons.map(person => <li key={person.id}>{person.name}</li>) }</ul>
)
}
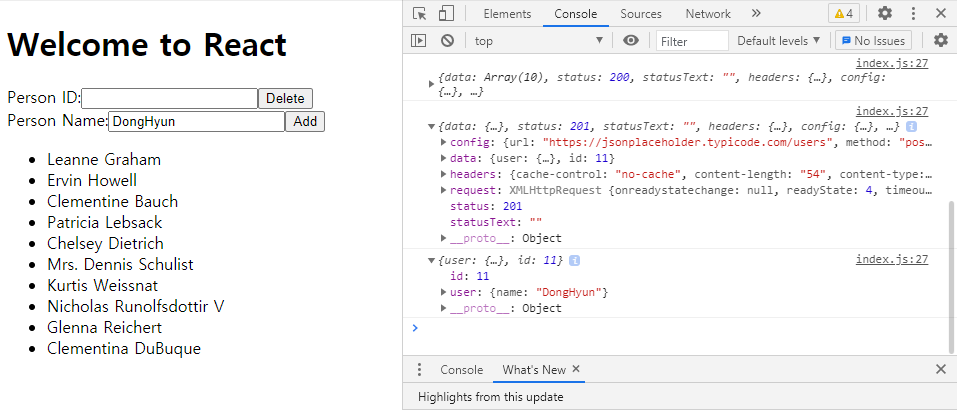
}post를 이용해 새로운 user name을 추가하였다.
//PersonInput.js
import React from "react";
import axios from "axios";

export default class PersonInput extends React.Component{
  state={
    name: '',
  };

  handleChange = event => {
    this.setState({name: event.target.value});
  }

  handleSubmit = event => {
    //submit버튼을 클릭하면 page re-load를 prevent하고 새 객체를 만든다음 axios를
    //사용하여 post기능을 실행한다
    event.preventDefault();

    const user = {
      name: this.state.name
    }

    axios.post(`https://jsonplaceholder.typicode.com/users`, {user})
    .then(res => {
      console.log(res);
      console.log(res.data);
    })
  }

  render(){
    return(
      <form onSubmit={this.handleSubmit}>
        <label>
          Person Name:
          <input type="text" name="name" onChange={this.handleChange} />
        </label>
        <button type="submit">Add</button>
      </form>
    )
  }
}
delete를 이용해 해당 id를 가지고 있는 object를 제거하였다.
//PersonDelete.js
import React from "react";
import axios from "axios";

export default class PersonInput extends React.Component{
  state={
    id: 0,
  };

  handleChange = event => {
    this.setState({id: event.target.value});
  }

  handleSubmit = event => {
    event.preventDefault();

    axios.delete(`https://jsonplaceholder.typicode.com/users/${this.state.id}`)
    .then(res => {
      console.log(res);
      console.log(res.data);
    })
  }

  render(){
    return(
      <form onSubmit={this.handleSubmit}>
        <label>
          Person ID:
          <input type="number" name="id" onChange={this.handleChange} />
        </label>
        <button type="submit">Delete</button>
      </form>
    )
  }
}
Name을 Add했을 때 해당 Name을 가진 object가 추가된 것을 볼 수 있다.
ID를 Delete했을 때 입력한 후 해당 ID를 가진 object가 제거된 것을 볼 수 있다.