-- 1. nodejs 다운로드 (v8엔진)
https://nodejs.org/ko/
- 웹을 구동하기 위해서는 서버가 있어야한다. vue나 react도 마찬가지.
- 이런 서버의 기반이 되는 것이 node.js -> 다운로드 환경을 만든다.
-- 2. node, npm 설치 버전 확인
CMD> node -v
18.12.1 => 18.14.1 => 20.12.1
- 탐색창에서 cmd를 쳐서 cmd창을 연다. 서버의 콘솔 역할.
- cmd 내부에서 복사는 ctrl+insert
- 최신 버전은 어떤 오류가 생길지 몰라... 안정버전 쓴다.
- 제일 앞의 숫자가 바뀐 버전은 아주 크게 바뀐것. 이전 버전과 호환 안될 수도..
- 왜 자꾸 업데이트 하나? 기능 보완은 다음 버전에 하겠다고 기한을 픽스한것. 이렇게 안하면 제품 발행이 무기한 연기될꺼임.
CMD> npm -v
8.19.2
- node를 깔면 npm도 같이 깔린다.
-- 2. vue, @vue/cli 설치하기
CMD> npm i vue -g
CMD> npm i @vue/cli -g
+npm을 이용해 라이브러리인 vue를 깐다.
- @ 뒤에 번호가 없으면 최신꺼를 깐다.
-- 3. 설치 확인
CMD> vue --version
@vue/cli 5.0.8
-- 4. 프로젝트 생성(프로젝트명 vue_20221219)
CMD> vue create vue_20221219
vue3 버전으로 설치
- 노트북에 깔려고 하니 자꾸 에러가 났는데 EPERM: operation not permitted
D드라이브에 nodejs를 설치했고... 그냥 이 폴더에 프로젝트 파일을 만드려고 했는데 알고보니 관리자 권한이 필요한 폴더라 폴더 생성이 안됐음. 그래서 D에서 cmd 켜서 만들었다.
-- 4. 프로젝트를 실행하기 위한 폴더 이동
CMD> cd vue_20221219
-- 서버구동
CMD npm run serve
- 서버 종료는 ctrl + c 2번
- cmd에서 볼록 잡혀 있으면 바뀐 값을 읽지 못하고 계속 돌아감. 볼록 잡지 마슈
-- 라이브러리를 다운받아서 node_modules폴더에 추가
- node_modules는 vue를 돌리기 위한 기본 라이브러리
- axios 같은 다른 라이브러리를 쓰기 위해서는 다운받아서 넣어줘야 한다.
-- 라우트 크롬의 주소에서 입력하는 주소명과 내가 만든 컴포넌트 연결
CMD> npm i vue-router@next --save
-- 벡엔드와 연동하기 위한
CMD> npm i axios --save
- node_modules 폴더가 존재하는 폴더에서 cmd창을 열어야함!
- 여기서는 vue_20221219
-
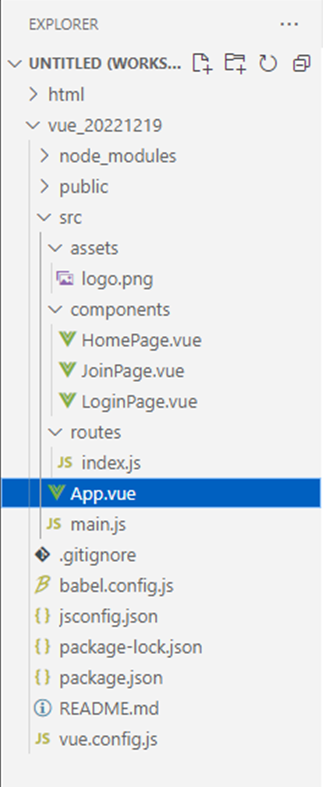
vs code 내부에서 확인했을때 우리가 주로 사용하게 되는건 src 아래의 영역들
-
src는 작업하는 영역, node_modules는 라이브러리를 다운받아서 보관해두는 영역
-
Hello World 클릭하면 익스텐션 깔지 물어보는데 깔아야지 코드가 컬러풀하게 보인다. 그러고 나서는 Hello World는 필요없으니 지워도됨...
-
좌측 인스텐션에서 vue를 치고 vs code snippets를 깔자.
-
component에서 newfile을 생성하는데 단어가 두단어는 되야하고 대문자로 시작해야한다.
-
html에서 ! 의 역할이 vbase인데 vue3을 설치했으니 vbase-을 쓰자. vb만 치면 나옴. (익스텐션에서 vs code를 깔아서 가능한것)
-
vue에서는 div, style, script만 필요하다고 보는 것
-
style language만 css로 바꿔주면 이때까지 사용했던 화면과 동일한것!
-
주소 url과 component를 매칭시키는 작업이 필요함 -> 라우터라고 한다.
-
매칭을 시키지 않으면 주소에 쳐도 안나옴.
-
처음 배우는 입장에서는 가이드라인 있으면 좋지만 제약이 많기 때문에 나중에는 별로다..
-
그래서 src에서 routes 폴더를 만들어서 직접해보자!
// 파일명 : routes/index.js
//  localhost:8080/login
//  localhost:8080/join

//  localhost:8080/#/login
//  localhost:8080/#/join
//  주소 입력시 #이 붙냐 안붙냐 두가지 방식!


// cmd에서 설치한 라이브러리를 가져와서 적용
import { createWebHistory, createRouter  } from 'vue-router';
// 내가 만든 컴포넌트 가져오기
import HomePage from '@/components/HomePage.vue';
import LoginPage from '@/components/LoginPage.vue';
import JoinPage from '@/components/JoinPage.vue';

// [{},{},{},{},{}] 배열 형태!
const routes = [
    {path :"/", component:HomePage },
  	// localhost:8080/ 치면  => HomePage 라는 component를 보여주는것
    {path :"/login", component:LoginPage },
    {path :"/join", component:JoinPage }
  	//localhost:8080/join => JoinPage
];
	// 즉 크롬에 치는 주소와 보여주고싶은 component를 매칭 시킨것.
	// 앞에가 주소, 뒤에가 component

const router = createRouter({ // 주소 체계를 어떻게 쓸까나? # 없는거로!
    history : createWebHistory(),
  	// createWebhashHistory는 #있는것
    routes : routes
});

export default router;
- 여기까지 작성해도 서버 연결 안됨. why?
폴더, 파일명 뭐로 만들지는 만드는 사람 마음... index.js로 안만들수도 있잖아!
따라서 등록을 해야한다! - 등록하는 곳은 main.js
내가 만든거니까 내가 등록해야한다!
main.js에 안들어온 라이브러리는 쓸수 없다.
// 파일명 : main.js
import { createApp } from 'vue'
import App from './App.vue'

// 내가만든 폴더의 파일 가져오기
import routes from './routes/index';

//createApp(App).mount('#app');
const app = createApp(App);
// vue에서 사용하다고 등록
app.use(routes);
app.mount('#app');- vue는 특정영역을 갈아끼우는것.
바깥에 변하지 않는 부분은 App.vue에 담기고
안이 들어가는 바뀌는 부분은 components에 존재 - 이런걸 보고 SPA :single page application 이라고 한다.
component는 부품. App에 안들어 오면 안보이는것.
public에서 index.html을 보면 div id가 app으로 설정되어있음. 그래서 app인거야..~ - 기존에 App.vue에 있는 내용은 Hello World를 띄우기 위한것. 다 지워버려~
// 파일명 : App.vue
<template>
  <div>
  	//공통으로 나오는 항목
    <router-link to='/'><button>홈으로</button></router-link>
    <router-link to='/login'><button>로그인</button></router-link>
    <router-link to='/join'><button>회원가입</button></router-link>
    <hr />
    //컴포넌트 부분을 넣어주는 역할
    <router-view></router-view>
	//여기에 footer 넣어도 교체 안됨!
  </div>
</template>

<script>
export default {
  setup () {


    return {}
  }
}
</script>

<style lang="css" scoped>

</style>- 여기까지는 개발환경을 만드는것. 개발하기 위한 기본 작업!
// 파일명 : LoginPage.vue
<template>
    <div class="container">
        {{ user }}
        // console창  없이 입력된 값 확인
        <h3>로그인</h3>
        <div>
            <label class="lbl">아이디</label>
            <input type="text" v-model="user.userid" />
            // 유저가 입력하는 값과 script의 값이 바로 연결되면 좋겠다.
            // 그대로 백엔드에 던져주면 되니까!
            // 그때 사용하는 것이 v-model
        </div>

        <div>
            <label class="lbl">암호</label>
            <input type="password" v-model="user.userpw" />
        </div>

        <div>
            <button @click="handleLogin()">로그인</button>
			// @click은 onclick과 같은것.
        </div>
    </div>
</template>

<script>
import { reactive } from 'vue';
export default {
    setup () {

        // 공통변수 영역 상수 object로 만듬, reactive
        const user = reactive({
          // ctrl+space로 엔터쳐줘야지 위에 import 라인이 자동 입력되어 활성화됨.
          // 수동으로 치면 안됨.
            userid : 'aaa',
            userpw : 'bbb'
        });
      	// script에서 변수를 만들고 return에서 template에 던지는것
      	// 그렇게 하면 template에서 자동으로 값을 읽어오게 된다.
      	// 내가 만든걸 던져줬기 때문에 굳이 다시 가져와서 user에 담는 작업을 안해도 되는거야~

        // 함수들 영역
        const handleLogin = () => {
          	// 함수 만들때 여기서는 function 못쓴다. 이걸 연습한 이유가 있었단다..
          	// 함수도 template를 쓰려면 return 되어야 함. 변수처럼.
          	// 자동으로 실행한 함수는 return 할 필요 없음. 왜지?
            console.log('handleLogin');
            if(user.userid === ''){
                alert('아이디 입력하세요.');
                return false;
            }

            if(user.userpw === ''){
                alert('암호를 입력하세요.');
                return false;
            }
            // 벡엔드 연동 위치
        };

        // 리턴 영역( 변수, 함수 등 templates에 사용하는 모든것)
        return {
            user,
            handleLogin
        };

    }
}
</script>

<style lang="css" scoped>
    .container {
        width   : 600px;
        padding : 20px;
        border  : 2px solid #cccccc;
    }

    .lbl {
        display : inline-block;
        width   : 100px;
    }
</style>
// 파일명 : JoinPage.vue
<template>
    <div class="container">
        <h3>회원 가입</h3>
        {{ user }}
        <div>
            <label class="lbl">아이디</label>
            <input type="text" v-model="user.userid"/>
        </div>
        <div>
            <label class="lbl">암호</label>
            <input type="password" v-model="user.userpw"/>
        </div>
        <div>
            <label class="lbl">암호 확인</label>
            <input type="password" v-model="user.userpw1"/>
        </div>
        <div>
            <label class="lbl">이름</label>
            <input type="text" v-model="user.username"/>
        </div>
        <div>
            <label class="lbl">나이</label>
            <input type="number" v-model="user.userage"/>
        </div>
        <div>
            <label class="lbl">이메일</label>
            <input type="text" v-model="user.useremail"/>
            <label>@</label>
            <select v-model="user.useremail1">
                <option>이메일 주소 선택</option>
                <option>google.com</option>
                <option>naver.com</option>
                <option>daum.net</option>
            </select>
        </div>
        <div>
            <button @click="handleJoin()">회원 가입</button>
        </div>
    </div>
</template>

<script>
import { reactive } from 'vue';

export default {
    setup () {

        // 상태변수
        const user = reactive({
            userid   : '',
            userpw   : '',
            userpw1  : '',
            username : '',
            userage : '',
            useremail: '',
            useremail1 : '이메일 주소 선택'
        });
      	// 유효성 체크시 변수 찾는걸(getElement...) 하지 않고 그대로 쓰는게 다름.
      	// + 로 데이터를 넣어주는 행위도 할 필요 없음!
      	// 중심은 script에 있는 reactive 변수. 화면과 script를 연결한다.
      	// 상태변수(reactive)에 데이터를 담아서 화면을 갱신한다는것이 front-end에서 가장 중요.
		// html은 script에서 바로 화면을 바꾼건데.. 이렇게 만들면 프레임워크를 쓰는 이유가 없다.
      	// 변수를 reactive 형태로 만들어 두고 v-model로 연결하는게 핵심..!


        // 함수들
        const handleJoin = () => {
            if(user.userid === '') {
                alert('아이디를 입력하세요.')
                return false;
            }
            if(user.userpw === '') {
                alert('암호를 입력하세요.')
                return false;
            }
            if(user.userpw1 === '') {
                alert('암호를 다시 입력하세요.')
                return false;
            }
            if(user.userpw !== user.userpw1) {
                alert('암호를 확인 하세요.')
                return false;
            }
            if(user.username === '') {
                alert('이름를 입력하세요.')
                return false;
            }
            if(user.userage === '') {
                alert('나이를 입력하세요.')
                return false;
            }
            if(user.useremail === '') {
                alert('이메일을 입력하세요.')
                return false;
            }
            if(user.useremail1 === '이메일 주소 선택') {
                alert('이메일 주소를 입력하세요.')
                return false;
            }
            // 유효성 성공하면 백엔드 연동
        }

        // 템플릿에서 사용하기 위한 리턴(변수, 함수 등..)
        return {
            user,
            handleJoin
        }
    }
}
</script>

<style lang="css" scoped>
    .container {
        width   : 600px;
        padding : 20px;
        border  : 2px solid #ffd7d7;
        margin  : 0px auto;
    }
    .lbl {
        display: inline-block;
        width: 100px;
    }
</style>
// 파일명 : BoardPage.vue
<template>
    <div>
        <table border="1">
            <thead>
                <tr>
                    <th>번호</th>
                    <th>제목</th>
                    <th>작성자</th>
                    <th>조회수</th>
                    <th>날짜</th>
                </tr>
            </thead>
            <tbody>
                <tr v-for="tmp of board.rows" :key="tmp">
                    <td>{{ tmp._id }}</td>
                    <td>{{ tmp.title }}</td>
                    <td>{{ tmp.writer }}</td>
                    <td>{{ tmp.hit }}</td>
                    <td>{{ tmp.regdate }}</td>
                </tr>
            </tbody>
        </table>
    </div>
</template>

<script>
import { reactive, onMounted } from 'vue';
import axios from 'axios';

export default {
    setup () {

        // 상태 변수
        // 목록 => [{},{}...{}]
        const board = reactive({
            rows : [
                {_id:1, title:'a', writer:'b', hit:1, regdate:'2022'},
                {_id:2, title:'a', writer:'b', hit:1, regdate:'2022'},
                {_id:3, title:'a', writer:'b', hit:1, regdate:'2022'},
            ]
        });

        const handleData = async() => {
            const url      = `http://1.234.5.158:23000/board101/select.json?page=1&text=`;
            const headers  = {"Content-Type":"application/json"};
            const { data } = await axios.get(url, {headers});
            console.log(data);

            // 정상적인 데이터인지 확인
            if(data.status === 200){
                // 테이블을 그리기 위한 상태변수에 값을 추가!!
                board.rows = data.rows;
            }
        }

        // 페이지가 로딩될때 자동 실행되는 함수
        onMounted(() => {
            handleData(); //벡엔드에서 게시판 목록 받아오기
        });

        return {
            board
        };
    }
}
</script>

<style lang="css" scoped>

</style>-
component를 만들면 routes에 뭔가 적용되야 한다!
색깔이 연하거니 밑에... 붙어있다는건 없다는 뜻. -
component 만들고->routes에 index.js에서 import하고 path추가하고 app에 버튼 만들기!
-
git ignore에 node 선택! node 빼고 올리는것 why? 양이 너무 많기도 하고 저작권상..? 올리면 안됨!
-
복원은? node_modules 필요한 곳(vue_20221219)에서 cmd 들어감-> npm install->npm run serve
-
package-lock이랑 package는 내가 뭘 설치 했는지 실시간으로 기록하는 라이브러리... 이게 있는 위치에서 npm install치면 여기에 있는 내용 읽어서 복원하는것
그밖에
- onMounted한 함수는 return 하지 않아도 되는 이유?

참고)v-model동작원리 : https://joshua1988.github.io/web-development/vuejs/v-model-usage/