앞서..우리는?
알지는 못하겠지만 회원가입과 로그인 entity 관계등을 만들고 레포지토리를 만들고
하였습니다. 간단하게 넘어갈 파트가 아니기 때문에 심화과정으로 jwt security를
적용하는 방법과 어떻게 작동하는지 security가 어떻게 작동하는지 대해서
제가 이해한 느낌으로 풀어볼 생각입니다.
회원가입과 로그인시 움직이는 과정
첫째
- 우리가 처음 배우기로는 클라이언트 측에서 request 요청을 하게되면
cotroller로 주소 값에 맞게 들어와서 진행이 된다고 배웠습니다.
여기서 우리는 다른 부분을 하나 알아야합니다.
처음이 cotroller에서 시작해서 service -> repository로 가는 과정은 맞습니다만
security가 의존성이 주입이 되어 있는 상황에서 약간 다릅니다. 그리고 우리는
aop 를 통해 validate 체크를 하고 전역에서 controll도 해주기 때문에 이런 과정을
알아보도록 하겠습니다.
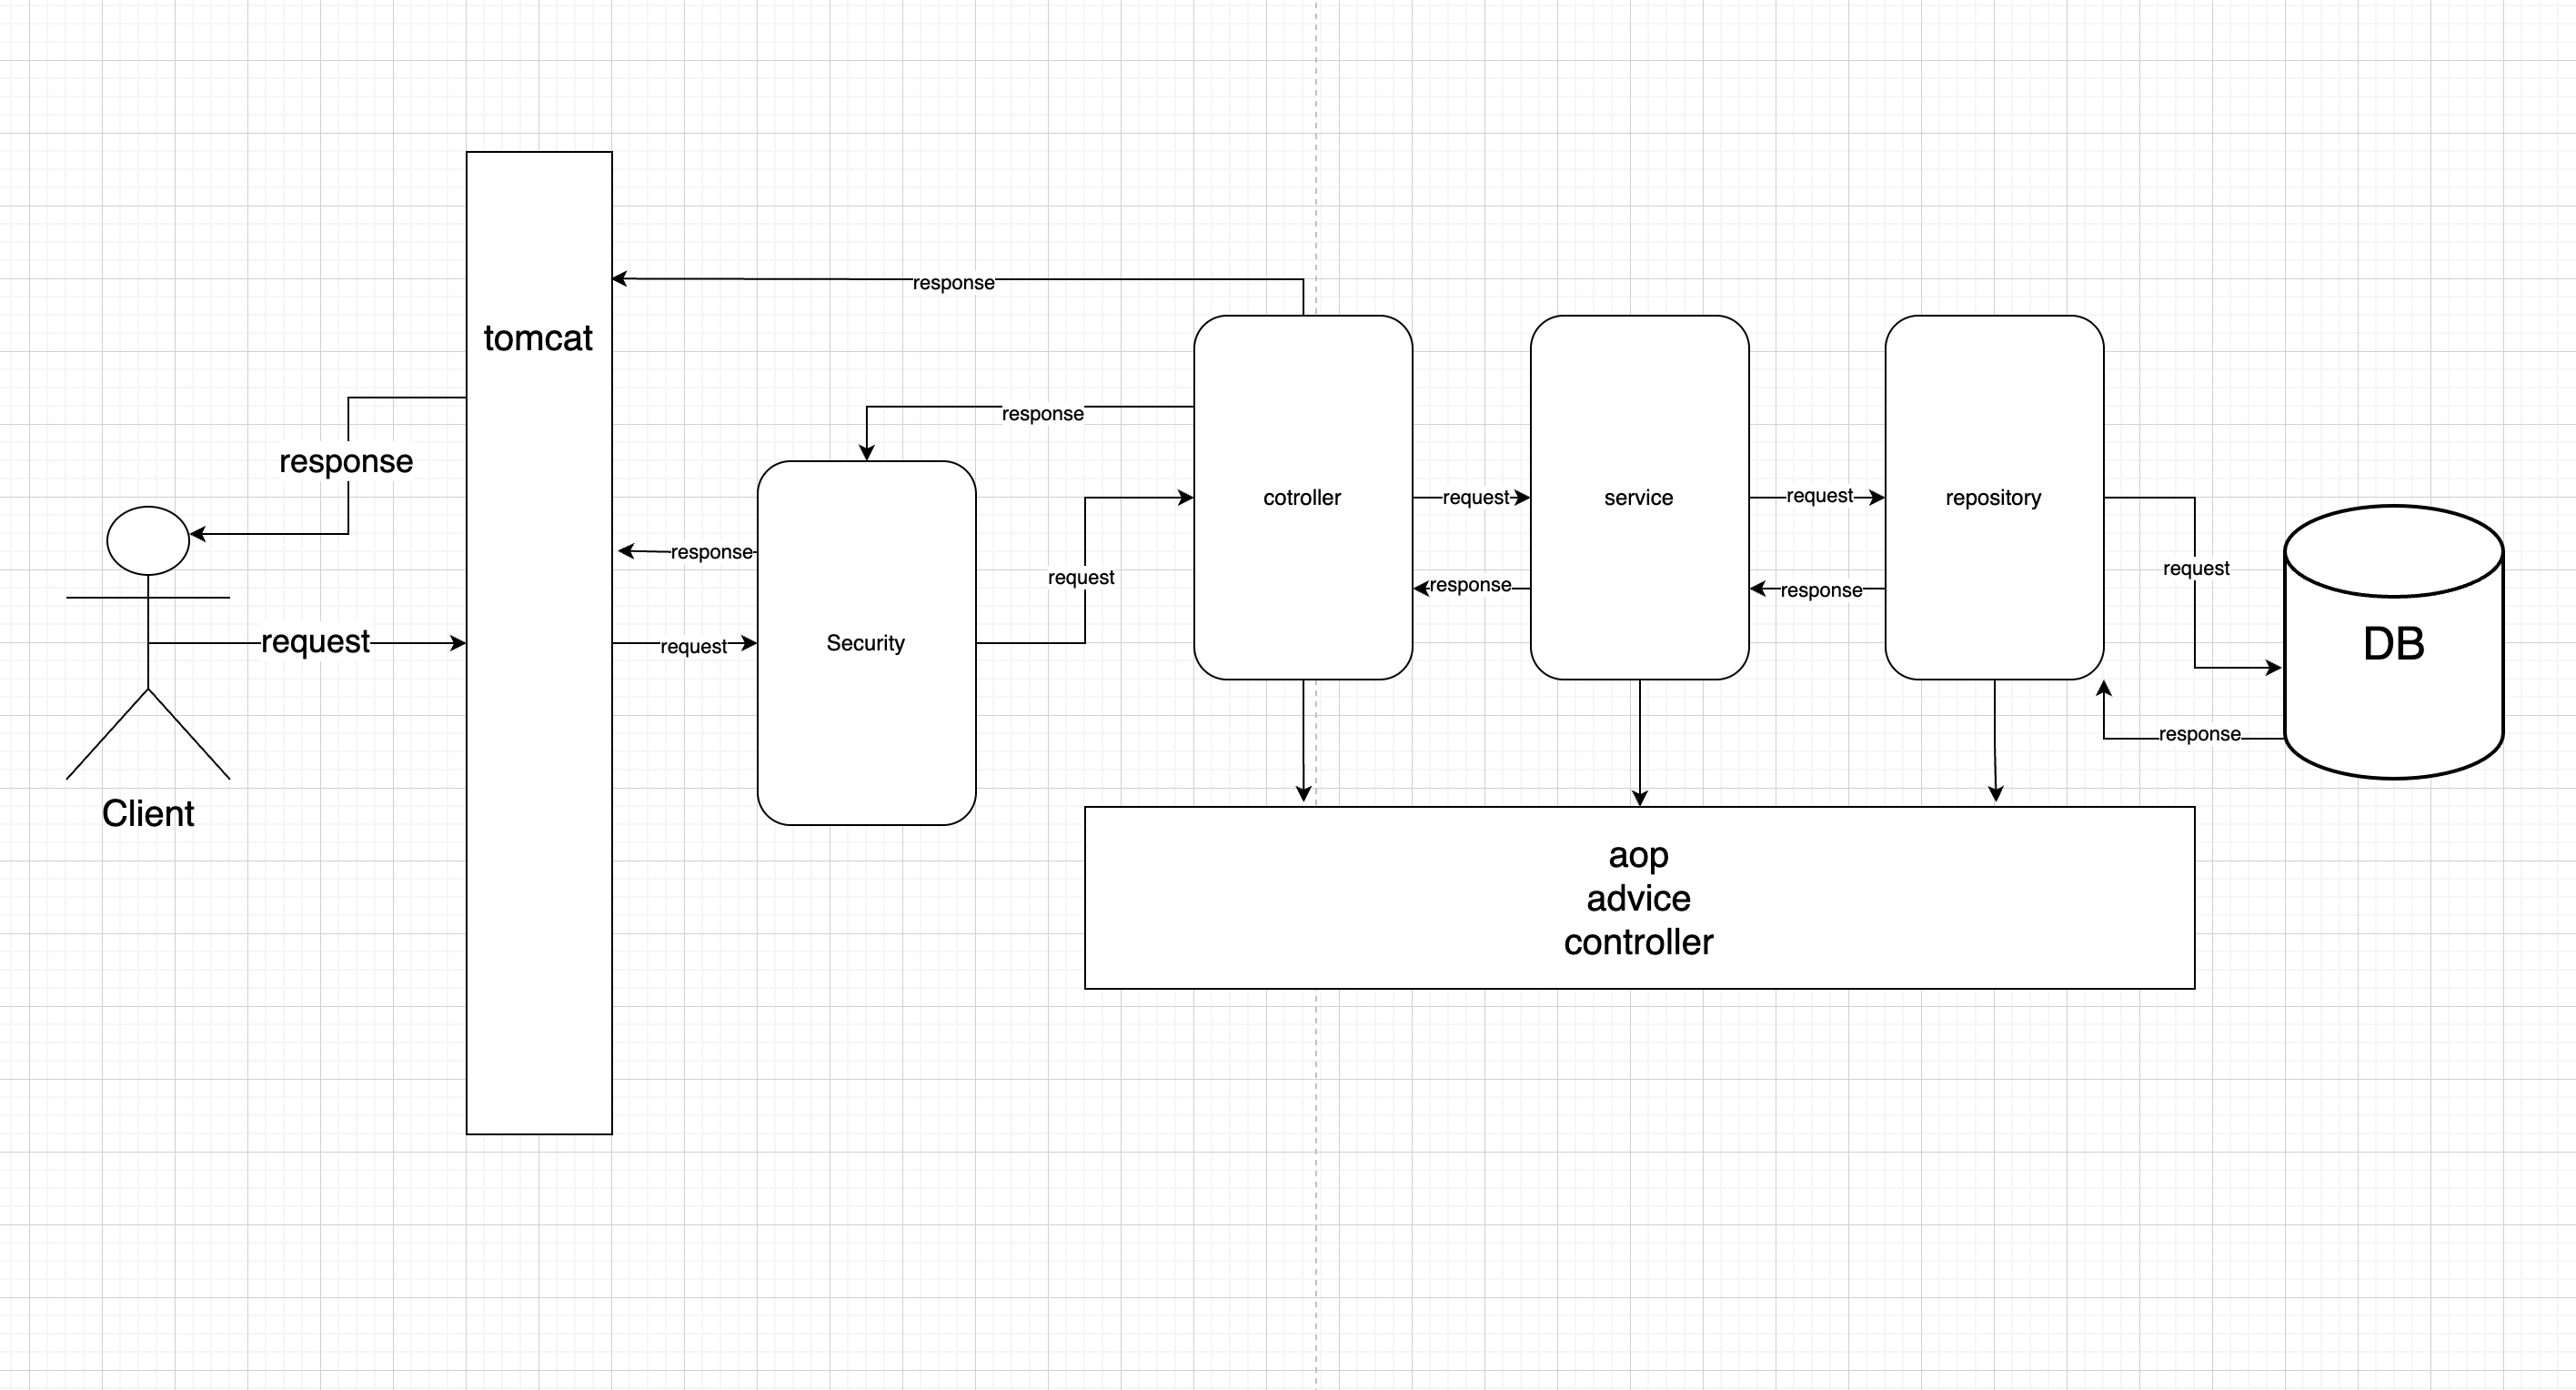
해당 그림에서 알 수 있는 것은
- 통신은 클라이언트에서 서버로 서버안에서도 단방향으로 통신을 합니다.
- 톰캣이라는 was를 통과하고나서 security를 거쳐서 controller로 들어오게 됩니다.
- request가 들어온 방향 그대로 다시 response가 반대로 나가게 됩니다.
그 중간에 aop advice controller가 exception을 catch 하면 모든 부분에서 관여를
하게되며 무조건 aop 에서 거쳐서 나가게 됩니다. 동시에 필요한 작업들을 모아 두었다고 생각하면
될 것같습니다.
여기서 우리가 주목할 부분은 security 부분일 것같습니다 로그인과 권한관련 작업들을 하기위해
security 설정을 해줄 것입니다.
security 설정
security는 전역으로 설정되어질 config와 custom을 해서 쓸 부분들로 나누어지게 됩니다.
security config
@EnableWebSecurity
@Configuration
@RequiredArgsConstructor
public class SecurityConfig extends WebSecurityConfigurerAdapter {

    private final JwtTokenProvider jwtTokenProvider;
    private final JwtAuthenticationEntryPoint jwtAuthenticationEntryPoint;

    @Bean
    public BCryptPasswordEncoder passwordEncoder() {
        return new BCryptPasswordEncoder();
    }

    @Override
    protected void configure(HttpSecurity http) throws Exception {
        http.cors();
        http.csrf().disable();
        http.httpBasic().disable();
        http.formLogin().disable();

        http.sessionManagement().sessionCreationPolicy(SessionCreationPolicy.STATELESS);

        http.authorizeRequests()
                .antMatchers("/auth/**") // 해당 주소로 요청이 온다면
                .permitAll() // 모두 통과시켜라
                .antMatchers("/admin/**") // 해당 주소로 요청이 온다면
                .hasRole("ADMIN") // ROLE 에대해 검사를 하는데 ADMIN인지 확인해라
                .anyRequest() // 다른 어떤 요청이 온다면
                .authenticated() // 권한 검사를 해라
                .and() // 그리고
                .addFilterBefore(new JwtAuthenticationFilter(jwtTokenProvider), UsernamePasswordAuthenticationFilter.class) // 필터를 더하기 전에 해당 매개변수의 필터들을 설정한다.
                .exceptionHandling() // exception에 대한 관리를 하는데
                .authenticationEntryPoint(jwtAuthenticationEntryPoint); // 인증관련 entry point 설정

    }
}
- 여기서 http통신에 대한 security 설정이 들어갑니다.
jwt토큰을 이용해서 로그인을 할 예정이고 비밀번호 암호화를 할 예정입니다.
- 암호화를 위해 BCryptPasswordEncoder를 Bean 객체로 등록을 해줍니다.
- http.cors : cors 를 방지하기 위해서 씁니다.
- http.csrf.disable() : csrf 를 쓰지 않기위해 씁니다.
- http.httpBasic.disable() : 기본으로 주어지는 http기본 로그인 방식을 사용하지 않습니다.
- http.formLogin().disable() : formLogin 방식을 사용하지 않습니다.
- http.sessionManagement().sessionCreationPolicy(SessionCreationPolicy.STATELESS) : 세션을 사용하지 않기 위해 선언합니다.

백엔드 개발자 준비중