바퀴달린 개발자 스터디 2주차!
1주차에는 웹서비스 아키텍처에 대해서 공부해보았고 이제 하나하나 깊게 들어가고자 한다.
그래서 이번 주제는 웹 서버 nginx에 대해 알아보고 nginx 설정을 통해서 웹서버가 어떤 기능을 할 수 있는지 알아보고자 한다.
nginx
- 동시 접속 처리에 특화된 웹 서버 프로그램
- Apache 보다 동작이 단순하고, 전달자 역할만 한다.
- 동시접속자가 약 700명 이상이면 nginx환경을 권장한다.
- 아파지는 MPM(Multi Processing Module)방식을 사용하는 반면, nginx는 Event-Driven 방식을 통해 구동된다. 이는, 메모리를 좀 더 효율적으로 가져올 수 있도록 운용된다.
💡 Event-Driven Programming
비동기 프로그래밍
💡 MultiProcessing Module
nginx의 역할
1. 정적 파일을 처리하는 HTTP 서버로서의 역할
2. 응용프로그램 서버에 요청을 보내는 리버스 프록시로서의 역할
💡 리버스 프록시(Reverse Proxy)
클라이언트는 가짜 서버에 request하면 프록시 서버(nginx)가 리버스 서버(응용프로그램 서버)로부터 데이터를 가져온다.
nginx 설치하기 (MAC)
설치
brew install nginx테스트
brew services start nginxnginx를 통해 할 수 있는 기능들
- 최대 접속자수 설정
- 페이지에 오류가 나면 오류 페이지로 return
- http keepalive 설정
- 특정 Url로 호출시 특정 페이지로 리턴
- 파일 업로드 용량 설정
nginx 디렉토리 구조
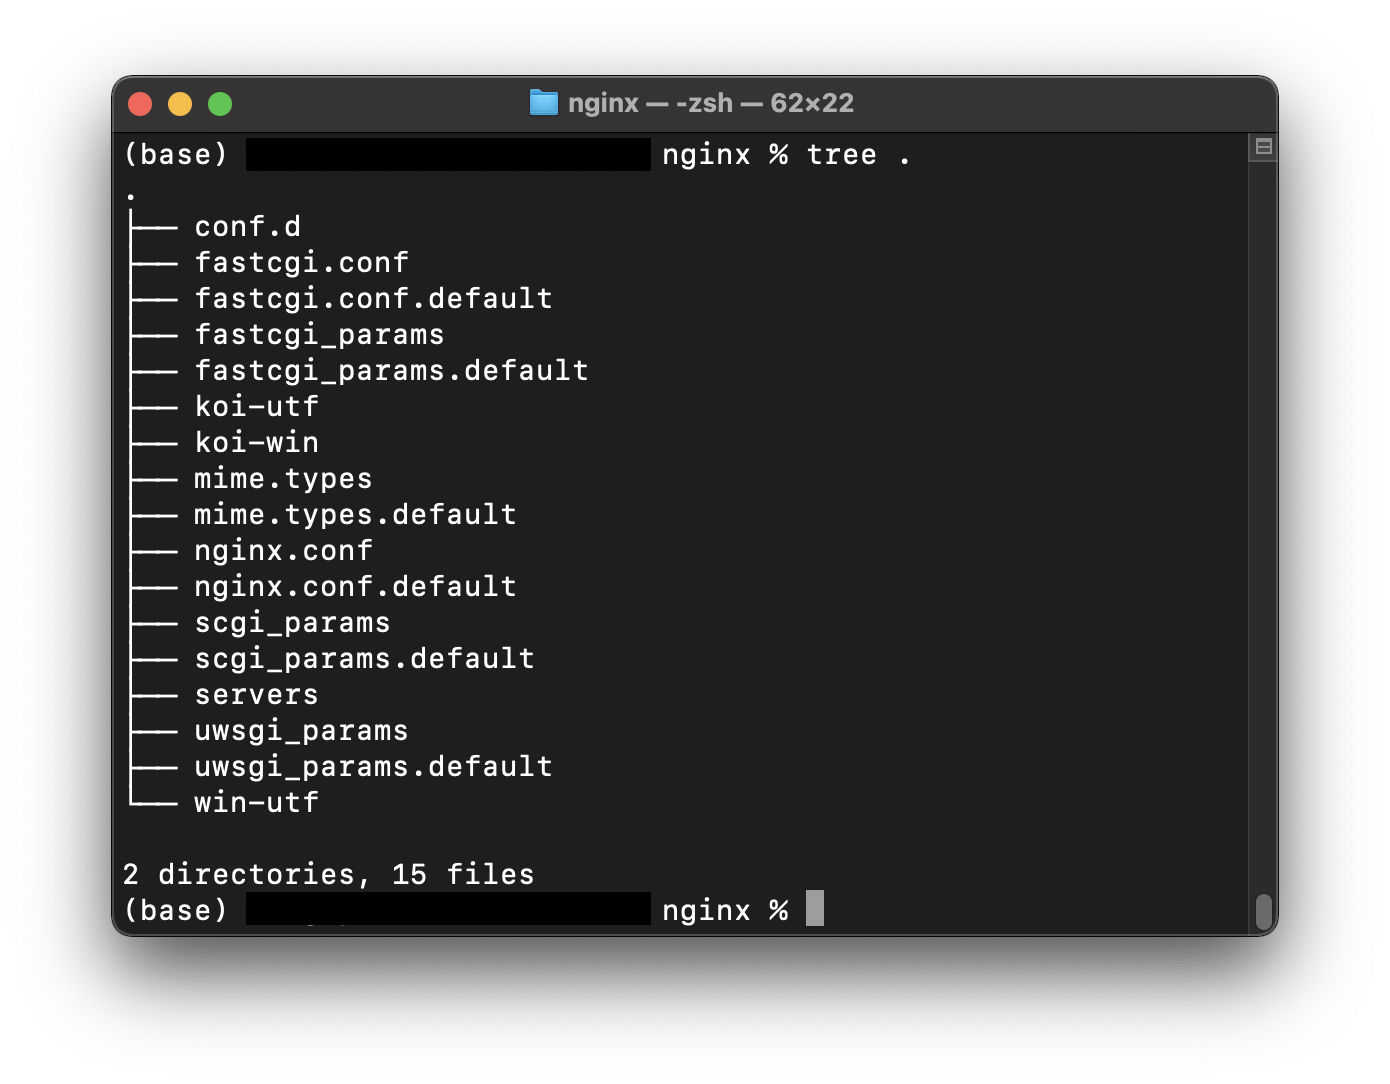
아래 두 개를 눈여겨 보자
nginx.conf
- nginx의 설정이 들어가는 핵심 파일.
conf.d
- nginx.conf에서 불러들일 수 있는 파일을 저장
nginx.conf 뜯어보기
NGINX 설정 파일 공식 문서
https://www.nginx.com/resources/wiki/start/topics/examples/full/#nginx-conf
- nginx가 동작해야할 방식을 설정 값을 통해 지정한다.
- 이 파일은 root 계정만 수정이 가능함.
sudo vi nginx.conf
user nginx;
worker_processes 2;
worker_priority 0;

# 로그레벨 [ debug | info | notice | warn | error | crit ]
error_log /var/log/nginx/error.log error;
pid /var/run/nginx.pid;

events {
}

http {
	server {
    	location {
        }
    }
}
구성
- Core 모듈
- http 블록
- server 블록
- location 블록
- events 블록
server 블록
- 하나의 웹 사이트를 선언하는 데 사용된다.
- 가상 호스팅의 역할을 한다.
💡 가상 호스트
하나의 서버에서 여러 개의 사이트를 띄우는 방법
http {
  server {
	listen 80;
    server_name example.com www.example.com
  	location / {
    	root html;
        index index.html
    }
  }

  server {
  	listen 443;
    server_name example.com www.example.com

   	location / {
    	root html;
        index index2.html;
    }
  }

  server {
  	listen 8080;
    server_name localhost;
    error_page  404              /404.html;
  }
}
listen
- 이 웹사이트가 바라보는 포트
server_name
- 클라이언트가 접속하는 서버. 이것과 실제 들어온 request header에 명시된 값이 일치하는지 확인해서 분기한다.
error_page
- 해당 오류 코드가 발생했을 때 에러페이지를 리턴한다.
example.com:80 으로 요청이 들어왔으면 index.html 페이지를 보여주고
example.com:443 으로 요청이 들어왔으면 index2.html 페이지를 보여준다.
ssl 설치
server {
  listen 443; (1.15 버젼 부터는 listen 443 ssl; 형식으로 변경됨)
  ssl on; (1.15 버젼 부터는 옵션 지원 종료)
  server_name www.sslcert.co.kr; (지정한 서버인증서에 포함(지원)된 도메인)
  ssl_certificate_key /파일경로/sslcert.co.kr_xxxxx.key.pem; (개인키 파일 지정)
  ssl_certificate /파일경로/sslcert.co.kr_xxxxx.ca-bundle.pem; (서버인증서+체인+루트 통합 unified 파일 지정)
  ssl_protocols TLSv1.2; (서버 환경에 따라 선택적 적용)

  location /
  	root path
  }
}
https://www.sslcert.co.kr/guides/NGINX-SSL-Certificate-Install
location 블록
- 특정 URL을 처리한다.
- 이 때, static content를 연동할 수 있다.
- reverse proxy 설정을 할 수 있다.
static content 연동
server {
	location / {
    	root /html;
        index index.html
    }

    location /test {
    	root /html;
        index test.html
    }

    location ~ \/(gif|jpg|pnt) {
    	root /data/images;
    }
}- root 는 해당 index 파일의 경로를 말한다.
- 만약 아무 파일도 없다면 404 리턴
proxy 설정
{
	server {
    	location / {
        	proxy_pass http://localhost:8081;
        }
    }
}- 해당 기능을 통해서 WAS와의 연동이 가능하다.
http 블록
- 웹서버에 대한 동작을 설정하는 영역
http {
	include       mime.types;
    default_type  application/octet-stream;

    log_format  main  '$remote_addr - $remote_user [$time_local] "$request" '
                      '$status $body_bytes_sent "$http_referer" '
                      '"$http_user_agent" "$http_x_forwarded_for"';

	log_format test '[$time_local] - $remote_addr | '
                    '$http_x_forwarded_for - "$request" '
                    '$status $body_bytes_sent "$http_referer" '
                    '"$http_user_agent"'; # 필요에따라 수정해서 사용

    access_log  logs/access.log  main;
    access_log  logs/access_test.log  test;
    error_log   logs/error.log  crit;

    sendfile        on;
    #tcp_nopush     on;

    #keepalive_timeout  0;
    keepalive_timeout  65;

	server_tokens off;
    #gzip  on;
}
include
- nginx에게 웹사이트 configuration 파일이 어디에 위치해 있는지를 알려준다.
keepalive_timeout
- 접속 커넥션 유지 시간
server_token
- nginx의 버전을 숨길것인가에 대한 옵션
access_log
- access log를 access.log 파일 저장. main은 로그 포맷
// access_test.log
[21/Feb/2021:02:54:45 +0000] - *.*.*.* | *.*.*.* - "GET / HTTP/1.1" 200 6180 "-" "Mozilla/5.0 (Windows NT 10.0; Win64; x64) AppleWebKit/537.36 (KHTML, like Gecko) Chrome/88.0.4324.182 Safari/537.36"
error_log
- error log를 error.log 파일 저장. crit 는 에러 레벨을 설정할 수 있음.
events 블록
- 주로 네트워크 동작에 관련된 설정하는 영역으로, 이벤트 모듈을 사용한다.
events {
	worker_connections 1024;
    # multi_accept on;
}
worker_connections
- 하나의 프로세스가 처리할 수 잇는 커넥션의 수
- 최대 접속자수 = worker_processes X worker_connections
multi_accept
- 한 번에 모든 요청을
Core 모듈
- 환경 설정 파일의 최상단에 위치하며 한 번만 사용할 수 있다. nginx의 기본적인 동작 방식을 정의한다.
user nginx;
worker_processes 1;
error_log /var/log/nginx/error.log warn;
pid /var/run/nginx.pid
user
- NGINX 프로세스가 실행되는 권한
- nginx는 마스터와 워커 프로셋로 나뉘는데 이때, 워커 프로세스가 실질적인 웹서버 역할을 수행한다.
- 이때,
user지시어는 워커 프로세스의 권한을 지정한다. - 워커 프로세스를 악의적 사용자가 제어하면 해당 머신을 최고 사용자의 권한으로 원격 제어하는 것이기 때문에 위험하다.
work_process
- NGINX 프로세스 실행 가능 수
- 워커 프로세스, 실질적인 역할을 한다.
pid
- NGINX 마스터 프로세스 ID 정보가 저장된다.
설정 파일 반영
sudo service nginx reload
참고
https://velog.io/@davelee/mac에-nginx-설치하기
https://whatisthenext.tistory.com/123
https://prohannah.tistory.com/136
다음 시간엔..
- 고성능 nginx를 위한 튜닝
- was 설정

감사합니다.