Django Class-Based Views
- Introduction to class-based views(CBV's)
- Focus Topic: TemplateView
- django coverage / process
- What are class-based views?
- Django Generic views
- TemplateView()
What are class-based views?(CBV's)
- views: take in request, return response
- Class-based views(implement view as Python object)
- Don't replace function-based views
- Benefits:
- Promote code reuse - inheritance
- Mixins
- DRY(Dont repeat yourself) - help reduce code duplication
- Code structuring
- Difficulties/Challenges
- Level of abstraction - (the magic)
Django Class-Based Views
- Django provides example views classes
- Built in /Pre-written views -(generic views)
- Accessed via:
- from django.vews.generic
TemplateView()
- When you might use Template.View()?
- Generic view to show static pages
- Pages that use GET requests
- Not genarlly used:
- Show a form on a pages
- Create/updates infomation(better options)
Using directly within URL Configuration
- TemplateView()
- Pass changes to class-based view as_view()
- Arguments passed to as_view() will override attributes set on the class.
- Example:
- We set template_name on the TemplateView
project directory structure
- cbv
- migrations/
- templates/
- ex1.html
- ex2.html
- __init__.py
- admin.py
- apps.py
- models.py
- tests.py
- urls.py
- viewss.py
- core
- venv
- db.sqlite3
- manage.py
# cbv/urls.py
from django.urls import path
from django.views.generic import TemplateView

app_name = 'website'

urlpatterns = [
    path('ex1', TemplateView.as_view(template_name='ex1.html', extra_context={'title':'Custom Title'})),

]
TemplateView는 generic에서 이미 작성된 View에요. 그대로 끌어당겨 쓰기만 하면 된다는 이점이 있어요.
as_view()안에 인자 값을 둬서 override 할 수 있는 응용도 가능해요.
보는것 처럼 template_name='ex1.html' 값을 설정하면 현재 앱의 templates 디렉토리에서 ex1.html 파일과 연결 되요.
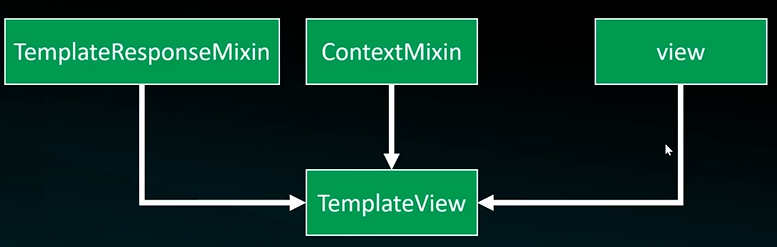
django.views.generic.base.TemplateResponseMixin
django.views.generic.base.ContextMixin
django.views.generic.base.View
단순히 simple request를 templateview를 통해 받고 이후 response를 돌려준다는게 포인트(url or context)에요.
# cbv/urls.py
from django.urls import path
from django.views.generic import TemplateView
from cbv.views import Ex2View

app_name = 'website'

urlpatterns = [
    path('ex1', TemplateView.as_view(template_name='ex1.html', extra_context={'title':'Custom Title'})), # 해당 템플릿의 title 키가 전달되고 출력시 Custom Title 값이 출력되요.
    path('ex2', Ex2View.as_view(), name='ex2'),
]
# cbv/views.py
from django.views.generic.base import TemplateView # 3개의 객체(TemplateResponseMixin, ContextMixin, View)를 상속 받고 있음
from cbv.models import Post
class Ex2View(TemplateView):
"""
TemplateResponseMixin
Provides a mechanism to construct a
[-]# cbv/models.py
from django.db import models
class Post(models.Model):
name = models.CharField(max_length=100)# templates/ex1.html
//Homepage
<hr/>
{{title}}위 ex1.html의 context는 cbv/urls.py에 정의된 extra_context={'title':'Custom Title'}를 통해 전달되었는데요. ex1.html 화면에서는 title의 value값인 ustom Title이 출력되요.
# templates/ex2.html
//Example 2 - TemplateView within view.py
<hr />
{{data}}
<hr />
{{posts.name}}
views.py 파일의 get_context_data 메소드 안에서 정의한 context의 post, data key-value가 ex2.html에 전달되고 결과적으로 출력되요.

어제보다 오늘 그리고 오늘 보다 내일...