리액트는 컴포넌트 기반의 라이브러리입니다. 그래서 컴포넌트가 페이지에 렌더링되기 전인 준비 과정부터 페이지에서 사라질 때 까지의 생명주기가 존재합니다.이 라이프 사이클은 크게 3단계로 Mount, Update, Unmount 나눠볼 수 있는데요. 각각은 컴포넌트의 생성, 업데이트, 제거되는 과정을 나타냅니다.
리액트 컴포넌트의 라이프사이클 메서드들은 특정 시점에서 호출되고, 이를 통해 컴포넌트의 상태관리 및 외부 리소스와 상호 작용을 할 수 있습니다.
(리액트 17에서 deprecated된 componentWillMount, componentWillUpdate, componentWillReceiveProps는 제외합니다.)
라이프사이클
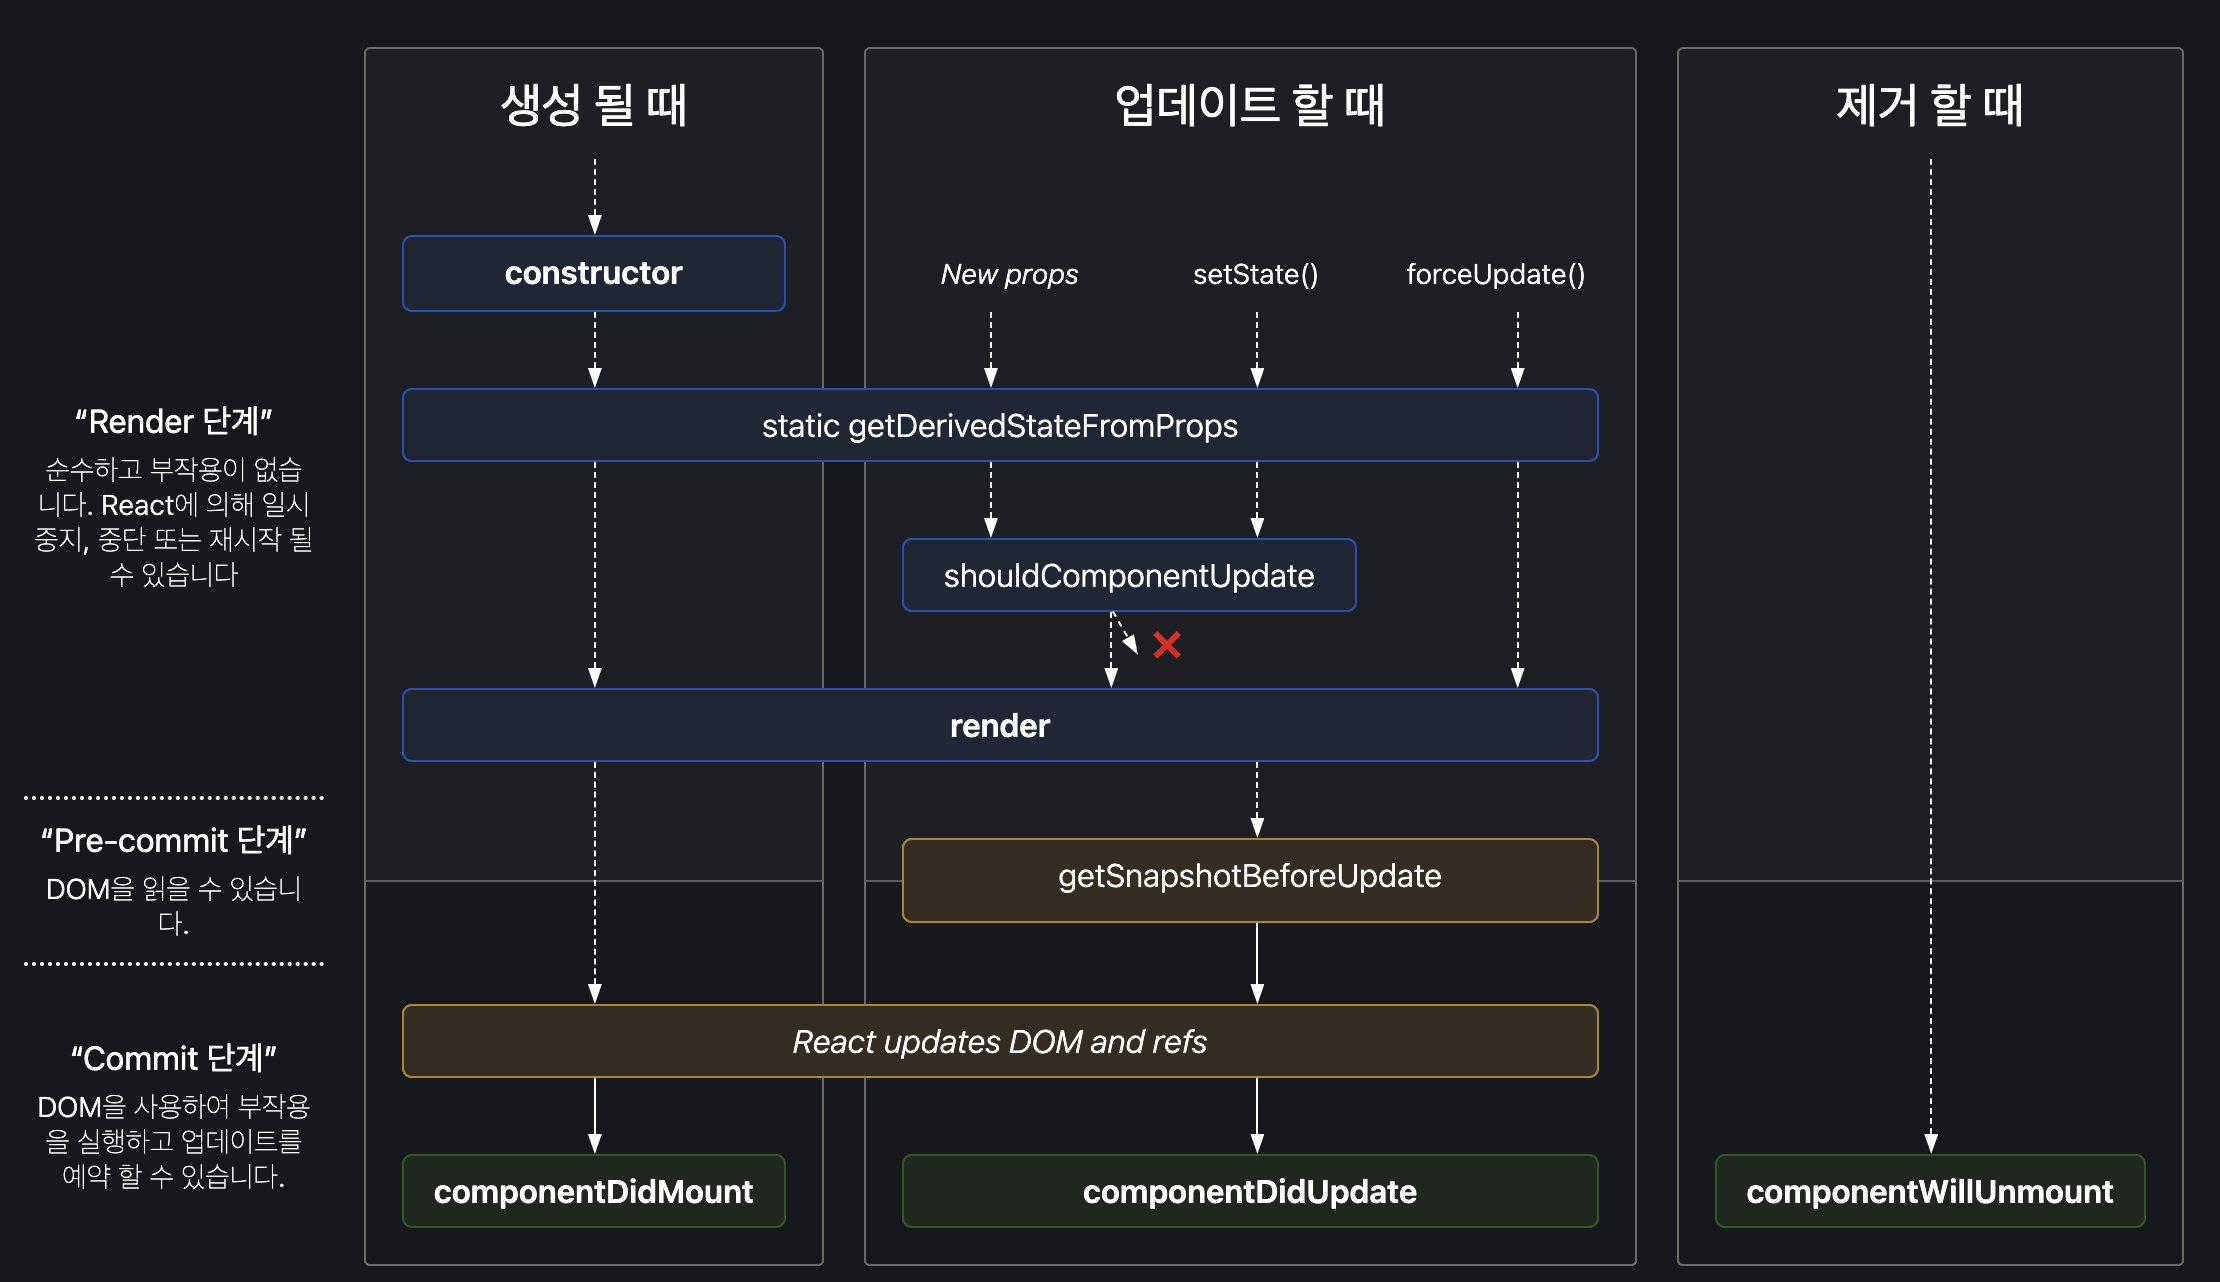
앞서 언급했던 것과 같이 라이프사이클은 크게 3가지 유형으로 나눌 수 있습니다. 생성될 때, 업데이트될 때, 제거될 때
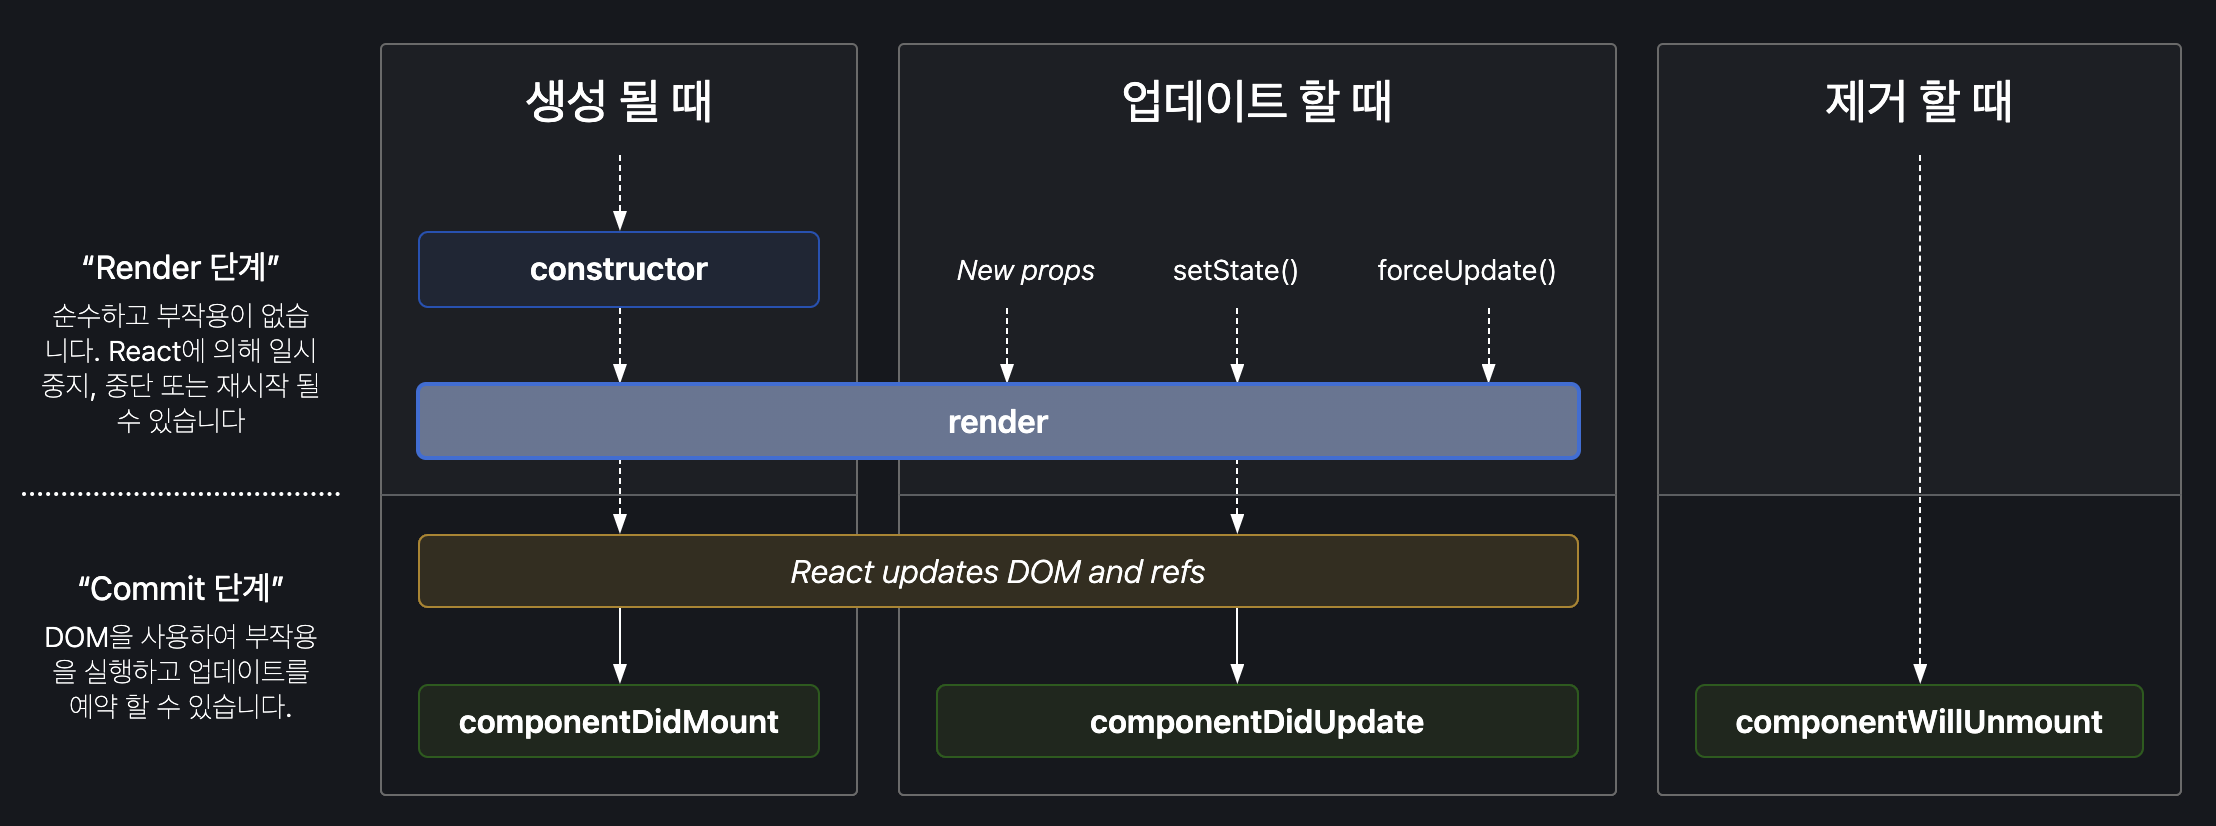
아래는 함수형 라이프사이클 방식입니다. 함수형 방식은 안됐었지만 React 16.8 Hooks 업데이트되면서 라이프사이클을 다룰 수 있게 되었습니다.
라이프사이클 메서드
1. Mount (생성)
마운트는 컴포넌트가 DOM에 삽입되는 과정입니다. 이 단계에서는 constructor와 componentDidMount 두 가지 메서드가 이용됩니다.
1-1. Constuctor(클래스 생성자)
constructor는 컴포넌트 생성 시 호출되며, 초기 상태 설정 및 바인딩을 처리하는 데 이용됩니다.
// class
class Component extends React.Component {
	constructor(props) {
    	super(props);
        this.state = { name: "kim" };
    }
}


// 함수형
const Component = (props) => {
	const [name, setName] = useState("kim");
    ....
}
메서드를 바인딩하거나 state를 초기화하는 작업이 없다면 그 컴포넌트은 constructor를 구현하지 않아도 됩니다.
클래스형에서는 초기 state를 정할 때 constructor를 이용합니다.
함수형에서는 useState hook을 이용해 초기 상태를 쉽게 설정할 수 있습니다.
1-2.static getDerivedStateFromProps
이 메서드는 리액트 16에서 추가된 라이프사이클 메서드로, props으로 받아온 값을 state에 동기화시키기 위해 사용합니다. 이 메서드는 컴포넌트가 최초 마운트 될 때와 업데이트 될 때 render 메서드를 호출하기 직전 호출됩니다.
이 메서드는 개발자가 특정 컴포넌트를 props에 따라 업데이트 시키고 싶을 때 사용할 수 있도록 그 기능을 제공하는데요. 이 메서드를 이용함으로써 개발자는 컴포넌트의 state가 props와 항상 동기화되었다고 확신할 수 있습니다.
다만 정적 메서드이므로 접근할 수 없고 상태를 직접 조작할 수 없습니다. 상태를 업데이트 하려면 객체를 반환해야 하고, 아무것도 변경되지 않았음을 나타내려면 null값을 반환해야 합니다.
class Component extends React.Component {
  static getDerivedStateFromProps(props, state) {
    if (props.name !== state.name) {
      return { name: props.name };
    }
    return null;
  }
  ...
}
1-3. shouldComponentUpdate
shouldComponentUpdate는 prop이나 state가 변경됐을 때 렌더링을 다시 할지 하지 않을지를 결정합니다.
이 메서드는 render이전에 호출되는데, 아직 render하기 전이기 때문에 return값으로 false를 반환하면 render를 취소할 수 있습니다. 기본적으로는 true를 반환합니다.
이 메서드를 이용해 주로 성능 최적화를 진행하는데, 쓸데없는 업데이트가 일어나지 않도록 하기 위해서 사용합니다.
// class
class Component Extends React.Component {
	shouldComponentUpdate(props, state) {
    	return props.name !== this.props.name
    }
    ...
}

//함수형
const Component = React.memo(MyComponent, (state, props) => {
	return state.name === props.name
});
함수형 컴포넌트에서는 React.memo, useMemo를 이용해 성능최적화를 합니다. 다만 작동 로직이 정반대로, shouldComponentUpdate는 true이면 리렌더링을 하지만 React.memo는 true이면 리렌더링을 방지합니다.
1-4. render
render는 React의 핵심적인 부분이고 컴포넌트의 UI를 정의하는 가장 중요한 메서드입니다. 최적화를 위해서 불필요한 렌더링을 피하고 동일한 입력에 대해 동일한 출력을 반환하는 가능한 가장 순수하게 유지하는 것이 중요합니다.
앞서 constructor, getDerivedStateFromProps, shouldComponentUpdate 등이 호출되고 나면 render로 컴포넌트를 DOM에 부착하고 Mount가 완료됩니다.
// class
class MyComponent extends Component {
  constructor(props) {
    super(props);
    this.state = {
      name: '',
      inputValue: ''
    };
  }

  handleInputChange = (e) => {
    this.setState({ inputValue: e.target.value });
  };

  render() {
    return (
      <div>
        <input
          value={this.state.inputValue}
          onChange={this.handleInputChange}
        />
        <span>{this.state.name}</span>
      </div>
    );
  }
}


// 함수형

함수형 컴포넌트는 함수 전체가 render의 역할을 합니다.

function Component() {
  const [name, setName] = useState('');

  const handleInputChange = (e) => {
    setName(e.target.value);
  };

  return (
    <div>
      <input
        value={inputValue}
        onChange={handleInputChange}
      />
      <span>{name}</span>
    </div>
  );
}
1-5.componentDidMount
마운트가 완료된 뒤엔 componentDidMount가 한 번 호출됩니다.
이 메서드는 주로 외부 API 데이터 소스를 가져오거나 구독을 설정, DOM조작, 외부 라이브러리 초기화 등 설정하는 데 사용됩니다.
// class
class Component extends React.Component {
    constructor(props) {
        super(props);
        this.state = {
          name: ''
        };
      }

	componentDidMount() {
    	fetch('https://test.com/api/data')
        	.then(response => response.json())
            .then(data => this.setState({ name: data }));

      	window.addEventListener('resize', this.handleResize);

        const element = document.getElementById('my-element');
          if (element) {
            element.focus();
          }
    }

    // 메모리 누수 방지를 위한 정리
    componentWillUnmount() {
      window.removeEventListener('resize', this.handleResize);
    }
    ...
}


// 함수형
const Component = (props) => {
	const [name, setName] = useState("kim");

 	const getUserName = () => {
    	fetch('https://test.com/api/data')
        	.then(response => response.json())
            .then(data => setName(data));
    }

    useEffect(() => {
    	getUserName()

        window.addEventListener('resize', handleResize);

        // cleanup 함수 (componentWillUnmount와 동일)
        return () => {
          window.removeEventListener('resize', handleResize);
        };
    }, [])

	....
}
2.Update
업데이트는 1)props가 변경될 때, 2) state가 변경될 때, 3) 부모 컴포넌트가 리렌더링될 때, 4) Context 값이 변경될 때, 5) forceUpdate를 이용할 때(클래스), 6) Hooks의 의존성 배열 값이 변경될 때(함수형) 이 경우에 발생합니다.
2-1. getDerivedStateFromProps, shouldComponentUpdate, render
앞서 컴포넌트가 생성될 때와 동일하게 컴포넌트가 새로운 속성을 받을 때 getDerivedStateFromProps가 호출되고, 다음으로 리랜더링을 결정하는 shouldComponentUpdate가 호출된 뒤 render 메서드가 호출됩니다.
2-2. getSnapShotBeforeUpdate
이 메서드는 DOM이 업데이트되기 직전에 호출됩니다. 예를 들어 스크롤 위치, 애니메이션 시작과 종료 지점 계산, DOM요소의 크기나 위치 변화 추적 등의 상황에서 유용하게 사용됩니다.
아래는 채팅화면에서 스크롤 위치를 따로 처리하는 예시입니다.
// class
class MyComponent extends React.Component {
	constructor(props) {
    	super(props);
        this.state = {
        	message: []
        }
        this.chatRef = React.createRef();

        // 새 메세지가 추가될 때마다 state 업데이트
        componentDidMount() {
    		this.setState({
      			messages: [
        			{ id: 1, text: "안녕하세요!" },
        			{ id: 2, text: "반갑습니다!" }
      			]
    		});
        }

        // DOM 업데이트 직전의 스크롤 높이를 캡처
        getSnapshotBeforeUpdate(prevProps, prevState) {
          if (prevState.messages.length < this.state.messages.length) {
            const chatBox = this.chatRef.current;
            return {
              scrollHeight: chatBox.scrollHeight,
              scrollTop: chatBox.scrollTop
            };
          }
          return null;
        }

        // DOM 업데이트 후 스크롤 위치 조정
        componentDidUpdate(prevProps, prevState, snapshot) {
          if (snapshot !== null) {
            const chatBox = this.chatRef.current;
            const newScrollHeight = chatBox.scrollHeight;
            chatBox.scrollTop = chatBox.scrollTop +
              (newScrollHeight - snapshot.scrollHeight);
          }
        }

        ...
  }


// 함수형
function MyComponent() {
  const [messages, setMessages] = useState([]);
  const chatRef = useRef();
  const prevScrollHeightRef = useRef();

  useEffect(() => {
    const chatBox = chatRef.current;
    if (prevScrollHeightRef.current) {
      const newScrollHeight = chatBox.scrollHeight;
      chatBox.scrollTop = chatBox.scrollTop +
        (newScrollHeight - prevScrollHeightRef.current);
    }
    prevScrollHeightRef.current = chatBox.scrollHeight;
  }, [messages]);

}
함수형에서는 useState와 useRef를 이용해 동일한 기능을 구현할 수는 있지만, 클래스형에서 DOM 업데이트 직전에 이 메서드를 호출하는 것처럼 정확히 같은 시점을 캡쳐하기는 어렵습니다. 만약 이 메서드를 이용하고 싶다면 클래스형으로 사용하는 것이 더 적절합니다.
2-3. componentDidUpdate
컴포넌트의 변경이 완료되었을 때 수행되는 메서드입니다. 업데이트가 끝난 직후이므로 DOM을 조작할 수 있고, props 변경에 따른 데이터 업데이트, state 변경에 따른 부수 효과 처리, 네트워크 요청, 외부 라이브러리 연동, 로컬 스토리지 업데이트 등 다양한 작업을 할 수 있습니다.
class UserProfile extends Component {
  constructor(props) {
    super(props);
    this.state = {
      user: null,
      loading: true
    };
  }

  componentDidMount() {
    this.fetchUserData(this.props.userId);
  }

  componentDidUpdate(prevProps, prevState) {
    // 1. props 변경 감지 및 처리
    if (prevProps.userId !== this.props.userId) {
      this.fetchUserData(this.props.userId);
    }

    // 2. state 변경 감지 및 처리
    if (prevState.user !== this.state.user) {
      localStorage.setItem('user', JSON.stringify(this.state.user));
    }

    // 3. DOM 업데이트 후 처리
    if (this.state.scrollToBottom) {
      window.scrollTo(0, document.body.scrollHeight);
      this.setState({ scrollToBottom: false });
    }
  }
 ....
}

// 함수형

function UserProfile({ userId }) {
  const [user, setUser] = useState(null);
  const [loading, setLoading] = useState(true);
  const [error, setError] = useState(null);

  // componentDidUpdate와 비슷한 역할
  useEffect(() => {
    const fetchUserData = async () => {
      try {
        setLoading(true);
        const response = await fetch(`https://api.example.com/users/${userId}`);
        const data = await response.json();
        setUser(data);
      } catch (error) {
        setError(error);
      } finally {
        setLoading(false);
      }
    };

    fetchUserData();
  }, [userId]); // userId가 변경될 때만 실행

  // 사용자 데이터가 변경될 때 로컬 스토리지 업데이트
  useEffect(() => {
    if (user) {
      localStorage.setItem('user', JSON.stringify(user));
    }
  }, [user]);
  ....

}
함수형에서는 useEffect로 대체됩니다.
3. Unmount
언마운트 단계는 컴포넌트가 DOM에서 제거되는 과정입니다. 이 단계에서는 주로 componentWillUnmount 메서드가 사용됩니다. componentWillUnmount는 컴포넌트가 DOM에서 제거되기 전에 호출되며, 주로 타이머를 해제하거나 외부 리소스를 정리하는 데 사용합니다.
3-1. componentWillUnmount
앞서 살펴봤던 예제에서 메모리 누수 방지를 위해 윈도우 이벤트리스너를 해제하는 데 사용을 했습니다. 이처럼 주로 이벤트리스너 제거, 타이머 정리, 구독 해제 등 정리 작업에 사용됩니다.
// 클래스형
class ChatRoom extends Component {
  constructor(props) {
    super(props);
    this.state = {
      messages: [],
      isOnline: true
    };
  }

  componentDidMount() {
    // 1. 이벤트 리스너 등록
    window.addEventListener('online', this.handleOnline);
    window.addEventListener('offline', this.handleOffline);

    // 2. 웹소켓 연결
    this.socket = new WebSocket('wss://chat.example.com');

    // 3. 주기적인 작업 설정
    this.interval = setInterval(this.checkNewMessages, 3000);

    // 4. 외부 라이브러리 초기화
    this.chart = new ExampleChart('#chart');
  }

  componentWillUnmount() {
    // 1. 이벤트 리스너 제거
    window.removeEventListener('online', this.handleOnline);
    window.removeEventListener('offline', this.handleOffline);

    // 2. 웹소켓 연결 종료
    this.socket.close();

    // 3. 타이머 정리
    clearInterval(this.interval);

    // 4. 외부 라이브러리 정리
    this.chart.destroy();

    // 5. 진행 중인 API 요청 취소
    if (this.controller) {
      this.controller.abort();
    }
  }
  ....

}

// 함수형
function ChatRoom() {
  const [messages, setMessages] = useState([]);
  const [isOnline, setIsOnline] = useState(true);

  useEffect(() => {
    // 컴포넌트 마운트 시 실행되는 로직
    const handleOnline = () => setIsOnline(true);
    const handleOffline = () => setIsOnline(false);

    // 이벤트 리스너 등록
    window.addEventListener('online', handleOnline);
    window.addEventListener('offline', handleOffline);

    // 웹소켓 연결
    const socket = new WebSocket('wss://chat.example.com');

    // 주기적인 작업 설정
    const interval = setInterval(() => {
      // 새 메시지 확인 로직
    }, 3000);

    // cleanup 함수 (componentWillUnmount와 동일)
    return () => {
      // 이벤트 리스너 제거
      window.removeEventListener('online', handleOnline);
      window.removeEventListener('offline', handleOffline);

      // 웹소켓 연결 종료
      socket.close();

      // 타이머 정리
      clearInterval(interval);
    };
  }, []);
함수형에서는 useEffect 내의 cleanup 함수를 이용해 이벤트 리스너를 제거하거나 타이머 정리, 웹소켓 연결 종료, 외부 라이브러리 인스턴스 정리, API요청 취소, 구독 해제 등을 구현할 수 있습니다.
마치며
이 글에서는 React 컴포넌트 라이프사이클에 대해 알아봤습니다. React 라이프사이클은 크게 3 단계로 나눌 수 있습니다. Mount, Update, Unmount. 이 세 과정을 거치면서 컴포넌트는 생성되고 업데이트 되고 제거되는 과정을 거칩니다.
이 글을 정리하면서 다시 한 번 React 라이프사이클에 대해 정리할 수 있었습니다.
React로 개발을 하면서 성능최적화에 대해 고민할 때도 라이프사이클에 대한 이해가 필수일 것 같습니다. 불필요한 리랜더링 방지, 메모리 누수 예방, 리소스의 효율적인 관리를 위해서는 반드시 알아야 하니까요.
또한 적절한 시점에 API를 호출하고, 데이터를 동기화 하기 위해서도 필요합니다. 이벤트 리스너 관리, 외부 라이브러리 연동, 구독 설정 및 해제 등에도 라이프사이클에 대한 이해 없이는 코드를 구현할 수 없다는 것을 다시 한 번 느낍니다.
