ES6 핵심 개념 정리
1. var, let, const
| 키워드 | 구분 | 선언위치 | 재선언 | window 객체에 값 저장 |
|---|---|---|---|---|
| var | 변수 | 전역스코프(함수레벨) | 가능 | 키:값 저장 가능 |
| let | 변수 | 해당스코프(블록레벨) | 불가능 | 불가능 |
| const | 상수 | 해당스코프(블록레벨) | 불가능 | 불가능 |
전역 변수 -> window / exports
로컬의 전역은 exports, 웹 브라우저의 전역은 window
웹 브라우저에서 실행되는 javascript에서 var 변수로 전역 변수 값을 저장하면 window객체에 키:값 쌍으로 저장이 된다.
const는 레퍼런스 변경이 불가능한 것
내부 속성은 변경 가능하다
const academy = {
	area : '서울',
	class= 10
}
console.log => {area : '서울', class : 10 }

ssafy.area = '대전'
console.log => {area : '대전', class : 10 }
const num = []
num.push(10)
=> [ 10 ]var / let
var i = 10
for(var i = 0; i < 5; i++){
	console.log(i)
}
console.log(i)
=> 0 1 2 3 4 5   5


let i = 10
for(let i = 0; i < 5; i++){
	console.log(i)
}
console.log(i)
=> 0 1 2 3 4 5   10
function scope3() {
if (true) {
var x = 99;
console.log(x);
}
console.log(x);
}
scope3()
=> 99, 99
function scope5() {
if (true) {
let x = 99;
console.log(x);
}
console.log(x);
}
scope5();
=> 99, error(x is not defined)2. Enhanced Object Literal
1. Property Shorthand(단축 속성명)
객체를 정의 할 때 객체의 key값과 value값이 같을경우, 각각 표기하지 않고 한번만 표기
// ES6 이전
const user = {
  id : id,
  name : name,
  age : age
}

// ES6 이후
const user = {
  id,
  name,
  age
}
2. Method Definitions(ConciseMethod, Shorthand method names)
// 개선 전
const person = {
  sayHi: function(){
    console.log('Hi')
  }
}
person.sayHi()
// 개선 후
const person = {
sayHi(){
console.log('Hi')
}
}
person.sayHi()3. Computed Property Names
동적으로 키 값 부여 가능
const dynamicKey = 'name'
const index = 1

const person = {
  [dynamicKey] : 'Kyle',
  ['age' + index] : 25,
}
3. Destructuring Assignment (구조 분해 할당)
배열이나 객체에 입력된 값을 개별적인 변수에 할당하는 간편한 방식 제공
// 배열
const areas = ["서울", "대전", "구미", "광주", "부울경"];

// ES6 이전
{
  const a1 = areas[0];
  const a2 = areas[1];
  const a3 = areas[2];
  const a4 = areas[3];
  const a5 = areas[4];
  console.log(a1, a2, a3, a4, a5);
}

// ES6 이후
{
  const [a1, a2, a3, a4, a5] = areas;
  console.log(a1, a2, a3, a4, a5);
}


// 객체
const user = {
  id: "naver",
  name: "김준환",
  age: 12,
};

// ES6 이전
{
  let id = user.id;
  let name = user.name;
  let age = user.age;
  console.log(id, name, age);
}

// ES6 이후
// 객체의 property와 변수명이 같을 경우.
{
  let { id, name, age } = user;
  console.log(id, name, age);
}

// 변수명을 객체의 property명과 다르게 만들 경우.
{
  let { id: userid, name: username, age: userage } = user;
  console.log(userid, username, userage);
}

function showUser1(user) {
  console.log("showUser1 call");
  let id = user.id;
  let name = user.name;
  let age = user.age;
  let age10 = age + 10;
  console.log(name + "님 10년 후 나이 : " + age10);
}
showUser1(user)

// 구조 분해로 개별 파라미터를 바로 받을 수 있다.
function showUser2({id,name,age}) {
  console.log("showUser2 call");
  let age10 = age + 10;
  console.log(name + "님 10년 후 나이 : " + age10);
}
showUser2(user)
4. Spread Syntax (전개구문)
spread operator는 반복 가능한(iterable) 객체에 적용할 수 있는 문법
배열이나 문자열 등을 풀어서 요소 하나 하나로 전개시킬 수 있다
const user1 = { id: "person1" };
const user2 = { id: "person2" };
const arr = [user1, user2];
console.log(arr);

const copyArr = [...arr];
console.log(copyArr);

const refArr = arr;
console.log(refArr);
console.log(copyArr === arr); // false
console.log(refArr === arr); // true
console.log(JSON.stringify(copyArr) === JSON.stringify(arr));

user1.id = "person9";
console.log(user1);
console.log(copyArr);

const addArr = [...arr, { id: "person9" }];
console.log(addArr);

let team1 = ["서울", "대전"];
let team2 = ["대구", "광주", "부산"];
let teamOne = [...team1, ...team2];
console.log(teamOne);

let team3 = ["서울", ...team2, "대전"];
console.log(team3);

const copyUser = {...user1}
console.log(copyUser)

const u1 = {id:'person1'}
const u2 = {id:'person2'}   //id가 겹쳐서 뒤에 값이 덮어 씀
const u = {...u1, ...u2}
console.log(u)

const num = [1,3,5,7]
function plus(a, b, c){
	console.log(a,b,c)
  return a + b + c;
}
let result = plus(num)   // a에 [1,3,5,7] 들어가고 b, c 는 undefined
console.log(result)

let result2 = plus(...num)   // a, b, c 에 1, 3, 5 들어가고 7은 무시
console.log(result2)   // 9
5. Default Parameter
함수 파라미터에 기본 값을 부여
// ES6 이전
function print1(msg){
  console.log(msg)
}
print1('hello')
print1()         // 에러

// ES6 이후
function print2(msg = '안녕'){
  console.log(msg)
}
print2('hello')  // hello
print2()         // 안녕


// default parameter는 함수에 전달된 파라미터가
// undefined이거나 전달되지 않았을 경우,
// 설정한 값으로 초기화.
function getUserId(userId = "person9") {
  return userId;
}

console.log(getUserId());
console.log(getUserId(undefined));
console.log(getUserId(null));
//null도 하나의 데이터 타입이므로 default 적용 안됨
console.log(getUserId("troment"));
6. Template String (`${ }`)
// Template String(`, 백틱 사용)

const id = "person",
  name = "김준환",
  age = 12;
// ES6 이전
console.log(name + "(" + id + ")님의 나이는 " + age + "입니다.");
// ES6 이후
console.log(`${name}(${id})님의


나이는 ${age}입니다.`);
7. Arrow Function (화살표 함수)
일반 함수
let result = (function (a){
  return a + 100
})(10)

// 110
화살표 함수
let result = (a => a + 100
)(10)

// 110
화살표 함수 사용 이유
- 함수 본연의 기능 잘 표현
- 코드 간결성
- 밖에 있던 this의 값을 그대로 사용(변화x) 👉클로저 개념
화살표 함수에서의 this
화살표 함수 표현식은
메서드가 아닌함수에 가장 적합합니다. -> (함수와 메서드 차이점 글 뒷부분에 정리)
함수가 아닌 메서드처럼 사용할 때 발생하는 문제들을 살펴 봅시다.
const obj = {
  i : 10,
  b : () => console.log(this.i, this),
  c : function(){
    console.log(this.i, this)
  }
}

obj.b()
obj.c()

// undefined {}
// 10 { i: 10, b: [Function: b], c: [Function: c] }
→ 화살표 함수에서의 this ? exports 객체이다 ( 브라우저에서는 window객체 )
⇒ 객체 내부에서는 화살표 함수 사용하지 않는게 좋다.
// obj 에 b라는 프로퍼티 추가해서 화살표 함수 값을 넣었다.
Object.defineProperty(obj, 'b',{
  get:() => {
    console.log(this.a, typeof this.a, this)
    return this.a + 10
  }
})

let a = obj.b
console.log(a)
//undefined undefined {}
//NaN
Closure (클로저)
클로저는 함수와 함수가 선언된 어휘적 환경의 조합이다.
lexical이란 어휘적 범위 지정(lexical scoping) 과정에서 변수가 어디서 사용 가능한지 알기 위해 그 변수가 소스코드 내 어디에서 선언되었는지 고려한다는 것을 의미한다.
자료 출처
[모던 자바스크립트 튜토리얼]
https://ko.javascript.info/closure
렉시컬 환경
1. 변수
렉시컬 환경 객체는 두 부분으로 나뉨
1. 환경 레코드_ 변수의 프로퍼티 저장 (박스)
2. 외부 렉시컬 환경에 대한 참조 (화살표)
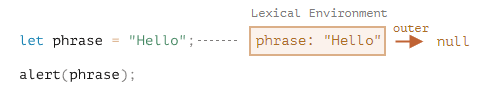
변수는 현재 실행 중인 함수와 코드 블록, 스크립트와 연관된 환경 레코드의 프로퍼티로 저장
2. 함수 선언문
함수 선언문은 변수와 달리 바로 초기화 된다.

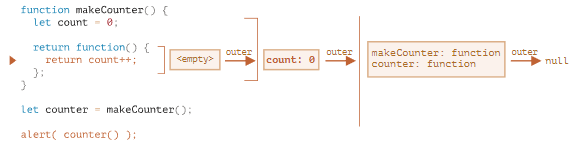
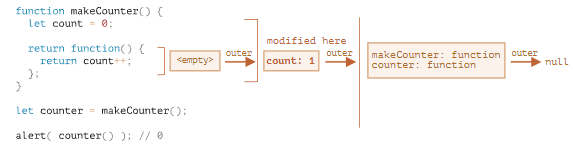
3. 내부와 외부 렉시컬 환경
코드에서 변수에 접근할 때
내부 렉시컬환경에서외부 렉시컬환경으로 확장한다. 이 과정은 검색 범위가 전역 렉시컬 환경으로 확장될 때까지 반복한다.

4. 함수를 반환하는 함수

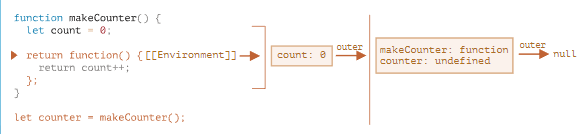
[요약]
자바스크립트의 함수는 숨김 프로퍼티인 [[Environment]]를 이용해 자신이 어디서 만들어졌는지를 기억한다.
다시 화살표 함수
class C {
  a = 1
  autoBoundMethod = () => {
    console.log(this)
    console.log(this.a)
  }
}

const c = new C()
c.autoBoundMethod()
const {autoBoundMethod} = c
autoBoundMethod()

/*
C { a: 1, autoBoundMethod: [Function: autoBoundMethod] }
1
C { a: 1, autoBoundMethod: [Function: autoBoundMethod] }
1
*/
객체 내부의 함수를 밖으로 끄집어 내서 실행시켜도 원래 함수가 존재하는 위치의 this 값을 반환한다.
8. for 반복문
1. for in ( ES6 이전 )
const person = {
  fname:'John',
  lname:'Doe',
  age:25
}

let text = ''
for (let key in person){
  text += person[key] + ' '
}

// John Doe 25    키 값

const numbers = [45,4, 9, 16, 25]
for(let i in numbers){
  console.log(i)
}
// 0 1 2 3 4      배열이면 인덱스
2. ForEach
const numbers = [45,4,9,16,25]

let text = ''
numbers.forEach(myFunction)
console.log(text)

function myFunction(value, index, array){
  text += value + " "
  console.log(`인덱스: ${index}, 배열:${array}`)
}

/*
인덱스: 0, 배열:45,4,9,16,25
인덱스: 1, 배열:45,4,9,16,25
인덱스: 2, 배열:45,4,9,16,25
인덱스: 3, 배열:45,4,9,16,25
인덱스: 4, 배열:45,4,9,16,25
45 4 9 16 25
*/
3. For of
// 반복문 for of

const cars = ['BMW', 'Volvo', 'Mini']
let text = ''
for (let x of cars){
  text += x + ' '
}
console.log(text)

// BMW Volvo Mini
9. Map & Set
map
const fruits = new Map([
  ["apples", 500],
  ["bananas", 300],
  ["oranges", 200],
]);

fruits.set("apples", 1000);

let result = fruits.get("apples");
console.log(result);

// 1000
Set
const letters = new Set(['a','b','c'])
letters.add('a')
letters.add('d')

console.log(letters)

// Set(4) { 'a', 'b', 'c', 'd' }
10. Class
// Class

class Car {
  constructor(name, year) {
    this.name = name;
    this.year = year;
  }
}

const myCar1 = new Car("Ford", 2014);
const myCar2 = new Car("Audi", 2019);

console.log(myCar1);
console.log(myCar2);
11. Promise객체
Promise는 Producing Code 와 Consuming Code를 연결하는 Javascript 객체입니다.
Producing Code: 실행시 시간이 걸리는 코드를 작성
Consuming Code: Producing Code의 결과를 기다리는 코드
const myPromise = new Promise(function (myResolve, myReject){

  // Producing Code
  let x = 0
  for (let i = 1; i <= 10; i++){
    x += i
  }

  if ( x == 55){
    myResolve(x)      // 성공했을 때 실행
  }else{
    myReject('fail')  // 실패했을 때 실행
  }
})

// Consuming Code
myPromise.then(
  function(value){
    console.log(value)
  },
  function(error){
    console.log(error)
  }
)
프로미스 객체는 비동기 실행이다
...
console.log('컨슈밍 이전')

myPromise.then(
  function(value){
    console.log(value)
  },
  function(error){
    console.log(error)
  }
)

console.log('컨슈밍 이후')

/*
컨슈밍 이전
컨슈밍 이후
55
*/
12. Function Rest Parameter (...args)
함수가 무한한 수의 파라미터를 배열로 처리할 수 있다.
ES6 이전 _ arguments
function sum(){
  let sum = 0
  for ( let arg of arguments){
    sum += arg
  }
  return sum
}

let x = sum(4, 9, 16, 25, 29, 100, 66, 77)
console.log(x)

/*
326
*/
ES6 이후
function sum(...args){
  let sum = 0
  for (let arg of args){
    sum += arg
  }
  return sum
}

let x = sum(4, 9, 16, 25, 29, 100, 66, 77)
console.log(x)

/*
326
*/