
React 시작 전 Jest 실습
환경 세팅
eslint 설정
eslint-jest-plugin 설치
참고: https://www.npmjs.com/package/eslint-plugin-jest
npm i -D eslint-plugin-jest.eslintrc.cjs
env: {
  'jest/globals': true
}

{
  "plugins": ["jest"]
}
jest가 제공하는 환경변수에 대해 ESLint에 알리기 위해 jest/globals: true 설정하고 plugins에 jest 추가
테스트 관련 설정
// npm test 축약표현
npm t


// 특정 파일만 테스트하는 경우
npm t getrandom
npm test를 다음과 같이 축약해서 사용할 수있고 특정 파일만 테스트를 할 수 있음
Jest 실습
jest.config.mjs
  // Jest가 테스트 파일을 감지하는 데 사용하는 glob 패턴
  testMatch: ['**/__tests__/**/*.[jt]s?(x)', '**/?(*.)+(spec|test).[tj]s?(x)'],
위와 같이 설정하였기 때문에 테스트파일이
__test__폴더안에 있는 파일들이 테스트파일로 감지됨
__test__/addClass.js
// Jest활용
// 작성할 유틸리티 함수 호출
import { addClass } from '../utils/dom/addClass.js';

test(`addClass(documnet.body, 'some') 함수 사용 시 document.body`, () => {
  const targetNode = document.body;
  let addedClassName = 'some';
  addClass(targetNode, addedClassName);
  expect(targetNode.classList.contains(addedClassName)).toBeTruthy();
});

document.body.innerHTML = `<div id="app" class="hi"></div>`;

test(`문서의 #app 노드에 'anything' 클래스 이름 설정이 가능하다.`, () => {
  const appNode = document.getElementById('app');
  let addedClassName = 'anything';

  addClass(appNode, addedClassName);
  expect(appNode.classList.contains(addedClassName)).toBeTruthy();
});
테스팅 addClass.js 이후 필요한 함수 작성!
addClass.js
export const addClass = (node, ...classNames) => {
  // 로직 작성
  // 문서 요소 노드에 접근/조작
  if (node && 'classList' in node) {
    node.classList.add(...classNames);
  }
  return node;
};
Class를 요소 노드에 추가하는 함수
위와 같이 클래스가 있는지 테스팅 할 시에 classList.contains() 과 toBeTruthy() 로 확인할 수 있지만 jest dom을 이용하여 DOM의 상태를 테스트하는 메서드를 쉽게 사용할 수 있음
jest dom 설치
npm install --save-dev @testing-library/jest-domjest dom 환경 설정
jest-setup.cjs
require('@testing-library/jest-dom');cjs라고 설정한 이유는 js로 설정후 import를 사용하여도 되지만
명시적으로 cjs, mjs로 설정하라고 공식문서에 나와있기 때문!
jest.config.mjs
  // 각 테스트 전에 테스트 프레임워크를 구성하거나 설정하기 위해 일부 코드를 실행하는 모듈의 경로 목록
  setupFilesAfterEnv: ['./jest-setup.cjs'],
eslint와 jest-dom과 같이 사용 하기위한 패키지
npm install --save-dev eslint-plugin-jest-domeslintrc.cjs
module.exports = {
  ...
  extends: [
    ...
    'plugin:jest-dom/recommended',
  ],
  plugins: ['react', 'jest', 'jest-dom'],

};
DOM API를 위한 js로 createElement 만들기
index.html
<script type="module" src="./src/main.js"></script>

...

<div id="app2"></div>
main.js
function bindProps(node, props) {
  if (props) {
    // props 객체 → props 배열 변경
    // prop 매개변수 → [key, value] 구조 분해 할당 활용
    Object.entries(props).forEach(([key, value]) => {
      if (key === 'className') {
        key = 'class';
      }
      node.setAttribute(key, value);
    });
  }
}

function createElement(type, props) {
  const node = document.createElement(type);
  bindProps(node, props);
  return node;
}

const contentsNode = createElement('div', {
  lang: 'en',
  className: 'contents',
});

console.log(contentsNode);


const appNode = document.getElementById('app2');
appNode.appendChild(contentsNode);
class라는 예약어가 있기 때문에 React에서는 className을 통해 class를 표현!
js로 구현할때에도 이를 고려하여 코드 작성
React, ReactDOM API
createElement()
React.createElement(
  type,
  [props],
  [...children]
)
인자로 주어지는 타입에 따라 새로운 React 엘리먼트를 생성하여 반환합니다. type 인자로는 태그 이름 문자열('div' 또는 'span' 등), React 컴포넌트 타입, 또는 React Fragment 타입 중 하나가 올 수 있습니다.
JSX로 작성된 코드는 React.createElement()를 사용하는 형태로 변환됩니다. JSX를 사용할 경우 React.createElement()를 직접 호출하는 일은 거의 없습니다. 자세한 정보는 JSX 없이 React 사용하기 문서에서 확인할 수 있습니다.
참고: https://ko.reactjs.org/docs/react-api.html#createelement
render()
ReactDOM.render(element, container[, callback])React 엘리먼트를 container DOM에 렌더링하고 컴포넌트에 대한 참조를 반환합니다(무상태 컴포넌트는 null을 반환합니다).
React 엘리먼트가 이전에 container 내부에 렌더링 되었다면 해당 엘리먼트는 업데이트하고 최신의 React 엘리먼트를 반영하는 데 필요한 DOM만 변경합니다.
참고: https://ko.reactjs.org/docs/react-dom.html#render
createPortal()
ReactDOM.createPortal(child, container)portal을 생성합니다. Portal은 DOM 컴포넌트 구조의 외부에 존재하는 DOM 노드에 자식을 렌더링하는 방법을 제공합니다.
참고: https://ko.reactjs.org/docs/react-dom.html#createportal
실습
<div id="root"></div>
<script>
(function renderReactApp(global, React, ReactDOM){
'use strict';
const { createElement: h } = React;
const headlineElement = h('h1', {}, 'Declarative programming');
const descriptionElement = h('p', {}, `
In computer science, declarative programming is a programming paradigm—a style of
building the structure and elements of computer programs—that expresses the logic of
a computation without describing its control flow. Many languages that apply this style
attempt to minimize or eliminate side effects by describing what the program must accomplish
in terms of the problem domain, rather than describe how to accomplish it as a sequence of
the programming language primitives (the how being left up to the language's implementation).
This is in contrast with imperative programming, which implements algorithms in explicit steps.
`.trim());
// 콘텐츠 가상 노드
const contentsElement = h(
'div',
{
className: 'contents',
lang: 'en'
},
headlineElement,
descriptionElement
);
// React Element (object)
// Virtual DOM Node Tree
console.log(contentsElement);
// ReactDOM.render() API 활용
// app rendering : React Element(VDOMNode) → Actual DOM Node에 착장(mount)
ReactDOM.render(
contentsElement,
document.getElementById('root'),
// () => {
// console.log('success rendering');
// }
);
})(window, window.React, window.ReactDOM);
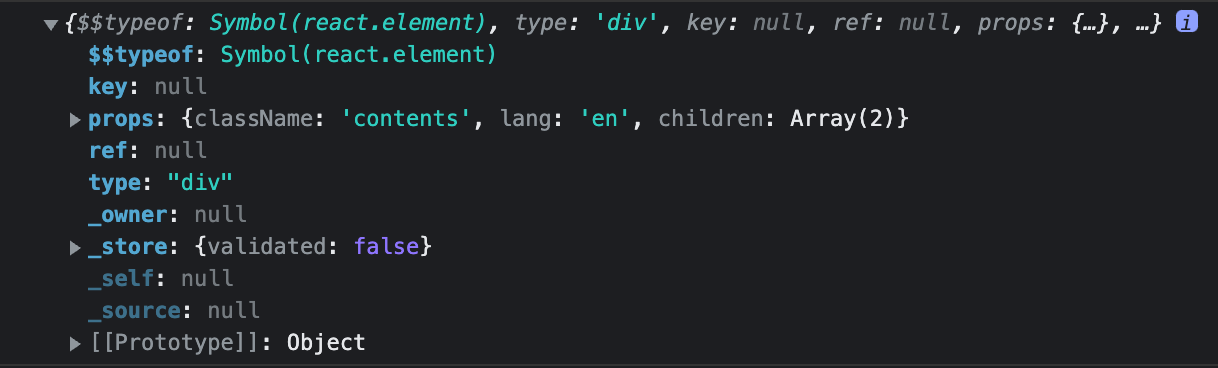
</script>contentsElement에 대한 정보를 콘솔에 찍어보면 다음과 같은 정보를 확인할 수 있음
참고해야할 정보:
Symbol(react.element) --> 리액트의 객체
type --> 어떤 타입인지 알려줌(type 인자로는 태그 이름 문자열('div' 또는 'span' 등), React 컴포넌트 타입, 또는 React Fragment 타입 중 하나가 올 수 있다.)
props --> html에서는 attr이 React에서는 props로 여기에서는 class, lang등을 확인할 수 있고 자식요소들이 존재하여 중첩 구조로 되어있음
prototype(object) --> 프로토타입이 객체임을 알려줌
ReactDOM 참고 공식문서
https://ko.reactjs.org/docs/react-dom.html#gatsby-focus-wrapper
React.Fragment
React요소는 하나의 루트요소만 가질 수 있는데 쉽게 해결할 수 있는 방법은 div 요소를 만들어 그 안에다 묶는 것이다.
그러나 이 방법은 권장되지 않고, React가 제공하는 Fragment 컴포넌트를 활용한다.
ReactDOM.render(
          h(
            React.Fragment,
            null,
            contentsElement,
            translationButtonElement,
          ),
          document.getElementById('app'),
        );
이렇게 작성하면 새로운 div 태그를 만들지 않도고 형제요소들을 묶어서 넣을 수 있다.
https://ko.reactjs.org/docs/react-api.html#reactfragment
svg의 viewBox
container element에 fit 하기 위한 주어진 graphics stretch의 set을 명시한다고 한다.
--> 쉽게 말해 비율 유지를 위한 svg의 attribute이다.
참고: https://developer.mozilla.org/ko/docs/Web/SVG/Attribute/viewBox
renderToString()
서버사이드 렌더링 시 사용하는 메서드로 공식문서에서는
React 엘리먼트의 초기 HTML을 렌더링하는데 사용한다고 한다.
const ssr = ReactDOMServer.renderToString(fragmentApp);
console.log(ssr);
만들어진 react element요소가 콘솔에 다음과 같이 찍히는 것을 확인할 수 있다.
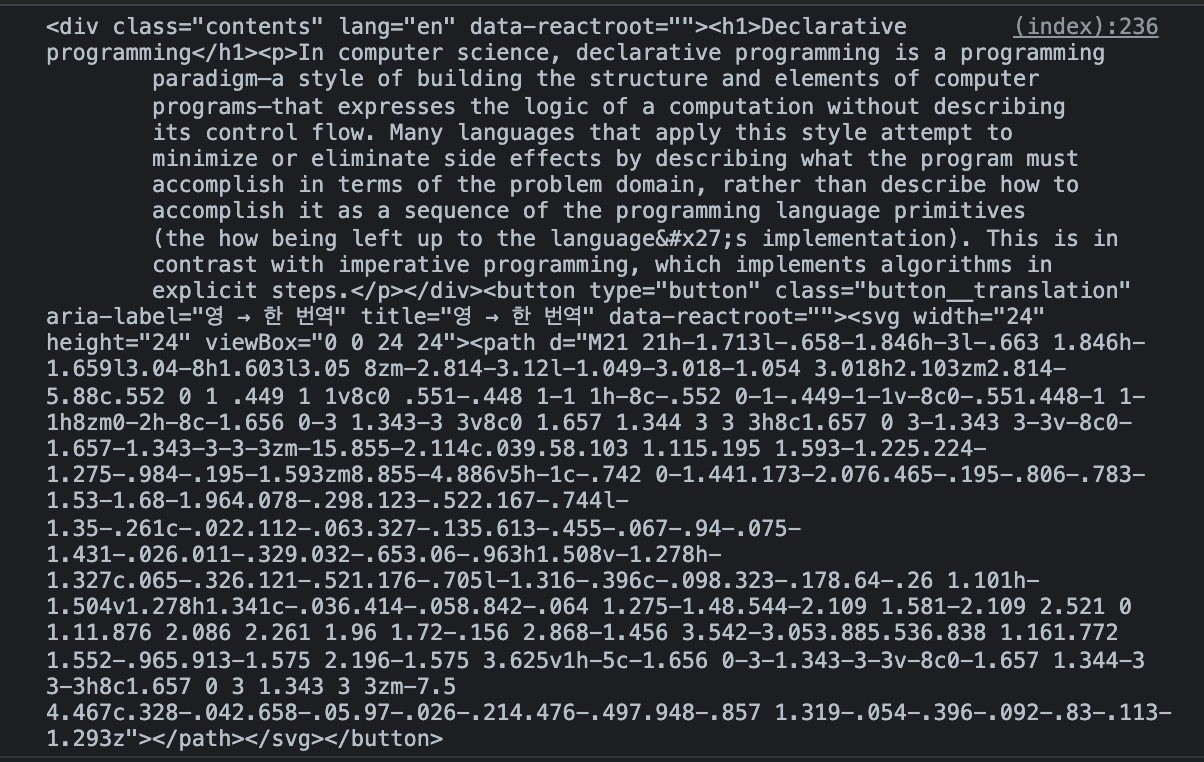
참고: https://reactjs.org/docs/react-dom-server.html#rendertostring
JSX
지금까지 createElement로 React element들을 만들었고 이제부터는 JSX라는 문법을 사용해서 더 쉽게 리액트 요소들을 만들 수 있음
JSX란?
원래는 E4X가 될 뻔 했으나 XML과 같은 구문의 확장이다. ECMAScript에서 규정하는 것은 아니지만 다양한 프리프로세서에서 이러한 토큰을 표준 ECMAScript로 변환하기 위해 사용된다.
참고: https://facebook.github.io/jsx/
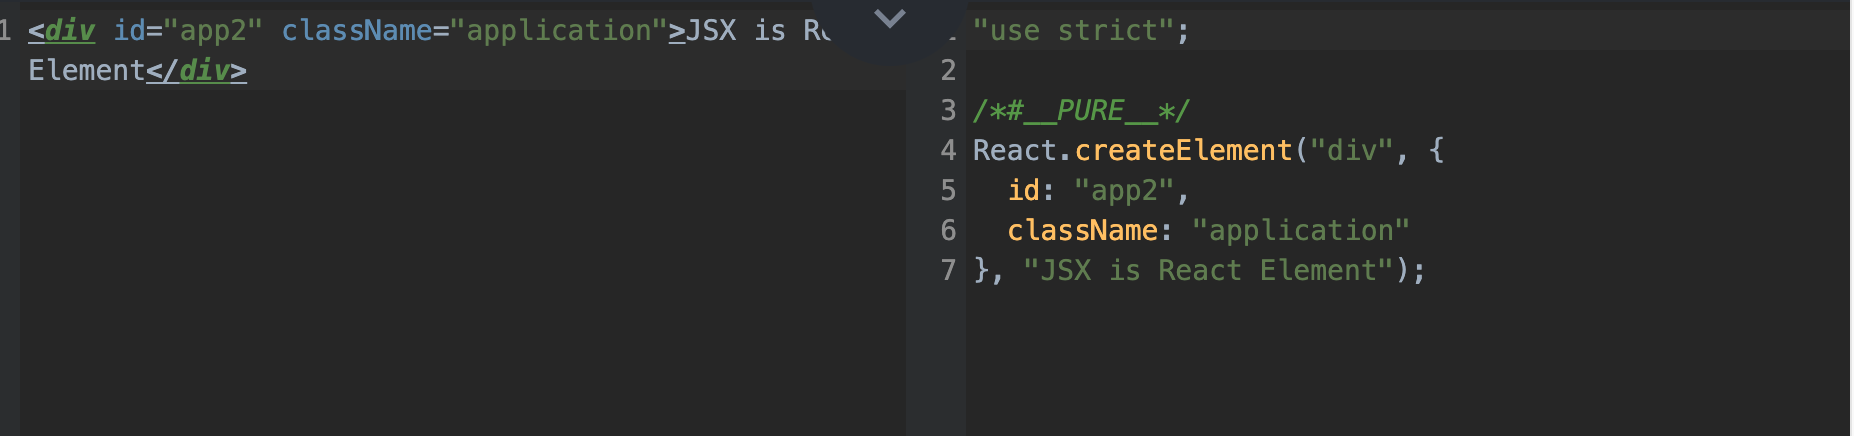
const jsxIsReactElement = <div id="app2">JSX is React Element</div>;
JSX문법은 다음과 같이 자바스크립트에 html 요소를 넣은것처럼 사용할 수 있다. 그러나 js가
<토큰을 인식하지 못하기 때문에 바벨이 필요하다
Babel standalone
https://babeljs.io/docs/en/babel-standalone#docsNav
cdn으로 브라우저에서 JSX문법을 사용하기 위해 src태그로 넣어주어 바벨 처리를 해준다.
그러나 이 cdn은 오늘 수업 이후로 쓰지 않는다 --> 속도가 매우 느리기 때문!
html에 위 CDN을 넣어준 후, script 태그에 type=text/babel or type=text/jsx를 넣어서 사용하는데 jsx의 경우 개발자가 보기에 컬러링이 되어있지 않기 때문에 babel을 사용한다.
JSX를 활용한 코드와 문자 보간(interpolation)
<script type="text/babel">
  // JSX

  function AppHeadline() {
    return <h1>선언형 프로그래밍</h1>;
  }

  function AppDescription() {
    return <p>선언형 프로그래밍은... 블라 블라 ...</p>;
  }

  function AppContents() {
    return (
      <div className="contents" lang="en">
        <AppHeadline />
        <AppDescription />
      </div>
    );
  }

  function TranslationButton(props) {
    const { size, label } = props;
    // console.log(props.size, props.label);
    return (
      <button
        className="button__translation"
        type="button"
        aria-label={label}
        title={label}
      >
        <svg width={size} height={size} viewBox={`0 0 ${size} ${size}`}>
          <path d="M21 21h-1.713l-.658-1.846h-3l-.663 1.846h-1.659l3.04-8h1.603l3.05 8zm-2.814-3.12l-1.049-3.018-1.054 3.018h2.103zm2.814-5.88c.552 0 1 .449 1 1v8c0 .551-.448 1-1 1h-8c-.552 0-1-.449-1-1v-8c0-.551.448-1 1-1h8zm0-2h-8c-1.656 0-3 1.343-3 3v8c0 1.657 1.344 3 3 3h8c1.657 0 3-1.343 3-3v-8c0-1.657-1.343-3-3-3zm-15.855-2.114c.039.58.103 1.115.195 1.593-1.225.224-1.275-.984-.195-1.593zm8.855-4.886v5h-1c-.742 0-1.441.173-2.076.465-.195-.806-.783-1.53-1.68-1.964.078-.298.123-.522.167-.744l-1.35-.261c-.022.112-.063.327-.135.613-.455-.067-.94-.075-1.431-.026.011-.329.032-.653.06-.963h1.508v-1.278h-1.327c.065-.326.121-.521.176-.705l-1.316-.396c-.098.323-.178.64-.26 1.101h-1.504v1.278h1.341c-.036.414-.058.842-.064 1.275-1.48.544-2.109 1.581-2.109 2.521 0 1.11.876 2.086 2.261 1.96 1.72-.156 2.868-1.456 3.542-3.053.885.536.838 1.161.772 1.552-.965.913-1.575 2.196-1.575 3.625v1h-5c-1.656 0-3-1.343-3-3v-8c0-1.657 1.344-3 3-3h8c1.657 0 3 1.343 3 3zm-7.5 4.467c.328-.042.658-.05.97-.026-.214.476-.497.948-.857 1.319-.054-.396-.092-.83-.113-1.293z" />
        </svg>
      </button>
    );
  }

  function App() {
    return (
      <div id="app">
        <AppContents />
        <TranslationButton size={24 * 0.5} label="영 => 한 번역" />
      </div>
    );
  }

  // React.createElement(FunctionalComponent) -> JSX
  // <FunctionalComponent />
  ReactDOM.render(<App />, document.getElementById('root'));
</script>
JSX문법을 사용하면 createElement를 사용하는 것보다 더 쉽게 react element를 만들 수 있고, 문자 보간을 사용하여 재사용성이 높은 컴포넌트를 만들기에 유용하다.
마지막으로 일반함수와 React 컴포넌트의 차이는 일반함수는 인자를 전달 받지만 React 컴포넌트는 props라는 객체를 전달받아서 사용한다.
ex)
// React Component
function TranslationButton(props) {
  const { size, label } = props;
  ...

// JSX (실제론 createElement처럼 동작)
function App() {
  return (
    ...
      <TranslationButton size={24 * 0.5} label="영 => 한 번역" />
    ...
  );
}

// createElement
const contentsNode = createElement('div', {
  lang: 'en',
  className: 'contents',
});
createElement에서 볼 수 있듯이, type, props, children으로 인자를 받는데, props를 위와 같이 객체로 전달한다.
따라서TranslationButton에서도 인자로 props 객체를 받아 사용한다.