
useMemo
참고사이트: https://ko.reactjs.org/docs/hooks-reference.html#usememo
useCallback과 달리 어떤 값 모두 기억이 가능하다.
useCallback과의 차이
  // 함수 값을 기억하려 시도

  // case 1. useMemo(() => 값(JS의 모든 값), [...state])
  let handleClick = useMemo(() => () => console.log('clicked heading'), []);

  // case 2. useCallback(함수값, [...state])
  handleClick = useCallback(() => console.log('clicked heading'), []);
useMemo는 값(위 상황에선 함수가 리턴하는 값)을 반환하는데 useCallback은 함수자체를 반환
실습
  useEffect(() => {
    countRef.current += 1;
    console.log('이펙트 함수 실행 횟수: ', countRef.current);
    const prevValue = compareRef.current;
    if (prevValue !== onClick) {
      console.log(
        '이전 onClick과 새롭게 전달된 onClick prop은 동일하지 않습니다.',
        prevValue,
        onClick
      );
    }
    if (prevValue === onClick) {
      console.log(
        '이전 onClick과 새롭게 전달된 onClick prop은 동일합니다.',
        prevValue,
        onClick
      );
    }
    // 방금 전달 받은 onClick prop을 메모
    // current 값이 변경되어도 컴포넌트는 다시 렌더링 되지 않는다.
    compareRef.current = onClick;
  }, [onClick]);
이 부분은
SkHeading.js부분인데onClick에 따라 useEffect함수가 작동되게 만들어 두고 App.js에서 useMemo, useCallback, 일반함수로 onClick으로 함수를 전달하였을 시, 작동 방식이 다르다는 것을 확인해볼 수 있다.
위 예시에서 일반 함수로 전달한 경우, 함수값을 기억하지 못해 버튼을 클릭시 2번 실행이 되지만, useMemo 혹은 useCallback을 사용하게 되면 그 값을 계속 기억하고 있어서 onClick의 값이 변하지 않기 때문에 useEffect가 실행되지 않는다.
보통 useMemo의 경우 계산하는데 많이 드는 비용의 값을 저장하는데 사용!
SkSpinner 컴포넌트
    <!-- 로딩 스피너 접근성을 위한 DOM 요소를 추가하세요. -->
    <!-- AT: Screen Reader -->
    <div id="loading-start" aria-live="assertive"></div>
    <div id="loading-end" aria-live="assertive"></div>
export function SkLoading() {
// 마운트 이후 시점에 명령형 프로그래밍
useEffect(() => {
console.log(startNode);
// [x] startNode의 role 속성 값을 alert으로 설정
startNode.setAttribute('role', 'alert');
// [x] startNode의 자식 노드로 a11yHidden 클래스 이름이 적용된 요소를 삽입
// [x] 삽입될 자식 노드의 콘텐츠는 사용자에게 안내할 내용을 포함
startNode.insertAdjacentHTML(
'beforeend',
`<span class="a11yHidden">데이터를 로딩 중입니다.</span>`
);
// 클린업 함수
// 언마운트 시점에 명령형 프로그래밍
return () => {
console.log(endNode);
// [x] startNode의 role 속성을 제거
startNode.removeAttribute('role');
// [x] startNode의 자식 노드 제거
startNode.innerHTML = '';
// [x] endNode의 자식 노드로 사용자에게 안내할 내용을 포함
endNode.insertAdjacentHTML(
'beforeend',
`<span class="a11yHidden">로딩이 완료되었습니다.</span>`
);
// [x] 특정 시간이 지나면 자식 노드 제거
setTimeout(() => (endNode.innerHTML = ''), 1000);
};
}, []);이를 통해 spinner가 돌아갈 때, 돔요소를 조작하여 스크린 리더가 현재 어떤 상태인지를 읽고 사용자에게 상태를 알려준후, 언마운트 시점에 spinner가 끝나고 돔요소에서 제거해줌
전달받은 타입에 따른 img 선택
...

const renderAsset = (type) => {
  switch (type) {
    default:
      // return assetLearn;
      return require('./assets/spinner-learn.gif');
    case 'grow':
      return require('./assets/spinner-grow.gif');
    // return assetGrow;
    case 'connect':
      return require('./assets/spinner-connect.gif');
    // return assetConnect;
  }
};

// Class 컴포넌트 대체: React Hooks + Functioncal Component
export function SkLoading({ type }) {
  // 마운트 이후 시점에 명령형 프로그래밍
  useEffect(() => {
    ...
  }, []);
  // 언마운트 시점에 명령형 프로그래밍

  return (
    <figure className={styles.component}>
      <img className={styles.image} src={renderAsset(type)} alt="" />
    </figure>
  );
}

SkLoading.defaultProps = {
  type: 'learn',
};

SkLoading.propTypes = {
  type: oneOf(['learn', 'connect', 'grow']),
};
prop-type의 oneOf을 사용하여 전달받은 propType을 제한하고
renderAsset함수의 switch문을 사용하여 조건에 따른 이미지를 제공해줌
SkSection 컴포넌트
import styles from './SkSection.module.css';
import { useState, useEffect } from 'react';
import { SkHeading, SkLoading, SkSectionCard } from 'components';
import { getSkCards } from 'api';

export function SkSection() {
  // isLoading
  const [isLoading, setIsLoading] = useState(true);
  // error
  const [error, setError] = useState(null);
  // success
  const [cards, setCards] = useState([]);


  // 사이드 이펙트 관리
  // 네트워크 통신
  // 통신 상태에 따라 상태 업데이트
  // - 로딩 중인지?
  // - 오류가 발생했는지?
  // - 성공해서 데이터를 업데이트 할건지?

  useEffect(() => {
    getSkCards()
      .then(({ gateway }) => {
        setCards(gateway);
        setIsLoading(false);
      })
      .catch((error) => {
        setError(error);
        setIsLoading(false);
      });
  }, []);

  if (isLoading) {
    return <SkLoading />;
  }

  if (error) {
    return <div role="alert">{error.message}</div>;
  }

  return (
    <section className={styles.component}>
      <SkHeading as="h2" className={styles.title}>
        gateway
      </SkHeading>
      {cards.length > 0 && (
        <div className={styles.list}>
          {cards.map((cardItem) => (
            <SkSectionCard key={cardItem.id} item={cardItem} />
          ))}
        </div>
      )}
    </section>
  );
}
만약 Promise대신 async await를 useEffect안에서 사용하고 싶다면 아래와 같이 사용할 수 있다.
  useEffect(() => {
    // async 함수 활용

    const fetchData = async () => {
      try {
        const { gateway } = await getSkCards();
        setCards(gateway);
      } catch (error) {
        setError(error);
      }
      setIsLoading(false);
    };

    fetchData();
  }, []);
SkSectionCard
import styles from './SkSectionCard.module.css';
import { Fragment } from 'react';
import { shape, exact, string, arrayOf } from 'prop-types';
import { getPublicAsset } from 'utils';

console.log(getPublicAsset('gateway/presentation.jpg'));

export function SkSectionCard({ item: { id, title, link, cover } }) {
  const coverStyle = {
    background: `url(${getPublicAsset(
      `gateway/${cover}`
    )}) no-repeat left top / cover`,
  };
  return (
    <article className={styles.component} aria-labelledby={id}>
      <a
        href={link.href}
        title={`${link.text}${link.cheon} 이동`}
        style={coverStyle}
      >
        <h3 id={id} className={styles.title}>
          {title.map((content, index) => (
            <Fragment key={content}>
              {content}
              {index < title.length - 1 && <br />}
            </Fragment>
          ))}
        </h3>
        <div className={styles.linkText}>
          <span>{link.text}</span> 바로가기
        </div>
      </a>
    </article>
  );
}

SkSectionCard.propTypes = {
  item: shape({
    id: string,
    titie: arrayOf(string),
    link: exact({
      text: string,
      cheon: string,
      href: string,
    }),
    cover: string,
  }),
};
getPublicAsset함수는 (process.env.PUBLIC_URL) 을 사용해서 경로를 설정하여 path를 전달하여 사용되는 구조
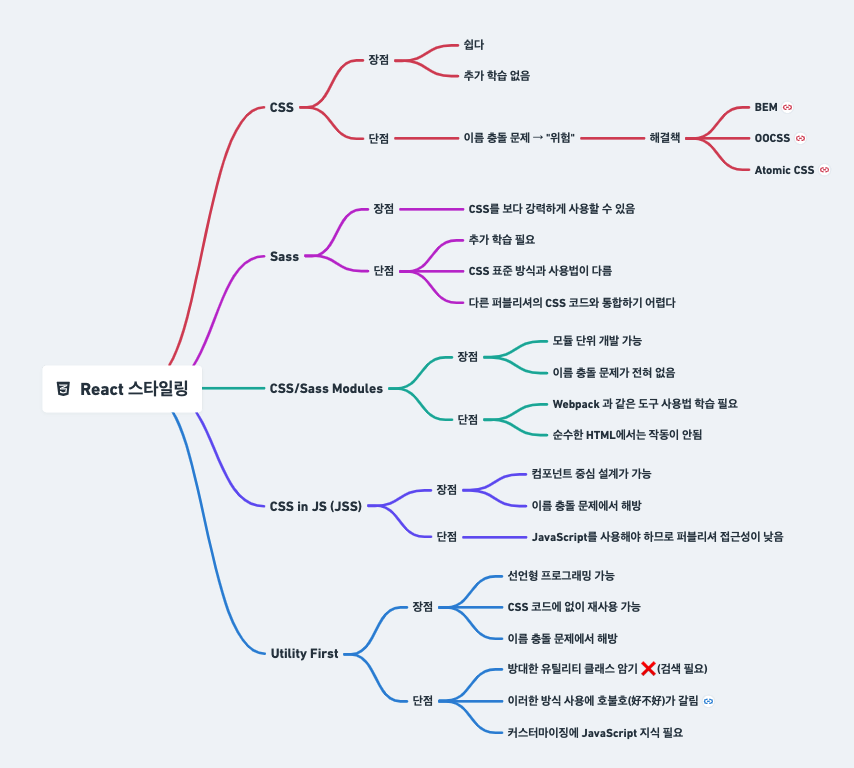
스타일 방법론
카운터 컴포넌트 실습 with styled components
패키지 설치
yarn add -D styled-componentsApp.js
import { Counter } from 'components';
import styled from 'styled-components';

const Container = styled.div`
  display: flex;
  justify-content: center;
  align-items: center;
`;

// React 컴포넌트
// Styled 컴포넌트
export default function App() {
  return (
    <Container>
      <Counter />;
    </Container>
  );
}
이렇게 들어오는데 이렇게 되면 디버깅이 매우 힘들어서 다음의 패키지를 설치
babel-plugin-styled-components 설치가 필수는 아니지만, 설치 및 적용을 권장! 클래스 이름이 읽기 쉬워져 디버깅이 용이하고, 서버 사이드 렌더링 호환 문제를 해결하며 번들 크기도 더 작아진다.
yarn add -D babel-plugin-styled-components이후 .babelrc에
"plugins": [
  "babel-plugin-styled-components"
]
그러나 현재 이 패키지는 문제가 있는 것으로 보임 (babel core 쪽에) --> 따라서 import가 아닌 require로 불러와야 정상작동이 됨
Styled Components 조건 처리 부분
Counter.styled.js
export const Container = styled.div`
  position: fixed;
  top: 0;
  left: 0;
  width: 100vw;
  height: 100vh;
  ${({ flex }) =>
    flex &&
    `
  display: flex;
  justify-content: center;
  align-items: center;
  `}
`;
flex라는 prop을 전달받아 조건부로 css를 조절할 수 있음
Styled Components의 단점: 빌드하고 배포시에 css 파일을 만드는데에 문제가 있음 (성능적인 면에서 js를 통해 css를 사용하기 때문에)
이를 위해 플러그인이나 다른 툴들을 사용하기도 함 (ex: linaria)
참고사이트: https://linaria.dev/
불필요한 컴포넌트 렌더링 이슈
React.memo
참고사이트: https://ko.reactjs.org/docs/react-api.html#reactmemo
import { useState, useCallback } from 'react';
import { StyledContainer, StyledOutput, StyledButton } from './Counter.styled';

export function Counter({ initialCount = 0, step = 1 }) {
  const [count, setCount] = useState(initialCount);
  const [temp, setTemp] = useState('');

  const decrement = useCallback(() => setCount(count - step), [count, step]);
  const increment = useCallback(() => setCount(count + step), [count, step]);

  return (
    <StyledContainer flex>
      <StyledButton type="button" aria-label="카운트 감소" onClick={decrement}>
        -
      </StyledButton>
      <StyledOutput onClick={() => setTemp((Math.random() * 10).toString())}>
        {count} {temp}
      </StyledOutput>
      <StyledButton type="button" aria-label="카운트 증가" onClick={increment}>
        +
      </StyledButton>
    </StyledContainer>
  );
}
위와 같은 코드가 있다고 가정해보면
StyledOutput을 눌렀을 눌렀을 시temp의 값이 변하면서 리렌더링 되는데, 이와 관련 없는StyledButton또한 렌더링이 다시 된다. 이것이 불필요한 컴포넌트 렌더링 이슈이다.
이를 해결하기 위해React.memo를 사용한다.
counter.styled.js
let Button = styled.button`
  cursor: pointer;
  border-radius: 4px;
  border: 1px solid currentColor;
  color: #343434;
  &:hover {
    background: #415162;
    color: #fff;
  }
`;

export const StyledButton = memo(Button);
다음과 같이 React.memo를 사용하여 컴포넌트를 기억해두면 불필요한 컴포넌트 렌더링을 방지할 수 있음
렌더링 검사 툴
react dev tool 확장을 설치하였다면 개발자 도구 탭에서 Profiler 탭을 확인할 수 있다. 이를 통해 어디서 렌더링이되는 지 정보들을 확인할 수 있다. --> 주로 성능 최적화를 할 때 디버깅용으로 사용한다.