Layout
Layout이란?
흔히 레이아웃이라 하면 어떤 요소들을 적재적소에 효율적으로 배치하는 것을 말합니다.
예를 들어 새로 오픈한 마트의 전단지를 보면 마트 이름, 행사 상품, 약도, 주소, 전화번호 등등 다양한 것들이 기재되어 있는데, 보기좋은 형태를 취하고 있습니다.
소비자의 눈에 한눈에 들어오도록 일목요연하게 정리되어 있지요.
Application을 제작할 때 사용자가 조작하기 쉽도록 UI를 각 공간에 효율적으로 배치하는 일을 레이아웃이라고 합니다.
레이아웃에는 다양한 종류가 있고, 이 포스팅에서는 6가지 정도에 대해 살펴보려고 합니다.
Android의 Layout
우선 안드로이드 개발자 문서에서는 다음과 같이 레이아웃을 정의하고 있습니다.
레이아웃은 앱에서 사용자 인터페이스를 위한 구조(예: 활동)를 정의합니다. 레이아웃의 모든 요소는
View와ViewGroup객체의 계층 구조를 사용하여 빌드됩니다. 일반적으로View는 사용자가 보고 상호작용할 수 있는 것을 그립니다.ViewGroup은 그림 1과 같이View및 기타ViewGroup객체의 레이아웃 구조를 정의하는 보이지 않는 컨테이너입니다.
그림 1. UI 레이아웃을 정의하는 뷰 계층 구조 예
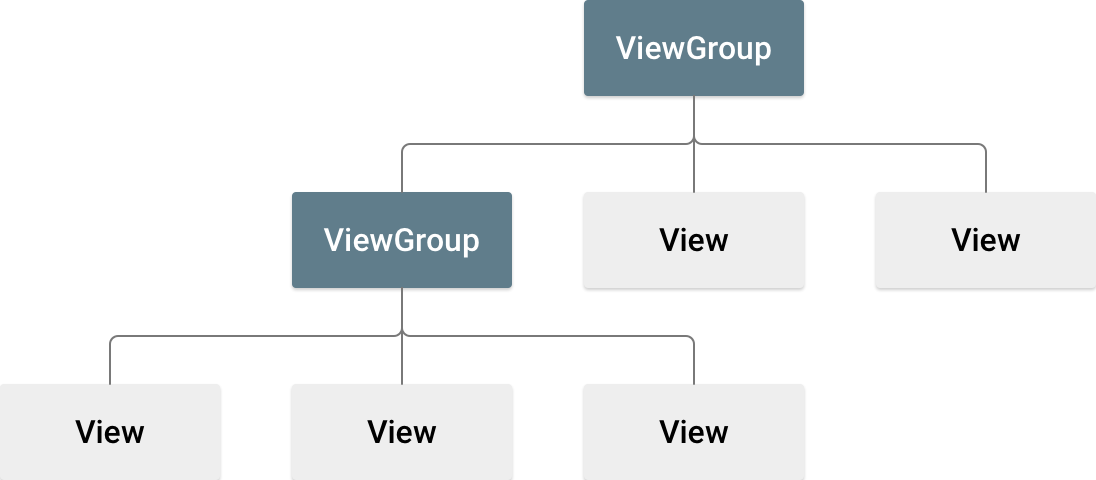
우리에게 가장 친숙한 HTML로 살펴본다면 View는 사용자와 소통하는 각각의 컴포넌트에, ViewGroup은 그 컴포넌트들을 감싸고 있는 <div> 태그 정도로 봐도 무방할 것 같습니다.
안드로이드에서는 이를 XML로 작성하여 화면에 보여주며, 반드시 하나의 View나 ViewGroup으로 감싸져 있어야 합니다.
<?xml version="1.0" encoding="utf-8"?>
<LinearLayout xmlns:android="http://schemas.android.com/apk/res/android"
              android:layout_width="match_parent"
              android:layout_height="match_parent"
              android:orientation="vertical" >
    <TextView android:id="@+id/text"
              android:layout_width="wrap_content"
              android:layout_height="wrap_content"
              android:text="Hello, I am a TextView" />
    <Button android:id="@+id/button"
            android:layout_width="wrap_content"
            android:layout_height="wrap_content"
            android:text="Hello, I am a Button" />
</LinearLayout>
이렇게 작성된 XML은 초기에 MainActivity.kt 안에 있는 클래스의 onCreate() 함수에 의해 호출되어 생성됩니다.
fun onCreate(savedInstanceState: Bundle) {
    super.onCreate(savedInstanceState)
    setContentView(R.layout.main_layout)
}
Layout에 배치되는 UI
여기서 UI라고 함은 텍스트 상자, 입력상자, 버튼 등 사용자에게 보여줄 다양한 요소를 말합니다. 이는 위에서 언급한 XML 문서로부터 작성되고 onCreate() 함수에 의해 초기화 됩니다.
각각의 요소들은 속성을 갖습니다.
<div id="container" class="wrap" style="width: 100px; height: 100px;" />html에서도 각 태그들은 위와 같이 속성과 값이라는 구조를 가지며 태그만의 특성을 나타내주었습니다.
안드로이드에서도 비슷한 방식을 취하는데 위의 xml을 예로 들어보겠습니다.
android:layout_width와 android:layout_height
모든 컴포넌트는 레이아웃 위에 배치됩니다. 이 때 레이아웃 컨테이너 내부에서 어느 정도의 너비와 높이를 가질 것인지 나타냅니다.
match_parent와 wrap_content
match_parent는 상위 뷰 그룹이 허용하는 한 최대한 커지도록 뷰에 지시합니다.
wrap_content는 콘텐츠에 필요한 치수대로 알아서 크기를 조절하라고 뷰에 지시합니다.
단, 픽셀과 같이 절대적인 단위를 사용하여 레이아웃 너비와 높이를 지정하는 것은 권장되지 않습니다. 밀도 독립형 픽셀 단위(dp)나 wrap_content, match_parent와 같은 상대적인 측정값을 사용하는 것이 좋습니다.
android:id="@+id/아이디"
컴포넌트의 아이디를 나타냅니다. 아이디를 통해 MainActivity에서 각 컴포넌트에 접근하여 이벤트를 제어하거나 할 수 있습니다.
android:orientation="vertical 또는 horizontal"
컨텐츠가 쌓이는 방식입니다. horizontal이면 컴포넌트가 수평하게 쌓입니다.
반대로 vertical이면 컴포넌트가 수직으로 쌓입니다.
ConstraintLayout
최신 레이아웃 방식입니다.
기존의 레이아웃도 물론 멋있는 애플리케이션을 만들 수 있었지만, 개발자들을 힘들게 만들었습니다.
그것은 바로 기기마다 다른 해상도가 주원인이었고, 개발자들은 어쩔 수 없이 다양한 해상도를 지원하기 위해 해상도만 다른 같은 앱을 여러개 만들었어야 했습니다.
그러나 Constraint Layout은 혁신을 불러왔습니다. 마치 HTML의 flex box처럼 작동하여 다양한 기기의 해상도에 맞게 알아서 컴포넌트의 크기를 최적화 해주기 때문입니다.
A ConstraintLayout is a ViewGroup which allows you to position and size widgets in a flexible way.
안드로이트 프로젝트를 새로 만들게 되면 레이아웃은 기본적으로 Constraint로 설정되어 있습니다.
<?xml version="1.0" encoding="utf-8"?>
<androidx.constraintlayout.widget.ConstraintLayout
        xmlns:android="http://schemas.android.com/apk/res/android"
        xmlns:tools="http://schemas.android.com/tools"
        xmlns:app="http://schemas.android.com/apk/res-auto"
        android:layout_width="match_parent"
        android:layout_height="match_parent"
        tools:context=".MainActivity">
LinearLayout
LinearLayout is a view group that aligns all children in a single direction, vertically or horizontally. You can specify the layout direction with the
android:orientationattribute.
쉽게 말해서 뷰 그룹의 하위에 속한 항목들을 수직 또는 수평방향으로, 단일 방향으로 배치하는 레이아웃입니다.

<?xml version="1.0" encoding="utf-8"?>
<LinearLayout xmlns:android="http://schemas.android.com/apk/res/android"
              android:layout_width="match_parent"
              android:layout_height="match_parent"
              android:orientation="vertical" >
    <TextView android:id="@+id/text"
              android:layout_width="wrap_content"
              android:layout_height="wrap_content"
              android:text="Hello, I am a TextView" />
    <Button android:id="@+id/button"
            android:layout_width="wrap_content"
            android:layout_height="wrap_content"
            android:text="Hello, I am a Button" />
</LinearLayout>
위 xml에서 레이아웃의 오리엔테이션이 수직으로 정의되어 있으므로 텍스트뷰와 버튼은 수직으로 배치됩니다.
위 아래로 긴 형태가 되는 것이지요.
RelativeLayout
상대적 레이아웃이라고도 부릅니다. 구글 개발자 문서에 우연히 한국어로 된 문서가 있었습니다.
RelativeLayout은 상대 위치에 하위 뷰를 표시하는 뷰 그룹입니다. 각 뷰의 위치는 동위 요소(예: 다른 뷰의 왼쪽 또는 아래)에 상대적이거나 상위RelativeLayout영역(예: 맨 아래, 왼쪽 또는 중앙으로 정렬됨)에 상대적인 위치로 지정될 수 있습니다.

단, 컴포넌트를 만들어주고 위치를 지정해주지 않으면 모두 왼쪽 상단에 그려지기 때문에 RelativeLayout.LayoutParams를 사용하여 위치를 지정해줄 수 있습니다.
RelativeLayout.LayoutParams를 네가지 정도만 가져와서 소개해보겠습니다.
android:layout_alignParentTop: "true"면 뷰의 상단 가장자리를 상위 뷰의 상단 가장자리와 일치시킵니다.android:layout_centerVertical: "true"면 하위 요소를 상위 요소 내에 세로로 중앙에 배치합니다.android:layout_below: 뷰의 상단 가장자리를 리소스 ID로 지정한 뷰 아래에 배치합니다.android:layout_toRightOf: 이 뷰의 왼쪽 가장자리를 리소스 ID로 지정된 뷰의 오른쪽에 배치합니다.- 더 많은 내용은 여기를 참고해주세요.
FrameLayout
우선 설명입니다.
FrameLayout is designed to block out an area on the screen to display a single item. Generally, FrameLayout should be used to hold a single child view, because it can be difficult to organize child views in a way that's scalable to different screen sizes without the children overlapping each other. You can, however, add multiple children to a FrameLayout and control their position within the FrameLayout by assigning gravity to each child, using the android:layout_gravity attribute.
집어 치우고 여기서 FRAME은 액자입니다. 액자에는 사진을 넣습니다.
하나의 액자에 여러개의 사진을 같이 넣으면 마지막에 넣은 사진은 앞에 넣은 사진에 가려서 보이지 않을 것입니다.
이를 프레임 레이아웃에 연결시켜보면 액자 속에서 보이는 뷰는 보이지 않는 뷰를 가리고 있어서 보이지 않는 뷰의 전체를 다 볼 수 없게 됩니다.
세 개의 뷰가 있다고 가정했을 때 크기가 모두 같다면 가장 앞에 있는 뷰만 보이게 되고, 크기가 모두 다르다면 가장 큰 크기의 뷰는 자신을 가리고 있는 뷰에 의해 일부분만 보이게 될 것입니다.
아래와 같이 xml에서 컴포넌트를 정의했다고 가정하면
<?xml version="1.0" encoding="utf-8"?>
<LinearLayout
        xmlns:android="http://schemas.android.com/apk/res/android"
        xmlns:tools="http://schemas.android.com/tools"
        xmlns:app="http://schemas.android.com/apk/res-auto"
        android:layout_width="match_parent"
        android:layout_height="match_parent"
        android:orientation="vertical"
        tools:context=".MainActivity">

    <Button
            android:id="@+id/btn"
            android:text="Button"
            android:layout_width="match_parent"
            android:layout_height="112dp"
            android:layout_weight="1"
            android:onClick="onClick"
    />

    <FrameLayout
            android:layout_width="match_parent"
            android:layout_height="match_parent"
            android:layout_weight="1"
    >

        <!-- 바다 그림 -->
        <ImageView
                android:id="@+id/sea"
                android:layout_width="wrap_content"
                android:layout_height="wrap_content"
                app:srcCompat="@drawable/sea"
        />

		<!-- 자동차 그림 -->
        <ImageView
                android:id="@+id/pride"
                android:layout_width="337dp"
                android:layout_height="181dp"
                app:srcCompat="@drawable/pride"
        />

    </FrameLayout>


</LinearLayout>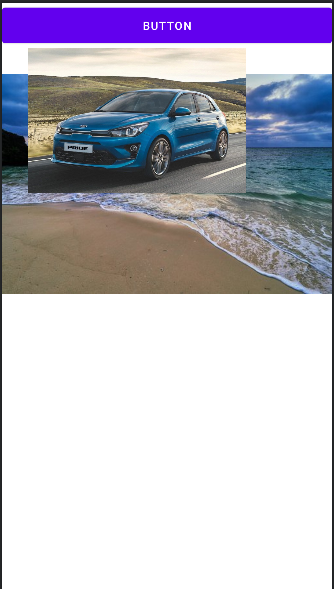
이와 같은 형태로 보일 것입니다.
나중에 들어간 자동자 사진이 맨 앞으로 나와서 처음 들어간 바다 사진을 가리는 것이지요.
참고로 여기서 app:srcCompat="@drawable/pride"는 미디어를 삽입하기 위한 속성으로 @drawble 디렉터리 안에 들어있는 사진이름을 적어준 것입니다.
GridLayout
CSS에서 그리드 시스템이라는 개념에 대해 들어보았을 것입니다.
MDN에서 다음과 같이 정의합니다.
그리드는 수평선과 수직선으로 이루어진 집합체로, 디자인 요소를 정렬할 수 있는 대상 패턴을 생성한다. 이 디자인은 페이지에서 페이지로 이동할 때 요소가 널뛰거나 너비가 바뀌지 않는 디자인 생성에 도움을 주어 웹 사이트의 일관성을 높여준다.
하나의 그리드은 대게 columns, rows로 구성되며, 각 행과 열 사이에 공백이 있는데, 대게는 이를 일컬어 gutters라고 부른다.
안드로이드에서도 마찬가지로 row와 column을 가지며 지정된 row와 column에 맞게 컴포넌트를 순서대로 정렬해줍니다.
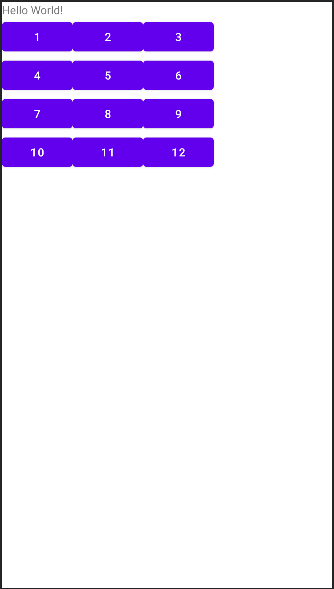
아래 XML을 보시면 <GridLayout />으로 선언되었고 이 태그는 android:rowCount과 android:columnCount라는 속성을 갖습니다.
4행 3열의 구조로 총 12칸을 가지며 1 ~ 12라는 값을 가진 버튼들은 순서대로 배치됩니다.
<?xml version="1.0" encoding="utf-8"?>
<LinearLayout
        xmlns:android="http://schemas.android.com/apk/res/android"
        xmlns:tools="http://schemas.android.com/tools"
        xmlns:app="http://schemas.android.com/apk/res-auto"
        android:layout_width="match_parent"
        android:layout_height="match_parent"
        android:orientation="vertical"
        tools:context=".MainActivity">

    <TextView
            android:layout_width="wrap_content"
            android:layout_height="wrap_content"
            android:text="Hello World!"
            app:layout_constraintBottom_toBottomOf="parent"
            app:layout_constraintLeft_toLeftOf="parent"
            app:layout_constraintRight_toRightOf="parent"
            app:layout_constraintTop_toTopOf="parent"/>

    <GridLayout
            android:layout_width="282dp"
            android:layout_height="wrap_content"
            android:columnCount="3"
            android:rowCount="4"
            android:orientation="horizontal"
    >
        <Button android:text="1"/>
        <Button android:text="2"/>
        <Button android:text="3"/>
        <Button android:text="4"/>
        <Button android:text="5"/>
        <Button android:text="6"/>
        <Button android:text="7"/>
        <Button android:text="8"/>
        <Button android:text="9"/>
        <Button android:text="10"/>
        <Button android:text="11"/>
        <Button android:text="12"/>

    </GridLayout>


</LinearLayout>
다음과 같은 결과를 얻을 수 있습니다.
TableLayout
단어에서 느껴지는 것처럼 표를 기반으로 한 레이아웃입니다.
그리드와 비슷할 수 있으나 그리드는 행렬에 순서대로 컴포넌트가 자리잡는데 반해 테이블은 HTML에서의 테이블처럼 지정된 곳에 값을 넣어줄 수 있습니다.
<?xml version="1.0" encoding="utf-8"?>
<androidx.constraintlayout.widget.ConstraintLayout
xmlns:android="http://schemas.android.com/apk/res/android"
xmlns:tools="http://schemas.android.com/tools"
xmlns:app="http://schemas.android.com/apk/res-auto"
android:layout_width="match_parent"
android:layout_height="match_parent"
tools:context=".MainActivity">
<TextView
android:layout_width="wrap_content"
android:layout_height="wrap_content"
android:text="Hello World!"
app:layout_constraintBottom_toBottomOf="parent"
app:layout_constraintLeft_toLeftOf="parent"
app:layout_constraintRight_toRightOf="parent"
app:layout_constraintTop_toTopOf="parent"/>
<TableLayout
android:layout_width="412dp"
android:layout_height="393dp"
app:layout_constraintTop_toTopOf="parent"
app:layout_constraintBottom_toBottomOf="parent"
app:layout_constraintStart_toStartOf="parent"
app:layout_constraintEnd_toEndOf="parent">
<TableRow android:layout_width="match_parent"
android:layout_height="match_parent">
<TextView android:text="국어"
android:textSize="30sp"
android:padding="10dp"/>
<TextView android:text="수학"
android:textSize="30sp"
android:padding="10dp"/>
<TextView android:text="영어"
android:textSize="30sp"
android:padding="10dp"/>
</TableRow>
<TableRow android:layout_width="match_parent"
android:layout_height="match_parent">
<TextView android:text="80"
android:textSize="30sp"
android:padding="10dp"/>
<TextView android:text="90"
android:textSize="30sp"
android:padding="10dp"/>
<TextView android:text="100"
android:textSize="30sp"
android:padding="10dp"/>
</TableRow>
<TableRow android:layout_width="match_parent"
android:layout_height="match_parent"/>
<TableRow android:layout_width="match_parent"
android:layout_height="match_parent"/>
</TableLayout>
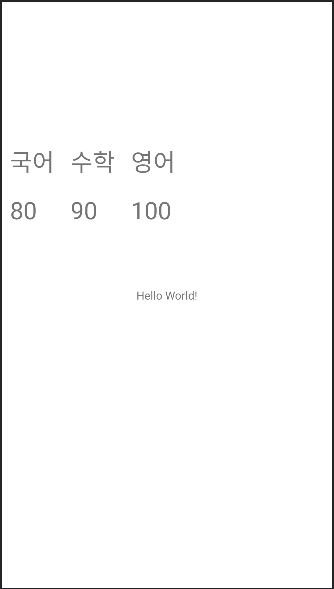
</androidx.constraintlayout.widget.ConstraintLayout>테이블 레이아웃 내부에는 TableRow가 존재하고 내부에 TextView가 들어있는 구조입니다.
마치
<table>
  <tr>
    <td></td>
  </tr>
</table>
와 같은 구조로 볼 수 있습니다.
결과는 다음과 같습니다.