- Swagger Documentation 구현
ApiInfo 추가
User 클래스 수정
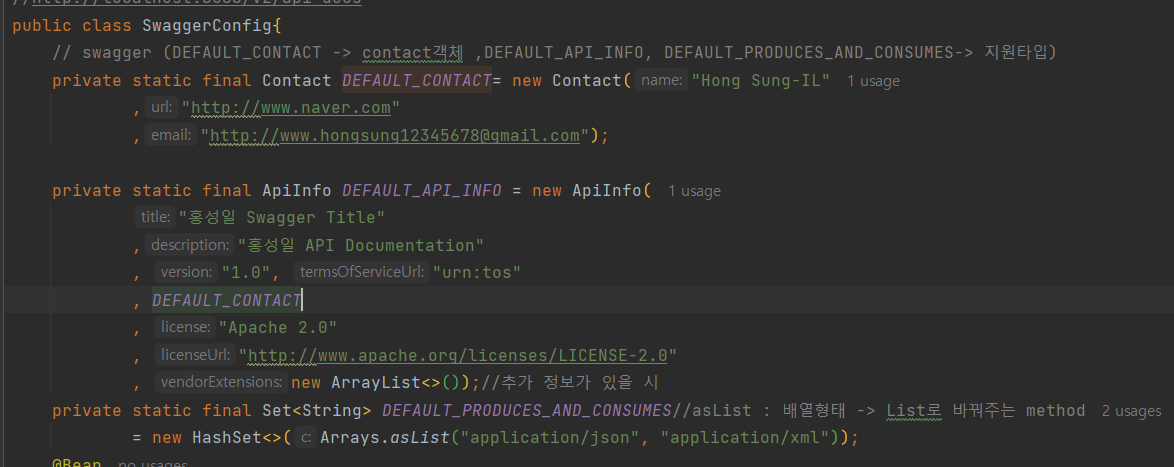
SwaggerConfig
@Configuration
@EnableSwagger2
public class SwaggerConfig{
private static final Contact DEFAULT_CONTACT= new Contact("Hong Sung-IL"
,"http://www.naver.com"
,"http://www.hongsung12345678@gmail.com");
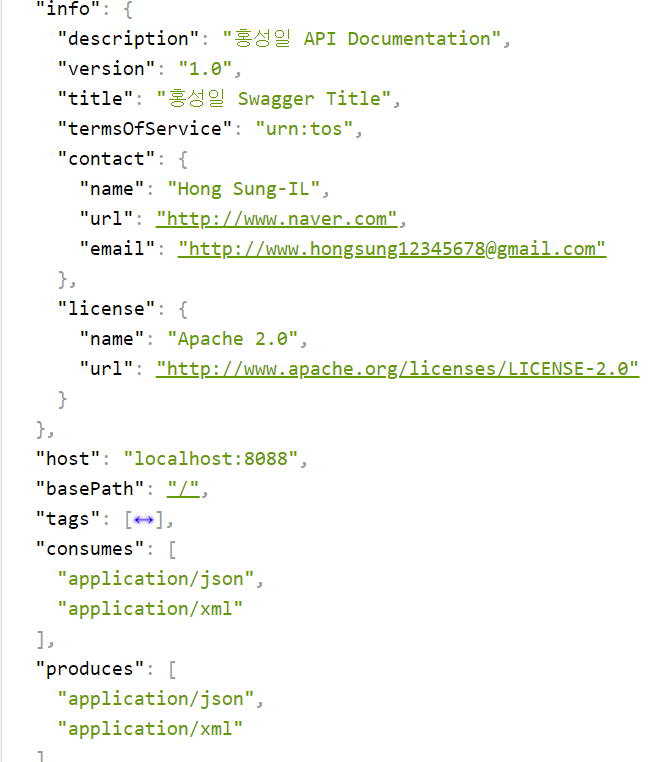
private static final ApiInfo DEFAULT_API_INFO = new ApiInfo(
"홍성일 Swagger Title"
,"홍성일 API Documentation"
, "1.0", "urn:tos"
, DEFAULT_CONTACT
, "Apache 2.0"
, "http://www.apache.org/licenses/LICENSE-2.0"
, new ArrayList<>());//추가 정보가 있을 시 확장
// 지원 타입 명시
private static final Set<String> DEFAULT_PRODUCES_AND_CONSUMES//asList : 배열형태 -> List로 바꿔주는 method
= new HashSet<>(Arrays.asList("application/json", "application/xml"));
@Bean
public Docket api(){
return new Docket(DocumentationType.SWAGGER_2)
.apiInfo(DEFAULT_API_INFO)
.produces(DEFAULT_PRODUCES_AND_CONSUMES)
.consumes(DEFAULT_PRODUCES_AND_CONSUMES);
}
}
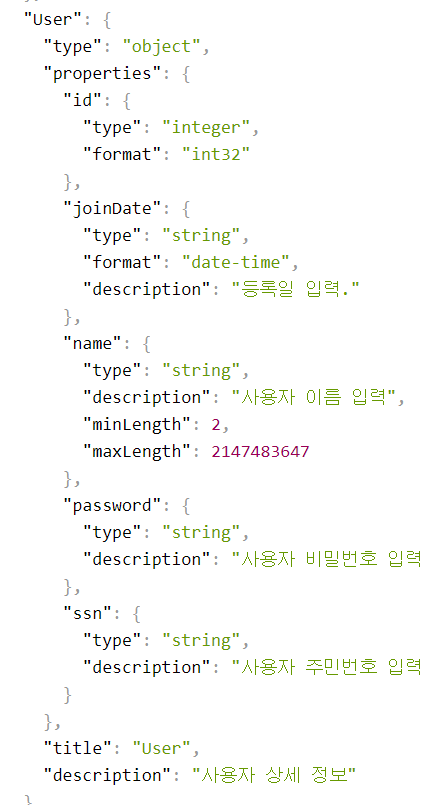
User.class
@ApiModel(description="") - class
@ApiModelProperty(notes="") - property
@Data
@AllArgsConstructor
@JsonFilter("UserInfo")
@NoArgsConstructor
@ApiModel(description = "사용자 상세 정보")//swagger
public class User {
    private Integer id;
    @Size(min=2,message="Name은 2글자 이상 입력.")
    @ApiModelProperty(notes="사용자 이름 입력")//swagger
    private String name;
    @Past
    @ApiModelProperty(notes="등록일 입력.")
    private Date joinDate;
    @ApiModelProperty(notes="사용자 비밀번호 입력.")
    private String password;
    @ApiModelProperty(notes="사용자 주민번호 입력.")
    private String ssn;
}
결과
-
User 클래스 화면
-
ApiInfo 화면

22