최근에 카카오에서 css를 tailwind로 마이그레이션했다.
내가 다니는 회사도 tailwind를 쓰고있기는 한데, unpkg으로 가져와서 텍스트로 클래스만 쭉 입력하는 방식이었다.
FE개발그룹에서는 Tailwind CSS를 왜 도입했고, 어떻게 사용했을까?
카카오에서 마이그레이션하면서 쓴 글을 보니 편하고 유용해보여 리액트로 테일윈드를 임포트 + 커스텀하는 방식에 대해 정리글을 쓰려고 한다.
1. 테일윈드 모듈 설치
테일윈드 홈페이지를 참고한다.
1] 리액트에 모듈을 설치한다.
npm install -D tailwindcss postcss autoprefixer2] 설정파일을 생성한다.
npx tailwindcss init -p 3] 설정파일 변경
위 커맨드를 실행하면 파일이 두개 생기는데, 그 중 tailwind.config.js 파일의 내용을 다음과 같이 변경한다.
/** @type {import('tailwindcss').Config} */

module.exports = {
    content: ["./src/**/*.{js,jsx,ts,tsx}"],
    theme: {
        extend: {},
    },
    plugins: [],
};
4] css에 테일윈드 적용
index.css 파일에 다음 세줄을 추가해 테일윈드를 적용시킨다.@tailwind base;
@tailwind components;
@tailwind utilities;5] tsx에서 테일윈드 써보기
기본 index.css 가 모든 파일에 적용되도록 App.js에서 css파일을 추가한다.
// src/App.js
...
import "../public/css/index.css";
...
지난 글에서 만든 Page_Home.tsx을 수정한다.
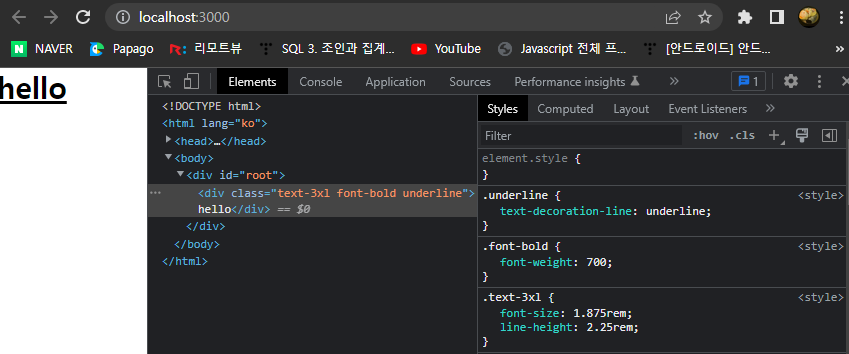
// src/pages/Page_Home.tsx
import React from "react";

const Home = () => {
    return <div className="text-3xl font-bold underline">hello</div>;
};

export default Home;
테일윈드 홈페이지에서 안내하고 있는 항목을 모두 했는데도 테일윈드가 제대로 동작하지 않았는데, CRA로 만든 프로젝트가 아니라서 추가 설정이 필요했다.
배워서 나주는 React에 Tailwind Css 적용하기 글에 해당 사항이 적혀있어 참고해 적용했다.
6] webpack을 위한 모듈 설치 및 설정
6-1) postcss-loader를 설치한다.
npm i -D postcss-loader6-2) 웹팩 설정을 수정한다.
// webpack.common.js
...
module.exports = {
  ...
    module: {
      ...
        rules: [
          ...
            {
                test: /\.css$/,
                use: ["style-loader", "css-loader", "postcss-loader"],
            },
          ...
        ],
      ...
    },
  ...
    }
...
이제 다시 실행해보면 정상적으로 테일윈드가 잘 적용된 것을 확인할 수 있다.
2.테일윈드에 emotion + twin.macro 얹기
emotion은 JavaScript로 css 스타일을 작성하도록 설계된 라이브러리다.
emotion 방식으로 css를 넣으면 class 하나에 css가 축약되어 적용된다.
<div css={css`
    background: red;
    font-size: 1.875rem;
    line-height: 2.25rem;
    font-weight: 700;
    text-decoration-line: underline;`}>
	hello world
</div>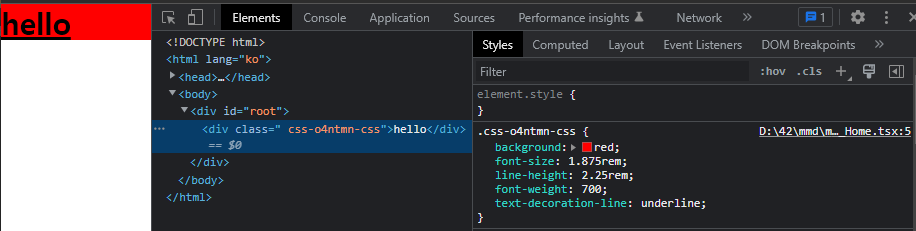
twin.macro는 tailwind를 css에 작성할 수 있도록 도와주는 라이브러리다.
emotion 라이브러리와 함께 사용하면 기존 emotion 방식대로 작성한 css 값과 tailwind방식으로 추가한 css가 함께 단 하나의 class로 축약된다.
<div
    className=""
    css={[
        tw`text-3xl font-bold underline`,
        css`background: red;`,
    ]}>
    hello
</div>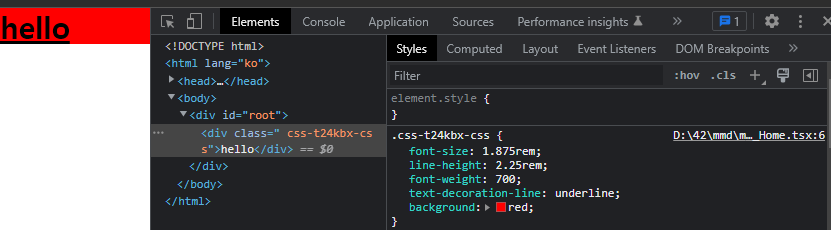
1] 필요한 모듈 설치
npm i @emotion/react @emotion/styled @emotion/babel-preset-css-prop

npm i @tailwindcss/typography twin.macro babel-plugin-twin
emotion에 필요한 모듈과 twin.macro에 필요한 모듈을 모두 설치한다.
2] typescript 설정
twin과 관련된 타입을 명시해야 하므로 types\twin.d.ts을 생성한 후 다음 내용을 채운다.
import 'twin.macro'
import { css as cssImport } from '@emotion/react'
import styledImport from '@emotion/styled'
import { CSSInterpolation } from '@emotion/serialize'

declare module 'twin.macro' {
  // The styled and css imports
  const styled: typeof styledImport
  const css: typeof cssImport
}

declare module 'react' {
  // The tw and css prop
  interface DOMAttributes<T> {
    tw?: string
    css?: CSSInterpolation
  }
}
그리고 tsconfig.json에 다음 코드를 추가한다.
{
  "compilerOptions": {
    ...
    //추가
     "jsxImportSource": "@emotion/react"
  },
  "include": ["src", "types"]
}
3] 바벨 설정
.babelrc내용을 변경한다.
{
    "presets": ["@babel/preset-env",
        ["@babel/preset-react", { "runtime": "automatic" }],
        "@emotion/babel-preset-css-prop",
        "@babel/preset-typescript"],
    "plugins": ["@babel/plugin-transform-runtime",
        "babel-plugin-twin",
        "babel-plugin-macros"]
}
4] 테스트
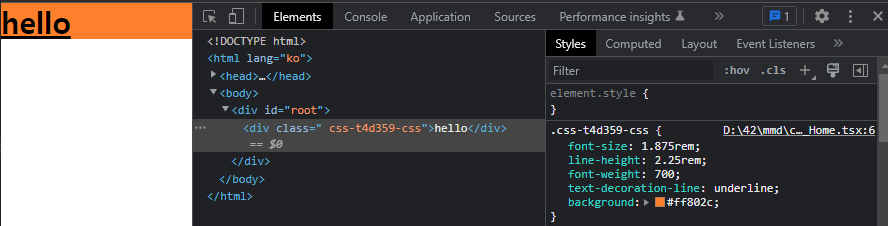
테스트를 위해 pages\Page_Home.tsx에 twin.macro를 적용시켜본다.
import React from "react";
import tw, { css } from "twin.macro";
const Home = () => {
    return (
        <div
            className=""
            css={[
                tw`text-3xl font-bold underline`,
                css`
                    background: #ff802c;
                `,
            ]}
        >
            hello
        </div>
    );
};

export default Home;
npm start로 실행시키면 정상적으로 적용된 것을 확인할 수 있다.
코드 링크:
https://github.com/hokim2407/react-typescript/tree/34ac1ec94e6b43ae8e7c2aeb61e93113908b7d31
+) 사담
twin.Macro를 적용하는데 자꾸 모듈을 찾을 수 없다는 오류가 발생했다.
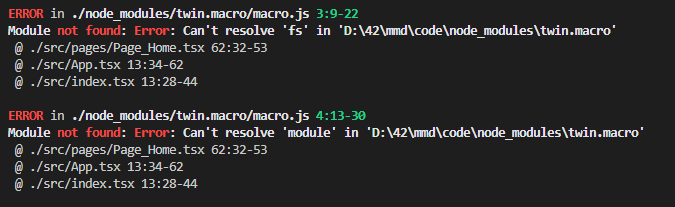 webpack이 버전 5로 업그레이드 되면서 기본 node모듈을 제공하지 않게되면서 발생한 문제라고 해서 관련된 모듈을 대부분 깔아줬는데, module 모듈은 끝내 깔 수가 없었다.
계속 방법을 찾다가 twin.Macro 개발자로 보이는 ben-rogerson님의 예시 깃허브를 발견했다!
클론해서 돌려보니 잘 돌아가서 내 프로젝트를 하나하나 마이그레이션 하면서 찾아봤는데, 소소한 차이도 있었지만 위에서 발생한 문제의 원인은 tsconfig.json 이었다.
기존에는
{
  "compilerOptions": {
    "module": "commonjs",
    "target": "es5",
    ...
로 쓰고있었는데,
{
  "compilerOptions": {
    "module": "ESNext",
    "target": "ESNext",
    ...
으로 바꾸니까 바로 오류가 사라졌다!
(바로 이전글도 수정했다...ㅎㅎㅎ)