serverless framework
AWS Provider 이용한 serverless framework 맛보기
-
서버리스 프레임 워크(AWS provider 이용)를 통해서 작성한
.yaml은 결과적으로 CloudFormation 파일 으로 변경된다. -
💢 서버리스 프레임워크의 lift 플러그인은 사용하지 않고 resource는 직접 제어
-
serverless-lift 를 이용하면 layer 설정할 때도 용량이 커짐
-
그리고 resource 제어는 terraform 이나 직접 제어가 좋음
-
서버리스 프레임워크를 사용하는 경우, lambda function 로컬로 개발해서 업로드하는 경우에만 사용, step Function 까지
- 서버리스 프레임워크로 resource 까지 제어 할 수 있으나 더 넓게 제어가능한 테라폼을 이용
-
테라폼(Terraform) : 사용자는 HashiCorp 구성 언어(HCL) 또는 선택적으로 JSON 으로 알려진 선언적 구성 언어를 사용하여 데이터 센터 인프라를 정의하고 제공 [WIKI]
- IaC : 코드형 인프라(Infrastructure as Code, IaC)는 수동 프로세스가 아닌 코드를 통해 인프라를 관리하고 프로비저닝하는 것 [코드형 인프라(IaC)란? - Red Hat] , 코드로 모든 것을 다 한다.
- EC2, Queue, Redis, WAF 등등 리소스 관리할 예정
✅ 서버리스 프레임워크에서는 람다 Functions 이외는 제어하지 않고, 리소스는 테라폼 OR 직접 제어
-
-
서비리스 프레임워크 설치
- window 10 에서 설치중 오류
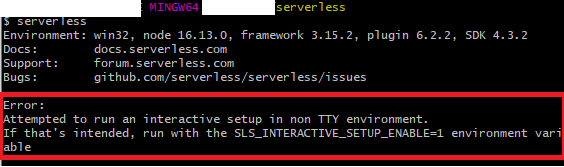
Error:
Attempted to run an interactive setup in non TTY environment.
If that's intended, run with the SLS_INTERACTIVE_SETUP_ENABLE=1 environment variable
오류:
TTY가 아닌 환경에서 대화형 설치를 실행하려고 했습니다.
원하는 경우 SLS_INTERACTIVE_SETUP_ENABLE=1 환경 변수를 사용하여 실행합니다.
- 터미널 환경에서 실행하라고 하기에 power shell 환경에서 수행 했다.
npm install -g serverless
AWS에서 serverless framework with node.js
IAM 계정(Aaccount) & 정책(Policy)생성
정책(Policy) 생성 - LambdaPolicy
❕ AWS - Credential, AWS provider 자격증명 설정 하는 여러가지 방법
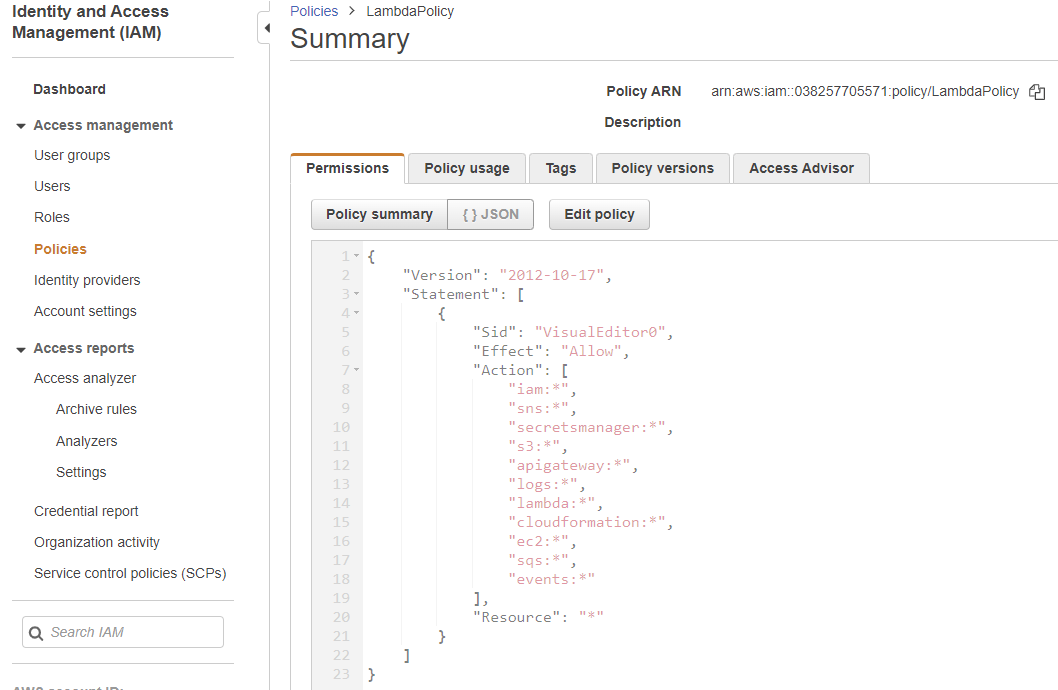
- lambda, cloudformation, sqs 등등,,,
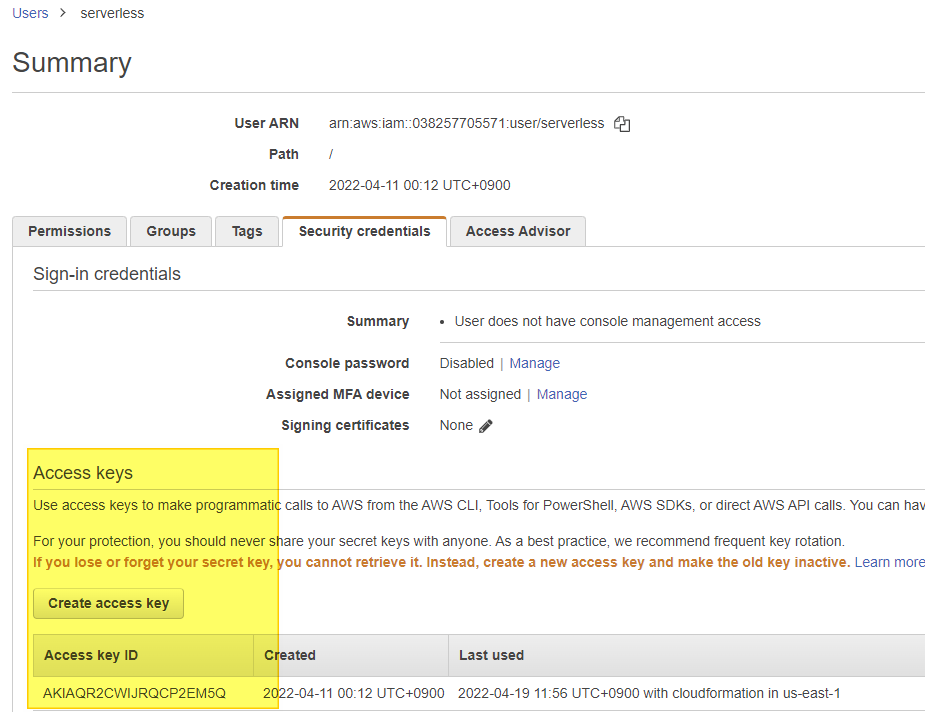
계정(Account) 생성 - serverless
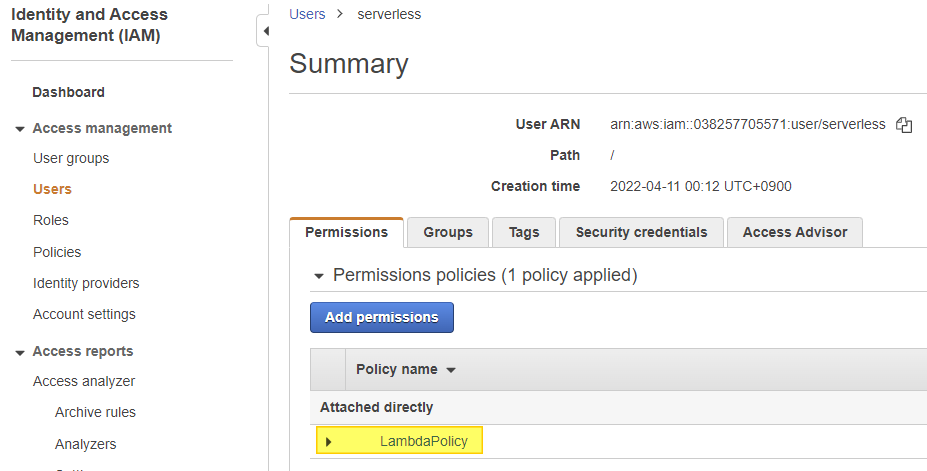
Access, Secret Key 발급
AWS CLI 설치
❕ Installing or updating the latest version of the AWS CLI - AWS Command Line Interface
AWS Config 설정
$ aws configure
AWS Access Key ID [None]: AKIAIOSFODNN7EXAMPLE
AWS Secret Access Key [None]: wJalrXUtnFEMI/K7MDENG/bPxRfiCYEXAMPLEKEY
Default region name [None]: None
Default output format [None]: json
Node.js 설치
Serverless 설치
$ npm install -g serverless
Serverless Framework Getting Started
❕ Serverless Getting Started Guide
Starter 서비스 생성 및 배포
❕ serverless framwork, node.js 로 시작하기
- window 10에서 power shell에서 수행
- 💥 이미 예시로 만들어둔 serverless tempate 활용해보기 💥
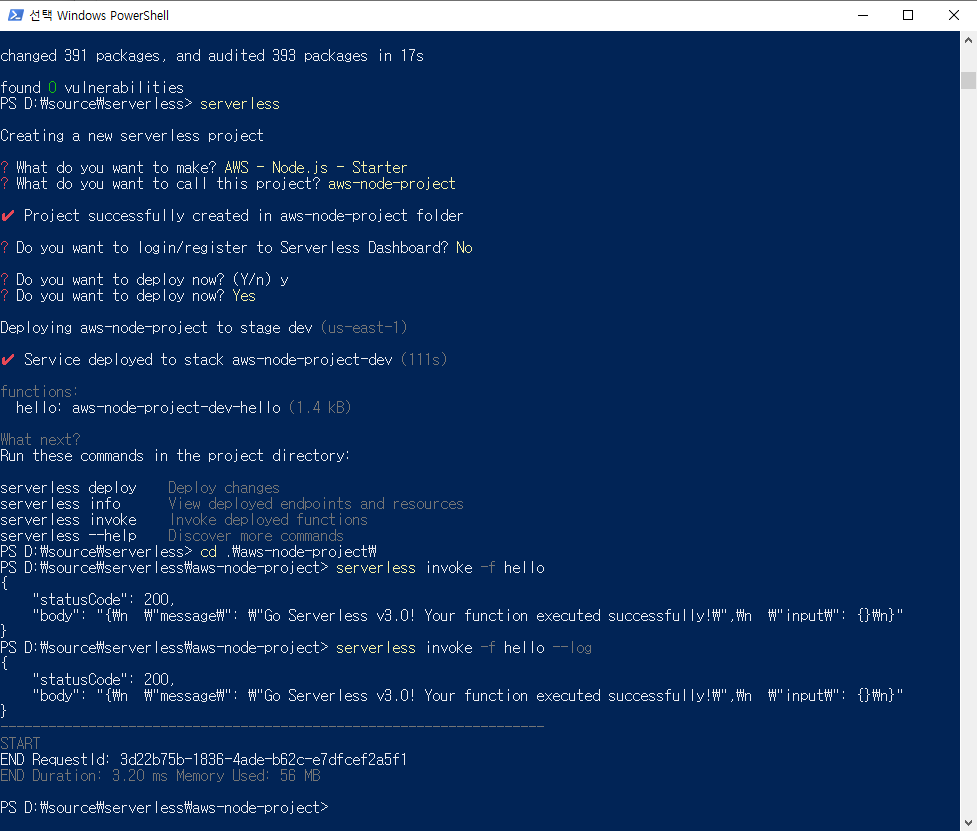
$ serverless
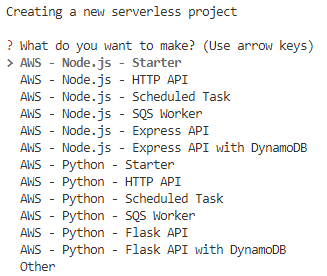
Creating a new serverless project
? What do you want to make? (Use arrow keys)
> AWS - Node.js - Starter
AWS - Node.js - HTTP API
AWS - Node.js - Scheduled Task
AWS - Node.js - SQS Worker
AWS - Node.js - Express API
AWS - Node.js - Express API with DynamoDB
AWS - Python - Starter
AWS - Python - HTTP API
AWS - Python - Scheduled Task
AWS - Python - SQS Worker
AWS - Python - Flask API
AWS - Python - Flask API with DynamoDB
Other
? What do you want to make? AWS - Node.js - Starter
? What do you want to call this project? aws-node-project
✔ Project successfully created in aws-node-project folder
? Do you want to login/register to Serverless Dashboard? No
? Do you want to deploy now? (Y/n) Y
? Do you want to deploy now? Yes
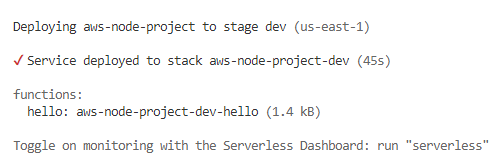
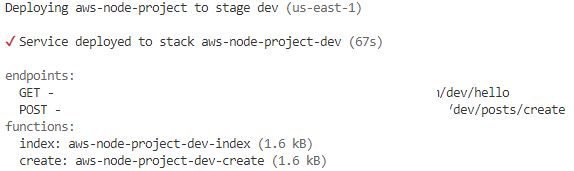
Deploying aws-node-project to stage dev (us-east-1)
✔ Service deployed to stack aws-node-project-dev (113s)
functions:
hello: aws-node-project-dev-hello (1.4 kB)함수 호출
API를 배포한 경우 해당 URL을 쿼리하여 연결된 Lambda 함수를 트리거합니다. serverless deploy출력 에서 해당 URL을 찾거나 나중에 serverless info를 통해 검색할 수 있습니다.
URL을 통해 노출되지 않는 함수를 배포한 경우 다음을 통해 호출할 수 있습니다.
$ cd aws-node-project
$ serverless invoke -f hello
{
    "statusCode": 200,
    "body": "{\n  \"message\": \"Go Serverless v3.0! Your function executed successfully!\",\n  \"input\": {}\n}"
}

# Invoke and display logs:
$ serverless invoke -f hello --log
{
    "statusCode": 200,
    "body": "{\n  \"message\": \"Go Serverless v3.0! Your function executed successfully!\",\n  \"input\": {}\n}"
}
--------------------------------------------------------------------
START
END RequestId: 4d31e061-c929-4254-b843-85a5d5343001
END Duration: 2.52 ms Memory Used: 57 MB
AWS Console -> Cloudformation 확인

로그 확인
$ serverless logs -f hello

# Tail logs
$ serverless logs -f hello --tail
Starter 서비스 제거
$ serverless remove서비리스 프레임워크 사용하기
AWS
배포 ( deploy )
serverless 명령 내에서 아직 수행하지 않은 경우 다음을 실행하여 언제든지 프로젝트를 배포할 수 있습니다.
serverless deploy배포된 기능, 리소스 및 URL이 명령 출력에 표시됩니다.
함수 호출 ( Invoking function )
-
API를 배포한 경우 해당 URL을 쿼리하여 연결된 Lambda 함수를 트리거합니다
-
serverless deploy출력 에서 해당 URL을 찾거나 나중에serverless info를 통해 검색 -
URL을 통해 노출되지 않는 함수를 배포한 경우 다음을 통해 호출할 수 있습니다.
	serverless invoke -f hello

	# Invoke and display logs:
serverless invoke -f hello --log- template 의 내용을 변경한후 호출 했더니 위에서 변경배포 된 내역을 확인

함수 로그 가져오기 ( Fetching function logs )
함수 호출에 의해 생성된 모든 로그는 AWS CloudWatch에 자동으로 저장됩니다. 다음을 통해 CLI에서 해당 로그를 검색합니다.
	serverless logs -f hello

	# Tail logs
	serverless logs -f hello --tail
AWS Service
❕ 서비스
1 service = 1 프로젝트를 의미- 여기에서 트리거하는 AWS Lambda 함수 events와 필요한 AWS 인프라 resources를 모두
serverless.yml라는 파일에 정의합니다.
users /
   # Users  CRUD 작업 및 Users 데이터베이스 를 수행하는 4개의 함수 포함
  serverless.yml
posts/ # Posts CRUD 작업 및 Posts 데이터베이스 를 수행하는 4개의 함수 포함
  serverless.yml
comments/ # Comments CRUD 작업 및 Comments를 수행하는 4개 함수 포함 데이터베이스
  serverless.yml
이는 관련 기능이 일반적으로 공통 인프라 리소스를 사용하고 더 나은 조직 및 문제 분리를 위해 이러한 기능과 리소스를 단일 배포 단위로 함께 유지하기를 원하기 때문에 의미가 있습니다.
serverless.yml
-
각
service구성은serverless.yml파일에서 관리 -
이 파일의 주요 책임은 다음과 같습니다.
- 서버리스 서비스 선언
- 서비스에서 하나 이상의 기능 정의
- 서비스가 배포될 공급자를 정의합니다(제공되는 경우 런타임).
- 사용할 사용자 정의 플러그인 정의
- 각 기능을 실행하는 이벤트 정의(예: HTTP 요청)
- 이 서비스의 기능에 필요한 리소스 집합(예: DynamoDB 테이블 1개) 정의
- 섹션에 나열된 events이벤트가 배포 시 이벤트에 필요한 리소스를 자동으로 생성하도록 허용
- 서버리스 변수를 사용하여 유연한 구성 허용
서비스 이름, 공급자 구성 및 파일을 handler.js 가리키는 functions 정의 내부의 첫 번째 함수를 볼 수 있습니다. 추가 서비스 구성은 이 파일에서 수행됩니다.
service: users: 서비스 기준으로 뭔가 생성됐던 것 같기두..
# serverless.yml

service:  users  # 서비스 기준으로 뭔가 생성됐던 것 같기두..

provider:
  name:  aws
  runtime:  nodejs12.x
  stage:  dev  # 사용되는 기본 단계를 설정합니다. 기본값은 dev
  region:  us-east-1  # 사용되는 기본 지역을 덮어씁니다. 기본값은 us-east-1 입니다.
  stackName:  my-custom-stack-name-${sls:stage}  # 기본 CloudFormation 스택 이름을 덮어씁니다. 기본값은 ${self:service}-${sls:stage}
  apiName:  my-custom-api-gateway-name-${sls:stage}  # 기본 API 게이트웨이 이름을 덮어씁니다. 기본값은 ${sls:stage}-${self:service} 입니다 .
  profile:  production  # 이 서비스와 함께 사용할 기본 프로필
  memorySize:  512 # 기본 메모리 크기를 덮어씁니다. 기본값은 1024 입니다.
  deploymentBucket:
    name:  com.serverless.${self:provider.region}.deploys  # 기본 배포 버킷을 덮어씁니다.
    serverSideEncryption:  AES256  # 서버 측 암호화
    태그를 사용할 때:  # 각 배포에 추가될 태그 resources
      key1:  value1
      key2:  value2
  deploymentPrefix:  serverless  # 배포된 아티팩트가 저장되어야 하는 기본 S3 접두사를 덮어씁니다. 기본값은 서버리스
  versionFunctions:  false  # 선택적 기능 버전 관리
  stackTags:  # 선택적 CF 스택 태그
    key: value
  stackPolicy: # Optional CF stack policy. The example below allows updates to all resources except deleting/replacing EC2 instances (use with caution!)
    - Effect: Allow
      Principal: '*'
      Action: 'Update:*'
      Resource: '*'
    - Effect: Deny
      Principal: '*'
      Action:
        - Update:Replace
        - Update:Delete
      Resource: '*'
      Condition:
        StringEquals:
          ResourceType:
            - AWS::EC2::Instance

functions:
  usersCreate: # A Function
    handler: users.create
    events: # The Events that trigger this Function
      - httpApi: 'POST /users/create'
  usersDelete: # A Function
    handler: users.delete
    events: # The Events that trigger this Function
      - httpApi: 'DELETE /users/delete'

# The "Resources" your "Functions" use.  Raw AWS CloudFormation goes in here.
resources:
  Resources:
    usersTable:
      Type: AWS::DynamoDB::Table
      Properties:
        TableName: usersTable
        AttributeDefinitions:
          - AttributeName: email
            AttributeType: S
        KeySchema:
          - AttributeName: email
            KeyType:  HASH
        ProvisionedThroughput:
          ReadCapacityUnits:  1
          WriteCapacityUnits:  1
AWS - Functions
configuration 구성
# serverless.yml
service: myService

provider:
  name: aws
  runtime: nodejs12.x
  memorySize: 512 # optional, in MB, default is 1024
  timeout: 10 # optional, in seconds, default is 6
  versionFunctions: false # optional, default is true
  tracing:
    lambda: true # optional, enables tracing for all functions (can be true (true equals 'Active') 'Active' or 'PassThrough')

functions:
  hello:
    handler: handler.hello # required, handler set in AWS Lambda
    name: ${sls:stage}-lambdaName # optional, Deployed Lambda name
    description: Description of what the lambda function does # optional, Description to publish to AWS
    runtime: python2.7 # optional overwrite, default is provider runtime
    memorySize: 512 # optional, in MB, default is 1024
    timeout: 10 # optional, in seconds, default is 6
    provisionedConcurrency: 3 # optional, Count of provisioned lambda instances
    reservedConcurrency:  5  # 이 함수에 대한 선택적, 예약된 동시성 제한. 기본적으로 AWS는 계정 동시성 제한을 사용합니다.
tracing: PassThrough # 선택 사항, 덮어쓰기, 'Active' 또는 'PassThrough' 가능- 함수 배열을 지정하여 함수를 다른 파일로 분리하는 경우에 유용하게 쓰임.
	# serverless.yml
	---
	functions:
  	-  ${file(./foo-functions.yml)}
  	-  ${file(./bar-functions.yml)}
foo-functions.yml
	# foo-functions.yml
	getFoo:
  	  handler: handler.foo
	deleteFoo:
  	  handler: handler.foo
등등 많음...
API 게이트 웨이
- API GATEWAY v1 - ❕ API Gateway REST API (API Gateway v1) Docs
- API GATEWAY v2 - ❕ API Gateway HTTP API (API Gateway v2) - Docs
API GATEWAY v1
- Request Parameters
- API Gateway 테스트 및 SDK 생성에서 사용할 수 있도록 함수에 선택적 매개 변수와 필수 매개 변수를 전달하려면 매개 변수를
true로 표시하면 필수 매개 변수가 되고false는 선택적 매개 변수가 됩니다.
functions:
  create:
    handler: posts.create
    events:
      - http:
          path: posts/create
          method: post
          request:
            parameters:
              querystrings:
                url: true
              headers:
                foo: false
              paths:
                bar: false
SQS 연동
- 기존 SQS 연동 : ❕ events - sqs
- ❕ aws lambda 개발하기 - (8) SQS 연동
- ❕ AWS Lambda에서 AWS SQS 실행하기 (Node.js)
💥참고💥
- Events sqs는 기존 SQS 대기열을 Lambda 함수에 연결
- 서버리스는 새 대기열을 생성 X
궁금한 사항
{proxy+}의 사용 이유 -> 쿼리스트링, PathVirable 캡쳐하기 위함. (event.getParameters??.proxy)으로 들어옴.- GET 방식에는 프록시가 들어가 있음.
/ft/klaytn/transfer/{proxy+}
- GET 방식에는 프록시가 들어가 있음.
-
lambda 를 이용하여 endpoint 설정시 람다 하나에 여러개의 endpoint가 들어가면 어떻게 되나??
- lambda는 별도로 생성되나 중복된 코드가 들어 갔다.

- lambda는 별도로 생성되나 중복된 코드가 들어 갔다.
-
handler.hello
  // handler.js

  'use strict';

  module.exports.hello = function (event, context, callback) {
    console.log(event); // Contains incoming request data (e.g., query params, headers and more)

    const response = {
      statusCode: 200,
      headers: {
        'x-custom-header': 'My Header Value',
      },
      body: JSON.stringify({ message: 'Hello World!' }),
      event: event,
      context: context,
    };

    callback(null, response);
  };

  module.exports.create = function (event, context, callback) {
    console.log(event); // Contains incoming request data (e.g., query params, headers and more)

    const response = {
      statusCode: 200,
      headers: {
        'x-custom-header': 'My Header Value',
      },
      body: JSON.stringify({ message: 'Hello World!' }),
      event: event,
      context: context,
    };

    callback(null, response);
  };
- posts/create
// handler.js

'use strict';

module.exports.hello = function (event, context, callback) {
  console.log(event); // Contains incoming request data (e.g., query params, headers and more)

  const response = {
    statusCode: 200,
    headers: {
      'x-custom-header': 'My Header Value',
    },
    body: JSON.stringify({ message: 'Hello World!' }),
    event: event,
    context: context,
  };

  callback(null, response);
};

module.exports.create = function (event, context, callback) {
  console.log(event); // Contains incoming request data (e.g., query params, headers and more)

  const response = {
    statusCode: 200,
    headers: {
      'x-custom-header': 'My Header Value',
    },
    body: JSON.stringify({ message: 'Hello World!' }),
    event: event,
    context: context,
  };

  callback(null, response);
};
환경 변수 설정
❕ aws lambda 개발하기(3) - node package(모듈) 설치 및 개발, 환경변수 적용
- ${file(FILE_PATH)}
- ${환경변수_프로퍼티}
- local.json
{
   "DB_HOST:"localhost"
   "DB_PORT:3306
   "DB_USER:"root"
   "DB_PASSWD:"password"
   "DB_NAME:"page-community"
   "REDIS_HOST:"localhost"
   "REDIS_PORT:6379"
}
- serverless.yml
service: lambda-ranking-hourly
custom:
  env: ${file(./env/${opt:stage,'local'}.json)}
provider:
   // 중간 내용 생략
    environment:
        DB_HOST: ${self:custom.env.DB_HOST}
        DB_PORT: ${self:custom.env.DB_PORT}
        DB_USER: ${self:custom.env.DB_USER}
        DB_PASSWD: ${self:custom.env.DB_PASSWD}
        DB_NAME: ${self:custom.env.DB_NAME}
        REDIS_HOST: ${self:custom.env.REDIS_HOST}
        REDIS_PORT: ${self:custom.env.REDIS_PORT}
// 나머지 내용 생략
- 환경변수 사용법
- process.env.[변수]
const mysql = require('mysql');

module.exports = {
    getCommentByDB: () => new Promise((resolve, reject) => {
    // Mysql
    const mysql_connection = mysql.createConnection({
      host: process.env.DB_HOST,
      port: process.env.DB_PORT,
      user: process.env.DB_USER,
      password: process.env.DB_PASSWD,
      database: process.env.DB_NAME
    });

    mysql_connection.connect();
    mysql_connection.query('select * from comment order by id desc limit 5', function(err, result, field) {
        if(result)
          resolve(result);

        if(err)
          console.log("db-error:",err);
    });
    mysql_connection.end();
  })
}
serverless framework - test
serverless framework docs - testing
참고
Serverless AWS SQS Pub/Sub template
const { SQS } = require("aws-sdk");

const sqs = new SQS();

const producer = async (event) => {
  let statusCode = 200;
  let message;

  if (!event.body) {
    return {
      statusCode: 400,
      body: JSON.stringify({
        message: "No body was found",
      }),
    };
  }

  try {
    await sqs
      .sendMessage({
        QueueUrl: process.env.QUEUE_URL,
        MessageBody: event.body,
        MessageAttributes: {
          AttributeName: {
            StringValue: "Attribute Value",
            DataType: "String",
          },
        },
      })
      .promise();

    message = "Message accepted!";
  } catch (error) {
    console.log(error);
    message = error;
    statusCode = 500;
  }

  return {
    statusCode,
    body: JSON.stringify({
      message,
    }),
  };
};

// handler Name : jobsWorker

const consumer = async (event) => {
  for (const record of event.Records) {
    const messageAttributes = record.messageAttributes;
    console.log(
      "Message Attribute: ",
      messageAttributes.AttributeName.stringValue
    );
    console.log("Message Body: ", record.body);
  }
};

module.exports = {
  producer,
  consumer,
};
(SQS 트리거로 시작하는 핸들러) Consumer Handler Testing
-
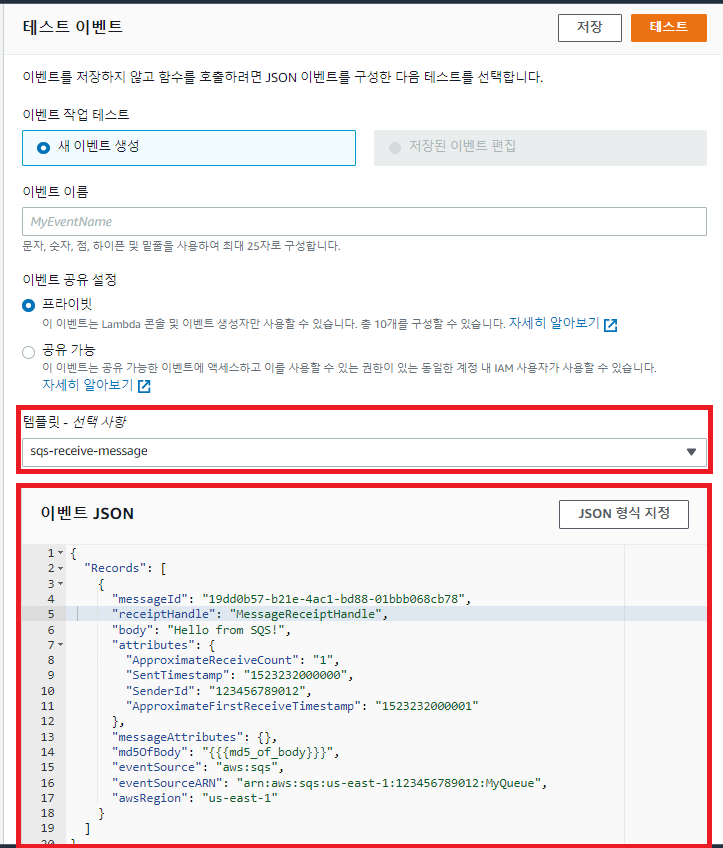
lambda 함수에서 SQS에 들어온 Message 를 받아 처리해야하는데 개발중인 lambda 에서는 SQS trigger를 설정할 방법이 없기 때문에 SQS 메시지가 전달되었다고 가정하고 테스트를 진행
- lambda 함수로 전달되는 SQS Message 형식 존재
-
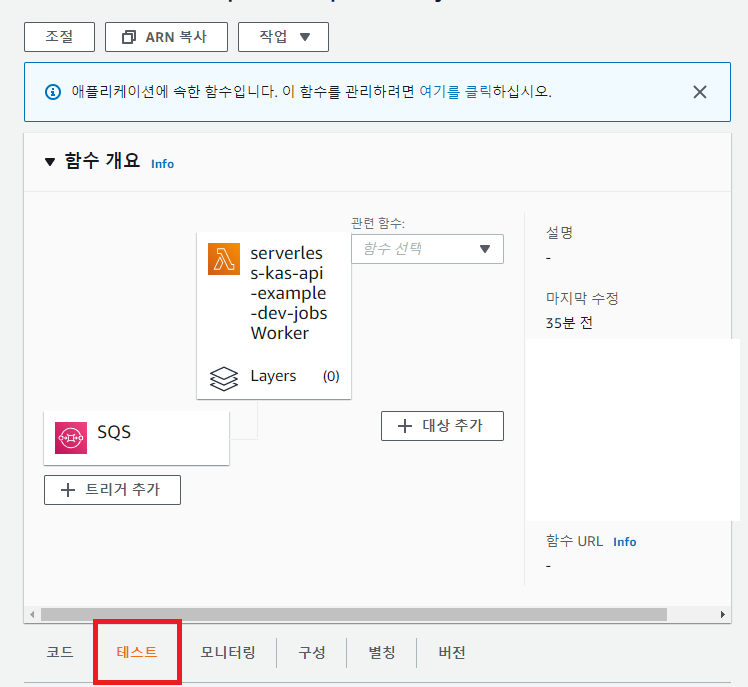
aws lambda console에 들어가 테스트 클릭
-
이후 템플릿에서 sqs template 선택
-
Test 로 사용할 템플릿으로 만들어진 JSON event 객체를 적절히 수정하여 저장
- test/sample.json 경로에 생성함.

- test/sample.json 경로에 생성함.
-
이벤트 JSON 파일을 lambda에 주입하여 테스트
serverless invoke local -f [Function Name(Handler)] -p [Test JSON File Path]- 💨 Consumer handler Name : jobsWorker
$ serverless invoke local -f jobsWorker -p test/sample.json

---  Running "serverless" from node_modules  ---
}
  Message Attribute:  TEST MESSAGE!!!!
  Message Body:  Hello from SQS!
}
Lambda Layer
-
Lambda layers: 람다 모듈을 참조를 할때(마운트) 외부로 빼기 위해
NODE_PATH환경 변수를 이용하는데 그 설정한것 때문에 그래서lib로 별도로 올려야 가능-
lib디렉터리로 따로 빼신 이유: 💨 Layermodule로 뺄때.. 디렉토리 기준으로 빼다보니.. node_modules를 따로 분리했습니다. -
layer 모듈 크기 제한 250MB 인것을 감안해야한다. / 💥 사용하지 않는 모듈 정리!
💢 serverless-lift 사용시 250MB 이상layers: - {Ref: NodeModulesLambdaLayer} # 해당 표현은 아래의 것과 매칭된다. layers: nodeModules: path: lib name: knx-${self:provider.stage}-layer-node-modules ####################################################### 참고 ####################################################### provider: ... stage: ${opt:stage, 'dev'}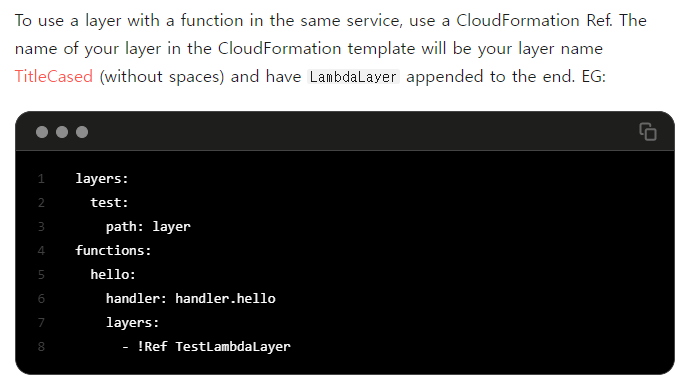
💦 functions에 layers를 추가하는 방법은 Layers의 이름(test, nodeModules, ...) +LambdaLayer를 붙이면 됩니다. ➡ TestLambdaLayer / NodeModulesLambdaLayer💦 / opt는 "애드온 응용 프로그램 소프트웨어 패키지 설치"를위한 것 - Linux : Opt Directory 란 무엇이며 Opt Directory를 여는 방법, Linux에서 /opt는 무엇을 의미합니까?
🆘/opt디렉터리는 Lambda가 표준 Lambda 런타임 환경에 포함되지 않은 추가 라이브러리나 종속성을 찾는 곳 - 😊 계층 콘텐츠 패키징💤
NODE_PATH: "./:/opt/node_modules"의 의미는./경로에 있는 디렉터리 또는 파일을/opt/node_modules경로에서 참조
./현재위치와/opt/node_modules의 경로 두개라는 것을 의미하는 것 같다5. 리눅스 환경변수(path) 설정
💨 Lambda Layers & Node & require the layer code & sls invoke localprovider: tracing: lambda: true environment: NODE_PATH: "./:/opt/node_modules" 이경우면 설정값에서 ./경로랑 /opt/node_odeuls 라는 경로랑 매칭된다. -> 람다는 잘모르는데 도커 설정파일건드렸을땐 현재 로컬서버랑 -> 컨테이너 안의 요소랑 매칭되는걸로 저렇게 자주 썼어여 아마 비슷한 경우인것같아유
-
# 에러
- **request 에 보낸 데이터가 lambda에서 `undefined` 인지 확인할 것**
  - PathVariable, RequestParam, RequestBody 등에 필요한 value의 값이 비어 있나 확인

- **strict-origin-when-cross-origin**
[Your CORS and API Gateway survival guide](https://www.serverless.com/blog/cors-api-gateway-survival-guide)
  - **요청** 부분에서 cors 설정을 수행하고 **응답** 부분 cors 설정을 해줘야함.

잘.보고.갑니다.^^.