Westagram Project를 하면서 회원가입과 로그인, 인증 & 인가, 게시글과 댓글 작성 기능까지 구현했었다. 당시에는 Get Method를 사용하면서 모든 게시물을 가져오거나 View에서 지정한 특정 게시물의 댓글들만 가져오는 등 단순한 기능만 있었으나, 이번엔 url mapping을 통해 다양한 기능을 구현해보자.
First Thought
Westagram Mission 8 은 다음과 같은 사항을 구현하도록 했다.
GET Method: 1번 게시물에 등록된 댓글만을 표출할 수 있도록 구현해보세요.
이를 위한 코드는 사실 매우 간단하다.
	comments = Comment.objects.filter(post_id = 1)
        results = []

        for comment in comments:
            results.append(
                {
                    "user"          : comment.user.nickname,
                    "comment"       : comment.comment,
                    "creation_time" : comment.creation_time
                }
            )
코드처럼 Comment Table에서 post의 id가 1인 QuerySet을 구해와 정보를 넣어주면 된다. 그런데 2번 게시물의 댓글을 구하려면 어떻게 해야할까? 구할때마다 View를 수정해야할까? 나는 n번째 게시물의 댓글들을 구하거나, n번째 사용자가 작성한 게시물들 같은 특정 정보를 View 수정 없이 HTTP Request 만으로 얻고 싶었다.
HTTP Request의 GET Method에는 Body가 없다. 따라서 Request에서 입력한 url에 따라 mapping된 App과 View를 통해 주어진 Data 없이 그 안의 로직을 구현할 뿐이다. 이렇게 URL Mapping을 통해 View Logic을 처리하는 것인 Django의 특징 중 하나이다.
그렇다면 URL을 통해서 원하는 정보를 얻을 수 있지 않을까? 예를들어
/post/1은 1번 게시물의 정보,/post/2는 2번 게시물의 정보처럼 분명히 url로 로직을 처리할 수 있을거라고 생각했다.
URL로 Parameter를 받는 것은 시행착오가 있었지만, Django Documentation과 참고사이트 등을 통해 방법을 알게 되었다. 이를 토대로 다양한 기능을 추가해봤다.
특정 Post의 정보 Get
저장된 모든 게시물을 Get하지 않고 특정 게시물만 Get 해보자. 주어진 HTTP Request의 url이 /post/1이면 id가 1인 게시물, /post/3이면 id=3 인 게시물을 불러올 것이다.
urlpattern
postings.urls.py에 다음과 같이 urlpattern을 저장한다. 그냥 <post_id>로 지정하면 str 타입이기 때문에 int:를 붙여 정수형으로 만들어준다.
path('/post/<int:post_id>', PostView.as_view()),
이제 /post/1은 post_id = 1이라는 정보를 가지고 PostView에 Mapping된다.
PostView Class
def get(self, request, post_id):
if not Post.objects.filter(id=post_id).exists():
return JsonResponse({"MESSAGE":"NO_POST"}, status=400)
post = Post.objects.get(id=post_id)
results = []
results.append(
{
"user" : post.user.nickname,
"image" : post.image,
"post" : post.post,
"creation_time" : post.creation_time
}
)
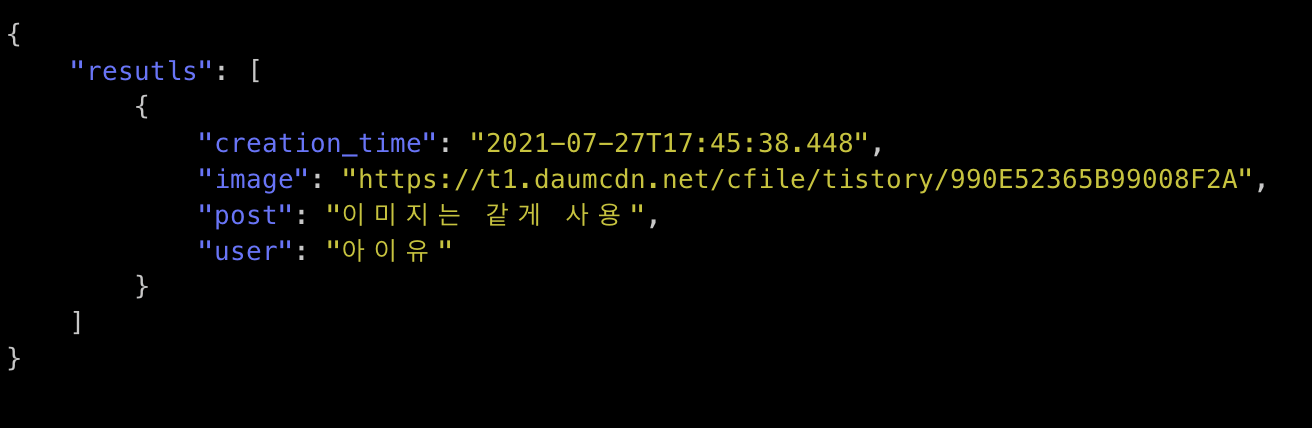
return JsonResponse({'resutls':results}, status=200)GET Method에 self, request 말고도 post_id 라는 argument를 추가해준다. 이제 Get 함수가 url을 통해 입력된 post_id를 받아 사용할 수 있게 되었다. Id가 post_id인 Post의 존재여부를 확인한 후, Post의 instance id가 post_id인 것의 정보를 불러와 응답하면 된다.
Httpie Request
ID=4 인 Post의 정보를 불러오는 Request를 보내 기능이 작동하는지 확인하자.
http -v GET 127.0.0.1:8000/postings/post/4
특정 User의 모든 게시물 GET
urlpattern
path('/<nickname>/follow', FollowView.as_view()),
postings/아이유, postings/장동건과 같은 url을 이용해 사용자가 작성한 게시물의 정보를 볼 수 있다.
UserPostView Class
class UserPostView(View):
    def get(self, request, nickname):
        if not User.objects.filter(user_nickname = nickname).exists():
            return JsonResponse({"MESSAGE":"INVALID_USER"}, status=400)

        posts = Post.objects.filter(user__nickname = nickname)
        results = []

        for post in posts:
            results.append(
                {
                    "user"          : post.user.nickname,
                    "image"         : post.image,
                    "post"          : post.post,
                    "creation_time" : post.creation_time
                }
            )
        return JsonResponse({'resutls':results}, status=200)
nickname argument를 추가하여 원하는 사용자의 nickname을 받아 로직을 처리할 수 있다. 주어진 nickname이 User Table에 존재하지 않는다면 Invalid User 에러를 반환하고, Post Table에서 참조하는 user의 닉네임이 nickname인 모든 Post를 가져와 결과를 응답해준다.
Httpie Request
아이유가 지금까지 쓴 모든 게시물의 정보를 열람해보자.
http -v GET 127.0.0.1:8000/postings/아이유

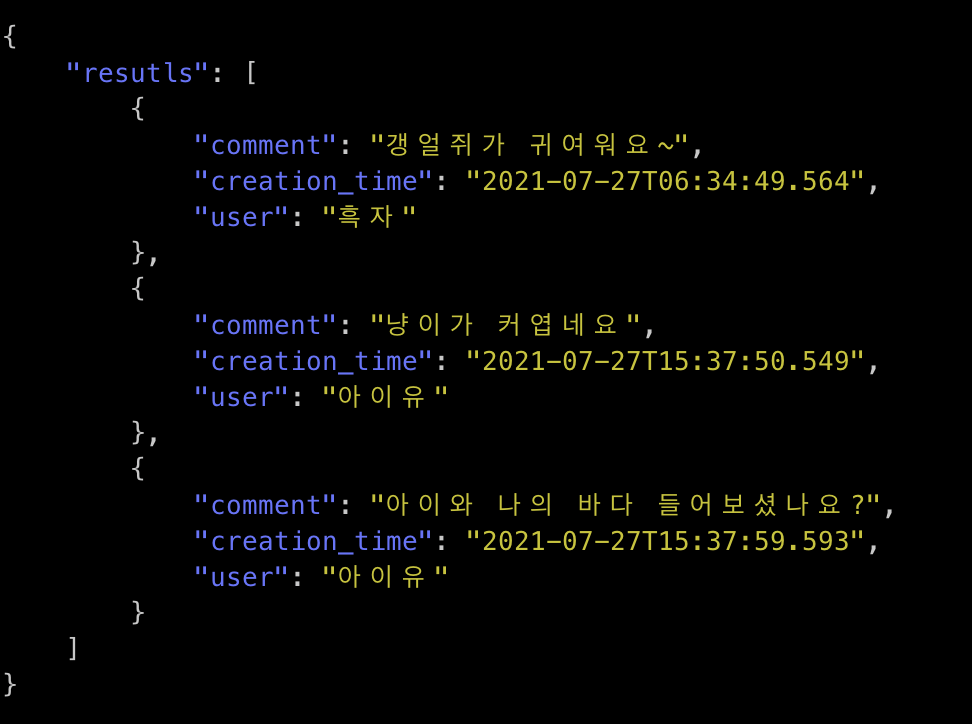
특정 Post의 모든 Comment GET
urlpattern
path('/post/<int:post_id>/comment', CommentView.as_view()),
/post/1/comment, /post/3/comment와 같은 url로 첫번째 게시물의 댓글들, 세번째 게시물의 댓글들과 같이 특정 게시물의 댓글 작성자와 내용을 볼 수 있다.
CommentView Class
class CommentView(View):
	.
    	.
        .
    def get(self, request, post_id):
        comments = Comment.objects.filter(post_id = post_id)
        results = []

        for comment in comments:
            results.append(
                {
                    "user"          : comment.user.nickname,
                    "comment"       : comment.comment,
                    "creation_time" : comment.creation_time
                }
            )
        return JsonResponse({'resutls':results}, status=200)
post_id argument를 추가하여 id가 post_id인 게시물의 존재여부를 확인하고 , Comment Table에서 참조하고 있는 Post의 id가 post_id인 모든 Comment의 정보를 반환한다.
Httpie Request
2번째 게시물의 댓글 작성자와 댓글 내용, 작성시간을 알아보자.
http -v GET 127.0.0.1:8000/postings/post/2/comment
특정 User의 모든 Comment GET
urlpattern
path('/<nickname>/comment', UserCommentView.as_view()),
UserCommentView Class
class UserCommentView(View):
    def get(self, requests, nickname):
    	if not User.objects.filter(nickname = nickname).exists():
            return JsonResponse({"MESSAGE":"INVALID_USER"}, status=400)

        if not Comment.objects.filter(user__nickname = nickname).exists():
            return JsonResponse({"MESSAGE":"NO_COMMENTS"}, status=400)

        comments = Comment.objects.filter(user__nickname = nickname)
        results = []

        for comment in comments:
            results.append(
                {
                    "user"          : comment.user.nickname,
                    "post"          : comment.post.id,
                    "comment"       : comment.comment,
                    "creation_time" : comment.creation_time
                }
            )
        return JsonResponse({'resutls':results}, status=200)
nickname argument를 받아 Comment가 존재하는지, nickname을 보유한 User가 존재하는지 여부를 확인한다. 그 후 nickname을 가진 User를 참조하는 Comment에 대한 정보를 반환한다.
Httpie Request
아이유가 작성한 댓글이 달린 post id와 댓글의 내용에 대해 알아보자.
http -v GET 127.0.0.1:8000/postings/아이유/comment

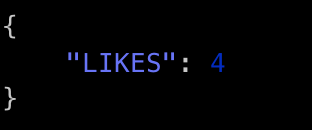
특정 Post의 Like 개수 Get
urlpattern
path('/post/<int:post_id>/like', LikeView.as_view()),
LikeView Class
    def get(self, request, post_id):
        if not Post.objects.filter(id = post_id).exists():
            return JsonResponse({"MESSAGE":"NO_POST"}, status=400)

        likes = Like.objects.filter(post_id = post_id).count()

return JsonResponse({'LIKES':likes}, status=200)post_id를 argument로 받아 Post의 존재여부를 확인한 후, Like Table에서 post_id를 참조하는 Instance의 개수를 반환한다.
Httpie Request
아이유가 작성한, 2번째 게시물의 좋아요 수를 알아보자.
http -v GET 127.0.0.1:8000/postings/post/2/like
특정 User가 Like한 Post와 Like 개수 GET
urlpattern
path('/<nickname>/like', UserLikeView.as_view()),
UserLIkeView Class
class UserLikeView(View):
    def get(self, requests, nickname):
        if not User.objects.filter(nickname = nickname).exists():
            return JsonResponse({"MESSAGE":"INVALID_USER"}, status=400)

        if not Post.objects.filter(user__nickname = nickname).exists():
            return JsonResponse({"MESSAGE":"NO_COMMENTS"}, status=400)

        likes = Like.objects.filter(user__nickname = nickname)
        results = []

        for like in likes:
            results.append(
                {
                    "post"  : like.post.id,
                    "likes" : Like.objects.filter(post_id = like.post.id).count()
                }
            )
return JsonResponse({'results':results}, status=200)nickname을 argument로 받아 nickname을 가진 User와 User가 좋아요를 누른 Post의 존재 여부를 확인한다. 그 후 Like Table에서 nickname을 가진 유저를 참조하는 QuerySet을 꺼내서 post id와 좋아요 수를 반환한다.
Httpie Request
아이유가 좋아요를 누른 게시글과 각 게시글의 좋아요 수를 반환하자.
http -v GET 127.0.0.1:8000/postings/아이유/like
특정 User의 Follow, Follower GET
urlpattern
path('/<nickname>/follow', FollowView.as_view()),
FollowView Class
    def get(self, request, nickname):
        if not User.objects.filter(nickname = nickname).exists():
            return JsonResponse({"MESSAGE":"INVALID_USER"}, status=400)

        follows   = Follow.objects.filter(follow__nickname = nickname)
        followers = Follow.objects.filter(followed__nickname = nickname)

        user_follow   = []
        user_followed = []

        for follow in follows:
            user_follow.append(follow.followed.nickname)
        for follower in followers:
            user_followed.append(follower.follow.nickname)

        return JsonResponse({'FOLLOW':user_follow, 'FOLLOWED':user_followed}, status=200)
nickname argument를 받아 User 존재여부를 확인하고, 그 User가 Follow 하고 있는 사람들의 list와 User를 Follow하고 있는 사람들의 list를 함께 반환한다.
Httpie Request
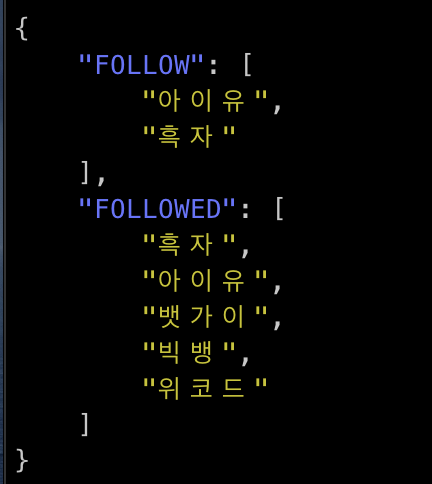
흑자가 팔로우한 사람과 흑자를 팔로우하는 사람들의 목록을 알아보자.
http -v GET 127.0.0.1:8000/postings/흑 자/follow
TIL
URL을 이용해서 parameter를 사용하기 위해 많이 고민하고 열심히 검색을 했는데, 시간이 좀 걸렸지만 해결하니 기분이 좋았다. Westagram Project를 하면서 새로운 View를 만들 때 App을 나누는 기준을 잘 모르겠었는데, 이번에 url mapping을 하면서 어렴풋이 알게된 것 같다. postings/ursl.py의 urlpattern은 다음과 같다.
urlpatterns = [
        path('/post', PostView.as_view()),
        path('/post/<int:post_id>', PostView.as_view()),
        path('/post/<int:post_id>/comment', CommentView.as_view()),
        path('/post/<int:post_id>/like', LikeView.as_view()),
        path('/follow', FollowView.as_view()),
        path('/<nickname>/follow', FollowView.as_view()),
        path('/<nickname>', UserPostView.as_view()),
        path('/<nickname>/comment', UserCommentView.as_view()),
        path('/<nickname>/like', UserLikeView.as_view()),
]
이렇게 App을 나누지 않고 한 App에서 모든 View를 처리하려니 괜시리 url이 복잡해진 것 같다. 물론 내가 url 작성이 미숙한 탓도 있지만, 기능이 많아질 수록 app을 세분화해서 url을 깔끔하게 만드는 것이 좋을 것 같다.