230313 열 여덟 번째 수업_Java
국비 수업
~저번주 거 복습~
ArrayList를 가장 많이 사용해서 이건 기본적으로 알아둬야 하고 나머지는 필요할 때 서치해서 프로그래밍 해도 됨
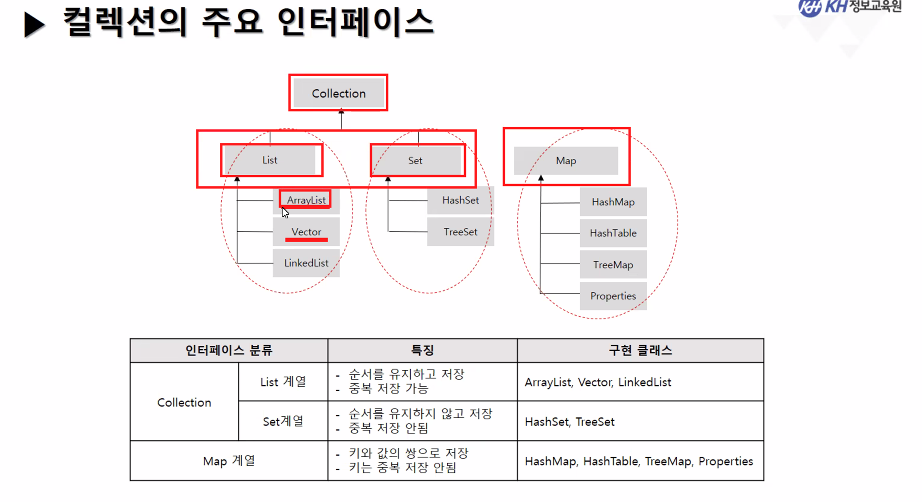
Map
package collection.map;

import java.util.HashMap;
import java.util.Iterator;
import java.util.Map.Entry;
import java.util.Set;

public class Map1 {
	public static void main(String[] args) {
		HashMap hm = new HashMap();

		//계층구조 : List계열, Set계열 => Collection 구현한 클래스
		// => 객체를 추가할 때 add() 메소드 사용

		//Map계열은 Collection 상속받아서 구현한 클래스가 아니다
		// => 추가하고자 할 때 put() 메소드 사용(이때, key+value 쌍으로 담아야됨)

		//1. put(A key, B value)
		hm.put("감자칩", "오리지널");
		/*
		 * Snack sn = new Snack("오리지널", 2600);
		 * hm.put("감자칩", "오리지널");
		 * 한 줄로하려면 밑에
		 */
		hm.put("감자칩", new Snack("오리지널", 2600));
		hm.put("빈츠", new Snack("초코맛", 1000));
		hm.put("새우깡", new Snack("매운맛", 2300));
		System.out.println(hm);

		//key는 중복을 허용하지 않아 덮어쓰기 하고 값은 중복 허용
		hm.put("감자칩", new Snack("양파맛", 3000));
		System.out.println(hm);
		hm.put("버터링", new Snack("오리지널", 2300));
		System.out.println(hm);

		// 2. get(Object key): 해당 key값의 value를 반환시켜주는 메소드
		// Object ob = hm.get("빈츠");
		//Snack에 값을 넣고 싶다면 밑처럼 형변환 해줘야됨
		Snack sn = (Snack) hm.get("빈츠");
		System.out.println(sn);

		// 3. size(): 담겨져있는 객체의 개수 반환
		System.out.println("객체의 수: " + hm.size());

		// 4. replace(A key, B value) => 해당 key를 찾아서 value값을 변경함
		hm.replace("버터링", new Snack("초코맛", 2500));
		System.out.println(hm);

=>
{새우깡=Snack [flavor=매운맛, calory=2300], 감자칩=Snack [flavor=오리지널, calory=2600], 빈츠=Snack [flavor=초코맛, calory=1000]}
{새우깡=Snack [flavor=매운맛, calory=2300], 감자칩=Snack [flavor=양파맛, calory=3000], 빈츠=Snack [flavor=초코맛, calory=1000]}
{새우깡=Snack [flavor=매운맛, calory=2300], 감자칩=Snack [flavor=양파맛, calory=3000], 버터링=Snack [flavor=오리지널, calory=2300], 빈츠=Snack [flavor=초코맛, calory=1000]}
Snack [flavor=초코맛, calory=1000]
객체의 수: 4
{새우깡=Snack [flavor=매운맛, calory=2300], 감자칩=Snack [flavor=양파맛, calory=3000], 버터링=Snack [flavor=초코맛, calory=2500], 빈츠=Snack [flavor=초코맛, calory=1000]}- keySet 원리
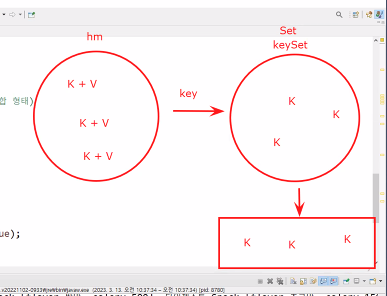
키 값만 가져옴
//Map안의 모든 key값과 value값을 출력하려면 Map을 Set으로 변경

		//for(어디부터; 어디까지; 무엇을) Map이 규칙성이 없기 때문에 반복을 돌릴 수X

		//Iterator 반복자 => List, Set에서만 사용하는 메서드
		//Iterator it = ((Object) hm).iterator();

		//Map을 Set으로 변경하는 메소드(2개)
		//1. keySet()
			//Map -> Set -> Iterator

			// 1) hm에 있는 key들만 Set에 담기(키들의 집합 형태)
			// hm.ketSet() -> Set으로 변경
		Set ks = hm.keySet();

			//2) keySet을 Iterator에 담기
		Iterator ik = ks.iterator();

			//3) 반복문을 이용하여 값 얻어오기
		while(ik.hasNext()) {
			String ky = (String) ik.next();
			Snack val = (Snack) hm.get(ky);
			System.out.println(ky + " = " + val);
		}


=>
새우깡 = Snack [flavor=매운맛, calory=2300]
감자칩 = Snack [flavor=양파맛, calory=3000]
버터링 = Snack [flavor=초코맛, calory=2500]
빈츠 = Snack [flavor=초코맛, calory=1000]- entrySet 원리
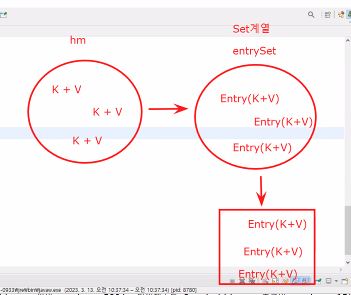
쌍으로 가져옴
keySet보단 entrySet이 더 짧기 때문에 더 많이 사용함
System.out.println("------------------------");
		//2. entrySet()
			// 1) hm.entrySet(): key + 값
		Set es = hm.entrySet();

			//2) entrySet.Iterator()에 담기
		Iterator it1 = es.iterator();

			//3) 반복문으로 가져옴
		while(it1.hasNext()) {
			Entry ent = (Entry) it1.next(); //Entry도 Object형임
			String ky1 = (String) ent.getKey();
			Snack val1 = (Snack) ent.getValue();
			System.out.println(ky1 + " = " + val1);
		}


=>
------------------------
새우깡 = Snack [flavor=매운맛, calory=2300]
감자칩 = Snack [flavor=양파맛, calory=3000]
버터링 = Snack [flavor=초코맛, calory=2500]
빈츠 = Snack [flavor=초코맛, calory=1000]
properties:
파일을 가져오거나 내보낼 때 사용함
.properties 파일을 사용하는 경우
프로그램상에 필요한 기본 환경설정(서버의 ip주소, DBMS 경로...등)과 관련된 구문을 기술
=>모두 문자열이기 때문에 일반 관리자가 해당 문서를 파악하여 쉽게 수정 가능
.xml 파일의 경우
프로그래밍 언어들 사이에서 호환이 쉽다
- 파일 내보내기
package collection.properties;

import java.io.FileNotFoundException;
import java.io.FileOutputStream;
import java.io.IOException;
import java.util.Properties;

public class Properties1 {
	public static void main(String[] args) {
		// properties: Map 계열의 컬렉션 => key+value쌍으로 저장
		// HashMap과의 차이: 객체면 아무거나 할 수 있지만 properties는 반드시!! 모두 String 값이어야 됨
		Properties prop = new Properties();

		/*
		// Map계열이기 때문에 put메소드로 key+value쌍으로 담기 가능
		prop.put("감자칩", new Snack("양파맛", 3200));
		prop.put("버터링", new Snack("오리지널", 3100));
		System.out.println(prop);
		System.out.println(prop.get("버터링"));

		//properties를 사용하는 경우는 주로 파일로 입력 또는 출력할 때 사용
		//즉, store()[파일로 저장(내보내기)], load()[파일을 읽어오기] 메소드 사용

		//파일로 내보내기(저장)
		try {
			//환경설정 같은 것을 확장자 properties로 만들어 비개발자가 볼 수 있도록 파일로 내보냄
			prop.store(new FileOutputStream("test.properties"), "propertiesTest임");
		} catch (FileNotFoundException e) {
			e.printStackTrace();
		} catch (IOException e) {
			e.printStackTrace();
		} //String으로 해야되는데 객체를 생성해놔서 형변환 할 수 없다고 오류남
		*/

		//properties를 파일로 내보내려면 String이어야됨
		//1. setProperties(String key, String value)
		prop.setProperty("List", "ArrayList");
		prop.setProperty("Set", "HachSet");
		prop.setProperty("Map", "HashMap");
		prop.setProperty("Map", "porperties");
		System.out.println(prop);

		//2. getProperties(String key)
		System.out.println(prop.getProperty("List"));
		System.out.println(prop.getProperty("Integer"));

		try {
			//properties 파일로 출력
			prop.store(new FileOutputStream("test.properties"), "propertiesTest임");

			//storeToXML (소스가 태그로 이루어짐)
			prop.storeToXML(new FileOutputStream("test.xml"), "propertiesTest임");
		} catch (FileNotFoundException e) {
			e.printStackTrace();
		} catch (IOException e) {
			e.printStackTrace();
		}
	}
}


=>
{Set=HachSet, List=ArrayList, Map=porperties}
ArrayList
null
확장자 xml은 소스가 태그로 이루어져있음
<?xml version="1.0" encoding="UTF-8"?>
<!DOCTYPE properties SYSTEM "http://java.sun.com/dtd/properties.dtd">
<properties>
<comment>propertiesTest임</comment>
<entry key="Set">HachSet</entry>
<entry key="List">ArrayList</entry>
<entry key="Map">porperties</entry>
<entry key="Hello">World</entry> //내가 추가도 가능
</properties>- 파일 출력하기
package collection.properties;

import java.io.FileInputStream;
import java.io.IOException;
import java.util.Properties;

public class Properties2 {
	public static void main(String[] args) {
		Properties prop = new Properties();

		try {
			//load(InputStream is)
			prop.load(new FileInputStream("test.properties"));

			//loadFromXML
			prop.loadFromXML(new FileInputStream("test.xml"));
		} catch (IOException e) {
			e.printStackTrace();
		}
		System.out.println(prop);
	}
}


=>
{Set=HachSet, Hello=World, List=ArrayList, Map=porperties}
제네릭(generics):
-compile-time에 타입 제한 기능(컴파일시 오류 체크)
-요소 추가시에 타입 체크 기능
-요소를 꺼낼 때 해당 타입의 값을 보장
사용하는 곳에 따라
-클래스레벨: 변수타입이나 객체 생성시 작성하여 객체요소의 타입 제한
-메소드레벨: 파라미터/리턴타입에 타입 제한
jdk1.7 버전 이상부터는 우항의 제네릭<>은 생략 가능
-(auto-)boxing:
int -> Integer.valueOf(123) 자동으로 변환해줌
-unboxing:
객체형태로 들어온(Integer) -> int로 변환
- 제네릭 개념
package generics;

import java.util.ArrayList;
import java.util.List;

public class Generics1 {
	public static void main(String[] args) {

		//ArrayList list = new ArrayList(); Object형
		ArrayList<String> list = new ArrayList(); //제네릭을 String으로 제한
		list.add("안녕");
		list.add("잘가");
		list.add("내일 봐");
		//list.add(123); 제네릭 선언 안 했을 때, boxing돼서 오류 안 남

		//제네릭 하기 전에는 String str=(String)list.get(0); 반드시 형변환(Object->String)
		String str = list.get(0);
		//int num = (int) list.get(1); 제네릭 String이라 오류

		List <Integer> list2 = new ArrayList();
		list2.add(1);
		list2.add(2);
		list2.add(3);
		//list2.add(3.145987); 자료형 체크하여 Integer형이 아니면 오류

		int num = list2.get(1);
	}
- 클래스 레벨 제네릭
package generics;

public class Parking<E> {
	//<E>: 자료형 타입 정의. 대문자 한 글자를 많이 씀
	//일반자료형은 들어올 수 없고 Object인 Wrapper클래스 또는 내가 만든 클래스 들어옴
	private E[] elemen;
	private int index;

	public Parking() {
		this.elemen = (E[]) new Object[16];
	}

	public void add(E e) {
		this.elemen[index++] = e;
        //인스턴스 변수 index는 초기화값 0부터이기 때문에 index++함
	}

	public E get(int index) {
		return this.elemen[index];
	}
	public int size() {
		return this.index;
	}

	public int indexOf(E e) {
		//반복문으로 elemen배열에서 객체 e를 검색하여 있으면 해당 인덱스 번호 반환
		for(int i=0; i<index; i++) {
			if(this.elemen[i].equals(e))
				return i;
		}
		//찾는 객체가 없으면
		return -1;
	}
}


		test1(); //메인에서 호출해야 밑에 클래스 제네릭 실행됨
	}
	//클래스 레벨 제네릭
	public static void test1() {
		Parking<String> park = new Parking();
		park.add("K7");
		park.add("GENESIS");

		System.out.println(park.get(0));
		System.out.println(park.get(1));
		System.out.println("--------------------");

		for(int i=0; i<park.size(); i++) {
			System.out.println(park.get(i));
		}
		System.out.println("--------------------");

		System.out.println(park.indexOf("K7"));
		System.out.println(park.indexOf("GENESIS"));
		System.out.println(park.indexOf("volvo"));
	}


=>
K7
GENESIS
--------------------
K7
GENESIS
--------------------
0
1
-1- 메소드 레벨 제네릭
		test2(); 메인에서 호출
	}


	//메소드 레벨 제네릭
	public static void test2() {
		int num1 = run(10);
		int num2 = run(20);
		String str = run("abc");

		System.out.println(num1 + num2);
		System.out.println(str + num1 + num2);

		List<Integer> intlist = of(1,2,3,4,5,6,7);
		System.out.println(intlist);

		List<String> strlist = of("5교시", "집가고", "싶다", "간절");
		System.out.println(strlist);

		//java에서 배열을 list로 변환해주는 메소드 Arrays.asList(array)
		//JDK9부터 List.of(array)로 새 팩토리 메소드를 사용
		//Arrays.asList, List.of: 한 번 값 넣으면 삽입, 삭제 불가 list임.
		List<String> strList2 = List.of("오늘은","월요일","끔찍","합니다");
		System.out.println(strList2);
		// strList2.add("그래도 파이팅"); 변경 불가해서 오류!

	}
	//메소드 정의해주는 블럭
	public static <E> E run(E e) {
	//<타입명>제네릭을 넣어 E객체를 반환하겠다, 매개변수로도 E타입의 e를 받겠다
		return e;
	}
	public static <T> List<T> of(T... elemen) {
		//매개변수에 ...은 0개~마음대로 넣어도 됨
		List<T> list = new ArrayList<>();

		for(T t : elemen) {
			list.add(t);
		}
		return list;
	}
}

=>
30
abc1020
[1, 2, 3, 4, 5, 6, 7]
[5교시, 집가고, 싶다, 간절]
[오늘은, 월요일, 끔찍, 합니다]
스레드:
가게에 직원이 한 명 있는 것보다 직원이 3명인 것이 일처리가 더 빠름
스레드가 많을 수록 빠름
스레드가 둘 이상이면 멀티 스레드라고 함
멀티 스레드의 경우, 제일 마지막 스레드(직원)까지 실행을 마쳐야 프로세스 종료
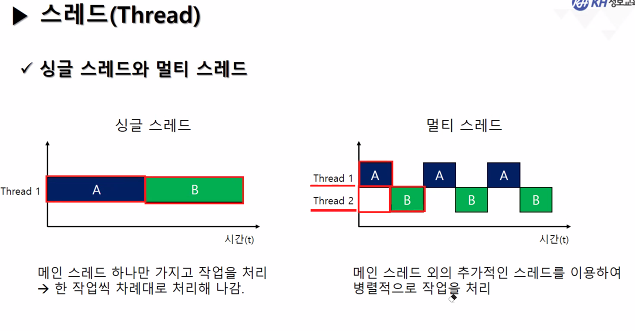
싱글 스레드는 A가 끝날 때까지 기다리고 B가 실행됨
멀티 스레드는 cpu에서 코어가 몇 개냐에 따라서 스레드가 동시에 몇 개가 실행될 수 있는지 정해짐
4코어 = 4개의 스레드 실행
사진에서는 코어가 1개일 때의 상황으로, 시간순으로 보면 A 다음 B가 실행되는 것으로 그려짐.
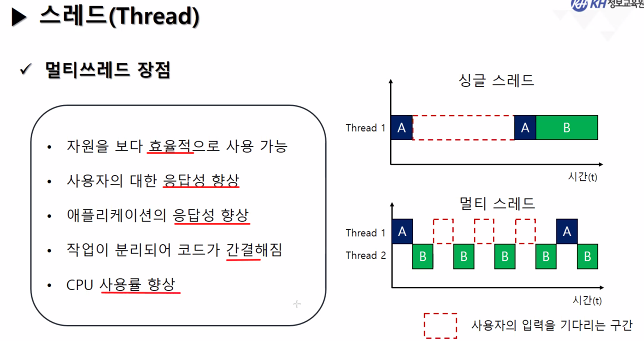
놀고있는 꼴을 못 본다고 보면 됨 ㅋㅋㅋㅋㅋㅋㅋㅋㅋㅋ
자원 2개를 써야된다고 가정했을 때, 먼저 선점한 것이 자원을 놓을 때까지 기다리고 있는 상황이 발생(교착상태)하면 영원히 둘 다 일을 진행할 수 없음. 그래서 저렇게 lock을 해줘야됨
- 스레드 생성:
클래스를 상속받거나 Runnable 인터페이스를 사용한다.
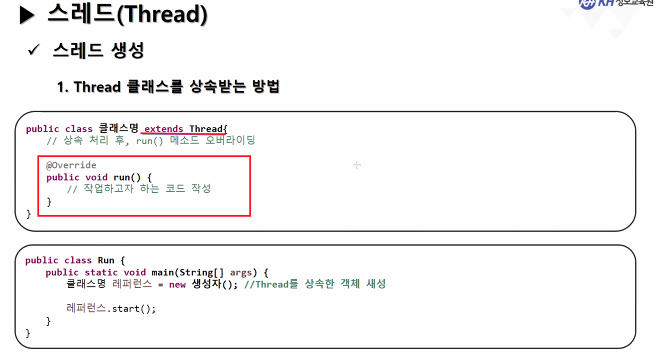
run 오버라이딩을 무조건!!! 써줘야함
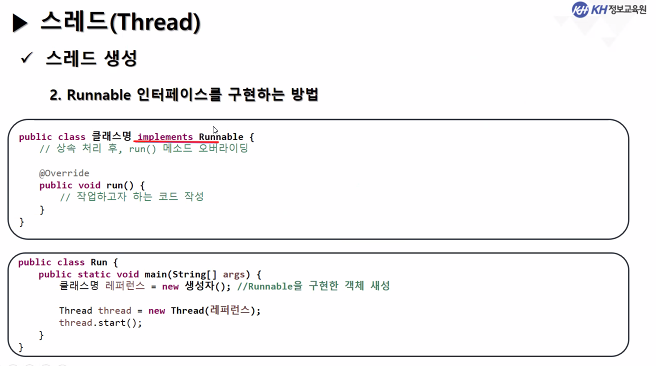
스레드의 new 객체 생성이 있어야됨
package thread;

public class Thread1 {

	public static void main(String[] args) {
		Thread1 thr1 = new Thread1();
		//thr1.test1(); //스레드 하나에서 실행되는 거라 a먼저 실행된 후 b가 실행됨
		//thr1.test2(); //스레드 두개에서 실행되는 거라 병렬적으로 작업됨
		//thr1.test3(); //Runnable로 해도 똑같이 병렬 실행
		thr1.test4();
		System.out.println(Thread.currentThread().getName() + " 스레드 종료");
	}

	private void test1() {
	//static 붙으면 객체 생성 안 해도 사용 가능 test1();
	//안 붙이면 무조건 객체 생성 사용 thr1.test1();
		a("#");
		b("^");
	}

	private void test2() {
		Thread th1 = new MyThread1();
		Thread th2 = new MyThread2();
		th1.start();
		th2.start();
	}
	//하나의 스레드 클래스로 여러 스레드 만들기
	private void test3() {
		Thread th1 = new Thread(new Foo("&"));
		Thread th2 = new Thread(new Foo("*"));
		//th1.start(); //start하면 무조건 run 호출
		//th2.start();

	//배열의 값 여러 스레드 만들기
		String[] arr = {"!","@","#","$","%","^","&","*","+"};
		for(int i=0; i<arr.length; i++) {
			new Thread(new Foo(arr[i])).start();
			//Tread th = new Thread(new Foo(arr[i]));
			//th.start(); 이걸 한 줄로 줄이면 위에
		}
	}

	/*
	 * 스레드 스케줄링
	 * - OS 스케줄링에 따라 임의의 순서 부여됨
	 * - 우선순위 (1~10) 내가 설정 가능
	 * - 10: Thread.MAX_PRIORITY
	 * - 5: Thread.NORM_PRIORITY (순서 설정 안 하면 기본값)
	 * - 1: Thread.MIN_PRIORITY
	 */
	private void test4() {
		Thread th1 = new Thread(new Foo("O"));
		Thread th2 = new Thread(new Foo("X"));

		th1.setPriority(3);
		th2.setPriority(Thread.MAX_PRIORITY);

		th1.start();
		th2.start();
	}

	/*
	 * 2. 스레드 클래스 만들기
	 * - implemants Runnable 사용: run 오버라이딩
	 */
	class Foo implements Runnable {
		private String str;

		public Foo(String str) {
			this.str = str;
		}

		@Override
		public void run() {
			for(int i=0; i<300; i++) {
				System.out.print(str);
			}
		}
	}

	/*
	 * 1. 스레드 클래스 만들기
	 * - Tread상속: run 오버라이딩
	 */

	//부모를 상속받았기 때문에 부모에서 static을 안 해서 static 사용 불가
	class MyThread1 extends Thread {
		@Override
		public void run() {
			a("$");
		}
	}

	class MyThread2 extends Thread {
		@Override
		public void run() {
			b("@");
		}
	}


	public void a(String str) {
		for(int i=0; i<300; i++) {
			System.out.print(str);
		}
	}

	public void b(String str) {
		for(int i=0; i<300; i++) {
			System.out.print(str);
		}
	}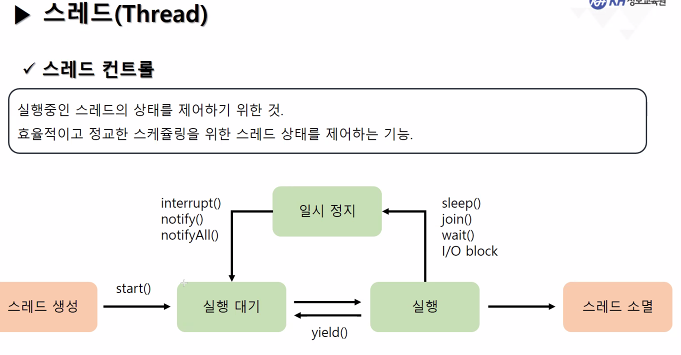
}- 스레드 생명 주기
package thread;
public class Thread2 {
/*
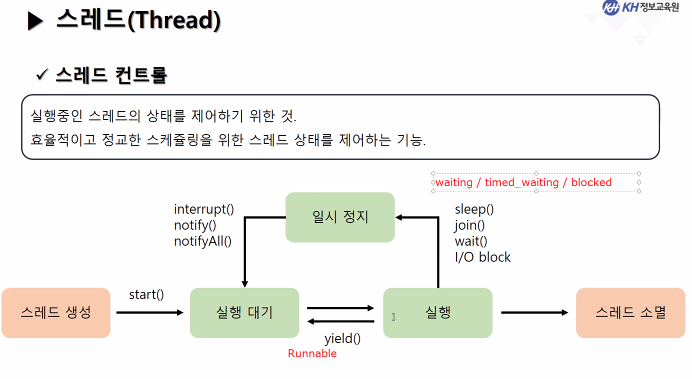
* 스레드 생명 주기
* - New 생성
* - RUNNABLE 실행/실행대기
* -WAITING / TIMED_WAITING / BLOKED
* - TERMINATED 제거
*
*/
public static void main(String[] args) {
Thread2 thr2 = new Thread2();
thr2.test1();
}
private void test1() {
new Thread(new SleepThread(), "밀리초스레드").start();
}
// Sleep(millseconds): 지정한 시간동안 일시정지
class SleepThread implements Runnable {
@Override
public void run() {
for(int i=1; i<=10; i++) {
try {
Thread.sleep(1000); // ms라 1초 = 1000
} catch (InterruptedException e) {
e.printStackTrace();
}
System.out.println("[" + Thread.currentThread().getName() + "] " + i);
}
}
}
}
=>
[밀리초스레드] 1
[밀리초스레드] 2
[밀리초스레드] 3
[밀리초스레드] 4
[밀리초스레드] 5
[밀리초스레드] 6
[밀리초스레드] 7
[밀리초스레드] 8
[밀리초스레드] 9
[밀리초스레드] 10