어제는 평가~
decimal format:
printf, print.format 대신에 사용가능
package decimalFormat01;

import java.text.DecimalFormat;	//ctrl+shift+O 하면 import 됨
import java.text.ParseException;

public class DecimalFormat1 {

	public static void main(String[] args) {
		double number = 12344567.89;
		DecimalFormat df = new DecimalFormat(".0"); //소수점 출력하고 싶으면 .추가
		System.out.println(df.format(number));
		df.format(123.789);	//format은 원하는 숫자를 넣든가 변수를 넣든가 상관x
		// new DecimalFormat(".0").format(123.789);로 쓸 수도 있음

		System.out.println(new DecimalFormat("0").format(4758.948));
		System.out.println("-----------------------------------");

		System.out.println(new DecimalFormat("0").format(number));
		System.out.println(new DecimalFormat("#").format(number));
		System.out.println(new DecimalFormat("0.00").format(number));
        //0은 그 자리에 수가 없으면 무조건 0으로라도 출력
		System.out.println(new DecimalFormat("#.###").format(number));
        //#은 그 자리에 수가 있으면 출력,없으면 출력 안함
		System.out.println("-----------------------------------");

		System.out.println(new DecimalFormat("000000000.0").format(number));
		System.out.println(new DecimalFormat("#########.#").format(number));
		System.out.println("-----------------------------------");

		//음수 부호 문자의 자리를 지정가능(실제 값이 음수가 되는 것이 아님)
		number = -1234567.89;
		System.out.println(new DecimalFormat("#.#-").format(number));
		System.out.println(new DecimalFormat("-#.#").format(number));
		//양수이면+를,음수이면-를 출력하는 방법(실제 음양의 값이 됨)
		System.out.println(new DecimalFormat("+#.#;-#.#").format(number));
		System.out.println("-----------------------------------");

		System.out.println(new DecimalFormat("#,###.#").format(number)); //세 자리마다 ,
		System.out.println(new DecimalFormat("#,####.#").format(number)); //네 자리마다 ,
		System.out.println(new DecimalFormat("+#,###.#;-#,###.#").format(number));
		System.out.println("-----------------------------------");

		System.out.println(new DecimalFormat("#.#%").format(number));//소수점 사라짐
		System.out.println(new DecimalFormat("\u00A4#.#").format(number));//통화기호
		System.out.println(new DecimalFormat("\\#,###.#").format(number));
        //글꼴이 한글일 때만 통화표시
		System.out.println("==============================");

		//parse() 메서드는 DecimalFormat의 조상인 NumberFormat에 정의되어 있는 메서드
		//Number는 Wrapper클래스의 조상 (int,double,char => Integer,Double,Character)
		//intValue(), doubleValue() 처럼 문자열을 형변환 시켜줌
		String stNum = "1.234,567.89";
		DecimalFormat df2 = new DecimalFormat("#,###.##");
		try {
			Number num = df2.parse(stNum);
			System.out.println(num); //String에서 Number객체로 바꾼 거라 num값은 수가 아님. 연산불가
			double douNum = num.doubleValue();	//이렇게 해야 실수형으로 변환
			System.out.println(douNum*2); //실수라 연산 가능

			//위를 한 줄로 표현
		System.out.println((new DecimalFormat("#,###.##").parse("1,234,567.89").doubleValue())*3);

		}catch (ParseException e) {
			e.printStackTrace();
		}
	}
}

=>
12344567.9
4759
-----------------------------------
12344568
12344568
12344567.89
12344567.89
-----------------------------------
012344567.9
12344567.9
-----------------------------------
-1234567.9-
--1234567.9
-1234567.9
-----------------------------------
-1,234,567.9
-123,4567.9
-1,234,567.9
-----------------------------------
-123456789%
-₩1234567.9
-\1,234,567.9
==============================
1.234
2.468
3703703.67
입출력(IO):
Input과 Output의 약자, 컴퓨터 내부 또는 외부 장치와 프로그램간의 데이터를 주고받는 것.
- 스트림(Stream):
입출력 장치에서 데이터를 읽고 쓰기 위해서 자바에서 제공하는 클래스.
모든 스트림은 단방향이며 각각의 장치마다 연결할 수 있는 스트림이 존재.
하나의 스트림으로 입출력을 동시에 할 수 없어서 동시에 하려면 2개의 스트림 필요
1.바이트 단위 처리: 1Byte, Stream키워드
2.문자 단위 처리: 2Byte, Reader/Writer키워드
package file01;

import java.io.File;
import java.io.IOException;

public class File1 {

	public static void main(String[] args) {
		try { //경로를 지정하지 않고 파일 만들면 내 workspace에 생성됨
			File f1 = new File("test.txt");
			f1.createNewFile(); //이 메소드(throw포함되어있음)까지 호출해야만 파일이 만들어짐

			//존재하고 있는 폴더에 파일 생성: 경로 지정하면 됨
			//File f2 = new File("d:\\test.txt"); 역슬래시 쓸거면 두 개씀
			File f2 = new File("d:/test.txt");
			f2.createNewFile();

			//폴더와 파일 새로 생성
			File tempfolder = new File("D:/temp");
			tempfolder.mkdir();
			File f3 = new File("D:/temp/kyr.txt");
			f3.createNewFile();

			System.out.println(f1.exists()); //파일이 존재하는지 여부 확인
			System.out.println(new File("ttt.txt").exists());
			//createNewFile(); 안했으니 없는 파일

			System.out.println(f1.isFile()); //파일인지 아닌지 확인
			System.out.println(tempfolder.isFile()); //디렉토리이기 때문에 아님
			System.out.println("--------------------------");

			//parent 폴더 만들기
			File folder = new File("parent");
			folder.mkdir();
			File file = new File("parent/person.txt");
			file.createNewFile();

			System.out.println("파일명: " + file.getName());
			System.out.println("절대경로: " + file.getAbsolutePath());
			System.out.println("파일용량: " + file.length());
			System.out.println("상위폴더: " + file.getParent());

		} catch (IOException e) { //없는 폴더에 생성하라고 할 수 있어서 있는 거
			e.printStackTrace();
		}
	}
}

=>
true
false
true
false
--------------------------
파일명: person.txt
절대경로: D:\KYR\01_javaWork\day15\parent\person.txt
파일용량: 0
상위폴더: parent- 바이트 스트림 활용
package byteStream02;

import java.io.FileInputStream;
import java.io.FileNotFoundException;
import java.io.FileOutputStream;
import java.io.IOException;

public class ByteStreamAPI {
	/*
	 * 바이트 기반 스트림:
	 * - 바이트 스트림: 1Byte단위로 전송하는 통로
	 * - 기반 스트림: 외부매체와 직접적으로 연결되는 통로
	 *
	 * xxxInputStream: xxx매체로부터 데이터를 직접 입력받는 통로
	 * xxxOutputStream: xxx매체로부터 데이터를 직접 출력하는 통로
	 */
	//프로그램으로부터 외부매체로 내보내기(파일)
	public void fileSave() {
		//프로그램으로부터 내보내 저장하는 것이기 때문에 Output
		//FileOutputStream: 파일의 형태로 직접적으로 연결하여 1Byte단위 출력하는 스트림

		/*
		 * 순서
		 * 1. 스트림 생성(통로 생성)
		 * 2. 스트림으로 데이터를 보내기(출력)
		 * 3. 다 사용한 후 반드시!! 스트림 반납
		 */

		//1. 스트림 생성
		FileOutputStream fout = null;

		try {
			fout = new FileOutputStream("a_byte.txt");
			//파일이 없으면 만들고 있으면 덮어쓰기함
			//fout = new FileOutputStream("a_byte.txt", true);
			//파일 내용에 이어서 덧붙임

			//2. 데이터 출력
			fout.write(97);	//'a'유니코드 값
			fout.write('b');

			byte[] arr = {99,100,101};	//'c,d,e'에 대한 유니코드 값
			fout.write(arr);

			fout.write(arr, 1, 2);	//배열의 길이 1부터 2개만 출력

			fout.write('랑');	//2Byte는 깨져서 나옴

		} catch (FileNotFoundException e) {
			e.printStackTrace();
		} catch (IOException e) {	//2번에 대한 오류 가능성
			e.printStackTrace();
		} finally {	//finally는 써도 되고 안 써도됨
			try {
				//3. 스트림 반납
				fout.close();
			} catch (IOException e) {
				e.printStackTrace();
			}
		}
	}
	//프로그램에서 파일 입력 (데이터 가져오기)
	public void fileRead() {
		//FileInputStream: 파일로부터 1Byte단위로 입력받는 스트림
		FileInputStream fin = null;
		try {
			fin = new FileInputStream("a_byte.txt");

			//fin.read() 2씩 호출되기 때문에 하나 건너씩 출력
			/*
			while(fin.read() != -1) {
				System.out.println(fin.read());
			}
			*/
			//해결방법 1. 무한반복을 돌면서 매번 검사
			/*
			while(true) {
				int value = fin.read();
				if(value == -1)
					break;
				System.out.println(value);
			}
			*/
			//해결방법 2. 권장사항
			int value=0; //변수에 넣지 않으면 while문에서 다음 것을 검사하기 때문에 퐁당퐁당 값이 됨
			while((value = fin.read()) != -1) {
				System.out.println((char)value);
			}
		} catch (FileNotFoundException e) {
			e.printStackTrace();
		} catch (IOException e) {
			e.printStackTrace();
		}
	}
}


package byteStream02;

public class ByteStreamTest {
	/*
	 * 스트림의 특징
	 * - 단방향: 입력과 출력이 따로 존재
	 * - 선입선출(FIFO)
	 * - 딜레이 생길 수 있음
	 *
	 * 스트림의 구분
	 * > 통로의 사이즈(1byte/2byte)
	 * - 바이트 스트림: 1Byte 단위로만 보내고 받을 수 있음
	 * - 문자 스트림: 2Byte 단위로만 보내고 받을 수 있음
	 * > 외부매체와 직접 연결 유무
	 * - 기반 스트림: 외부매체와 직접 연결 통로(필수)
	 * - 보조 스트림: 보조 역할만. 반드시 기반 스트림으로 연결이 돼있어야 사용가능
	 * 			   단독으로 사용 불가
	 *
	 */

	public static void main(String[] args) {
		ByteStreamAPI bs = new ByteStreamAPI();
		//bs.fileSave();
		bs.fileRead();
	}
}- 문자 스트림 활용
package char03;

import java.io.FileNotFoundException;
import java.io.FileReader;
import java.io.FileWriter;
import java.io.IOException;

public class CharAPI {
	/*
	 * 문자기반 스트림
	 * -문자 스트림: 2Byte단위로 전송하는 통로
	 * -기반 스트림: 외부매체와 직접 연결하는 통로
	 *
	 * xxxReader: 입력용 스트림
	 * xxxWriter: 출력용 스트림
	 */

	//프로그램에서 파일로 출력
	public void fileSave() {
		FileWriter fw = null;
		try {
			//1. 객체 생성
			fw = new FileWriter("b_char.txt");
			//2. 데이터 출력
			fw.write("안녕하세요");
			fw.write('A');
			fw.write("\n");//엔터치라는 말
			fw.write("안녕히가세요");
		} catch (IOException e) {
			e.printStackTrace();
		}
		//3. 스트림 반납
		try {
			fw.close();
		} catch (IOException e) {
			e.printStackTrace();
		}
	}
	// 프로그램으로 파일 입력
	public void fileRead() {
		//FileReader: 파일로부터 데이터를 2Byte단위로 읽어 오는 스트림
		FileReader fr = null;
		try {
			fr = new FileReader("b_char.txt");
			int value =0; //변수에 넣지 않으면 while문에서 다음 것을 검사하기 때문에 퐁당퐁당 값이 됨
			while((value = fr.read()) != -1) {
				System.out.println((char)value);
			}
		} catch (FileNotFoundException e) {
			e.printStackTrace();
		} catch (IOException e) {
			e.printStackTrace();
		}
		try {
			fr.close();
		} catch (IOException e) {
			e.printStackTrace();
			}
	}
}


package char03;

public class CharTest {

	public static void main(String[] args) {
		CharAPI cr = new CharAPI();
		cr.fileSave();
		cr.fileRead();

	}
}- 보조 스트림(Buffer):
보조 스트림은 보통 BufferedRead를 많이 사용함
package buffer04;

import java.io.BufferedReader;
import java.io.BufferedWriter;
import java.io.FileNotFoundException;
import java.io.FileReader;
import java.io.FileWriter;
import java.io.IOException;

public class BufferAPI {
	//프로그램 -> 파일(출력)
	public void fileSave() {
		//FileWriter
		//BufferedWriter: 버퍼라는 공간을 제공해주는 보조스트림(속도 향상)

		//1. 기반 스트림 먼저 생성
		//FileWriter fw = new FileWriter("c_buffer.txt");
		//2. 보조 스트림
		//BufferedWriter bw = new BufferedWriter(fw);

		//위에것을 한 줄로
	/*	BufferedWriter bw = null;
		try {
			bw = new BufferedWriter(new FileWriter("c_buffer.txt"));

			//3. 보조 스트림을 이용한 출력
			bw.write("안녕?\n");
			bw.write("반가워요");
			bw.newLine();	//줄바꿈 메서드
			bw.write("잘가요");
			//버퍼라는 공간에 계속 쌓아놨다가 한꺼번에 출력 => 속도 향상

		} catch (IOException e) {
			e.printStackTrace();
		}
		//4. 보조 스트림 반납
		try {
			bw.close();
		} catch (IOException e) {
			e.printStackTrace();
		}
		*/

		//try ~ with ~ resource 구문으로 자원반납을 자동으로 해줌
		//JDK 1.7버전 이상부터 사용가능
		/*
		 * try(반납할 스트림 객체 생성){
		 *
		 * } catch(예외클래스 e) {
		 *
		 * }
		 */
		try(BufferedWriter bw = new BufferedWriter(new FileWriter("c_buffer.txt"))) {
			//반납할 거 많으면 변수에 ;넣고 또 넣어주면 됨
			bw.write("안녕?\n");
			bw.write("반가워요");
			bw.newLine();
			bw.write("잘가요");
		}catch(IOException e) {
			e.printStackTrace();
		}
	}
	//프로그램 <- 파일(입력)
	public void fileRead() {
		//FileReader
		//BufferedReader
		try(BufferedReader br = new BufferedReader(new FileReader("c_buffer.txt"))){
			String value = null; //int형은 값이 없으면 -1 String이면 null
			while((value=br.readLine()) != null) {
				System.out.println(value);
			}
		}catch(FileNotFoundException e) {
			e.printStackTrace();
		}catch(IOException e) {
			e.printStackTrace();
		}
	}
}


package buffer04;

public class BufferTest {
	/*
	 * 보조 스트림: 기반스트림만으로는 부족한 성능을 보다 향상 시켜주는 스트림
	 * 			기반스트림에서 제공하지 않는 추가적인 메소드 제공
	 * 			속도 향상 등등
	 * 	>>외부매체와 직접 연결 안 됨
	 * 		단독사용 불가(반드시 기반 스트림과 함께)
	 */
	public static void main(String[] args) {
		BufferAPI bf = new BufferAPI();
		bf.fileSave();//한 번 저장하면 주석 처리해도 됨
		bf.fileRead();
	}
}- 객체 입출력 보조 스트림:
(역)직렬화: 객체를 보내려면 통로가 좁기 때문에 통로에 들어갈 수 있게 문자 크기로 일렬로 나열해주는 것
package object05;

import java.io.Serializable;

public class Phone implements Serializable {
	private String name;
	private int price;

	public Phone() { }
	public Phone(String name, int price) {
		super();
		this.name = name;
		this.price = price;
	}
	public String getName() {
		return name;
	}
	public void setName(String name) {
		this.name = name;
	}
	public int getPrice() {
		return price;
	}
	public void setPrice(int price) {
		this.price = price;
	}
	@Override
	public String toString() {
		return "Phone [name=" + name + ", price=" + price + "]";
	}
}


package object05;

import java.io.EOFException;
import java.io.FileInputStream;
import java.io.FileNotFoundException;
import java.io.FileOutputStream;
import java.io.IOException;
import java.io.ObjectInputStream;
import java.io.ObjectOutputStream;

public class ObjectDao {
	// 프로그램 -> 파일(출력)
	public void fileSave() {
		Phone ph1 = new Phone("아이폰", 1800000);
		Phone ph2 = new Phone("갤럭시", 1700000);
		Phone ph3 = new Phone("갤럭시노트", 2100000);

		//FileOutputStream: 1Byte 기반 스트림
		//ObjectOutputStream: 객체 단위로 출력할 수 있도록 도움을 주는 보조 스트림
		//					 (ObjectWriter없음)

		try(ObjectOutputStream oos = new ObjectOutputStream(new FileOutputStream("d_phone.txt"))){
			oos.writeObject(ph1); //직렬화 하지 않으면 예외발생 Phone 클래스에 implements Serializable를 해야 됨
			oos.writeObject(ph2);
			oos.writeObject(ph3);
		} catch(FileNotFoundException e) {
			e.printStackTrace();
		} catch(IOException e) {
			e.printStackTrace();
		}
	}
	//프로그램 <- 파일(입력)
	public void fileRead() {
		try(ObjectInputStream ois = new ObjectInputStream(new FileInputStream("d_phone.txt"))) {
			while(true)
			System.out.println(ois.readObject());
		} catch(FileNotFoundException e) {
			e.printStackTrace();
		} catch(EOFException e) {//object는 값이 없을 때 -1,null도 아닌 예외가 발생해서 IO예외를 상속받는 EOF를 명시.
			System.out.println("파일을 모두 읽었습니다.");
		} catch(IOException e) {
			e.printStackTrace();
		} catch (ClassNotFoundException e) {
			e.printStackTrace();
		}
	}
}


package object05;

public class ObjectTest {

	public static void main(String[] args) {
		ObjectDao dao = new ObjectDao();
		dao.fileSave();
		dao.fileRead();
	}
}
API 클래스에 implements Serializable 해주면 직렬화 됨.
*Serializable에 ctrl누른채로 클릭하면 클래스 구성 볼 수 있음
새로운 클래스 생성시 주석 뜨는 거 없애는 방법:
Window - Preperences - Code Templates - Method body - edit - 주석문 지우기 - Ok - Apply
Catch block body - 주석문 지우기 - ok
Constructor body - 주석문 지우기 - ok
네트워크:
여러대의 컴퓨터를 통신회선으로 연결한 것.
사내나 어느 공간 안에서만 쓸 수 있는 통신망을 인트라넷이라고 함.
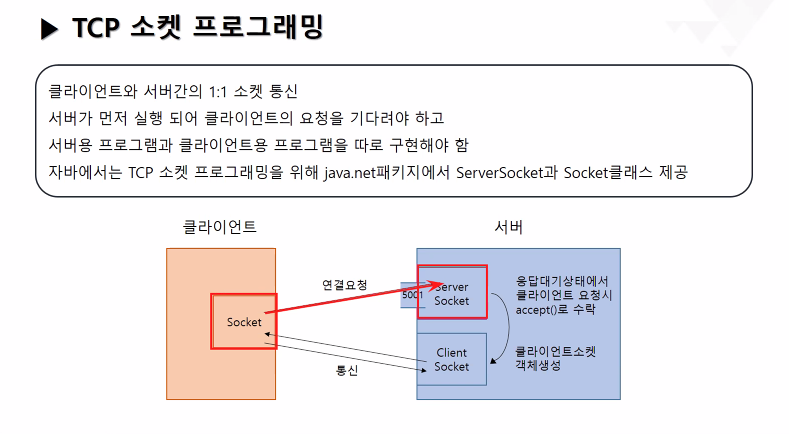
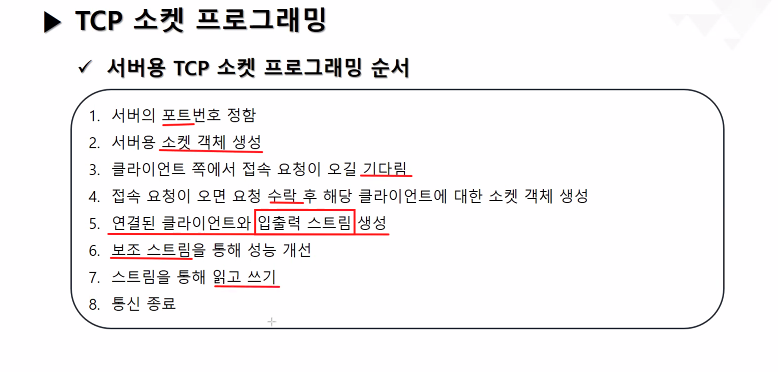
서버는 소켓 2개 필요
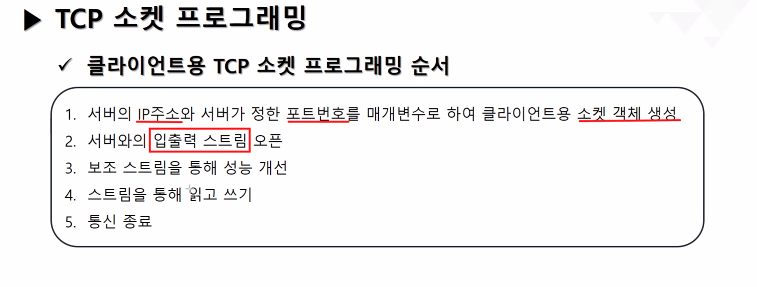
클라이언트는 소켓 1개 필요
package network;

import java.net.InetAddress;
import java.net.UnknownHostException;

public class Network01 {

	public static void main(String[] args) {
		//서버에 요청을 위해서 서버의 ip와 port번호가 있어야 됨
		//InetAddress : 네트워크 정보(ip주소 관련)를 확인할 수 있는 클래스
		try {
			InetAddress localhost = InetAddress.getLocalHost(); //static으로 되어있어서 new로 객체 생성 안 함
			System.out.println(localhost); //내 pc명 + 내 ip주소
			System.out.println("내 pc명: " + localhost.getHostName());
			System.out.println("내 ip주소: " + localhost.getHostAddress());
			System.out.println("---------------------------");

			//도메인을 통해 그 서버에 관련된 정보 얻기
			InetAddress googleHost = InetAddress.getByName("google.com");
			System.out.println("google 서버명: " + googleHost.getHostName());
			System.out.println("google ip주소: " + googleHost.getHostAddress());

			// 도메인을 통해 그 서버에 관련된 정보를 배열로 얻기
			InetAddress[] naverHost = InetAddress.getAllByName("naver.com");//getallbyname이어야 배열 모두 가져올 수 있음.
			System.out.println("네이버 호스트 개수: " + naverHost.length);
			for(InetAddress n : naverHost) {
				System.out.println("naver 서버명: " + n.getHostName());
				System.out.println("naver ip주소: " +n.getHostAddress());
			}
		} catch (UnknownHostException e) {
			e.printStackTrace();
		}
	}

=>
DESKTOP-HSRD9DI/192.168.20.43
내 pc명: DESKTOP-HSRD9DI
내 ip주소: 192.168.20.43
---------------------------
google 서버명: google.com
google ip주소: 142.250.66.46
네이버 호스트 개수: 4
naver 서버명: naver.com
naver ip주소: 223.130.200.104
naver 서버명: naver.com
naver ip주소: 223.130.200.107
naver 서버명: naver.com
naver ip주소: 223.130.195.200
naver 서버명: naver.com
naver ip주소: 223.130.195.95
내 인생을 망치러 온 나의 구원, 개발