Vue에서 사용한 Vuex와 React에서 사용한 Redux의 학습후기
1. Redux?
💡 Redux는 모든 JavaScript에서 활용 가능한 상태관리 라이브러리이다.
- React-Redux는 Redux 라이브러리에 추가적으로 React에 특화된 Redux라이브러리이다.
- Redux에 더해서 Redux Toolkit이 등장하면서 기존 Redux를 좀 더 쉽고 용이하게 활용이 가능해졌다.
- Vuex는 Vue에서 활용하는 Redux라이브러리로 React-Redux처럼 Vue에 특화된 상태관리 라이브러리이다.
2. React에서 Redux활용하기
-
Redux에는 총 4가지 속성이 있다.
- 스토어(store): Redux에서는 한 애플리케이션 당 단일 스토어를 갖는다. 애플리케이션의 상태(state)와 리듀서가 포함되어 있다.
- 액션 및 액션생성함수(action / actionCreator): 상태(state)에 변화가 필요할 때 액션을 발생시키는데 객체로 구성되어 있으며 액션생성함수는 말 그대로 액션을 만들어주는 함수이다. 단순하게 파라미터를 받아 액션 객체 형태로 제작한다.
- 디스패치(dispatch): 디스패치는 스토어의 내장 함수 중 하나이며 액션을 발생시키는 것으로 볼 수 있다. dispatch라는 함수에 액션을 파라미터로 전달한다. ex) dispatch(action)
- 리듀서(reducer): 변화를 일으키는 함수로 두 가지 파라미터를 받아오는데 첫번째는 현재의 상태(state), 두 번째는 전달 받은 액션으로 이 두 가지를 참고해 새로운 상태(state)를 만들어서 반환한다.
-
Redux에는 3가지 규칙이있다.
- 하나의 애플리케이션엔 단일 스토어
- 상태(state)는 읽기 전용(read-only)
- 변화를 일으키는 함수 즉, 리듀서는 순수함수여야 함
a. 리듀서는 함수 이전 상태와 액션 객체를 파라미터로 받는다.
b. 이전 상태는 절대 건드리지 않고 변화를 일으킨 새로운 상태 객체를 만들어 반환한다.
c. 같은 파라미터로 호출된 리듀서 함수는 언제나 동일한 결과값을 반환해야 한다.
-
리액트에서 Redux를 활용해 counter를 제작해보자
- 먼저 store를 제작하기 위해 action, action creator, reducer를 제작한다.
/* store/counter.js */ // toolkit 활용시 두 함수들을 import한다. import { createAction, createReducer } from '@reduxjs/toolkit'; // 1. action의 타입을 정의한다. const INCREASE = 'counter/INCREASE'; const DECREASE = 'counter/DECREASE'; // 2. action 생성 함수를 제작한다. export const increase = () => ({ type: INCRESAE }); export const decrease = () => ({ type: DECREASE }); // toolkit을 활용한다면 아래와 같이 변환 가능 export const increase = createAction(INCREASE); export const decrease = createAction(DECREASE); // 만약 1번 단계를 생략한다면? export const increase = createAction('counter/INCREASE'); export const decresae = createAction('counter/DECREASE'); // 3. 초기 상태(state)를 설정한다. // 이 과정은 toolkit도 동일하다. const initialState = { value: 0, }; // 4. reducer를 제작한다. const counter = (state, action) => { switch(action.type) { case INCREASE: return { ...state, value: state.value + 1 }; case DECREASE: return { ...state, value: state.value - 1 }; default: return state; } }; // toolkit을 활용하면 아래와 같이 변환 가능 const counter = createReducer(initialState, { [INCREASE]: (state) => ({ ...state, value: state.value + 1 }), [DECREASE]: (state) => ({ ...state, value: state.value - 1 }), // 최상위에서 actio의 타입을 지정해주지 않았다면 createAction에서 첫번째인자는 // string타입의 값을 받아 해당 액션의 타입의 객체를 리턴하기 때문에 함수.type으로도 가능하다. [increase.type]: (state) => ({ ...state, value: state.value + 1 }), [decrease.type]: (state) => ({ ...state, value: state.value - 1 }), }) // toolkit에서 객체형 리듀서가 곧 deprecated될 예정으로 builder 콜백을 사용하는 것을 권장하고 있다. const counter = createReducer(initialState, (builder) => { builder .addCase(INCREASE, (state) => ({ ...state, value: state.value + 1 }) .addCase(DECREASE, (state) => ({ ...state, value: state.value - 1 }) }); export default counter;-
리듀서까지 완성이 됐다면 여러가지 리듀서들을 하나의 리듀서로 통합해주는 작업을 한다. (현재는 하나이지만 추후에도 추가될 리듀서들을 위해 미리 하나의 리듀서로 통합한다.)
/* store/index.js */ import { combineReducers } from 'redux'; // 1. combineReducers를 import import counter from './counter'; const rootReducer = combineReducers({ counter }); // 3. 객체의 형태로 넣어주고 export default rootReducer; // 4. 합쳐진 리듀서들을 export 시킨다. -
리듀서까지 통합되었으면
index.js로 가서 store를 생성하고 React-Redux에서 제공하는Provider를 통해 App컴포넌트를 감싸준다./* index.js */ import ReactDOM from 'react-dom/client'; import { configureStore, createStore } from '@reduxjs/toolkit'; import { Provider } from 'react-redux'; import rootReducer from './store/index'; // 기존 리덕스 라이브러리에서 제공하는 createStore를 활용해서 아래와 같이 store를 제작할 수 있으나 // 리덕스에서는 툴킷을 쓰는 것을 권장하고 있다. const store = createStore(rootReducer); // toolkit에서는 createStore를 대체하여 configureStore가 등장했다. const store = configureStore({ reducer: rootReducer }); const root = ReactDOM.createRoot( document.getElementById('root) ); root.render( // Provider를 활용해 store를 부여해주고 // App 컴포넌트(혹은 상황에 따라 Router컴포넌트)를 감싸주면 세팅은 완료된다. <Provider store={store}> <App /> </Provider> ); -
추가적으로 액션생성함수들을 실행시키기 위해서는 꼭
dispatch함수를 활용해서 리듀서를 통해 상태들이 바뀌도록 해줘야한다. -
createStore와 configureStore의 큰 차이점은 createStore는 브라우저에서 리덕스가 작동되는 액션을 추적 할 수 없는데 추적을 하려면 redux-devtools-extension라이브러리를 설치해서 createStore에 추가를 해주어야 추적이 가능하다.
-
하지만 configureStore는 자체적으로 내장이 되어있어 별도의 라이브러리 설치 없이 추적이 가능한 장점이 있다.
-
또한 createStore를 활용할 땐 통합된 리듀서를 그냥 넣어주고 미들웨어를 추가하려면 applyMiddleware를 활용해서 각종 미들웨어를 넣어줘야 했지만 configureStore에서 미들웨어를 추가할 때는 객체안에 middleware 키값으로 사용하고자 하는 미들웨어들은 배열의 형태로 넣어주면 된다.
3. Vue에서 Vuex활용하기
-
React에 Toolkit이 있다면 Vue에는 Vuex가 있다.
-
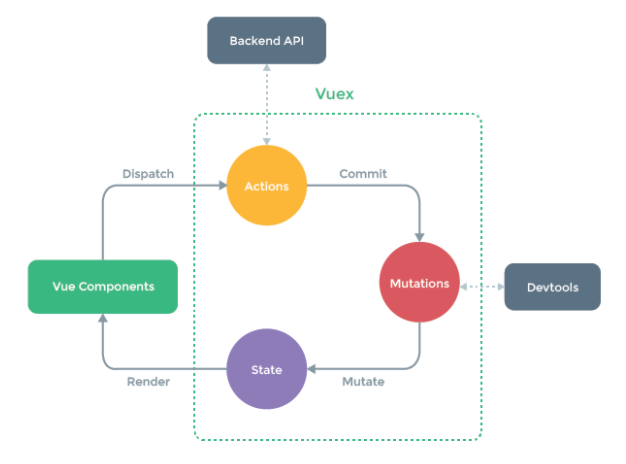
Vuex에도 마찬가지로 4가지 속성이 있다.
- 상태(state): 리액트와 마찬가지로 전역적으로 관리되는 상태(state)를 의미한다. 즉, 각종 변수들의 집합
- 게터(getters): 상태(state)의 변수들을 get하는 역할을 하나 사용하지 않아도 무방하다.
- 변이(mutations): 상태(state)를 조작하고 변경하는 함수들의 집합
- 액션(actions): 비동기 처리를 위한 함수들의 집합
-
리액트와의 차이점 중 하나로 actions부분이 가장 크다고 생각한다.
- 리액트에서는 비동기 처리를 위해 middleware를 따로 라이브러리로 설치하고(toolkit은 통합되어 있다.) 적용해주어야 했으나 Vuex자체적으로 비동기 처리를 제공함으로써 이 부분은 리액트보다 사용하는데 훨씬 편하고 쉽다고 느껴졌다.
-
마찬가지로 Vue에서 Vuex를 활용해 counter를 만들어보자.
/* store/store.js */ import { createStore } from 'vuex'; const store = createStore({ // 1. 상태를 저장 state() { return { value: 0, } }, // 2. 변이(mutations) 함수 생성 mutations: { increase(state) { // 함수의 첫번째 인자는 상태(state)를 의미하고 // 두번째 인자는 payload, 이 mutations함수가 들고오는 외부 요소를 의미한다. state.value++; }, decrease(state) { state.value--; }, }, // 3. 비동기 처리를 위한 액션(actions)함수 생성 actions: { increaseAsync(context) { setTimeout(() => { // 주의사항: 모든 상태의 변화는 필히 mutations 함수로만 이루어져야 한다. context.commit('increase'); }, 1000); }, decreaseAsync(context) { setTimeout(() => { context.commit('decrease'); }, 1000); }, }); export default store;- Vuex에서도 마찬가지로 store를 제작하는데 createStore를 활용해 객체 형태로 state와 mutations들을 저장해준다. (actions도 마찬가지로 같이 저장이 가능하다.)
- 리액트 리덕스와는 다르게 비동기 처리 함수도 같이 제공을 해주어 어려움 없이 코드 작성이 가능하다.
-
store제작이 완료되었다면 main.js로 이동해 해당 store를 사용한다고 명시해준다.
import { createApp } from 'vue'; import store from './store/store'; // 제작해둔 store를 import해서 import App from './App.vue'; const app = createApp(App); app.use(store); // App컴포넌트에 주입하면 끝! app.mount('#app');- 확실히 store를 적용하는 단계에 있어서도 리액트 리덕스보단 단계도 많이 절약적이라고 느꼈다.
-
store 적용까지 완료되었다면 사용만 하면 된다.
<!-- 1. 직접 store로 접근 --> <template> <div>count is: {{ $store.state.value }}</div> </template> <!-- 2. computed에 등록 --> <template> <div>count is: {{ value }}</div> </template> <script> export default { computed: { value() { return this.$store.state.value } } } </script> <!-- 3. mapState를 활용한 접근 --> <template> <div>count is: {{ value }}</div> </template> <script> export default { computed: { ...mapState(["value"]), }, } </script> -
상태(state)는 위에 있는 것처럼 접근하고 가져올 수 있으며 이 상태들을 변형 시키고 싶다면 mutations함수들을 활용해야 한다.
<!-- 1. 바로 변이를 시키는 방법 --> <template> <div>count is: {{ value }}</div> <!-- mutations함수를 실행시키기 위해선 commit이라는 메서드를 활용한다 --> <button @click="$store.commit('decrease')">-1</button> <button @click="$store.commit('increase')">+1</button> </template> <script> export default { computed: { ...mapState(["value"]), }, } </script> <!-- 2. mapMutaions를 활용하는 방법 --> <template> <div @click="$store.commit('increase')"> count is: {{ value }} </div> <button @click="increase">-1</button> <button @click="decrease">+1</button> </template> <script> export default { computed: { ...mapState(["value"]), }, methods: { ...mapMutations(['increase', 'decrease']), } } </script> -
비동기 처리를 위한 actions함수를 실행시키기 위한 방법
<!-- 1. 바로 변이를 시키는 방법 -->
<template>
  <div>count is: {{ value }}</div>
<!-- actions함수를 실행시키기 위해선 dispatch라는 메서드를 활용한다 -->
  <button @click="$store.dispatch('decreaseAsync')">1초뒤 -1</button>
  <button @click="$store.dispatch('increaseAsync')">1초뒤 +1</button>
</template>

<script>
export default {
  computed: {
    ...mapState(["value"]),
  },
}
</script>

<!-- 2. mapActions를 활용하는 방법 -->
<template>
  <div @click="$store.commit('increase')">
    count is: {{ value }}
  </div>
  <button @click="increaseAsync">1초뒤 -1</button>
  <button @click="decreaseAsync">1초뒤 +1</button>
</template>

<script>
export default {
  computed: {
    ...mapState(["value"]),
  },
  methods: {
    ...mapActions(['increaseAsync', 'decreaseAsync']),
  }
}
</script>
3. 정리
- vuex를 학습한 시간이 모자르긴 했으나 짧게나마 보았을 때도 확실히 리액트에서의 리덕스 보단 훨씬 쉽고 간결하다고 느껴진다.
- 또한 기존의 Todo프로젝트를 진행하면서 Vuex로 바꿔보니 하나의 Vue컴포넌트 내에 코드량이 확실히 많이 줄어들어 가독성도 높아진점에 있어 매우 유용하게 사용이 가능하다고 생각이 된다.
- 하지만 전역상태관리가 무조건 좋은 것은 아니므로 데이터의 규모에 따라 props로도 가능한 것은 컴포넌트 내의 data로 그 외 데이터가 이곳 저곳 컴포넌트에서 다중적으로 사용된다면 전역상태관리를 하는것이 좋다고 느껴졌다.