Almost every website we use today has a login/logout functionality where the user can create an account and save information regarding information on that particular website. This is where user authentication plays a big role in managing information for the users.
User authentication verifies the identity of a user attemptinng to gain access to a network(in this case, a website) by authorizing a human-to-machine transfer of information during interactions to confirm a user's authenticity.
In a more simpler explanation, when the user(client) requests to obtain access to a certain website, the user goes through a process of recognition in order to check if the user is real or not.
Creating an Account
In order for a server to do user authentication, there first needs to be an actual information. For this process, users can create an account in order to save their information and request access whenever needed.
For this, we should create a new model which functions only for user authentication. Just like other models, we can write any information we want to receieve on our schema.
// dont' forget to import mongoose!
import mongoose from "mongoose";

const userSchema = new mongoose.Schema({
  email: { type: String, required: true, unique: true },
  username: { type: String, required: true, unique: true },
  password: { type: String, required: true },
  name: { type: String, required: true },
  location: String,
});

const User = mongoose.model("User", userSchema);
export default User;
Then, we can create a new controller and a pug.js file where we can use our previously created model to make it available for users to add actual data.
// router
rootRouter.route("/join").get(getJoin).post(postJoin);
// controller
import User from "../models/User";
export const getJoin = (req, res) => res.render("join", { pageTitle: "Join" });
export const postJoin = async (req, res) => {
const { name, username, email, password, location } = req.body;
await User.create({
name,
username,
email,
password,
location,
});
return res.redirect("/login");
};// pug.js file
extends base
block content
form(method="POST")
input(placeholder="Name" name="name", type="text", required)
input(placeholder="Email" name="email", type="email", required)
input(placeholder="Username" name="username", type="text", required)
input(placeholder="Password" name="password", type="password", required)
input(placeholder="Location" name="location", type="text", required)
input(type="submit", value="Join")With this, users are able to fill out their information can create an account which will get saved on the database. However, there is a slight problem with this process.
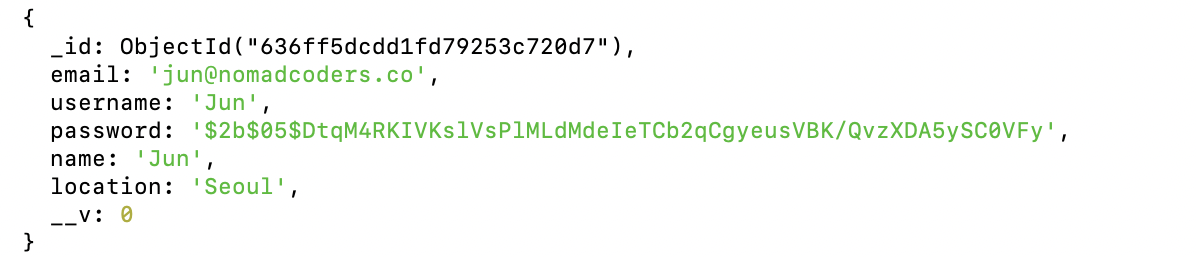
If we look at our database on the terminal, we will find that the user's password is clearly seen visible. This can be detrimental especially for real-world websites today as hackers can easily steal information from databases.
Thankfully, in order to prevent these situations, npm has a special security package known as bcrypt. This package essentially protects our data from being seen by any unwanted people by hashing our information to a encrypted code. Hashing bascially means that we are taking the original data and hiding it with an entirely bizarre, long mix of strings. Hashing can be done as many times as we want. As such, even if a hacker successfully gets into a database, our information will be presented as a bizarre, long code.
Implementing this functionality is very simple. We simply install bcrypt through npm on our node.js and then we choose the information we want to hash and fill it inside the following code:
('pre' means that we want to execute the following code before saving)
userSchema.pre("save", async function () {
  this.password = await bcrypt.hash(this.password, 5);
});
Form Validation
While creating a sign-up form, there may be cases where users might try to use duplicating username or email. In order to fix this issue, we need to create a functionality which validates information on forms.
Using the exists() function, we can check whether the user is inputting a data which already exists within the database. If so, we can create a conditional that will display an error message and redirect the user back to the sign-up page.
const usernameExists = await User.exists({ username });
if (usernameExists) {
  return res.render("join", {
    pageTitle: "Join",
    errorMessage: "This username is already taken.",
  });
}
In case we have to repeta similar code, we have the option to use the or operator.
const pageTitle = "Join";
const exists = await User.exists({$or: [{ username }, { email }] });
if (exists) {
  return res.render("join", {
    pageTitle,
    errorMessage: "This username/email is already taken.",
  });
}
Status Code
We use status codes to inform users whether a request made to the server is working or not. If it works, then the server will reply with the rendered content. It not, the server will reply with an error message.
Ex) 200 -> Status OK!
Ex) 400 -> Error :(
res.status(200)
res.status(400)
// example
const exists = await User.exists({ $or: [{ username }, { email }] });
if (exists) {
return res.status(400).render("join", {
pageTitle,
errorMessage: "This username/email is already taken.",
});
}Creating a Login Form
With the sign-up form, users should be able to login with their newly created account. For this, we need to create a login form.
The code structure of the login form will not be much different from the sign-up form as it uses the same type of form.
export const getLogin = (req, res) =>
  res.render("login", { pageTitle: "Login" });

export const postLogin = async (req, res) => {
  const { username, password } = req.body;
  const exists = await User.exists({ username });
  if (!exists) {
    return res.status(400).render("login", {
      pageTitle: "Login",
      errorMessage: "An account with this username does not exist.",
    });
  }
  res.end();
};
However, we might be wondering how users can use their hashed password to login. For this process, we need to know how hashing works during a login process. When the user hashes a password, the hash does not change whatsoever. Because it does not change, when the password is used for a login attempt, the server will compare the password with the hash code. If it is similar, the user will be able to login. If not, the login will fail.
To implement this process, we use bcrypt's compare() function to check if the users hash is valid.
export const postLogin = async (req, res) => {
  const { username, password } = req.body;
  const pageTitle = "Login";
  const user = await User.findOne({ username });
  if (!user) {
    return res.status(400).render("login", {
      pageTitle,
      errorMessage: "An account with this username does not exist.",
    });
  }

  const ok = await bcrypt.compare(password, user.password);
  if (!ok) {
    return res.status(400).render("login", {
      pageTitle,
      errorMessage: "Wrong password.",
    });
  }
  return res.redirect("/");
};
Sessions and Cookies
Now that users can create an account and login to the browser, we need to make the browser remember the logged in users. For this, we need to understand sessions and cookies.
A session in a browser is used to save information on the server momentarily so that it may be utilized across various pages of the website. Basically, it is the overall amount of time spent on an activity. A session begins when the user logs in to a specific network of the website and ends when the user logs out of that network.
A cookie is a small text file that is saved on the user's computer. These text files are used by the users to confirm to the server that they have access to the website. Cookies help the server recognize logged in users and authorizes a session.
To use sessions, we need install a npm package called express-session and import it on the server.js file.
npm i express-sessionWe then create a session middleware which will recognize anyone who visits this website regardless of whether they logged in or not (make sure to add this middleware before the router).
For every visit to the website, the browser will send a cookie to the server and the server will give a text file which will be used to recognize users.
app.use(
  session({
    secret: "Hello!",
    resave: true,
    saveUninitialized: true,
  })
);
To make sure the server remembers the user, we need to add a few more session information to the controller. This way, even if the user moves from one place to another, the server will not forget that particular user.
req.session.loggedIn = true;
req.session.user = user;
If we use pug.js, we are able to send variables to our pug.js templates globally by using the locals object. We can make this happen by creating a separate middleware (make sure to call next()).
Additionally, we can use this middleware to share information with templates regarding who is logged in.
export const localsMiddlware = (req, res, next) => {
  res.locals.loggedIn = Boolean(req.session.loggedIn);
  res.locals.siteName = "Wetube";
  res.locals.loggedInUser = req.session.user;
  next();
};
Session Store
In default, session data is stored in memory instead of database. Even though sessionID is saved in the cookie, the actual data inside the sessionID is saved on another location called server-side.
To configure sessions to be saved on the database, we need to use a session store.
A session store is a place where session dession data can be stored on a server. On the web, the cookies within the clients browser are able to identify these sessions. This helps users to be logged in even if a new request is made.
We can use an npm package known as connect-mongo which will save sessions even if the server restarts.
npm i connecet-mongoAfter installing connect-mongo, we can add a property called store on the session object to create a storage for saving sessions.
app.use(
  session({
    secret: "Hello!"
    resave: true,
    saveUninitialized: true,
    store: MongoStore.create({ mongoUrl: "mongodb://127.0.0.1:27012/wetube" }),
  })
);
With this, sessions will be saved within a database.
Uninitialized Sessions
We can now save sessions for every user visiting our website. However, this may cause some problem for the database. Imagine if a large number of users and bots visit our website. The cookies will then have to unnecessarily record all the sessions for all the incoming visitors.
To avoid this situation, we can switch the value of the resave and saveUninitialized properties from true to false.
resave: false,
saveUninitialized: false,
Now our cookies will save sessions only when the users are logged in.
Expiration and Secrets
If needed, we can set expiration dates for our cookie and create a time limit of how long a user can hold on to a session.
cookie: {
  maxAge: 20000,
}
Additionally, in order to prevent our information from being hacked and stolen, we need to protect our cookies.
app.use(
  session({
    secret: process.env.COOKIE_SECRET,
    resave: false,
    saveUninitialized: false,
    store: MongoStore.create({ mongoUrl: process.env.DB_URL }),
  })
);
For the information within the properties, we can save them in an .env file which is an environment file for saving classified information. This will hide information and not display them explicitly within the codebase.
Ex) URL, API Keys
Environment Variables
To make the .env files work, we need to install another npm package called dotenv. This will allow .env file to load environment variables into process.env.
npm i dotenvAdditionally, it is mentioned that we need to apply and configure this package into our codeabase "as early as possible". This means that it will not work if this is placed anywhere after a certain code.
import "dotenv/config";With this setting, we will be able to use our .env file.