홍팍 님의 스프링 부트, 입문! 강의를 보고 작성한 내용이며 이미지 또한 강의에 나오는 이미지를 따라 만들었습니다.
https://www.youtube.com/watch?v=Ym7cAtE2jQs&list=PLyebPLlVYXCiYdYaWRKgCqvnCFrLEANXt&index=29
14. 수정 폼 만들기
14-1. 링크 생성
<a href="/articles/{{article.id}}/edit">Edit</a>
-
수정 페이지로 이동하는 링크
-
{{#article}}로 묶는 방식 외 위처럼model이름.데이터로 사용 가능
14-2. Controller 수정
-
Controller
-
수정 페이지 url을 처리하는 메소드 작성
-
url을 통해 같이 전달된 id를 이용해서 DB에서 데이터를 가져옴
-
model에 데이터를 등록
-
-
수정 페이지
- input 태그의
value속성에{{title}}처럼 model의 데이터를 불러온다
- input 태그의
15. 데이터 수정하기
15-1. 설명
-
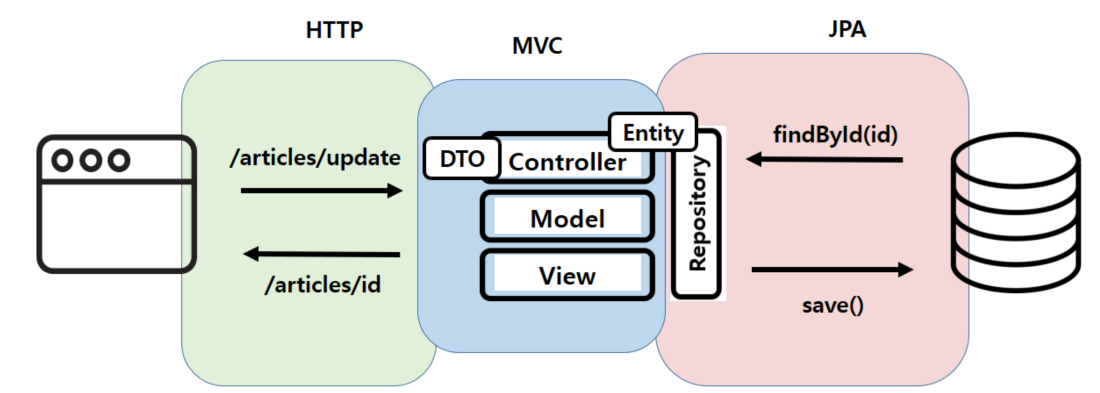
클라이언트 <--> 서버의 데이터 전송은 다양한 통신 규약 즉, 프로토콜을 통해 이루어짐
-
Protocool
-
FTP : File Transfer Protocool
-
SMTP : Simple Mail Transfer Protocol
-
SSH : Secure Shell
-
HTTP : Hyper Text Transfer Protocol (웹 서비스에서 사용)
-
-
HTTP : 다양한 요청을 메소드를 통해 보낸다
-
GET : read
-
POST : create
-
PATCH/PUT : update
-
DELETE : delete
-
15-2. 동작 흐름
15-3. 수정 페이지 생성
-
<input name = "id" type="hidden" value = "{{id}}">: 수정 페이지에서 데이터 전달을 위해 추가 -
<form class="container" action="/articles/update" method="post">: HTML에서는 patch 방식을 지원하지 않아 post 방식을 사용
15-4. DTO 및 Controller 수정
15-4-1. 수정 내용
-
DTO
- 수정 폼에서 id 값을 받아오기 때문에 폼에서 데이터를 전달받는 DTO에 id필드 추가, toEneity()에 id 추가
-
Controller
-
@PostMapping("/articles/update"): HTML 에서 get, post 방식만 지원하기 때문에 PostMapping 어노테이션을 사용 -
폼에서 DTO로 데이터가 전송되기 때문에 매개변수에 DTO 객체 추가
-
DB에 반영하기 위해 Entity로 변환
-
15-4-2. 수정 후 코드
    @PostMapping("/articles/update")
    public String update(ArticleForm form) {
        log.info(form.toString());

        // 1. DTO --> Entity
        Article articleEntity = form.toEntity();

        // 2. Entity를 DB에 저장
        // 2-1. DB에 기존 데이터를 가져온다
        // 가져오려는 값이 없는 경우 null을 반환하도록
        // 원래 반환되는 값은 Optional<Article>
        Article target = articleRepository.findById(articleEntity.getId()).orElse(null);

        // 2-2. 기존 데이터가 있다면 값을 갱신
        if(target != null) {
            articleRepository.save(articleEntity);
        }

        // 3. 수정 결과 페이지로 리다이렉트
        return "redirect:/articles/" + articleEntity.getId();
    }
16. 데이터 삭제하기
16-1. RedirectAttributes
-
RedirectAttributes 클래스
-
.addFlashAttributes("key", "value"): redirect된 페이지에서 일회성으로 사용할 데이터를 등록 -
삭제가 완료됐다는 메세지를 전달하기 위해 사용
-
Controller의 메소드에서 매개변수에 선언 후 사용
-
16-2. 수정하기
16-2-1. Controller
<ArticleController>

    @GetMapping("/articles/{id}/delete")
    public String delete(@PathVariable Long id, RedirectAttributes rttr) {

        // 1. 삭제 대상을 가져온다
        Article target = articleRepository.findById(id).orElse(null);

        // 2. 대상을 삭제한다
        if(target != null) {
            articleRepository.delete(target);
            // 삭제완료 메세지 출력을 위한 메소드
            rttr.addFlashAttribute("msg", target.getId() + "번 글이 삭제되었습니다");
        }

        // 3. 결과 페이지로 리다이렉트
        return "redirect:/articles";
}@GetMapping("/articles/{id}/delete"): HTML 에서 get, post 방식만 지원하기 때문에 GetMapping 어노테이션을 사용
16-2-2. mustache
<header.mustache>

<!-- alert msg -->
{{#msg}}
    <div class="alert alert-primary alert-dismissible">
        {{msg}}
        <button type="button" class="btn-close" data-bs-dismiss="alert" aria-label="Close"></button>
    </div>
{{/msg}}
17. CRUD와 SQL 쿼리
17-1. ID 오류
-
지금까지의 코드에서 더미 데이터의 id를 1번으로 설정해서 삽입한 경우, 새 글을 작성할 때 새 글의 id도 1이 되기 때문에 id(대푯값, 기본키)가 겹쳐서 오류 발생
-
@GeneratedValue(strategy = GenerationType.IDENTITY)로 설정- 위의 방식은 DB가 ID를 자동으로 생성
17-2. 기타 설정
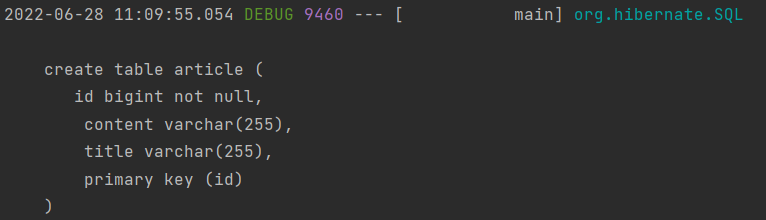
<application.properties>

# JPA Logging 설정
# DEGUB LEVEL로 QUERY 출력
logging.level.org.hibernate.SQL = DEBUG

# format 형태로 출력 (SQL문을 보기 좋게 출력)
spring.jpa.properties.hibernate.format_sql = true

# parameter 보여주기 (? 값 출력)
logging.level.org.hibernate.type.descriptor.sql.BasicBinder=TRACE

# H2 console의 DB URL 고정 설정
# 유니크 URL 생성 X
spring.datasource.generate-unique-name=false
## 고정 url 설정
spring.datasource.url=jdbc:h2:mem:testdb
17-2-1. JPA Logging & 출력 확인
17-2-2. ? 값 확인하기

17-2-3. H2 console JDBC URL 고정
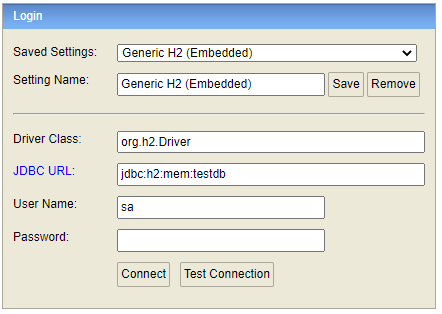
- 위처럼
jdbc:h2:mem:testdb로 접속 가능
