
참고 : https://mangkyu.tistory.com/76
참고 : 스프링 시큐리티 기본 API및 Filter 이해
참고 : Authentication의 Filter, Manager, Provider
Spring Security
Spring Security는 Spring 기반의 애플리케이션의 보안( 인증, 인가, 권한 )을 담당하는 스프링 하위 프레임워크이며 인증과 권한에 대한 부분을 Filter 흐름에 따라 처리합니다.
[ 인증과 인가 ]
Spring Security 는 인증과 권한에 대한 처리를 한다고 했는데 인증과 인가에 대해 알아보도록 하겠습니다.
-
인증( Authentication ) : 해당 사용자가 본인이 맞는지를 확인하는 절차이고
-
인가( Authorization ) : 인증된 사용자가 요청한 자원에 접근 가능한지를 결정하는 절차입니다.
Spring Security 는 인증 절차를 거친 후에 권한에 따른 인가 절차를 진행합니다. 인가 과정에서 해당 리소스에 대한 접근 권한이 있는지 확인하게 됩니다.
[ Principal 과 Credential ]
Spring 은 이러한 인증과 인가를 위해 Principal 을 아이디로, Credential 을 비밀번호로 사용하는 Credential 기반의 인증 방식을 사용합니다.
-
Principal(접근 주체): 보호받는 Resource에 접근하는 대상
-
Credential(비밀번호): Resource에 접근하는 대상의 비밀번호
인증이 완료되면 최종적으로 Spring Security 에 사용자의 정보가 담긴 UsernamePasswordAuthenticationToken 을 전달하게 되는데 이 클래스의 최상위 인터페이스가 바로 Principal 입니다.
Principal 을 상속받은 것이 Authentication 인터페이스이며 내부를 보면 아래와 같이 Principal 과 Credential 을 가져오는 메서드와 설명이 있습니다.
public interface Authentication extends Principal, Serializable {

	/**
	 * The credentials that prove the principal is correct.
     * This is usually a password, but could be anything relevant to the AuthenticationManager.
     * Callers are expected to populate the credentials.
	 * @return the credentials that prove the identity of the Principal
	 */
	Object getCredentials();

	/**
	 * The identity of the principal being authenticated.
     * In the case of an authentication request with username and password, this would be the username.
     * Callers are expected to populate the principal for an authentication request.
	 * The AuthenticationManager implementation will often return an Authentication containing richer information as the principal for use by the application.
     * Many of the authentication providers will create a UserDetails object as the principal.
	 * @return the <code>Principal</code> being authenticated or the authenticated
	 * principal after authentication.
	 */
	Object getPrincipal();
}
[ Filter 와 Intercepter ]
HTTP 요청 ➜ WAS ➜ 필터 ➜ 서블릿( DispatcherServlet ) ➜ Controller
Filter 는 DispatcherServlet 으로 가기 전에 호출되며, 필터가 적절하지 못한 요청이라고 판단하면 서블릿을 호출하지 않습니다. 예를 들면, 로그인하지 않은 사용자의 요청이라면 서블릿을 호출하지 않는다를 들 수 있겠습니다.
HTTP 요청 ➜ WAS ➜ 필터 ➜ 서블릿 ➜ 스프링 인터셉터 ➜ Controller
Intercepter 는 필터와는 다르게 서블릿이 호출된 다음에 호출됩니다. Intercepter 는 Spring 이 제공하는 기술이고, 스프링 MVC 의 시작점이 DispatcherServlet 이기 때문에 서블릿 뒤에서 호출되는 것입니다.
Filter 와 Intercepter 에 대한 자세한 설명은 강의 게시글에 있습니다.
Spring Security 로그인 프로세스
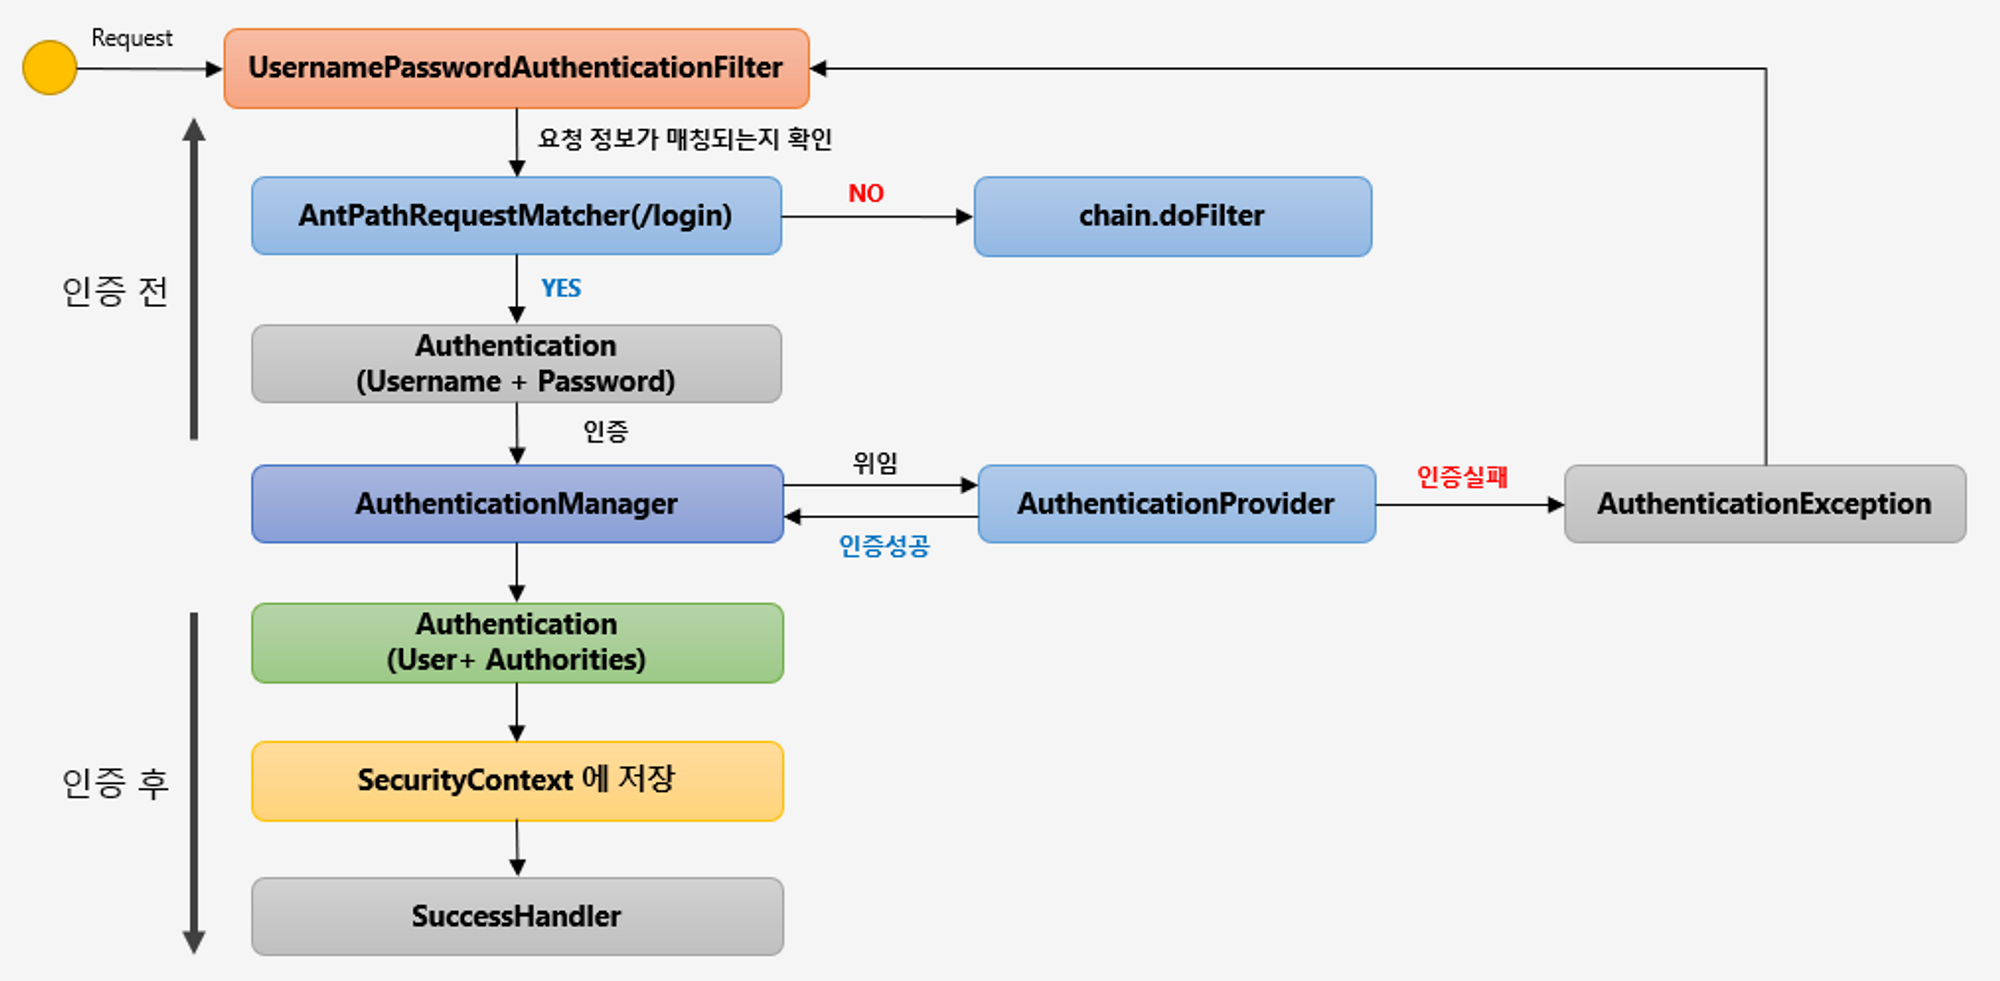
Spring Security 의 각 모듈들에 대해 알아보기 전, 간단하게 어떤 과정으로 로그인이 처리되는지를 보도록 하겠습니다.
1. AntPathRequestmatcher(/login)
사용자가 요청한 요청 정보를 확인하여 요청정보 url 이 /login 으로 시작하는지 확인합니다. 요청 url 이 /login 으로 시작하고 요청 방식이 POST 라면 인증의 다음 단계를 진행하고 그렇지 않으면 다음 필터로 진행됩니다.
이 때 /login 이라는 url 은 default 값이며, Spring Security 의 웹 보안 기능을 설정하기 위해 WebSecurityConfigurerAdapter 를 상속받아 구현한 설정클래스에서 변경 가능합니다. configure() 메서드 내부에서 .loginProcessingUrl() 으로 변경할 수 있습니다.
2. Authentication
실제 인증 처리는 Authentication 를 이용해서 하게 되는데, 로그인 페이지에서 입력한 Username 과 Password 를 인증 객체( Authentication )에 저장해서 인증을 처리하는 AuthenticationManager에게 맡기게 됩니다.
정확하게 말하면 Authentication 은 인터페이스이기 때문에 구현체인 UsernamePasswordAuthenticationToken 에 저장되어 AuthenticationManager 에게 전달되게 됩니다.
아래에서 언급하는 Authentication 은 모두 UsernamePasswordAuthenticationToken 이라고 생각하시면 됩니다. 그리고 여기까지가 인증처리를 하기 전 UsernamePasswordAuthenticationFilter 가 하는 역할입니다.
3. AuthenticationProvider
AuthenticationManager는 내부적으로 AuthenticationProvider 에게 인증처리를 위임하게 됩니다. Provider 가 인증처리를 담당하는 클래스로 인증 성공과 실패에 따른 동작을 다르게 수행합니다.
인증에 성공하면 Authentication 객체를 생성하여 User 객체와 Authorities( 유저 권한 정보 ) 객체를 담아서 AuthenticationManager 에게 반환합니다.
먼저 인증을 실패한다면 AuthenticationException 예외를 반환하여 UsernamePasswordAuthenticationFilter 로 돌아가서 예외 처리를 수행합니다.
4. AuthenticationManager
AuthenticationManager 는 Provider 로부터 반환받은 Authentication( User + Authorities ) 를 SecurityContext 에 저장합니다.
SecurityContext 는 Session 에도 저장되어 전역적으로 SecurityContext 를 참조할 수 있으며, 인증 성공 이후에는 SuccessHandler 에서 인증 성공이후의 로직을 수행하게 됩니다.
Spring Security 모듈
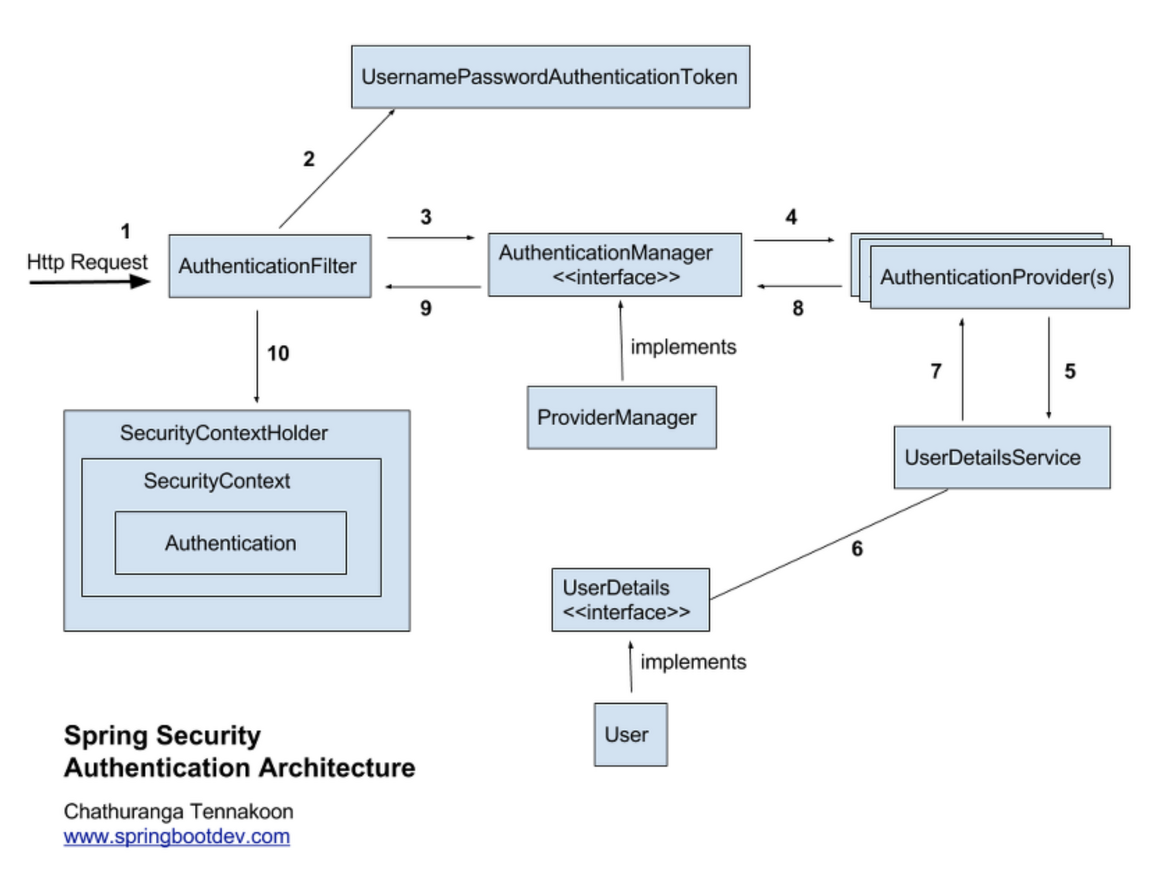
Spring Securirty 는 위와 같은 모듈들을 이용하여 아래와 같은 인증 과정을 거치게 되는데 모듈들과 함께 자세히 알아보도록 하겠습니다.
[ AuthenticationFilter ]
@Override
	public Authentication attemptAuthentication(HttpServletRequest request, HttpServletResponse response)
			throws AuthenticationException {
		if (this.postOnly && !request.getMethod().equals("POST")) {
			throw new AuthenticationServiceException("Authentication method not supported: " + request.getMethod());
		}

		String username = obtainUsername(request);
		username = (username != null) ? username.trim() : "";
		String password = obtainPassword(request);
		password = (password != null) ? password : "";

		UsernamePasswordAuthenticationToken authRequest = UsernamePasswordAuthenticationToken.unauthenticated(username, password);
		// Allow subclasses to set the "details" property
		setDetails(request, authRequest);
		return this.getAuthenticationManager().authenticate(authRequest);
	}
HTTP 요청이 오면 가장 먼저 Filter 에 도달합니다. 로그인 인증 처리를 담당하고 인증 처리에 관련된 요청을 처리하는 Filter 가 바로 UsernamePasswordAuthenticationFilter 입니다.
Filter 의 attemptAuthentication() 에서 HttpServletRequest 에서 username 과 password 를 추출하여, 아직 인증되지 않은 UsernamePasswordAuthenticationToken 의 객체를 생성합니다.
UsernamePasswordAuthenticationToken 은 Authentication 의 구현 객체이며, 이렇게 생성된 객체를 AuthenticationManager 에게 전달합니다.
	private void doFilter(HttpServletRequest request, HttpServletResponse response, FilterChain chain)
			throws IOException, ServletException {
		...
		try {
			Authentication authenticationResult = attemptAuthentication(request, response);
			if (authenticationResult == null) {
				// return immediately as subclass has indicated that it hasn't completed
				return;
			}
			this.sessionStrategy.onAuthentication(authenticationResult, request, response);
			// Authentication success
			if (this.continueChainBeforeSuccessfulAuthentication) {
				chain.doFilter(request, response);
			}
			successfulAuthentication(request, response, chain, authenticationResult);
		}
		...
	}
UsernamePasswordAuthenticationFilter 는 AbstractAuthenticationProcessingFilter 를 상속받는데 AbstractAuthenticationProcessingFilter 의 내부의 doFilter() 메서드에서 attemptAuthentication() 실행합니다.
모든 인증 과정이 끝나고 attemptAuthentication() 를 통해 Authentication 객체가 반환되었을 때 successfulAuthentication() 메서드가 실행됩니다.
	protected void successfulAuthentication(HttpServletRequest request, HttpServletResponse response, FilterChain chain,
			Authentication authResult) throws IOException, ServletException {

		SecurityContext context = SecurityContextHolder.createEmptyContext();

		context.setAuthentication(authResult);

		SecurityContextHolder.setContext(context);

		this.securityContextRepository.saveContext(context, request, response);
		...
	}
successfulAuthentication() 메서드를 통해 파라미터로 받은 Authentication 객체를 SecurityContext 에 저장합니다.
[ Authentication ]
Authentication 는 현재 접근하는 주체의 정보와 권한을 담는 인터페이스입니다. Authentication 객체는 AbstractAuthenticationProcessingFilter 에 의해 Security Context 에 저장됩니다.
SecurityContextHolder 를 통해 SecurityContext 에 접근하고, SecurityContext 를 통해 Authentication 에 접근할 수 있습니다.
[ UsernamePasswordAuthenticationToken ]
public class UsernamePasswordAuthenticationToken extends AbstractAuthenticationToken {

	public UsernamePasswordAuthenticationToken(Object principal, Object credentials) {
		super(null);
		this.principal = principal;
		this.credentials = credentials;
		setAuthenticated(false);    //  인증되지 않음
	}


	public UsernamePasswordAuthenticationToken(Object principal, Object credentials,
			Collection<? extends GrantedAuthority> authorities) {
		super(authorities);
		this.principal = principal;
		this.credentials = credentials;
		super.setAuthenticated(true); // must use super, as we override
	}
}
Authentication을 구현한 추상 클래스로 AbstractAuthenticationToken 가 있고, 이를 구현한 하위 클래스가 바로 UsernamePasswordAuthenticationToken 입니다.
UsernamePasswordAuthenticationToken 에는 두 개의 생성자가 있는데 의 첫 번째 생성자는 인증 전의 객체를 생성하고, 두번째 생성자는 인증이 완료된 객체를 생성하게 됩니다.
[ AuthenticationManager ]
public interface AuthenticationManager {

	/**
	 * Attempts to authenticate the passed Authentication object,
     * returning a fully populated Authentication object (including granted authorities) if successful.
	 * @param authentication the authentication request object
	 * @return a fully authenticated object including credentials
	 * @throws AuthenticationException if authentication fails
	 */
	Authentication authenticate(Authentication authentication) throws AuthenticationException;

}
인증에 대한 부분은 AuthenticatonManager 를 통해서 처리하게 되는데, 실질적으로는 AuthenticationManager 에 등록된 AuthenticationProvider 에 의해 처리됩니다.
인증이 성공하면 2번째 생성자를 이용해 인증이 성공한 객체를 생성하여 AuthenticationFilter 에게 전달합니다 ( 정확히는 Authentication 객체를 반환합니다 )
그리고 인증 상태를 유지하기 위해 세션에 보관하며, 인증이 실패한 경우에는 AuthenticationException 를 발생시킵니다.
@Override
	public Authentication authenticate(Authentication authentication) throws AuthenticationException {
		Class<? extends Authentication> toTest = authentication.getClass();
		Authentication result = null;
		Authentication parentResult = null;
		...

		for (AuthenticationProvider provider : getProviders()) {
			if (!provider.supports(toTest)) {
				continue;
			}
			...
			try {
				result = provider.authenticate(authentication);
				if (result != null) {
					copyDetails(authentication, result);
					break;
				}
			}
			...
		}
		if (result == null && this.parent != null) {
			// Allow the parent to try.
			try {
				parentResult = this.parent.authenticate(authentication);
				result = parentResult;
			}
			...
		}
		...
	}
AuthenticationManager 를 implements 한 ProviderManager 는 실제 인증 과정에 대한 로직을 가지고 있는 AuthenticaionProvider 를 List로 가지고 있습니다.
ProividerManager 는 for문을 통해 모든 Provider 를 반복하면서 authenticate 처리를 하는데 이때 파라미터로 받은 Authentication 객체를 Provider 에게 전달합니다.
[ AuthenticationProvider ]
public interface AuthenticationProvider {

	/**
	 * @param authentication the authentication request object.
	 * @return a fully authenticated object including credentials.
     * May return null if the AuthenticationProvider is unable to support authentication of the passed Authentication object.
     * In such a case, the next AuthenticationProvider that supports the presented Authentication class will be tried.
	 */
	Authentication authenticate(Authentication authentication) throws AuthenticationException;

	/**
	 * Returns true if this AuthenticationProvider supports the indicated Authentication object.
	 * @param authentication
	 * @return true if the implementation can more closely evaluate the Authentication class presented
	 */
	boolean supports(Class<?> authentication);

}
실제 인증에 대한 처리를 하는 AuthenticationProvicer 에는 두 가지 메서드가 존재합니다.
supports() 메서드는 파라미터로 받은 Authentication 객체가 UsernamePasswordAuthenticationToken 클래스를 구현한 객체인지 확인하고 맞을 경우에만 인증 로직을 진행합니다.
authentication() 은 인증 전의 Authentication 객체를 받아서 인증된 객체를 반환하는 역할을 합니다. 실제로 AuthenticationProvicer 의 구현체들의 authenticate() 를 살펴보면 아래와 같은 동작을 합니다.
authenticate() 에는 인증로직이 포함되어 있고, additionalAuthenticationChecks() 메서드를 통해 Authentication 객체의 credentials( password )과 UserDetails를 통해 가져온 credentials 값을 비교합니다.
비밀번호가 동일할 경우 createSuccessAuthentication() 메서드를 통해 인증이 완료된 UsernamePasswordAuthenticationToken 객체를 만들어 반환하게 됩니다.
@EnableWebSecurity
public class WebSecurityConfig extends WebSecurityConfigurerAdapter {

    @Bean
    public AuthenticationManager getAuthenticationManager() throws Exception {
        return super.authenticationManagerBean();
    }

    @Bean
    public CustomAuthenticationProvider customAuthenticationProvider() throws Exception {
        return new CustomAuthenticationProvider();
    }

    @Override
    protected void configure(AuthenticationManagerBuilder auth) throws Exception {
        auth.authenticationProvider(customAuthenticationProvider());
    }
}
AuthenticationProvider 인터페이스를 구현해서 Custom 한 AuthenticationProvider 을 작성해서 AuthenticationManager 에 등록할 수 있는데 WebSecurityConfigurerAdapter 를 상속해 만든 SecurityConfig 에서 할 수 있습니다.
WebSecurityConfigurerAdapter 의 상위 클래스에서는 AuthenticationManager 를 가지고 있기 때문에 직접 만든 CustomAuthenticationProvider 를 등록할 수 있습니다.
[ UserDetailsService ]
public interface UserDetailsService {

	/**
	 * Locates the user based on the username.
     * In the actual implementation, the search may possibly be case sensitive, or case insensitive depending on how the implementation instance is configured.
     * In this case, the UserDetails object that comes back may have a username that is of a different case than what was actually requested..
	 * @param username the username identifying the user whose data is required.
	 * @return a fully populated user record ( never null )
	 * @throws UsernameNotFoundException if the user could not be found or the user has no GrantedAuthority
	 */
	UserDetails loadUserByUsername(String username) throws UsernameNotFoundException;

}
UserDetailsService 인터페이스는 username 을 전달받아 UserDetails 객체를 반환하는 메서드를 가지고 있는데, 일반적으로 이를 구현한 클래스의 내부에 UserRepository 를 주입받아 DB와 연결하여 처리합니다.
UserDetailsService 는 인증 요청이 AuthenticationProvider 로 흘러들어오게 될때, 사용자의 id와 pw를 확인하기 위해 PasswordEncoder 와 함께 사용됩니다.
[ UserDetails ]
public interface UserDetails extends Serializable {

    Collection<? extends GrantedAuthority> getAuthorities();

    String getPassword();

    String getUsername();

    boolean isAccountNonExpired();

    boolean isAccountNonLocked();

    boolean isCredentialsNonExpired();

    boolean isEnabled();

}
인증에 성공하여 생성된 UserDetails 객체는 Authentication 객체를 구현한 UsernamePasswordAuthenticationToken 을 생성하기 위해 사용됩니다.
[ GrantedAuthority ]
GrantAuthority는 현재 사용자가 가지고 있는 권한을 의미합니다. ROLE_ADMIN나 ROLE_USER 와 같이 사용합니다.
GrantedAuthority 객체는 UserDetailsService 에 의해 불러올 수 있으며, 특정 자원에 대한 권한이 있는지를 검사하여 접근 허용 여부를 결정하는데 이용합니다.
[ SecurityContext ]
Authentication을 보관하는 역할을 하며, SecurityContext를 통해 Authentication 객체를 꺼내올 수 있습니다.
[ SecurityContextHolder ]
SecurityContextHolder는 보안 주체의 세부 정보를 포함하여 응용프래그램의 현재 보안 컨텍스트에 대한 세부 정보가 저장됩니다.
인증 과정 정리
-
AuthenticationFilter 가 가정 먼저 요청 정보를 받음
AuthenticationFilter => UsernamePasswrordAuthenticationFilter ( 구현체 )
HttpServletRequest 에 사용자가 입력한 정보가 있음
-
attemptAuthentication()에서 인증 전 Authentication 객체를 생성해서 AuthenticationManger 의authenticate()로 전달Authentication => UsernamePasswordAuthenticationToken ( 구현체 )
인증 전 객체를 위한 User 정보, 패스워드를 받는 생성자가 있고
인중 후 객체를 위한 User 정보, 패스워드, 권한을 받는 생성자가 존재
-
AuthenticationManger 가 AuthenticationProvider 의
authenticate()에 Authentication 객체를 전달 -
authenticate()에서 Authentication 객체의 username 정보를 뽑아 UserDetailsService 의loadUserByUsername()을 호출 -
userRepository 를 이용해 DB 에서 사용자 정보를 조회하고, DB 에 정보가 있다면 UserDetails 를 생성해서 반환 ( User 정보 + 권한 )
-
AuthenticationProvider 는 전달받은 UserDetails 의 password ( DB에 담긴 암호화된 password ) 와 Authentication 객체로 전달받은 사용자가 입력한 password 를 비교한다
-
인증이 완료되면 User 정보 + 비밀번호 + 권한을 가진 Authentication 객체( 인증이 완료된 객체 )를 생성하여 반환하면 차례차례 앞으로 전달된다
-
다시 AuthenticationFilter 로 돌아왔을 때 인증이 성공했다면
successfulAuthentication()메서드가 실행되고, SecurityContext 에 Authentication 객체를 저장한다
