
카카오톡 알림 기능을 만들어보자!
NestJS 학습을 위한 토이 프로젝트입니다!
OAuth를 이용해 카카오톡, 구글, 네이버 로그인 등을 구현하고, 카카오톡에 시간마다 메시지를 보내는 프로젝트 개발 과정을 정리하면서, 어려웠던 부분이나 해결방법을 적어보겠습니다!
NestJS 환경 구축
Nest CLI를 사용해서 환경을 구축하고 시작하겠습니다.
먼저 CLI를 이용할 수 있도록 패키지 설치가 필요합니다.
$ npm i -g @nestjs/cli이후 Nest CLI를 이용해 프로젝트 파일을 하나 만들어주세요.
$ nest new kakao-alarm저는 프로젝트 이름을 kakao-alarm로 지었습니다.
그러면 npm이나 yarn 중에 어떤 패키지 매니저를 사용할 것인지 알려달라고합니다.
? Which package manager would you ❤️  to use? (Use arrow keys)
> npm
  yarn
  pnpm
이 때, 본인이 원하는 것을 선택하면 됩니다.
저는 yarn을 사용하겠습니다.
User 만들기
User 기본 프로젝트 생성
일단 User모듈을 만들어서 기본적인 CRUD를 할 수 있도록 만들어봅시다.
$ nset g module user
$ nset g controller user --no -sepc
$ nset g service user --no -sepc

//user는 사용할 폴더 이름입니다.
위의 nest CLI를 이용해 user 모듈, 컨트롤러, 서비스를 만듭니다.
저는 user entity를 정의해서 user에 들어갈 정보를 정의해놓겠습니다.
user에 entity를 정의하는 폴더를 만들어서 그 안에 user.entity.ts를 만들겠습니다.
// user.entity.ts
import { BaseEntity, Column, Entity, PrimaryColumn, PrimaryGeneratedColumn } from "typeorm";
import { ROLE } from "../constant/user.role";


@Entity()
export class User extends BaseEntity {

    @PrimaryColumn()
    id: string;

    @Column({ type: 'varchar', unique: true })
    email: string;

    @Column({ type: 'varchar' })
    password: string;

    @Column({ type: 'enum', enum: Object.values(ROLE) })
    role: ROLE;

    @Column({ type: 'varchar', nullable: true })
    refreshToken: string | null;
}
id는 uuid로 생성합니다. ( uuid 패키지를 설치해주세요! $ yarn add uuid )
role은 사용자의 역할입니다. ( 일반 유저인 'USER'와 관리자 'ADMIN'으로 구분 )
refreshToken은 사용자가 로그인 할 때, 발급해주는 refreshToken을 저장해줍니다.
// user.role.ts
export enum ROLE {
    ADMIN = 'ADMIN',
    USER = 'USER',
}
이제 기본적인 User CRUD를 해봅시다!
먼저 모듈부터 보겠습니다.
import { Module } from '@nestjs/common';
import { UserController } from './user.controller';
import { UserService } from './user.service';

@Module({
  controllers: [UserController],
  providers: [UserService]
})
export class UserModule {}
UserModule입니다!
특별한 내용 없이 그냥 UserController와 UserService 프로바이더를 포함하고있어요
다음은 컨트롤러 입니다!
import { Controller, Get, Post, Body } from '@nestjs/common';
import { UserService } from './user.service';
import { CreateUserDto } from './dto/create-user.dto';
import { User } from './entity/user.entity';
import { UserLoginDto } from './dto/user-login.dto';

@Controller('user')
export class UserController {
    constructor(
        private readonly userService: UserService,
    ) {}

    @Get('allUsers')
    async getAllUsers() : Promise<User[]>{
        return await this.userService.getAllUsers();
    }

    @Post('signUp')
    async signUp(@Body() createUserDto: CreateUserDto) : Promise<void> {
        return await this.userService.signUp(createUserDto);
    }

    @Post('signIn')
    async signIn(@Body() userLoginDto: UserLoginDto) : Promise<User> {
        return await this.userService.signIn(userLoginDto);
    }
}
base router를 'user'로 설정하고, 모든 user를 가져오는 작업을 'allUser'라우터, 새로운 user를 만드는 작업을 'signUp'라우터에서 그리고 로그인은 'signIn'라우터에서 진행할게요.
'signUp'을 할 때, 보내주는 데이터를 createUserDto라고 정의해놨습니다.
dto의 코드는 다음과 같습니다.
import { IsNotEmpty } from "class-validator";

export class CreateUserDto{
    @IsNotEmpty()
    email: string;

    @IsNotEmpty()
    password: string;
}
email과 password만 받겠습니다!
서비스가 커져서 더 많은 회원 정보를 받으려고 하면 그 때 업데이트 하죠!
로그인때도 dto를 사용합니다.
import { IsNotEmpty } from "class-validator";

export class UserLoginDto{
    @IsNotEmpty()
    email: string;

    @IsNotEmpty()
    password: string;
}
다음과 같이 정의해놨습니다.
그런데 UserLoginDto와 CreateUserDto가 같은 데이터를 요구하는 것을 볼 수 있습니다. 그런데도 굳이 2개의 dto를 선언한 이유는 Create할때와 Login할때 요구하는 데이터가 서로 달라질 수 있기 때문에 확장성을 열고, 유지보수를 쉽게 하기 위함입니다.
dto를 사용하기 위해 필요한 패키지를 설치하세요!
$ yarn add class-validator class-transformer다음은 서비스입니다.
import { Injectable } from '@nestjs/common';
import { UserRepository } from './user.repository';
import { CreateUserDto } from './dto/create-user.dto';
import { User } from './entity/user.entity';
import { UserLoginDto } from './dto/user-login.dto';

@Injectable()
export class UserService {
    constructor(
        private readonly userRepository: UserRepository
    ) {}

    async getAllUsers() : Promise<User[]> {
        return await this.userRepository.getAllUsers();
    }

    async signUp(createUserDto: CreateUserDto) : Promise<void> {
        await this.userRepository.signUp(createUserDto);
        return null;
    }

    async signIn(userLoginDto: UserLoginDto) : Promise<User> {
        return await this.userRepository.signIn(userLoginDto);
    }
}
이 부분은 선택의 영역이라고 생각합니다.
저는 service에서는 비즈니스 로직을 작성하고, db 작업은 repository를 사용해서 처리하려고합니다.
따로 처리해줄 부분이 없기 때문에 바로 userRepository로 넘겨줘서 db 작업을 하겠습니다.
마지막으로 userRepository입니다.
import { Repository } from "typeorm";
import { BadRequestException, NotFoundException } from "@nestjs/common";
import { CreateUserDto } from "./dto/create-user.dto";
import { CustomRepository } from "src/typeorm-ex.decorator";
import { uuid } from "uuidv4";
import * as bcrypt from 'bcrypt';
import { User } from "./entity/user.entity";
import { ROLE } from "./constant/user.role";
import { UserLoginDto } from "./dto/user-login.dto";
import { UserErrorEnum } from "src/common/Error/user.error.enum";

@CustomRepository(User)
export class UserRepository extends Repository<User>{

    async getAllUsers(): Promise<User[]>{
        const found = await this.find();
        if(!found){
            throw new NotFoundException(UserErrorEnum.USER_NOT_FOUND);
        }
        return found;
    }

    async signUp(createUserDto: CreateUserDto): Promise<void>{
        const {email, password} = createUserDto;
        const hashedPassword = await bcrypt.hash(password, 10);

        const user = this.create({
            id: uuid(),
            email,
            password: hashedPassword,
            role: ROLE.USER,
            refreshToken: null,
        })
        if(!user){
            throw new BadRequestException(UserErrorEnum.SIGN_UP_ERROR);
        }

        await this.save(user);
        return null;
    }

    async signIn(userLoginDto: UserLoginDto): Promise <User>{
        const {email, password} = userLoginDto;
        if (!email) {
            throw new BadRequestException(UserErrorEnum.NO_EMAIL_OR_PASSWORD);
          }

        const hashedPassword = await bcrypt.hash(password, 10);

        const found = await this.findOne({
            where:{
                email,
                password: await bcrypt.hash(hashedPassword, 10),
            }
        });

        if(!found){
            throw new NotFoundException(`Can't find Board with id ${email}`);
        }
        return found;
    }
}
대부분의 에러는 common의 error폴더에서 관리하겠습니다.
다음은 userErrorEnum입니다.
//src/common/error/user.error.enum.ts

export enum UserErrorEnum {
    USER_NOT_FOUND = "Can't find User Board",
    SIGN_UP_ERROR = "Something went wrong while signing up",
    NO_EMAIL_OR_PASSWORD = "Email and Password must be provided",
}
user 생성시에 id는 uuid를 사용하고, 비밀번호는 bcrypt를 사용해 암호화해서 사용하겠습니다.
필요한 패키지들을 설치해주세요!
$ yarn add uuidv4 bcrypttypeorm의 Repository를 사용하고 있습니다.
다음에 DB 연동 파트로 넘어가면서 바로 typeorm패키지를 설치할거에요!
사실 Repository패턴을 사용하기 위해서는 커스텀 데코리에터를 만들 필요가 있습니다. 옛날에는 안그랬는데, typeorm이 0.3.x 버전으로 넘어오면서 부터 사용할 수 없게된 기능이 있습니다ㅠㅠ.
다음은 만들어야 커스텀 데코레이터 코드입니다!
//src/type-orm-ex.module.ts
import { DynamicModule, Provider } from "@nestjs/common";
import { getDataSourceToken } from "@nestjs/typeorm";
import { DataSource } from "typeorm";
import { TYPEORM_EX_CUSTOM_REPOSITORY } from "./typeorm-ex.decorator";

export class TypeOrmExModule {
  public static forCustomRepository<T extends new (...args: any[]) => any>(repositories: T[]): DynamicModule {
    const providers: Provider[] = [];

    for (const repository of repositories) {
      const entity = Reflect.getMetadata(TYPEORM_EX_CUSTOM_REPOSITORY, repository);

      if (!entity) {
        continue;
      }

      providers.push({
        inject: [getDataSourceToken()],
        provide: repository,
        useFactory: (dataSource: DataSource): typeof repository => {
          const baseRepository = dataSource.getRepository<any>(entity);
          return new repository(baseRepository.target, baseRepository.manager, baseRepository.queryRunner);
        },
      });
    }

    return {
      exports: providers,
      module: TypeOrmExModule,
      providers,
    };
  }
}
//src/typeorm-ex.decorater.ts
import { SetMetadata } from "@nestjs/common";
export const TYPEORM_EX_CUSTOM_REPOSITORY = "TYPEORM_EX_CUSTOM_REPOSITORY";
export function CustomRepository(entity: Function): ClassDecorator {
return SetMetadata(TYPEORM_EX_CUSTOM_REPOSITORY, entity);
}여기로 들어가셔서 코드의 자세한 동작을 확인해보세요!
(잘 읽었습니다..! 감사합니다!)
typeorm 사용을 위해 AppModule과 UserModule에 필요한 코드를 추가합니다.
// app.module.ts
...
import { TypeOrmModule } from '@nestjs/typeorm';
import { typeOrmConfig } from './common/config/typeorm.config';

@Module({
  imports: [
    ConfigModule.forRoot({
      envFilePath: '.env',
      isGlobal: true,
      validationSchema: configValidationSchema,
    }),
    TypeOrmModule.forRoot(typeOrmConfig), //TypeOrmModule에 미리 설정했던 typeOrmConfig설정을 추가
    // typeOrmConfig는 이따가 밑에서 만들거에여
    UserModule,
  ],
  controllers: [],
  providers: [],
})
export class AppModule {}
// user.module.ts
...
import { TypeOrmExModule } from 'src/typeorm-ex.module';
import { UserRepository } from './user.repository';
@Module({
imports: [
TypeOrmExModule.forCustomRepository([UserRepository]), //UserRepository를 사용
],
controllers: [UserController],
providers: [UserService]
})
export class UserModule {}여기까지 하면 User CRUD를 위한 코드는 모두 작성되었습니다!
User DB 연동
그리고 회원 정보를 저장하기 위한 데이터베이스 연동을 위한 패키지들을 설치합니다.
$ yarn add --save @nestjs/typeorm typeorm mysql2$ yarn add joi @nestjs/typeorm @nestjs/config dotenv너무 많아서 2번에 나눠서 입력했습니다!
저는 mysql을 사용해보려고 mysql을 사용한 것입니다.
mongoDB와 같은 다른 데이터베이스를 사용할 경우에는 mongoose같은 알맞은 패키지를 설치해주세요.
typeorm을 사용하여 DB에 데이터를 조작하겠습니다.
joi, config, dotenv를 사용해 숨겨야하는 정보를 관리하겠습니다.
저는 src/common/config에 config에 관련된 파일들을 모아놓겠습니다.
먼저 joi를 사용해서 .env에 필요한 변수들을 관리해보겠습니다.
//src/common/config/config.schema.ts

import * as Joi from 'joi';

export const configValidationSchema = Joi.object({
  PORT: Joi.number().default(4000),

  DB_HOST: Joi.string().required(),
  DB_PORT: Joi.number().required(),
  DB_USER: Joi.string().required(),
  DB_PASS: Joi.string().required(),
  DB_NAME: Joi.string().required(),
});
.env에 정의가 필요한 변수들을 관리하는 코드입니다.
config.schema.ts에 정의되어있는 변수들이 .env에 존재하지 않는다면 최초 구동시에 오류를 발생시킵니다. 무엇보다 중요한 점은 이렇게 joi를 써서 해놓으면 .env안의 변수들을 사용할때 무려 "자동완성"으로 쓸 수 있슴다ㅋㅋ
다음으로 ConfigService의 타입으로 줄 config.type.ts를 생성해보겠습니다.
//src/common/config/config.type.ts
export interface ConfigType {
    PORT: number;

    DB_HOST: string;
    DB_PORT: number;
    DB_USER: string;
    DB_PASS: string;
    DB_NAME: string;
  }
마지막으로 typeorm의 설정들을 관리할 파일을 생성해보겠습니다.
//src/common/config/typeorm.config.ts
import { ConfigService } from "@nestjs/config";
import { TypeOrmModuleOptions } from "@nestjs/typeorm";
import { ConfigType } from "./config.type";

dotenv.config();

const configService = new ConfigService<ConfigType>;

export const typeOrmConfig: TypeOrmModuleOptions = {
  type: 'mysql',
  host: 'localhost',
  port: configService.get("DB_PORT"),
  username: configService.get('DB_USER'),
  password: configService.get('DB_PASSW'),
  database: configService.get('DB_NAME'),
  entities: [__dirname + '/../../**/*.entity.{js,ts}'],
  synchronize: false,
  migrations: [],
  subscribers: [],
};
데이터베이스와 연결해줄 DB 연결 설정입니다.
여기서 저는 삽질을 좀 했는데, __dirname을 제대로 이해하지 못하고 사용했기 때문이에요
__dirname은 Node.js에서 제공되는 특별한 전역 변수(global variable)로서 현재 실행 중인 스크립트 파일의 디렉토리 경로를 나타냅니다. 즉,__dirname은 현재 파일이 위치한 디렉토리의 절대 경로를 가리킵니다.
절대 경로를 기준으로 entity 파일들이 어디에 있는지 확인하고 경로를 설정하세요!
.env파일에 필요할 설정들 넣는 것 꼭 잊지마세요!
그리고 .env파일의 위치 아주 중요합니다...!
// kakao-alarm/.env

PORT = your port number

DB_HOST = localhost
DB_PORT = 3306
DB_USER = dbuser
DB_PASS = your db pass
DB_NAME = your db name
이런 식으로 설정해주세요.
위치는 프로젝트 바로 아래입니다! src안에 넣지 마세요! 안그러면 인식을 못합니다.
파일 경로를 src/.env 로 하면 괜찮겠지만 이 글 내에서는 .env의 경로는 프로젝트 바로 아래입니다!
이렇게 설정하면 DB연동도 끝입니다!
이제 postman을 사용해서 데이터를 넣어봅시다!
사용하기
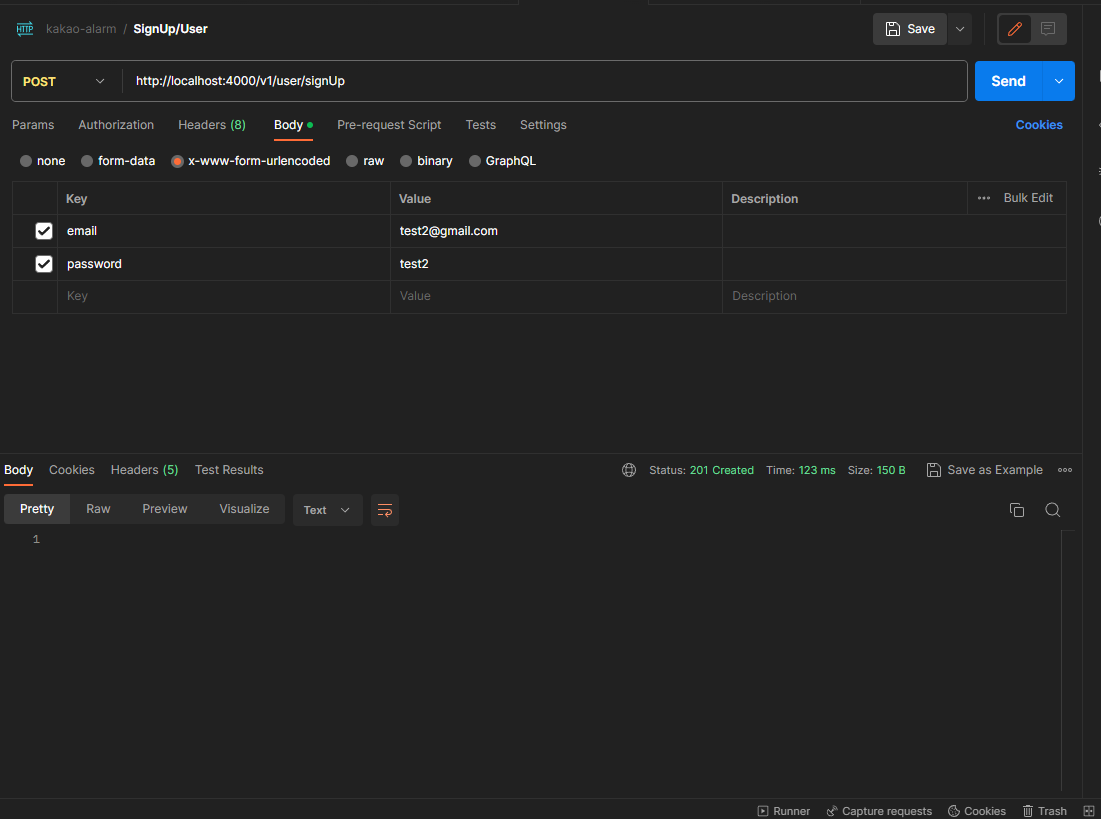
이렇게 하면 user를 저장할 수 있습니다.
실제로 가져와봅시다!
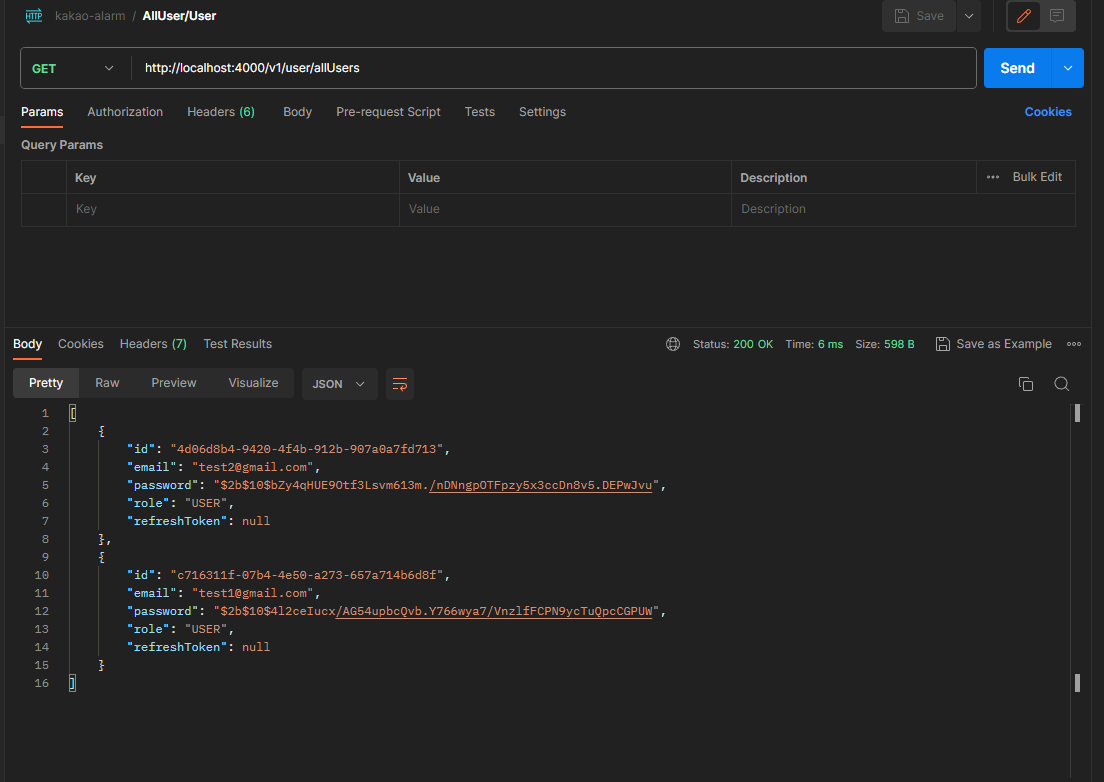
잘되는군요!
좋습니다!
글의 양이 얼마 안되는 것 같지만 저는 이거 하루 넘게 걸렸습니당ㅠㅠ
기본 개념을 잘 다지고자 정리해보면서 처음부터 코딩 하려니까 꽤나 시간이 걸렸네요...
그래도 제대로 공부한 느낌이어서 기분 좋습니다!
아쉬운 점 및 고칠 점
typeormConfig에 설정을 넣어놓고 관리하려고 했는데, 이러면 dotenv.config() 코드를 사용해서 config안의 정보를 가져와야 하더라구요.. 그래서 이러면 AppModule에서 ConfigModule을 전역으로 사용하는 이유가 없지않나? 싶어져서 고치려고했습니다. 밑에처럼요!
// app.module.ts

import { Module } from '@nestjs/common';
import { UserModule } from './user/user.module';
import { ConfigModule, ConfigService } from '@nestjs/config';
import { configValidationSchema } from './common/config/config.schema';
import { TypeOrmModule } from '@nestjs/typeorm';
import { ConfigType } from './common/config/config.type';
import { typeOrmConfig } from './common/config/typeorm.config';

@Module({
  imports: [
    ConfigModule.forRoot({
      envFilePath: '.env',
      isGlobal: true,
      validationSchema: configValidationSchema,
    }),
    TypeOrmModule.forRoot(typeOrmConfig),
    // TypeOrmModule.forRootAsync({
    //   imports: [ConfigModule],
    //   inject: [ConfigService],
    //   useFactory: (configService: ConfigService<ConfigType>) => ({
    //     type: 'mysql',
    //     host: configService.get('DB_HOST') || 'localhost',
    //     port: configService.get("DB_PORT"),
    //     username: configService.get('DB_USER'),
    //     password: configService.get('DB_PASS'),
    //     database: configService.get('DB_NAME'),
    //     entities: [__dirname + '/../**/*.entity.{js,ts}'],
    //     synchronize: false,
    //     migrations: [],
    //     subscribers: [],
    //   }),
    // }),
    UserModule,
  ],
  controllers: [],
  providers: [],
})
export class AppModule {}
typeormConfig를 쓰지 않고 사용하려고 했습니다! 그런데 하다가 잘 안됐습니다ㅠㅠ
이 부분은 나중에 고쳐볼게요!
추후에 이 부분을 고치면 이 글에 그대로 업데이트 하겠습니다!
뭔가 잘못된 구조가 있다면 언제든지 말씀해주세요!
긴 글 봐주신 분들 감사합니다!
