아직도 Push Notification 으로 고생하세요? (Expo-Notifications)

eject의 고통
FCM을 사용할려고 무수한 노력을 하였지만 eject의 고통이 너무 심해 expo에서 지원해주는 expo-notifications을 사용해보기로 하였다.
expo-notifications
The expo-notifications provides an API to fetch push notification tokens and to present, schedule, receive and respond to notifications.
What are notificaitons?
Pop-up messages that appear on your user's device. Useful for alerts, engagement, and smooth user experiences
Two types of notificaitons
- Push notificaiton : Sent by a server or another client via a request.
- Local notificaion : Scheduled by the app itself, on the device. No requests are made.
한마디로 실행의 주체가 누구인가에 따라 다르다.
expo를 활용해서 개발하면 좋은 점은 기존의 IOS, Android에서 먼저 세팅을 해줘야 한다는 번거로움이 있었고 ios 는 따로 더 복잡한 설정울 해줘야 한다는 복잡함이 있었지만 expo 에서는 크게 3가지를 담당하여 개발하면 된다.
- Get the device token
- Make an HTTPS requests asking for a notification to be sent
- Handle receial/interaction of that notificaiton in my app
이때 1번과 3번은 📲 expo-notificaitons 에서 지원을 해주고 2번은 ☁️ Expo's Notificaiton Serice에서 지원을 해준다.
1. Get the token
The token is the "address" where we'd like to send notificaions. Uniquely identifies an instance of my app on a device
async function registerForPushNotificationsAsync() {
	let token;
	if (Device.isDevice) {
		const { status: existingStatus } = await Notifications.getPermissionsAsync();
		let finalStatus = existingStatus;
		if (existingStatus !== 'granted') {
			const { status } = await Notifications.requestPermissionsAsync();
			finalStatus = status;
		}
		if (finalStatus !== 'granted') {
			alert('Failed to get push token for push notification!');
			return;
		}
		token = (await Notifications.getExpoPushTokenAsync()).data;
		console.log(token);
	} else {
		alert('Must use physical device for Push Notifications');
	}

	if (Platform.OS === 'android') {
		Notifications.setNotificationChannelAsync('default', {
			name: 'default',
			importance: Notifications.AndroidImportance.MAX,
			vibrationPattern: [0, 250, 250, 250],
			lightColor: '#FF231F7C',
		});
	}

	return token;
}
이때 시뮬레이터에서는 구동이 안되기 때문에 무조건 디바이스에서 진행을 해야한다. 그리고 안드로이드에서는 알람을 받는 체널이 다양하기 때문에 default 체널을 지정해줘야한다.
Fetching tokens for push notifications
getExpoPushTokenAsync(options: ExpoTokenOptions): ExpoPushToken
Returns an Expo token that can be used to send a push notification to the device using Expo's push notifications service
해당 함수를 통해 토큰을 받을 수 있다.
type (string) - Always expo.
data (string) - The push token as a string.
그래서 현재는 local notification을 받지만 이걸 만약 push notification으로 해서 백엔드와 받고 싶다면 아래처럼 사용할 수 있다.
import * as Notifications from 'expo-notifications';

export async function registerForPushNotificationsAsync(userId: string) {
  const expoPushToken = await Notifications.getExpoPushTokenAsync({
    experienceId: '@username/example',
  });

  await fetch('https://example.com/', {
    method: 'POST',
    headers: {
      'Content-Type': 'application/json',
    },
    body: JSON.stringify({
      userId,
      expoPushToken,
    }),
  });
}
이때 experienceId는 app.json에 있는 slug를 넣어주면 된다. 이건 옵셔널이긴 한데 공식문서상에는 함께 passing 해주는 걸 권장하고 있다.
나는 이런식으로 구현을 해보았다.
	useEffect(() => {
		registerForPushNotificationsAsync().then(token => {
			fetch(PUSH_ENDPOINT, {
				method: 'POST',
				headers: {
					Accept: 'application/json',
					'Content-Type': 'application/json',
				},
				body: JSON.stringify({
					token: {
						value: token,
					}
				}),
			})
				.then(() => console.log('send!'))
				.catch((err) => console.log(err));
			setExpoPushToken(token);
		});
2. make the request
여기에는 두가지 방법이 있다.
- Expo Push Notification's Service를 사용하지 않고 직접 3rd party librarr인 FCM과 APNs 를 이용하여 바로 Device에 전달하는 경우.
- Expo Backend로 Expo에서 제공한 SDK를 통해 요청하는 경우.
나는 Expo 생태계를 통해서 구현을 하고 싶어서 후자를 선택했다. 그래서 터미널에 Expo service에 토큰, 제목, 내용을 담아 보내보았다.
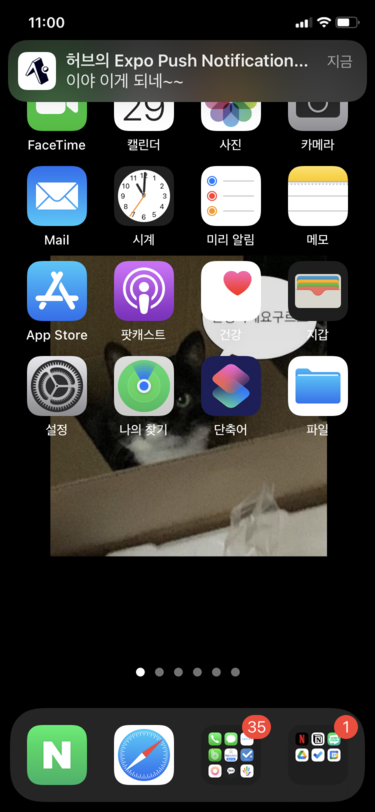
curl -H "Content-Type: application/json" -X POST "https://exp.host/--/api/v2/push/send" -d '{  "to": "ExponentPushToken[tokenAddress]", "title":"허브의 Expo Push Notification 구현기",
  "body": "이야 이게 되네~~","sound":"default"
}'
이후엔 이 내용을 Expo SDK를 활용해서 Backend에서 보내주면된다.
이 외에도 다양한 방법으로 데이터를 담을 수 있다.
https://docs.expo.dev/push-notifications/sending-notifications/#message-request-format
3. Handle the notificatiion
- When a notification comes in, we may want to take particular action -> Like fetching data
- When a user interacts with a notification, we may want to handle that, like : Opening to a particular scrcreen
위처럼 우리는 알림을 받았을 때 특정한 행동을 할 수 있어야 한다. 예를 들어 주문 했던 상품이 주문 완료가 되었다. 그럼 사용자에겐 주문중이였던 화면이 주문 완료 되었다고 변경될 필요가 있을 것이다.
그럴땐 아래와 같이 작성을 해주면 된다.
Notifications.addNotificationReceivedListener((notification: Notificaion) => {
	alert('주문하신 상품이 배송 완료되었습니다.');
    fetchSomeData();
    updateUI();
})
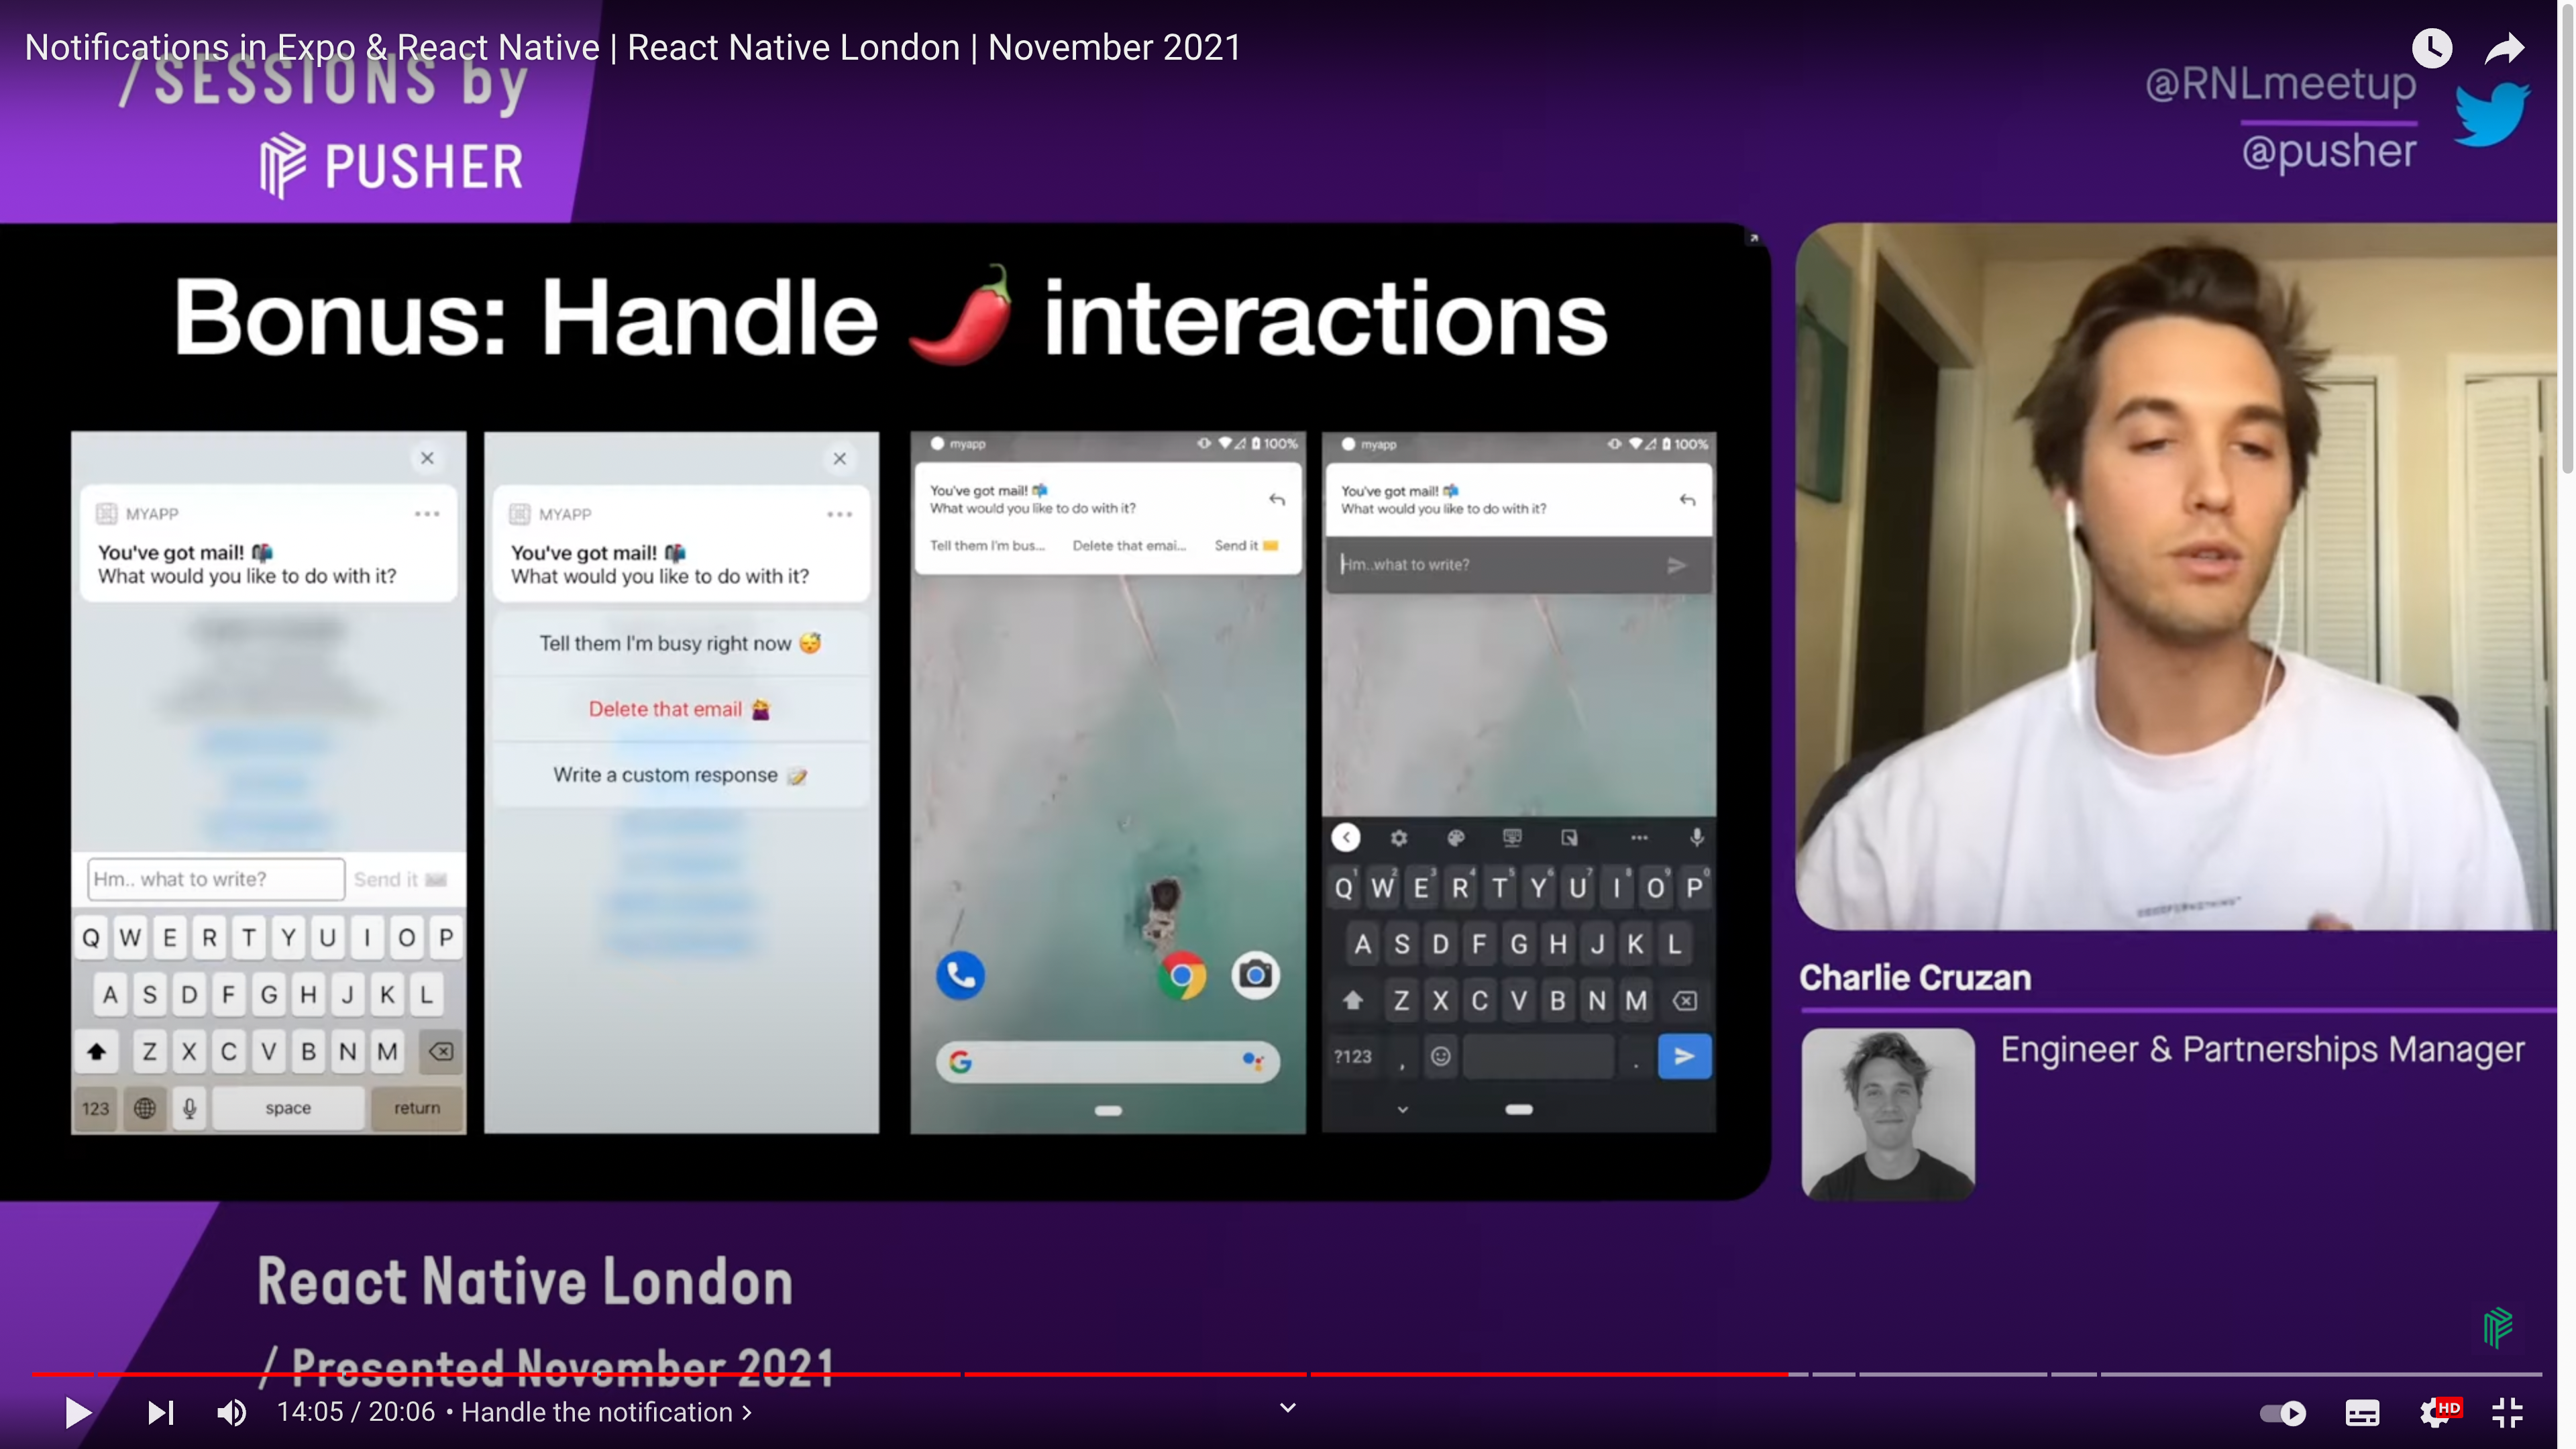 그 외에도 다양한 인터렉션이 존재한다. EXPO 엔지니어인 Charlie Cruzan의 발표에서 많은 도움을 받았다.
하지만 이번엔 알림만 한번 띄워보는것을 목표로 나는 개발을 하였다.
This handler determines how your app handles notifications that come in while the app is foregrounded
앱이 실행 중일 때 알람이 왔을 경우 알람 소리, 알람이 보일지 안보일지, 벳지에 표시될지 등에 대해 상단에 먼저 셋업을 해둔다.
Notifications.setNotificationHandler({
	handleNotification: async () => ({
		shouldShowAlert: true,
		shouldPlaySound: true,
		shouldSetBadge: true,
	}),
});
그리고 화면이 마운트 됐을때 두가지 일을 해주어야 한다.
- 토큰을 가져오기 위한 권한 확인 및 토큰 backend 전송
- 응답에 대한 리스너 등록
	useEffect(() => {
		registerForPushNotificationsAsync().then(token => {
			fetch(PUSH_ENDPOINT, {
				method: 'POST',
				headers: {
					Accept: 'application/json',
					'Content-Type': 'application/json',
				},
				body: JSON.stringify({
					token: {
						value: token,
					}
				}),
			})
				.then(() => console.log('send!'))
				.catch((err) => console.log(err));
			setExpoPushToken(token);
		});

		notificationListener.current = Notifications.addNotificationReceivedListener(notification => {
			setNotification(notification);
		});

		responseListener.current = Notifications.addNotificationResponseReceivedListener(response => {
			console.log(response);
		});

		return () => {
			if(typeof notificationListener.current !== 'undefined' && typeof responseListener.current !== 'undefined'){
				Notifications.removeNotificationSubscription(notificationListener.current);
				Notifications.removeNotificationSubscription(responseListener.current);
			}
		};
	}, []);
addNotificationReceivedListener
This listener is fired whenever a notification is received while the app is foregrounded.
이 리스너는 앱이 포그라운드에서 실행되는 동안 알림이 수신될 때마다 시작된다.
addNotificationResponseReceivedListener
This listener is fired whenever a user taps on or interacts with a notification (works when app is foregrounded, backgrounded, or killed). This listener is especially useful for routing users to a particular screen after they tap on a particular notification.
이 리스너는 사용자가 알림을 탭하거나 알림과 상호작용할 때마다 시작된다.(앱이 포그라운드, 백그라운드 또는 종료될 때 작동). 이 리스너는 사용자가 특정 알림을 탭한 후 특정 화면으로 라우팅하는 데 특히 유용하다.
두번째 리스너는 해당 알람을 클릭했을 때 동작할 내용을 처리할때 사용된다고 생각하면 된다.
그리고 마지막으로 UI에 테스트 용이라 좀 그렇지만 아래와 같이 띄워주면 원하는 결과를 얻을 수 있다.
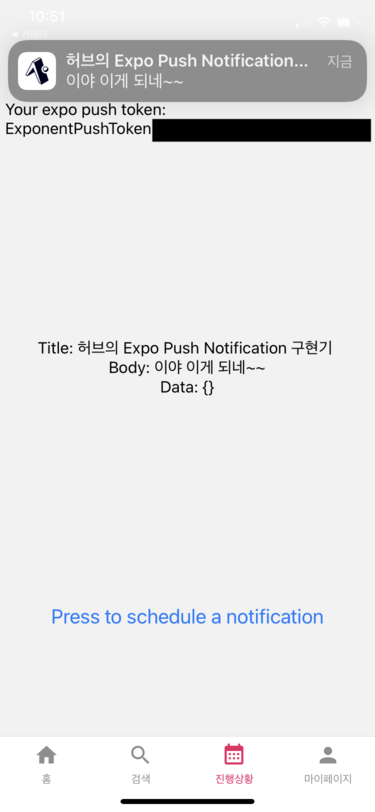
<View style={{ alignItems: 'center', justifyContent: 'center' }}>
				<Text>Title: {notification && notification.request.content.title} </Text>
				<Text>Body: {notification && notification.request.content.body}</Text>
				<Text>Data: {notification && JSON.stringify(notification.request.content.data)}</Text>
			</View>
전체코드
공식문서는 타입스크립트랑 훅을 사용하지 않아서 이걸 변환하는게 조금 힘들었다.
import {Button, Platform, StyleSheet, Text, View } from 'react-native';
import React, { useEffect, useRef, useState } from 'react';
import * as Device from 'expo-device';
import * as Notifications from 'expo-notifications';
import { Subscription } from 'expo-modules-core';

Notifications.setNotificationHandler({
	handleNotification: async () => ({
		shouldShowAlert: true,
		shouldPlaySound: true,
		shouldSetBadge: true,
	}),
});


const Progress = () => {
	const [expoPushToken, setExpoPushToken] = useState<string | undefined>('');
	const [notification, setNotification] = useState<Notifications.Notification>();
	const notificationListener = useRef<Subscription>();
	const responseListener = useRef<Subscription>();

	useEffect(() => {
		registerForPushNotificationsAsync().then(token => {
			// fetch(PUSH_ENDPOINT, {
			// 	method: 'POST',
			// 	headers: {
			// 		Accept: 'application/json',
			// 		'Content-Type': 'application/json',
			// 	},
			// 	body: JSON.stringify({
			// 		token: {
			// 			value: token,
			// 		}
			// 	}),
			// })
			// 	.then(() => console.log('send!'))
			// 	.catch((err) => console.log(err));
			setExpoPushToken(token);
		});

		notificationListener.current = Notifications.addNotificationReceivedListener(notification => {
			setNotification(notification);
		});

		responseListener.current = Notifications.addNotificationResponseReceivedListener(response => {
			console.log(response);
		});

		return () => {
			if(typeof notificationListener.current !== 'undefined' && typeof responseListener.current !== 'undefined'){
				Notifications.removeNotificationSubscription(notificationListener.current);
				Notifications.removeNotificationSubscription(responseListener.current);
			}
		};
	}, []);


	return (
		<View
			style={{
				flex: 1,
				alignItems: 'center',
				justifyContent: 'space-around',
			}}
		>
			<Text>Your expo push token: {expoPushToken}</Text>
			<View style={{ alignItems: 'center', justifyContent: 'center' }}>
				<Text>Title: {notification && notification.request.content.title} </Text>
				<Text>Body: {notification && notification.request.content.body}</Text>
				<Text>Data: {notification && JSON.stringify(notification.request.content.data)}</Text>
			</View>
			<Button
				title="Press to schedule a notification"
				onPress={async () => {
					await schedulePushNotification();
				}}
			/>
		</View>
	);
};

export default Progress;

const styles = StyleSheet.create({});

async function schedulePushNotification() {
	await Notifications.scheduleNotificationAsync({
		content: {
			sound: 'default',
			title: 'You\'ve got mail! 📬',
			body: 'Here is the notification body',
			data: { data: 'goes here' },
		},
		trigger: { seconds: 2 },
	});
}

async function registerForPushNotificationsAsync() {
	let token;
	if (Device.isDevice) {
		const { status: existingStatus } = await Notifications.getPermissionsAsync();
		let finalStatus = existingStatus;
		if (existingStatus !== 'granted') {
			const { status } = await Notifications.requestPermissionsAsync();
			finalStatus = status;
		}
		if (finalStatus !== 'granted') {
			alert('Failed to get push token for push notification!');
			return;
		}
		token = (await Notifications.getExpoPushTokenAsync()).data;
		console.log(token);
	} else {
		alert('Must use physical device for Push Notifications');
	}

	if (Platform.OS === 'android') {
		Notifications.setNotificationChannelAsync('default', {
			name: 'default',
			importance: Notifications.AndroidImportance.MAX,
			vibrationPattern: [0, 250, 250, 250],
			lightColor: '#FF231F7C',
		});
	}

	return token;
}
추가 해결과제
지금 앱 아이콘이 Expo 기본 icon으로 정해져 있는데 이게 app.json에서 설정하면 된다고는 하는데 잘 안된다. 그래서 FCM도 같이 이것저것 해봤는데 expo에서 build한다음 내 아이폰에 설치하면 assets로 설정한 로고가 기본아이콘이 되니 저 아이콘도 바뀔거 같아서 일단 지켜보고 다른 것 먼저 개발 하기로 하였다.
참고 자료
Notifications in Expo & React Native | React Native London | November 2021
https://docs.expo.dev/push-notifications/overview/
https://docs.expo.dev/push-notifications/sending-notifications/
https://docs.expo.dev/push-notifications/receiving-notifications/
CMC 10기 웹 아카이빙 클럽
CMC 10기 React, RN 관련 스터디 내용을 모아두고 있으니 많관부~
https://github.com/CMC-Web-10th/10th-Web-archive


안녕하세요, 좋은 글 감사합니다.
한 가지 여쭙고 싶은 것이 있어 댓글 남깁니다.
현재 저는 react native를 이용하여 hybridapp을 만들고 있고, php-mysql로 백엔드 영역을 구성했습니다.
올려주신 소스 중 fetch를 사용하는 부분에서 token을 백엔드 코드로 보내고(저의 경우 php), 이것을 실행하면 푸시 서버(저의 경우 expo server)로 보낸 후 푸시가 오는 것 같은데, fetch에서 백엔드 코드로 token을 보내는 방법이 무엇인지(fetch 안에 있는 json값은 알아서 백엔드 코드로 넘어가는 건지?), 이렇게 받은 token들을 db에 저장하고 싶은데 어떻게 하면 되는지 말씀 좀 구할 수 있을까요??