Coordinator Pattern
Coordinator Pattern은 Structure Design Pattern으로 View Controller간의 로직 흐름을 조직하기 위한 디자인 패턴이다.
간단하게 얘기하자면, 뷰간 화면 전환 Coordinator로 한번에 관리하겠다는 뜻이다.
5개의 컴포넌트로 이루어져 있다.
- 코디네이터 프로토콜: View Present, Dismiss 메소드를 정의
- 코디네이터 인스턴스: 코디네이터 프로로콜을 채용한 인스턴스, 뷰 컨트롤러를 어떻게 만들 것인지 알고있다.
- 라우터 프로토콜: View Present, Dismiss 메소드를 정의
- 라우터 인스턴스: 라우터 프로토콜을 채용한 인스턴스, 코디네이터와 다른 점이라면, 어디서 무엇을 보여줄 것인지가 아니라, 어떻게 보여줄 것인지를 정의한다.
- 뷰 컨트롤러 인스턴스 들: 뷰 컨트롤러는 서로, 어디서 어떻게 표시될지는 모른다.
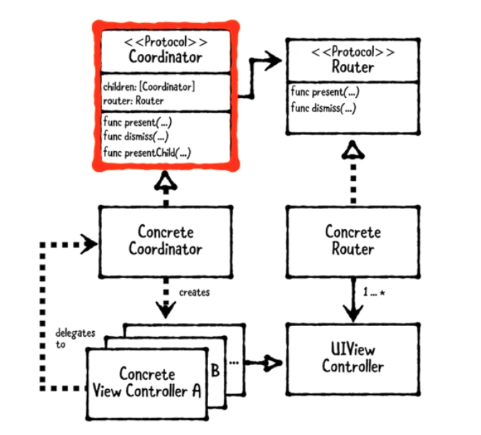
코디네이터 패턴 클래스 다이어그램 srouce: raywenderlich
사용목적은 다음과 같다.
- 뷰 컨트롤러간의 종속성을 때어내고 싶을 때
- 뷰 컨트롤러의 재사용성을 높이고 싶을 때
- 런타임에 뷰 컨트롤러 시퀀스가 결정될 때
Router
Router는 Coordinator Pattern에서 어떻게 뷰의 Present, Dismiss의 방법을 정의한다.
import UIKit

public protocol Router: AnyObject {
  func present(_ viewController: UIViewController, animated: Bool)
  func present(_ viewController: UIViewController, animated: Bool, onDismissed: (() -> Void)?)
  func dismiss(animated: Bool)
}

extension Router {
  public func present(_ viewController: UIViewController, animated: Bool) {
    present(viewController, animated: animated, onDismissed: nil)
  }
}
프로토콜 에서는 present와 dismiss 메소드를 정의한다.
NavigationRouter
UINavigationController를 사용할 때 Router가 어떻게 동작하는지 만든다
import UIKit

public class NavigationRouter: NSObject {
  private let navigationController: UINavigationController
  private let routerRootController: UIViewController?
  private var onDismissForViewController: [UIViewController: (()->Void)] = [:]

  public init(navigationController: UINavigationController) {
    self.navigationController = navigationController
    self.routerRootController = navigationController.viewControllers.first
    super.init()
    self.navigationController.delegate = self
  }
}NavigationRouter는 UINavigationController와 RootViewController, 그리고 View가 Dismiss됐을 때 동작을 저장하는 Dictionary로 [UIViewController: (() -> Void)?)]
정의한다.
이제 NavigationRouter는 Router 프로토콜을 채용한다.
extension NavigationRouter: Router {
  public func present(_ viewController: UIViewController, animated: Bool, onDismissed: (() -> Void)?) {
    onDismissForViewController[viewController] = onDismissed
    navigationController.pushViewController(viewController, animated: animated)
  }

  public func dismiss(animated: Bool) {
    guard let routerRootController = routerRootController else {
      navigationController.popToRootViewController(animated: animated)
      return
    }
    performOnDismissed(for: routerRootController)
    navigationController.popToViewController(routerRootController, animated: animated)
  }

  private func performOnDismissed(for viewController: UIViewController) {
    guard let onDismiss = onDismissForViewController[viewController] else {
      return
    }
    onDismiss()
    onDismissForViewController[viewController] = nil
  }
}present시에는 present할 viewController를 파라메터로 가진다. 전달받은 viewController는 navigationController에 push되는데, 이때 onDismissForViewController에 onDismissed 클로져와 함께 등록된다.
dismiss(animated:)메소드는 뷰가 dismiss될 때를 정의하는 것으로,
routerRootViewController가 없으면 가장 아래 뷰 컨트롤러까지 pop한다.
있을 경우는 평범하게 해당 뷰 컨트롤러까지 pop하는데 이 전에 performOnDismissed를 호출한다. 해당 메서드는 뷰를 present할때 정의해 두었던 dismiss 클로져를 실행하고, 딕셔너리에서 정리하기 위함
Coordinator
코디네이터 프로토콜은 각 뷰 컨트롤러간의 계층 구조를 나타내기 위함이다.
코디네이터 프로토콜은 아래와 같다
public protocol Coordinator: AnyObject {
  var children: [Coordinator] { get set }
  var router: Router { get }

  func present(animated: Bool, onDismissed: (()->Void)?)
  func dismiss(animated: Bool)

  func presentChild(_ child: Coordinator, animated: Bool)
  func presentChild(_ child: Coordinator, animated: Bool, onDismissed: (()->Void)?)
}
Coordinator 프로토콜을 준수하는 객체를 children으로 가지고
router를 가진다.
extension Coordinator {
  public func dismiss(animated: Bool) {
    router.dismiss(animated: animated)
  }

  public func presentChild(_ child: Coordinator, animated: Bool) {
    presentChild(child, animated: animated, onDismissed: nil)
  }

  public func presentChild(_ child: Coordinator, animated: Bool, onDismissed: (()->Void)?) {
    children.append(child)
    child.present(animated: animated, onDismissed: {[weak self, weak child] in
      guard let self = self, let child = child else { return }
      self.removeChild(child)
      onDismissed?()
    })
  }

  public func removeChild(_ child: Coordinator) {
    guard let index = children.firstIndex(where: { $0 === child }) else { return }
    children.remove(at: index)
  }
}
child를 present 할 때는 children에 해당 child View Controller를 등록한다. onDismissed 클로져에는 실행 시에 스스로를 제거하는 클로져이다.
Simple Example
간단한 실제 예제로 Coordinator 패턴을 좀더 들여다보자.
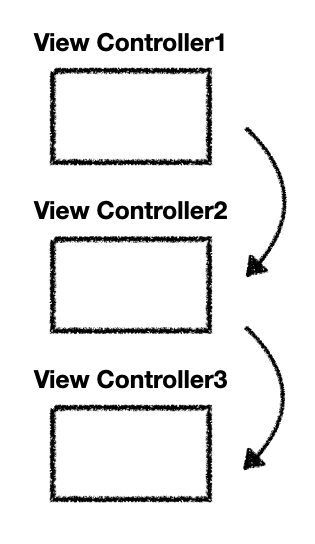
간단하게 각기다른 3개의 뷰 컨트롤러가 있다고 가정하자.
Coordinator 패턴이 아닌 일반적인 방법으로 계층을 보면
1. ViewController1에서 ViewController2를 인스턴스화 하고 push한다(네비게이션 기준, present일 수도 있다.)
2. ViewController2에서 ViewController3를 인스턴스화 하고 push한다.
이고 각 뷰컨트롤러 내용에는 화면 전환에 대한 코드가 존재할 것이다.
//View Controller1
func buttonAction() {
	navigationController?.pushViewController(ViewController2, animated: true)
	//or
	present(ViewController2, animated: true)

}

//View Controller2
func buttonAction() {
	navigationController?.pushViewController(ViewController3, 	animated: true)
	//or
	present(ViewController3, animated: true)
}


//View Controller3
func buttonAction() {
	navigationController?.popViewController(animated: true)
	//or
	dismiss(animated: true))
}
Coordinator 패턴에서는 이 부분이 뷰 컨트롤러에서 빠지고, 두 컴포넌트, Coordinator와 Router로 분리되어 작성된다.
그러면 뷰컨트롤러에서는 Coordinator에게 나 버튼 눌렸으니 화면 이동해줘! 라고 핸들러나 델리게이트로 알려주기만 하면 된다. 어떻게 전환할지(push, present)는 Router에서,
어디로 이동할지(ViewController1 -> ViewController2)는 Coordinator에서 관리하게 된다.
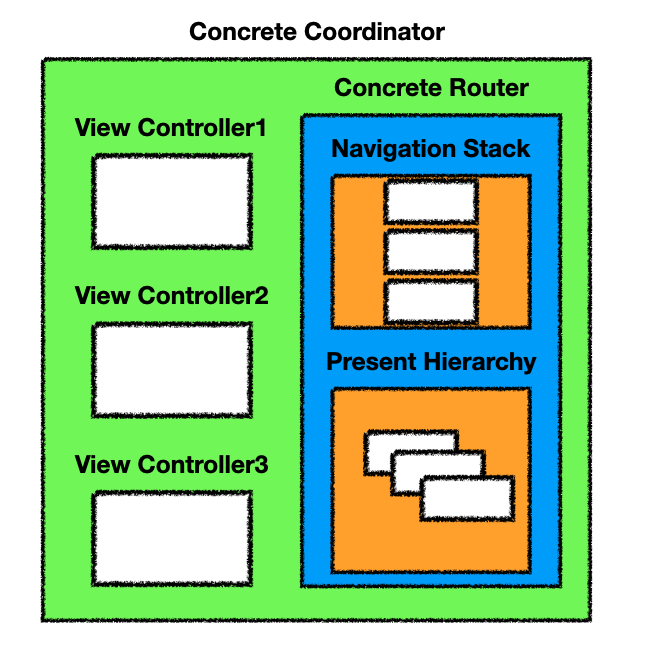
Concrete Coordinator에서는 ViewController의 계층을 알고있고, View Controller에서 델리게이트 또는 핸들러 등으로 화면 전환이 필요하다고 요청하면, Router를 통해 어떻게 전환할 것인지 결정한다.
장점
Coordinator Pattern의 장점은 위 처럼 하여, 여기저기 흩어져 있는 뷰 계층을 Coordinator에서 한눈에 파악이 가능하고, 뷰 전환에 관련된 코드가 뷰 컨트롤러에서 빠지므로, 뷰가 좀더 정말 보여주는 거에만 집중할 수 있다.
다만 너무 작은 시스템에서는 오히려, 오버킬이 될 수 있다.