Cache under the hood
마법같다. 레일즈에 자주 붙는 수식어이다. 레일즈의 캐시도 마법처럼 참 편리하고 우아하게 동작한다. 물론 이렇게 편하게 사용하다 내부를 들추어볼 일이 없다면 참 좋겠지만, 성능 문제나 디버깅, 또는 그냥 즐거움을 위해 자동차의 보닛을 열고 손을 더렵혀야만 할 때가 있는 법이다.
레일즈 캐시는 최근에 많은 내부적 변경을 거쳤다. 본 게시글은 메인 브랜치 기준 7.2 배포 준비 중인 ad0e3123e186c919973fe9e1cec04272c75dd252 커밋을 대상으로 작성되었다. 주로 레디스를 중심으로 파악해보고 memcached나 메모리 등은 일부만 살펴본다.
이 글을 읽고 나면 아무 생각 없이 사용했던 Rails.cache.{read, write}가 어떻게 동작하는지 알 수 있게될 것이다.
Rails.cache
우선 Rails.cache를 생각해보자. Rails.cache의 정체는 무엇인가? 콘솔에서 확인해보면 다음과 같이 ActiveSupport::Cache::RedisCacheStore가 나온다.
>> Rails.cache
=> #<ActiveSupport::Cache::RedisCacheStore
  		options={:compress=>true, :compress_threshold=>1024}
        redis=#<ConnectionPool:...>>
하지만 생각해보면, 우리가 config에서 cache_store 옵션을 변경하면 다른 백엔드를 사용해서 캐싱할 수 있다. 그럼 어떻게 레일즈는 Rails.cache를 결정하는 걸까?
우선 Rails.cache는 Rails 모듈의 클래스 레벨 attr_accessor이다. (https://github.com/rails/rails/blob/ddeb955d458f6d7aa44a313dc1d533a19aa13b50/railties/lib/rails.rb#L44)
module Rails
  class << self
  	attr_accessor :app_class, :cache, :logger
  end
end
그러면 처음 시점에는 Rails.cache는 nil이어야 한다.
Rails.application.configure do
  config.cache_store = :redis_cache_store
end
그 후 Rails의 initalizer들이 불리는 과정에서 initialize_cache는 Rails.cache를 초기화한다.
# Initialize cache early in the stack so railties can make use of it.
initializer :initialize_cache, group: :all do
  cache_format_version = config.active_support.delete(:cache_format_version)
  ActiveSupport.cache_format_version = cache_format_version if cache_format_version

  unless Rails.cache
    Rails.cache = ActiveSupport::Cache.lookup_store(*config.cache_store)

    if Rails.cache.respond_to?(:middleware)
      config.middleware.insert_before(::Rack::Runtime, Rails.cache.middleware)
    end
  end
end
즉, 실제로 Rails.cache를 초기화하는 것은 ActiveSupport::Cache.lookup_store(*config.cache_store) 이 라인이 된다.
# Creates a new Store object according to the given options.
#
# If no arguments are passed to this method, then a new
# ActiveSupport::Cache::MemoryStore object will be returned.
#
# If you pass a Symbol as the first argument, then a corresponding cache
# store class under the ActiveSupport::Cache namespace will be created.
# For example:
#
#   ActiveSupport::Cache.lookup_store(:memory_store)
#   # => returns a new ActiveSupport::Cache::MemoryStore object
#
#   ActiveSupport::Cache.lookup_store(:mem_cache_store)
#   # => returns a new ActiveSupport::Cache::MemCacheStore object
#
# Any additional arguments will be passed to the corresponding cache store
# class's constructor:
#
#   ActiveSupport::Cache.lookup_store(:file_store, '/tmp/cache')
#   # => same as: ActiveSupport::Cache::FileStore.new('/tmp/cache')
#
# If the first argument is not a Symbol, then it will simply be returned:
#
#   ActiveSupport::Cache.lookup_store(MyOwnCacheStore.new)
#   # => returns MyOwnCacheStore.new
def lookup_store(store = nil, *parameters)
  case store
  when Symbol
    options = parameters.extract_options!
    retrieve_store_class(store).new(*parameters, **options)
  when Array
    lookup_store(*store)
  when nil
    ActiveSupport::Cache::MemoryStore.new
  else
    store
  end
end

# Obtains the specified cache store class, given the name of the +store+.
# Raises an error when the store class cannot be found.
def retrieve_store_class(store)
  # require_relative cannot be used here because the class might be
  # provided by another gem, like redis-activesupport for example.
  require "active_support/cache/#{store}"
rescue LoadError => e
  raise "Could not find cache store adapter for #{store} (#{e})"
else
  ActiveSupport::Cache.const_get(store.to_s.camelize)
endlookup_store는 일반적으로 symbol을 인자로 받고, 그 인자는 retrieve_store_class를 호출한다. 그리고 해당 위치에 있는 store를 호출한다. 그러면 이용 가능한 클래스들은 어떤게 있는가?
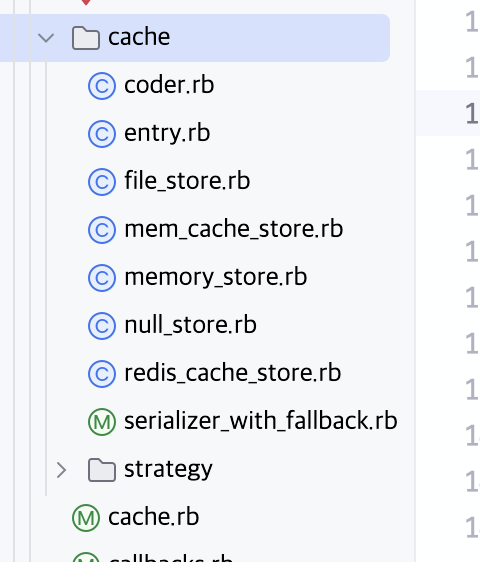
현재 코드 기준으로 file, mem_cache(멤캐시드), memory, null, redis_cache 등을 사용 가능한 것을 알 수 있다.
그래서, 다시 긴 여정을 떠나 우리는 Rails.cache에 ActiveSupport::Cache::RedisCacheStore를 손에 넣었다!
Rails.cache.read
우선 상대적으로 쉬운 읽기 과정에 집중해보자. 다음과 같이 구현되어있다.
def read(name, options = nil)
  options = merged_options(options)
  key = normalize_key(name, options)
  version = normalize_version(name, options)

  instrument(:read, key, options) do |payload|
    entry = read_entry(key, **options, event: payload)

    if entry
      if entry.expired?
        delete_entry(key, **options)
        payload[:hit] = false if payload
        nil
      elsif entry.mismatched?(version)
        payload[:hit] = false if payload
        nil
      else
        payload[:hit] = true if payload
        begin
          entry.value
        rescue DeserializationError
          payload[:hit] = false
          nil
        end
      end
    else
      payload[:hit] = false if payload
      nil
    end
  end
end
Rails는 다른 observability를 위해 상당히 높은 수준의 instrument를 제공한다. cache_read는 다음과 같은 형태의 instrument를 제공한다.
| Key | Value |
|---|---|
| :key | Key used in the store |
| :store | Name of the store class |
| :hit | If this read is a hit |
| :super_operation | :fetch if a read is done with fetch |
하지만 지금은 별로 관심이 없으므로 관련 코드를 제거해보자.
def read(name, options = nil)
  entry = read_entry(key, **options, event: payload)

  if entry
    if entry.expired?
      delete_entry(key, **options)
      nil
    elsif entry.mismatched?(version)
      nil
    else
      begin
        entry.value
      rescue DeserializationError
        nil
      end
    end
  else
    nil
  end
end
실행에서 중요한 부분은 read_entry이다. 그리고 이 read_entry를 각 백엔드에 맞는 store에서 구현해서 실제 캐시 읽기가 완성된다.
RedisCacheStore#read_entry
이제 레디스에서 어떻게 구현하는지 살펴보자.
# Store provider interface:
# Read an entry from the cache.
def read_entry(key, **options)
  deserialize_entry(read_serialized_entry(key, **options), **options)
end

def read_serialized_entry(key, raw: false, **options)
  failsafe :read_entry do
    redis.then { |c| c.get(key) }
  end
end

def deserialize_entry(payload, raw: false, **)
  if raw && !payload.nil?
    Entry.new(payload)
  else
    super(payload)
  end
end
위와 같이 단순한 코드로 되어있다. 실제 처리하는 부분은 Store와 Entry에 위임하는 것을 알 수 있다. 그럼 나머지 코드도 계속 읽어보자.
# From Store, not RedisCacheStore
def deserialize_entry(payload)
  payload.nil? ? nil : @coder.load(payload)
rescue DeserializationError
  nil
end

# Coder#load
def load(dumped)
  return @serializer.load(dumped) if !signature?(dumped)

  type = dumped.unpack1(PACKED_TYPE_TEMPLATE)
  expires_at = dumped.unpack1(PACKED_EXPIRES_AT_TEMPLATE)
  version_length = dumped.unpack1(PACKED_VERSION_LENGTH_TEMPLATE)

  expires_at = nil if expires_at < 0
  version = load_version(dumped.byteslice(PACKED_VERSION_INDEX, version_length)) if version_length >= 0
  payload = dumped.byteslice((PACKED_VERSION_INDEX + [version_length, 0].max)..)

  compressor = @compressor if type & COMPRESSED_FLAG > 0
  serializer = STRING_DESERIALIZERS[type & ~COMPRESSED_FLAG] || @serializer

  LazyEntry.new(serializer, compressor, payload, version: version, expires_at: expires_at)
end
일부 메서드만 발췌하면 위와 같다. 순서를 정리하자면
redis에서 문자열 읽어옴coder를 이용해서Entry객체를 만듦
이 되는 것을 알 수 있다. 그리고 이 Entry는 가장 위 read_entry를 호출하는 부분에서 다시 Entry#value를 호출해서 결국 객체를 얻게 될 것임을 알 수 있다.
Entry
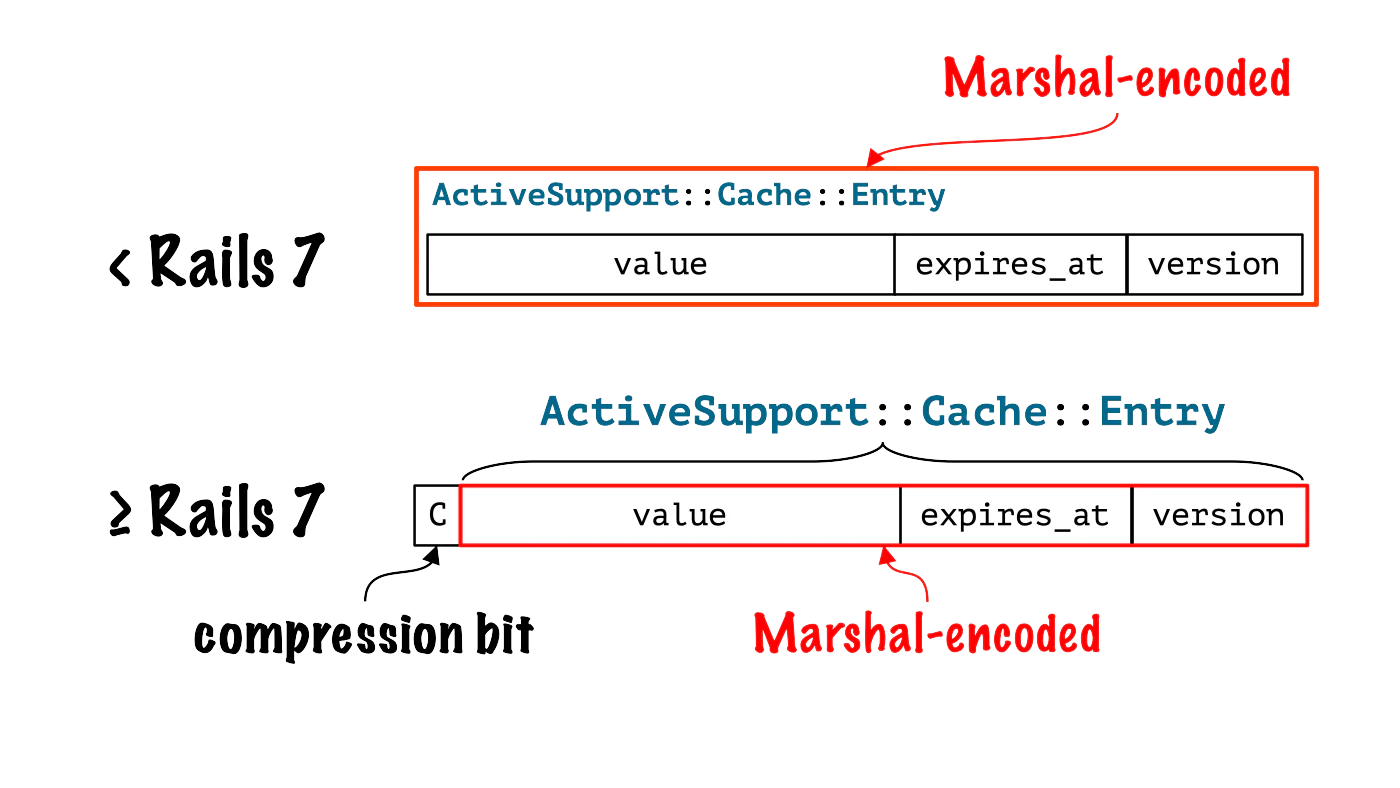
출처: https://shopify.engineering/caching-without-marshal-part-one
이 클래스는 캐시 Entry를 나타낸다. 위에 써져있듯, 7 이상에서는 compression bit, value, 만료일, 버전을 담고 있다.
def value
  compressed? ? uncompress(@value) : @value
end
위와 같이 결국 Entry#value를 압축된 레코드는 압축을 풀어서, 그렇지 않다면 원래 값을 반환하게 된다.
...
사실은, LazyEntry가 사용되는 경우가 좀 더 잦다. LazyEntry는 비슷하지만 value를 다음과 같이 정의한다.
def value
  if !@resolved
    @value = @serializer.load(@compressor ? @compressor.inflate(@value) : @value)
    @resolved = true
  end
  @value
end
compressor 관련된 이야기는 우선 잠시 미루어두도록 하자.
Rails.cache.write
이제 쓰기에 대해 알아보자. 좀 간소화한 쓰기 메서드는 다음과 같다.
def write(name, value, options = nil)
  options = merged_options(options)
  key = normalize_key(name, options)

  entry = Entry.new(value, **options.merge(version: normalize_version(name, options)))
  write_entry(key, entry, **options)
end

# Write an entry to the cache.
#
# Requires Redis 2.6.12+ for extended SET options.
def write_entry(key, entry, raw: false, **options)
  write_serialized_entry(key, serialize_entry(entry, raw: raw, **options), raw: raw, **options)
end

def write_serialized_entry(key, payload, expires_in: nil, **options)
  modifiers = {}
  if expires_in
    modifiers[:px] = (1000 * expires_in.to_f).ceil
  end

  failsafe :write_entry, returning: nil do
  	redis.then { |c| !!c.set(key, payload, **modifiers) }
  end
end
# ActiveSupport::Cache::Store#serialize_entry, not RedisCacheStore#serialize_entry
def serialize_entry(entry, **options)
options = merged_options(options)
if @coder_supports_compression && options[:compress]
@coder.dump_compressed(entry, options[:compress_threshold])
else
@coder.dump(entry)
end
end
def dump(entry)
dump_compressed(entry, Float::INFINITY)
end
def dump_compressed(entry, threshold)
# If value is a string with a supported encoding, use it as the payload
# instead of passing it through the serializer.
if type = type_for_string(entry.value)
payload = entry.value.b
else
type = OBJECT_DUMP_TYPE
payload = @serializer.dump(entry.value)
end
if compressed = try_compress(payload, threshold)
payload = compressed
type = type | COMPRESSED_FLAG
end
expires_at = entry.expires_at || -1.0
version = dump_version(entry.version) if entry.version
version_length = version&.bytesize || -1
packed = SIGNATURE.b
packed << [type, expires_at, version_length].pack(PACKED_TEMPLATE)
packed << version if version
packed << payload
end
def try_compress(string, threshold)
if @compressor && string.bytesize >= threshold
compressed = @compressor.deflate(string)
compressed if compressed.bytesize < string.bytesize
end
end복잡하게 되어있지만, 대략적으로 생각해보면 다음과 같다.
Entry를 만든다- 정해진
cache_format에 맞추어 serializer를 선택한다. 대부분의 경우Marshal71WithFallback이 선택된다. - options로 받은 threshold가 넘는 객체는 압축해서 저장한다. (기본은 1kb이다: https://github.com/rails/rails/blob/38bfbcfbeacf461cafc4ef816cd5552696da2352/activesupport/lib/active_support/cache.rb#L45)
그런데 루비 객체는, ActiveRecord처럼 복잡한 객체도 어떻게 잘 직렬화해서 저장하는가? 이를 위해서는 Marshal에 대해 알 필요가 있다.
Marshal
marshal 모듈은 루비 객체의 직렬화/역직렬화를 제공한다. 다음과 같이 사용해볼 수 있다.
data = {
  name: "heka1024",
  city: "Seoul",
  age: 99
}
Marshal.dump(data)
이렇게 marshal을 하면 "\x04\b{\b:\tnameI\"\rheka1024\x06:\x06ET:\tcityI\"\nSeoul\x06;\x06T:\bageih" 이런 문자열을 얻을 수 있다. 이 문자열을 다시 Marshal.load하면 원래 객체를 얻을 수 있다.
marshal_data = "\x04\b{\b:\tnameI\"\rheka1024\x06:\x06ET:\tcityI\"\nSeoul\x06;\x06T:\bageih"
Marshal.load(marshal_data) # returns {:name=>"heka1024", :city=>"Seoul", :age=>99}
비슷하게, 레일즈는 Marshal을 이용해 객체를 직렬화한다. Serializer는 이 부분을 추상화한다. (7.1 이전에는 압축 역할도 담당했다.)
module Marshal71WithFallback
  include SerializerWithFallback
  extend self

  MARSHAL_SIGNATURE = "\x04\x08".b.freeze

  def dump(value)
    Marshal.dump(value)
  end

  def _load(dumped)
    marshal_load(dumped)
  end

  def dumped?(dumped)
    dumped.start_with?(MARSHAL_SIGNATURE)
  end
Compress
이제 압축만 설명하면 레일즈 캐시의 설명의 대부분이 끝난다. 앞서 말했듯 Marshal을 사용하면 복잡한 루비 객체라도 손쉽게 직렬화할 수 있다. 하지만 단점도 있는데, Marshal은 효율성을 중심에 둔 프로토콜은 아니기 때문에 객체가 굉장히 커질 수 있다는 것이다. 그래서 레일즈는 기본으로는 1kb가 넘는 레코드를 압축해서 저장한다.
@coder = @options.delete(:coder) do
  legacy_serializer = Cache.format_version < 7.1 && !@options[:serializer]
  serializer = @options.delete(:serializer) || default_serializer
  serializer = Cache::SerializerWithFallback[serializer] if serializer.is_a?(Symbol)
  compressor = @options.delete(:compressor) { Zlib }

  Cache::Coder.new(serializer, compressor, legacy_serializer: legacy_serializer)
endStore생성자 중 위의 부분에 나와있는 것처럼 compressor는 기본적으로 Zlib이 된다. 만약 다른 알고리즘으로 교체하고 싶다면 다음과 같이 inflate, deflate에 응답하도록 만들어야 한다. 만약 기존 레코드와 호환성을 유지해야한다면 Zlib의 매직 넘버를 검사해야한다.
module MyCompressor
  def self.deflate(dumped)
    # compression logic... (make sure result does not start with "\x78"!)
  end

  def self.inflate(compressed)
    if compressed.start_with?("\x78")
      Zlib.inflate(compressed)
    else
      # decompression logic...
    end
  end
end

ActiveSupport::Cache.lookup_store(:redis_cache_store, compressor: MyCompressor)
참고문헌
- Rails tutorial: Cache
- Shopify: Caching without marshal
- https://shopify.engineering/caching-without-marshal-part-one
- https://shopify.engineering/caching-without-marshal-part-two-messagepack