컨트롤러 구현
컨트롤러는 요청에 따라서 어떤 작업을 처리하고 응답을 내릴 지 구현하는 부분이다.
1) 컨트롤러 뼈대를 먼저 구성한 뒤 구조가 작동하는 지를 우선 확인 후에,
2) 컨트롤러 메서드 내용을 구현하고, Postman과 Todo 페이지에서 기능이 잘 작동하는지 테스트를 해 볼 것이다.
controller 패키지에 TodoController 클래스 파일을 생성한다.

1) 컨트롤러 구조 테스트
TodoController
@RestController(컨트롤러 표시), @CrossOrigin(CORS 이슈 해결) 등 필요한 어노테이션을 추가한다.
클래스 내부에는 들어오는 요청 별로 처리할 응답을 매핑한다.
실질적인 메서드 내용은 API 구조가 정상적으로 작동하는 지 확인 후에 구현할 것이다.
package org.example.controller;

import lombok.AllArgsConstructor;
import org.example.model.TodoResponse;
import org.example.service.TodoService;
import org.springframework.http.ResponseEntity;
import org.springframework.web.bind.annotation.*;

import java.util.List;

@CrossOrigin
@RestController
@AllArgsConstructor
@RequestMapping("/")
public class TodoController {

    private final TodoService service;

    @PostMapping
    public ResponseEntity<TodoResponse> create() {
        System.out.println("CREATE");
        return null;
    }

    @GetMapping
    public ResponseEntity<List<TodoResponse>> readAll() {
        System.out.println("READ ALL");
        return null;
    }

    @GetMapping("{id}")
    public ResponseEntity<TodoResponse> readOne() {
        System.out.println("READ ONE");
        return null;
    }

    @PatchMapping("{id}")
    public ResponseEntity<TodoResponse> update() {
        System.out.println("UPDATE");
        return null;
    }

    @DeleteMapping("{id}")
    public ResponseEntity<?> deleteOne() {
        System.out.println("DELETE");
        return null;
    }

    @DeleteMapping
    public ResponseEntity<?> deleteAll() {
        System.out.println("DELETE ALL");
        return null;
    }
}
톰캣 서버 실행
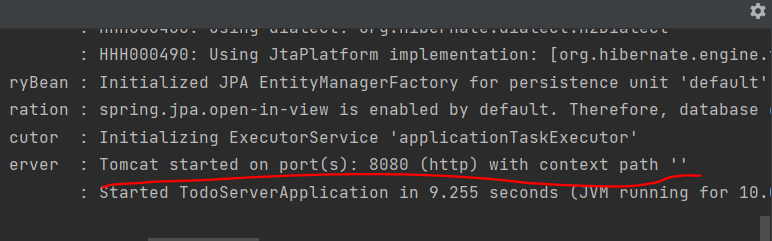
다음과 main() 메서드를 작성 후 run하면 톰캣 서버가 시작했다는 메시지가 뜬다.
- TodoServerApplication
package org.example;

import org.springframework.boot.SpringApplication;
import org.springframework.boot.autoconfigure.SpringBootApplication;

@SpringBootApplication
public class TodoServerApplication {
    public static void main(String[] args) {
        SpringApplication.run(TodoServerApplication.class, args);
    }
}
Postman
-
API는 Postman 앱을 이용해서 테스트 할 것이다.
Download Postman에서 운영체제에 맞는 버전을 설치하고, 계정을 생성한다.
Postman이 실행되면 다음과 같이 POST 방식으로 localhost:8080 url에 요청을 보낸다.
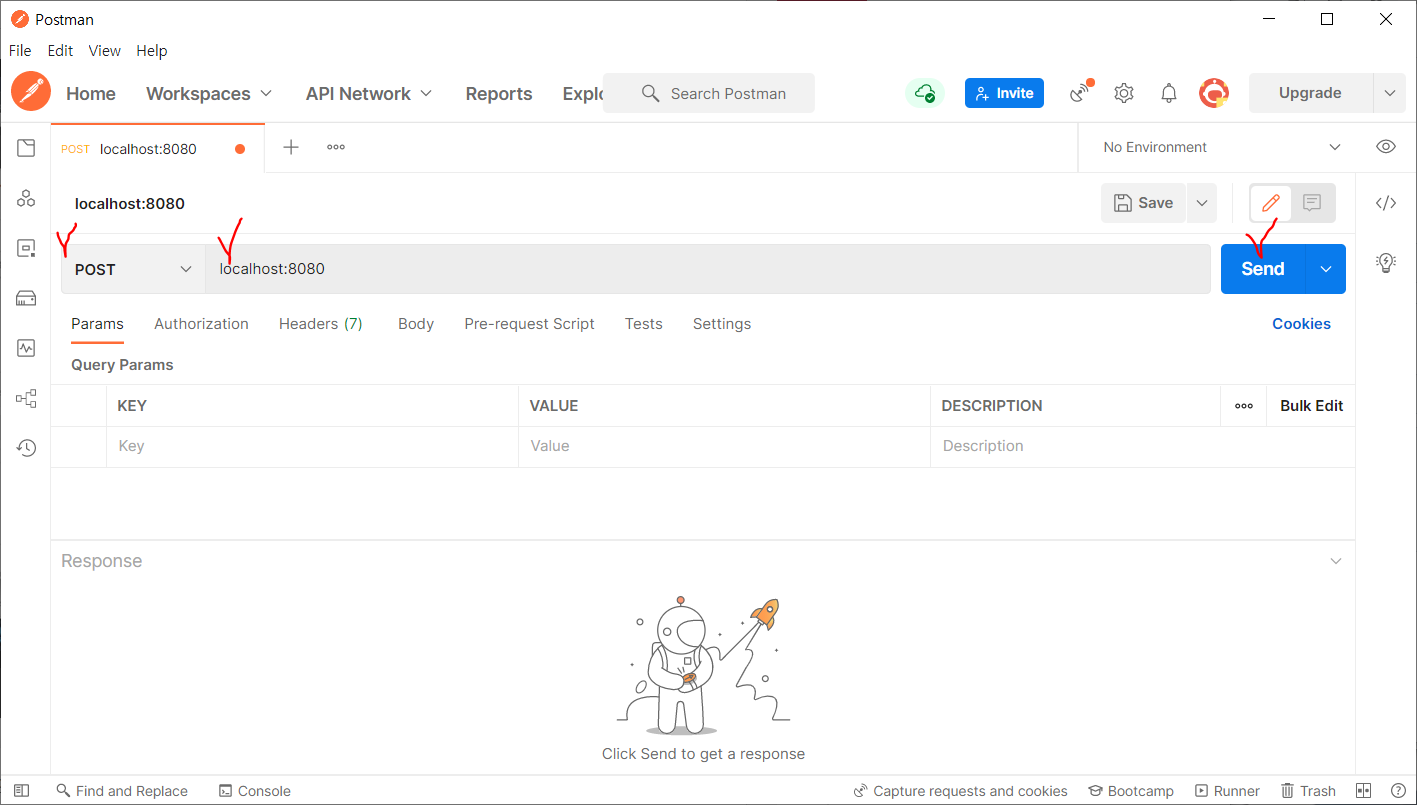
-
Postman에는 아무것도 뜨지 않지만 intellij를 확인해보면 API가 정상적으로 동작하는 것을 확인할 수 있다.

2) 컨트롤러 구현 후 Todo 테스트
컨트롤러 구현
API가 정상적으로 작동하는 것을 확인했으니 컨트롤러를 마저 구현한다.
코드 보기package org.example.controller;
import lombok.AllArgsConstructor;
import org.example.model.TodoEntity;
import org.example.model.TodoRequest;
import org.example.model.TodoResponse;
import org.example.service.TodoService;
import org.springframework.http.ResponseEntity;
import org.springframework.util.ObjectUtils;
import org.springframework.web.bind.annotation.*;
import java.util.List;
import java.util.stream.Collectors;
@CrossOrigin
@RestController
@AllArgsConstructor
@RequestMapping("/")
public class TodoController {
private final TodoService service;
@PostMapping
public ResponseEntity<TodoResponse> create(@RequestBody TodoRequest request) {
System.out.println("CREATE");
if (ObjectUtils.isEmpty(request.getTitle()))
return ResponseEntity.badRequest().build();
if (ObjectUtils.isEmpty(request.getOrder()))
request.setOrder(0L);
if (ObjectUtils.isEmpty(request.getCompleted()))
request.setCompleted(false);
TodoEntity result = this.service.add(request);
return ResponseEntity.ok(new TodoResponse(result));
}
@GetMapping
public ResponseEntity<List<TodoResponse>> readAll() {
System.out.println("READ ALL");
List<TodoEntity> list = this.service.searchAll();
List<TodoResponse> response = list.stream().map(TodoResponse::new)
.collect(Collectors.toList());
return ResponseEntity.ok(response);
}
@GetMapping("{id}")
public ResponseEntity<TodoResponse> readOne(@PathVariable Long id) {
System.out.println("READ ONE");
TodoEntity result = this.service.searchById(id);
return ResponseEntity.ok(new TodoResponse(result));
}
@PatchMapping("{id}")
public ResponseEntity<TodoResponse> update(@PathVariable Long id, @RequestBody TodoRequest request) {
System.out.println("UPDATE");
TodoEntity result = this.service.updateById(id, request);
return ResponseEntity.ok(new TodoResponse(result));
}
@DeleteMapping("{id}")
public ResponseEntity<?> deleteOne(@PathVariable Long id) {
System.out.println("DELETE");
this.service.deleteById(id);
return ResponseEntity.ok().build();
}
@DeleteMapping
public ResponseEntity<?> deleteAll() {
System.out.println("DELETE ALL");
this.service.deleteAll();
return ResponseEntity.ok().build();
}
}API 테스트
-
이제 다시 Postman에서 Body > raw > JSON 선택 후,
todo 아이템 내용을 입력하고 테스트 요청을 보내면
다음과 같이 1번 id로 아이템이 추가된 것을 확인할 수 있다.

-
마찬가지로 전체 목록 조회, 수정, 삭제 요청 모두 잘 작동하는 것을 확인하였다.


Todo run test
-
Todo-Backend run test에서 To do list 테스트를 통과하는 지 확인한다.


-
Todo-Backend client에서 url 입력 후 go를 클릭하면 프론트가 구현된 To do list 페이지가 나온다.

-
다음과 같이 아이템 추가, 수정, 완료 여부를 테스트 해보았고, 잘 동작하는 것을 확인하였다.