SpringBoot 프로젝트에서 OAuth2와 spring security를 사용하여 카카오API를 이용한 소셜 로그인을 구현하고 DB에 넣는것까지 완성했다.
개발 환경
- Spring Boot 2.7.15
- Java 11
- spring security 5
- Maria DB
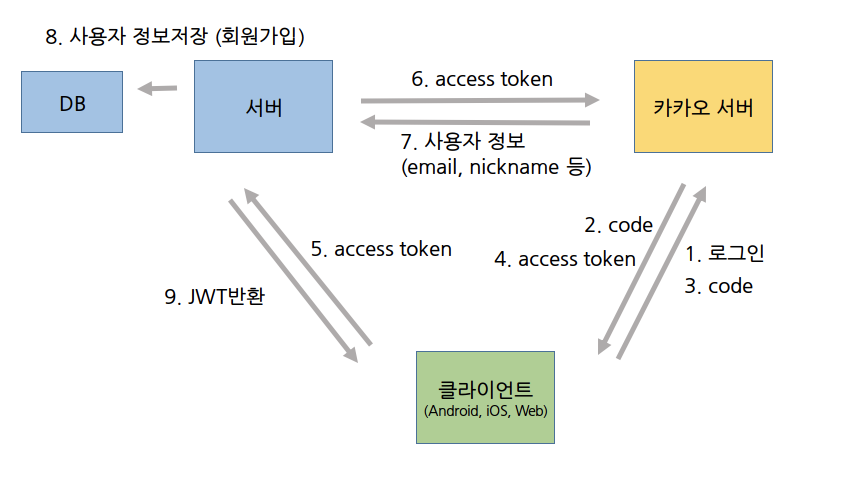
카카오 로그인 API는 이런식으로 진행된다.
1. Kakao Developers 에서 애플리케이션 등록
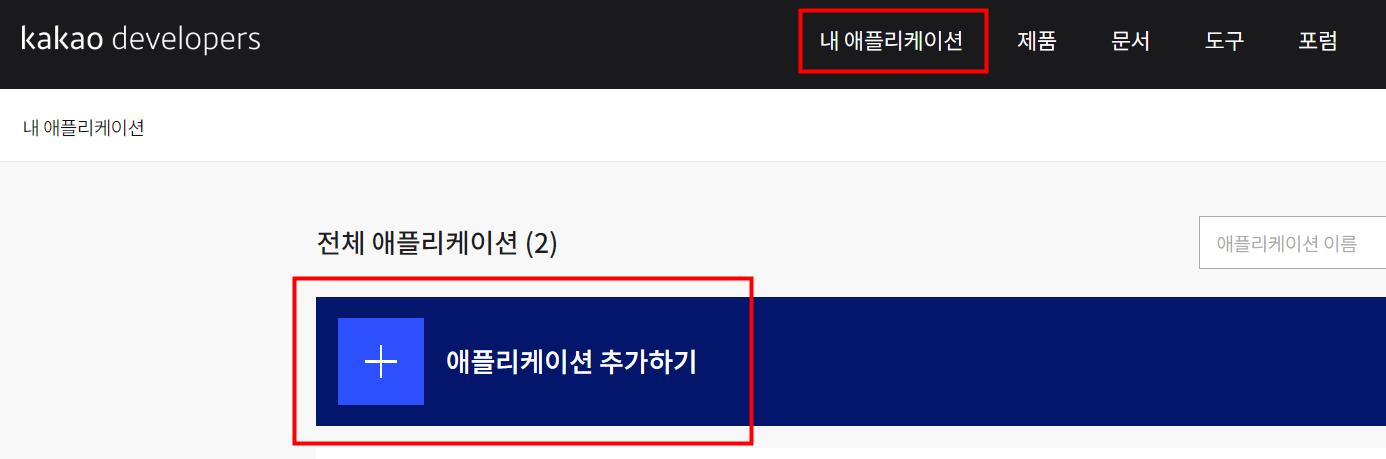
Kakao Developers에서 애플리케이션을 추가한다.

앱 이름과 사업자명은 편하게 설정
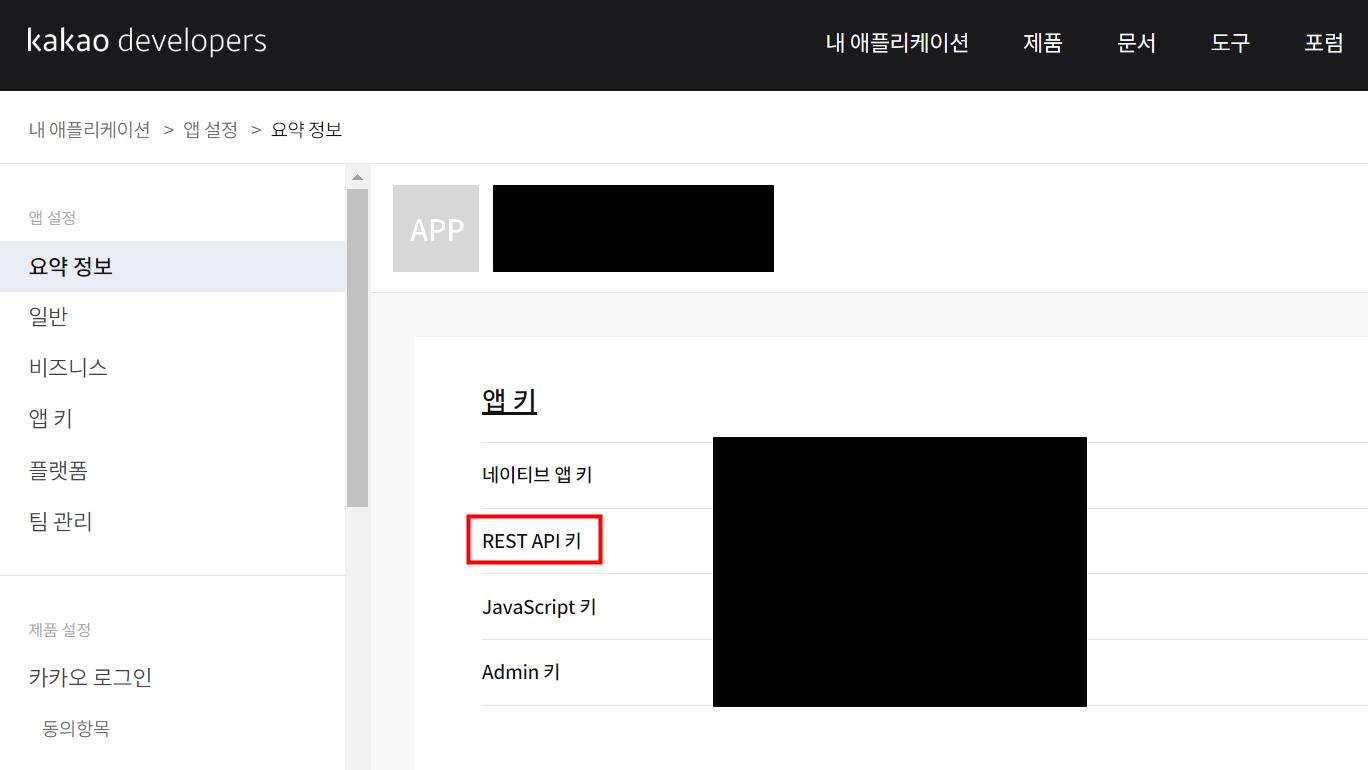
애플리케이션이 추가되면 여러 종류의 키가 생성되는데 이 중에서 REST API 키는 application.properties에서 spring.security.oauth2.client.registration.kakao.client-id= 에 작성한다.

Web 플랫폼을 지정하고 사이트 도메인은 http://localhost:8080 으로 지정 (나중에 호스팅을 이용할 때는 변경)

동의 항목을 지정하는데 '닉네임'과 '카카오 계정'을 선택했다.

카카오 로그인 활성화 ON

아래로 스크롤하면 'Redirect URI'를 지정하는 부분이 나온다. 여기에서 값은 http://localhost:8080/login/oauth2/code/kakao 로 지정했다.

보안 항목에서 'Client Secret'으로 코드를 생성받는다.
이 코드는 application.properties에서 spring.security.oauth2.client.registration.kakao.client-secret= 에 작성한다.
2. build.gradle에 스프링 시큐리티, DB 관련된 dependencies 추가
implementation 'org.springframework.boot:spring-boot-starter-thymeleaf'
	implementation 'org.springframework.boot:spring-boot-starter-web'
	compileOnly 'org.projectlombok:lombok'
	developmentOnly 'org.springframework.boot:spring-boot-devtools'
	annotationProcessor 'org.projectlombok:lombok'
	testImplementation 'org.springframework.boot:spring-boot-starter-test'

	implementation 'org.springframework.boot:spring-boot-starter-data-jpa'

	implementation 'org.springframework.boot:spring-boot-starter-security'
	implementation 'org.springframework.security:spring-security-oauth2-client'
	implementation 'org.thymeleaf.extras:thymeleaf-extras-springsecurity5'
	testImplementation 'org.springframework.security:spring-security-test'

	runtimeOnly 'org.mariadb.jdbc:mariadb-java-client'
3. application.properties에 Kakao와 DB 관련 설정 추가
# Kakao
spring.security.oauth2.client.provider.kakao.authorization-uri=https://kauth.kakao.com/oauth/authorize
spring.security.oauth2.client.provider.kakao.user-name-attribute=id
spring.security.oauth2.client.provider.kakao.token-uri=https://kauth.kakao.com/oauth/token
spring.security.oauth2.client.provider.kakao.user-info-uri=https://kapi.kakao.com/v2/user/me

spring.security.oauth2.client.registration.kakao.client-name=kakao
spring.security.oauth2.client.registration.kakao.authorization-grant-type=authorization_code
spring.security.oauth2.client.registration.kakao.redirect_uri=http://localhost:8080/login/oauth2/code/kakao
spring.security.oauth2.client.registration.kakao.client-id=

spring.security.oauth2.client.registration.kakao.client-secret=
spring.security.oauth2.client.registration.kakao.client-authentication-method=POST
spring.security.oauth2.client.registration.kakao.scope=profile_nickname,account_email


# MariaDB
spring.datasource.driver-class-name=org.mariadb.jdbc.Driver
spring.datasource.url=jdbc:mariadb://localhost:(포트번호)/(Database명)
spring.datasource.username=(계정명)
spring.datasource.password=(비밀번호)
client-id= 는 REST API 키
client-secret= 은 Client Secret 코드
DB 관련 설정은 본인의 DB에 맞게 수정한다.
4. 테스트할 로그인 페이지 만들기
- 메인 페이지
<!DOCTYPE html>
<html lang="en">
<head>
    <meta charset="UTF-8">
</head>
<body>
	<a sec:authorize="isAnonymous()" th:href="@{/user/login}">로그인</a>
	<a sec:authorize="isAuthenticated()" th:href="@{/user/logout}">로그아웃</a>
</body>
</html>- 로그인 페이지
<!DOCTYPE html>
<html lang="en">
<head>
    <meta charset="UTF-8">
</head>
<body>
    <div>
    	<input type="button" onclick="location.href='/oauth2/authorization/kakao'">
    </div>
</body>
</html>
5. Controller
@Controller
@RequestMapping("/user")
public class UserController {

    @GetMapping("/login")
    public String login() {
        return "login";
    }

    @GetMapping("/logout")
    public String logout(HttpServletRequest request, HttpServletResponse response) {
        Authentication authentication = SecurityContextHolder.getContext().getAuthentication();  // 현재 인증 객체(Authentication)를 가져옴
        if (authentication != null) {  // 가져온 인증 객체를 이용하여 SecurityContextLogoutHandler를 통해 로그아웃 실행
            new SecurityContextLogoutHandler().logout(request, response, authentication);
        }

        return "redirect:/";
    }
6. SecurityConfig
@Configuration  // 해당 클래스를 스프링 설정 클래스로 등록
@EnableWebSecurity  // spring security 설정을 활성화
public class SecurityConfig extends WebSecurityConfigurerAdapter {

    @Autowired  // 해당 타입의 빈을 자동으로 주입
    private CustomOAuth2UserService customOAuth2UserService;

    @Override  // 상위 클래스의 메소드를 오버라이드
    protected void configure(HttpSecurity http) throws Exception {

        http
                // 카카오 로그인
                .authorizeRequests()  // HttpServletRequest에 따라 접근을 제한하거나 허용하려면 사용
                .antMatchers("/", "/user/**", "/search_fail", "/게시판").permitAll()  // 해당 경로에 대한 모든 요청을 허용
                .antMatchers( "/static1/**", "/static2/**").permitAll() // 정적 자원에 대한 접근 허용
                .anyRequest().authenticated()  // 그 외의 모든 요청은 인증이 필요
                .and()
                .oauth2Login()  // OAuth 2 로그인 기능 활성화
                .userInfoEndpoint()  // OAuth2 로그인 성공 이후 사용자 정보를 가져올 때 설정을 저장
                .userService(customOAuth2UserService)  // OAuth 2 사용자 정보를 얻기 위한 서비스 지정
                .and()
                .defaultSuccessUrl("/")  // 로그인 성공 시 리다이렉트할 URL
                .failureUrl("/login?error=true")  // 로그인 실패 시 리다이렉트할 URL
                .and()
                .csrf().ignoringAntMatchers("/", "/user/**", "/search_fail", "/게시판")  // CSRF 보호에서 제외 페이지
                .and()
                .headers().frameOptions().disable()  // X-Frame-Options 헤더를 비활성화하여 iframe 내에서 페이지를 렌더링 허용
                .and()

                // 카카오 로그아웃
                .logout()
                .logoutUrl("/user/logout")  // 로그아웃을 수행하는 URL
                .logoutSuccessUrl("/")  // 로그아웃 성공 후 리다이렉트할 URL
                .invalidateHttpSession(true) // 세션 무효화
                .addLogoutHandler((request, response, authentication) -> {  // 소셜 로그아웃 처리 및 세션 관련 작업 등 추가
                    HttpSession session = request.getSession();  // 세션을 무효화하여 사용자의 세션 정보를 제거
                    session.invalidate();
                })
                .logoutSuccessHandler((request, response, authentication) -> response.sendRedirect("/user/login"))  // 소셜 로그아웃 성공 후 처리 및 리다이렉트3
                .deleteCookies("remember-me");  // 로그아웃 시 제거할 쿠키를 설정
    }
}
7. User 도메인
@Entity  // JPA를 사용하여 테이블과 매핑할 클래스임을 나타냅니다.
@Getter  // Lombok을 사용하여 getter 메소드를 자동으로 생성합니다.
@Setter  // Lombok을 사용하여 setter 메소드를 자동으로 생성합니다.
@RequiredArgsConstructor  // Lombok을 사용하여 final이나 @NonNull 필드만 매개변수로 갖는 생성자를 생성합니다.
public class User {

    @Id  // 해당 프로퍼티가 테이블의 기본 키 역할을 한다는 것을 나타냅니다.
    @GeneratedValue(strategy = GenerationType.IDENTITY)  // 기본 키 생성 전략을 지정합니다. IDENTITY는 데이터베이스에 위임하는 방식입니다.
    private Long user_id;

    private String email;  // 사용자의 이메일 주소를 저장하는 프로퍼티

    private String nickname;  // 사용자의 별명을 저장하는 프로퍼티

    // email과 nickname을 매개변수로 받는 생성자입니다.
    // Lombok의 @RequiredArgsConstructor 어노테이션으로 인해 필요없게 될 수도 있습니다.
    public User(String email, String nickname) {
        this.email = email;
        this.nickname = nickname;
    }
}
8. UserRepository
public interface UserRepository extends JpaRepository<User, Long> {


    Optional<User> findByEmail(String email);  // email을 이용해서 회원 정보 찾음
}
9. CustomOAuth2UserService
@Service  // 해당 클래스를 Spring의 Service로 등록합니다. 비즈니스 로직을 포함하는 클래스에 주로 사용됩니다.
@RequiredArgsConstructor
public class CustomOAuth2UserService extends DefaultOAuth2UserService {

    @Autowired  // Spring의 DI를 사용하여 userRepository 인스턴스를 자동으로 주입받습니다.
    private UserRepository userRepository;

    private final HttpSession httpSession;

    @Override  // 부모 클래스의 메소드를 오버라이드 합니다.
    public OAuth2User loadUser(OAuth2UserRequest userRequest) throws OAuth2AuthenticationException {
        OAuth2User oauth2User = super.loadUser(userRequest);  // 부모 클래스의 loadUser 메소드를 호출하여 기본 OAuth2User를 가져옵니다.

        // 사용자의 OAuth2 인증 정보에서 가져온 속성들을 저장하는 Map 객체를 생성합니다.
        Map<String, Object> attributes = new HashMap<>(oauth2User.getAttributes());
        System.out.println(attributes);  // 가져온 속성들을 로그로 출력합니다.

        // 카카오 API로부터 반환된 "kakao_account" 속성을 맵으로 추출합니다.
        Map<String, Object> kakaoAccount = (Map<String, Object>) attributes.get("kakao_account");
        String email = (String) kakaoAccount.get("email");  // "kakao_account"에서 "email" 속성을 가져옵니다.

        // "kakao_account"의 "profile" 속성을 맵으로 추출합니다.
        Map<String, Object> profile1 = (Map<String, Object>) kakaoAccount.get("profile");
        String nickname = (String) profile1.get("nickname");  // "profile"에서 "nickname" 속성을 가져옵니다.

        // "kakao_account"의 "profile" 속성을 맵으로 추출합니다.
        Map<String, Object> profile2 = (Map<String, Object>) kakaoAccount.get("profile");

        // attributes 맵에 email과 nickname 속성을 추가합니다.
        attributes.put("email", email);
        attributes.put("nickname", nickname);

        // 데이터베이스에서 해당 이메일을 가진 사용자를 찾습니다.
        // 없을 경우 새로운 User 객체를 생성하고 저장한 뒤 반환합니다.
        User user = userRepository.findByEmail(email)
                .orElseGet(() -> {
                    User newUser = new User(email, nickname, pw);
                    return userRepository.save(newUser);
                });

        // OAuth2 인증에 사용될 사용자 정보를 담고 있는 DefaultOAuth2User 객체를 생성하여 반환합니다.
        return new DefaultOAuth2User(
                Collections.singleton(new SimpleGrantedAuthority("ROLE_USER")),  // 기본 권한을 설정합니다.
                attributes,  // OAuth2 인증 정보의 속성들
                "email");  // 이름 필드의 키를 "email"로 설정합니다.
    }
진행 사항
카카오 로그인을 완료하면 데이터베이스 USER 테이블에 동일한 email이 없을 경우, 사용자 email과 nickname이 저장된다.
문제점
로그아웃 후 로그인 페이지까지는 원하는 대로 진입하는데, 로그아웃을 했음에도 불구하고 카카오 로그인을 시도하면 자동 로그인 된 것처럼 바로 로그인이 되어버린다.
카카오 로그인했을 때 토큰 정보를 받아서 저장해놨다가 로그아웃할 때 버려야 한다는데 거기까진 아직 구현이 안 됐다.
