Nextjs
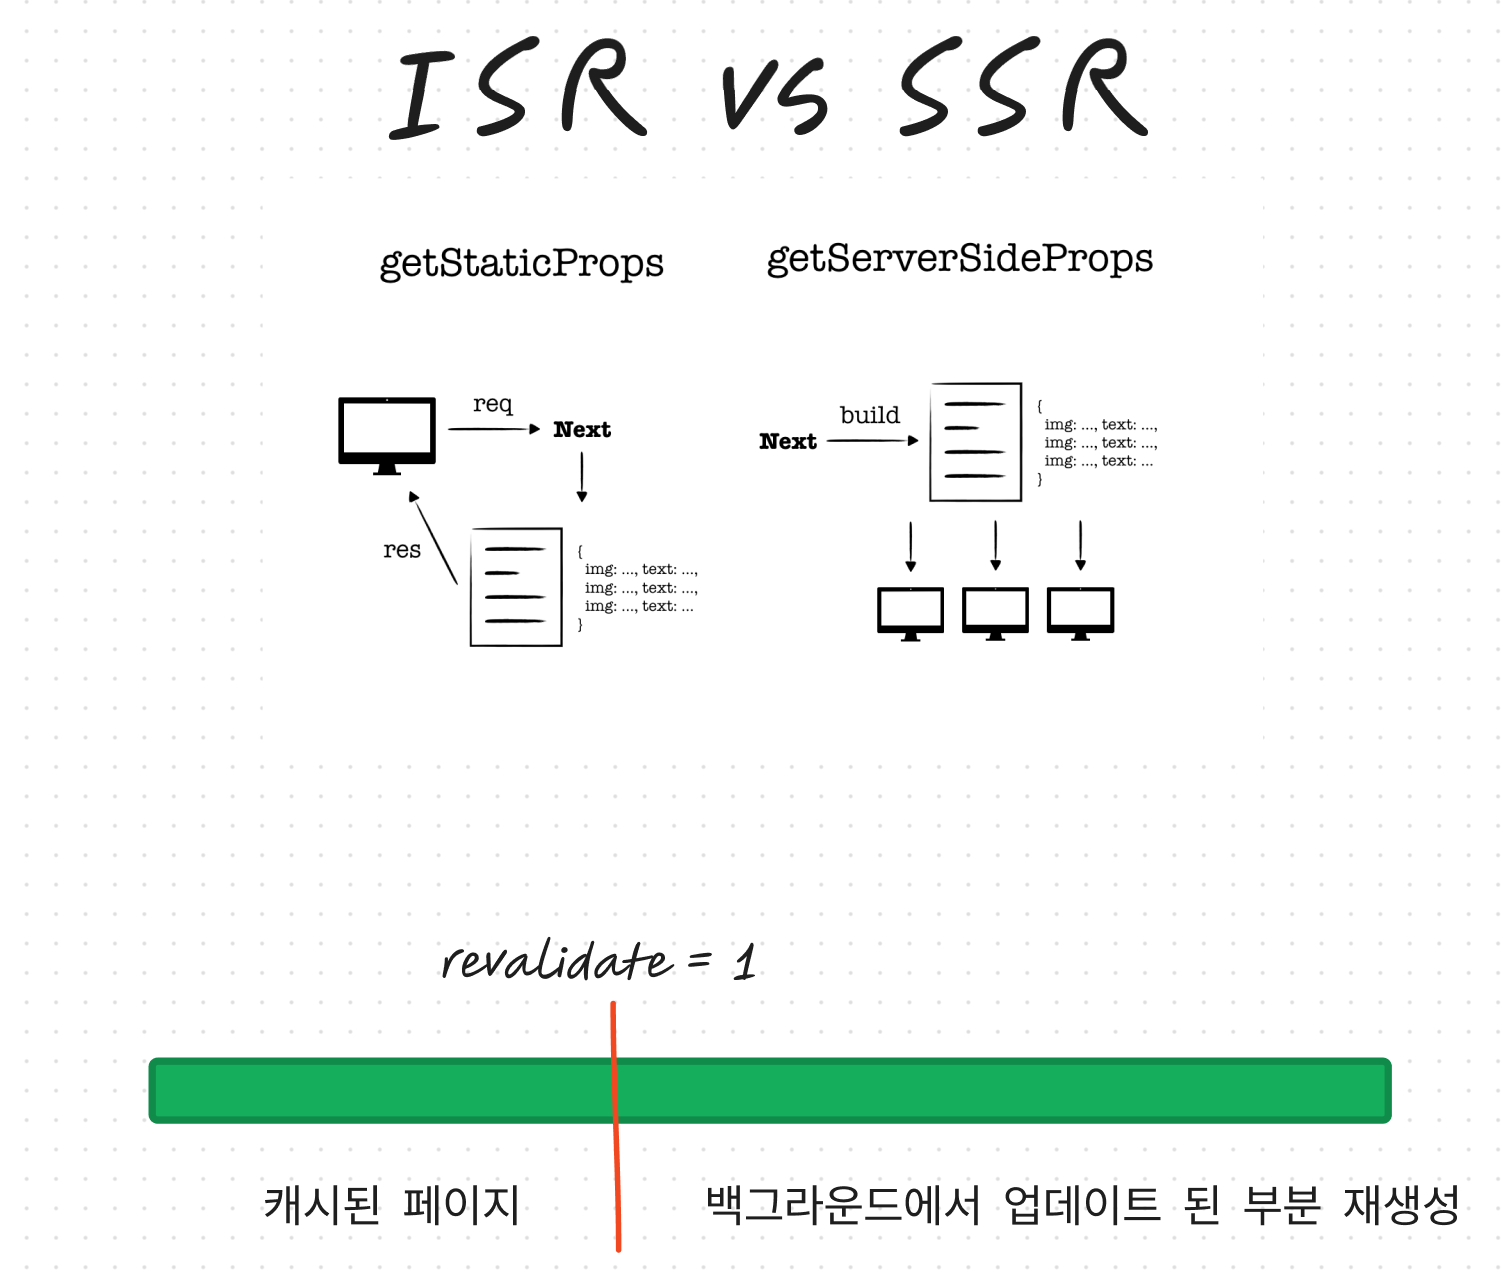
ISR(Incremental Static Regeneration)
-
Next.js can define a revalidation time per-page (e.g. 60 seconds).
-
The initial request to the product page will show the cached page.
-
The data for the product is updated in the CMS.
-
Any requests to the page after the initial request and before the 60 seconds window will show the cached (hit) page.
-
After the 60 second window, the next request will still show the cached (stale) page. Next.js triggers a regeneration of the page in the background.
-
Once the page has been successfully generated, Next.js will invalidate the cache and show the updated product page. If the background regeneration fails, the old page remains unaltered.
- revalidation 값을 정의
- 페이지에 대한 초기 요청에는 캐시된 페이지가 표시
- 게시물의 데이터가 업데이트
- 초기 요청 후 revalidation 시간 창 이전에 페이지에 대한 모든 요청은 캐시된 페이지를 표시
- Next.js는 백그라운드에서 페이지 재생성을 트리거
- 성공적으로 페이지가 생성되면 Next.js는 페이지를 무효화하고 업데이트된 페이지를 표시, 실패할 경우 변경되지 않은 상태로 유지
이때, 재구축은 트래픽이 발생하면 이뤄진다.
JS
메서드 정리
예제 업데이트 하기
Array
- length
- forEach
- map
- filter
- push, pop
- slice
얕은 복사
const animals = ['ant', 'bison', 'camel', 'duck', 'elephant'];

animals.slice(2)
["camel", "duck", "elephant"]

nums = [0, 1, 2, 3, 4, 5, 6, 7, 8, 9, 10, 11, 12, 13, 14, 15, 16, 17, 18, 19]
nums.slice(5, 10)
// [5, 6, 7, 8, 9]- splice
let months = ["January", "February", "Monday", "Tuesday"];
// 1 예제
let days = months.splice(2); // 인덱스 2부터 배열 변경

console.log(days); // ["Monday", "Tuesday"]

// 2 예제
let days = months.splice(2, 1); // 요소 하나만 삭제

console.log(days); // ["Monday"]
console.log(months); // ["January", "February", "Tuesday"]- split
파라미터가 없으면 그냥 배열에 담아 return
파라미터로" "를 넣으면 띄어쓰기를 기준으로 각 배열에 저장
const str = "apple banana orange";

const arr = str.split(" ");

document.writeln(arr.length); // 3
document.writeln(arr[0]); // apple
document.writeln(arr[1]); // banana
document.writeln(arr[2]); // orange- reduce
- join
- sort
[1, 11, 2, 22, 3, 33, 2221].sort()
// [1, 11, 2, 22, 2221, 3, 33]
[1, 11, 2, 22, 3, 33].sort((a, b) => a - b)
// [1, 2, 3, 11, 22, 33]- reverse
// 1. split() 메서드를 사용해 새 배열을 반환하기
    var splitString = str.split(""); // var splitString = "hello".split("");
    // ["h", "e", "l", "l", "o"]

    // 2. reverse() 메서드를 사용해 새 배열의 순서를 뒤집기
    var reverseArray = splitString.reverse(); // var reverseArray = ["h", "e", "l", "l", "o"].reverse();
    // ["o", "l", "l", "e", "h"]

    // 3. join() 메서드를 사용해 배열의 모든 요소를 문자열로 결합하기
    var joinArray = reverseArray.join(""); // var joinArray = ["o", "l", "l", "e", "h"].join("");
    // "olleh"

    // 4. 반전된 문자열을 반환하기
return joinArray; // "olleh"- fill
- join
Math
Map
let map = new Map()
map.set('one', 100)
map.set('two', 200)
map.set('three', 300)
map.set('four', [10, 20])
map.set(5, [100, 200])
map.set([1, 2], [100, 200])
map.get(5)

let human = {
    name:'hojun3',
    age:30,
    local:'jeju'
}
let hojun = new Map(Object.entries(human))
Set
중복 허용 x
let set = new Set()
set.add(1);
set.add(3);
set.size

let a = new Set([1, 2, 3])
let b = new Set([3, 4, 5])
const 합집합 = new Set([...a, ...b]);
const 교집합 = new Set([...a].filter(x => b.has(x)));
const 차집합1 = new Set([...a].filter(x => !b.has(x)));
const 차집합2 = new Set([...b].filter(x => !a.has(x)));
문서 객체 조작(DOM)
HTML에서의 요소 = JS에서의 문서 객체
- 예제
doc= document.createElement('h1')
doc.innerText = 'hello world'
document.body.append(doc)<body>내에 <h1>hello world</h1>가 추가된다.
for (let i = 0; i < 10; i ++) {
    content = document.createElement('p')
    content.innerText = 'hello world'
    document.body.append(content)
}<p>태그의 hello world 라는 내용을 10개 만든다.
container = document.createElement('div')
container.classList.add('one')
container.classList.add('two')
container.classList.remove('one')
for (let i = 0; i < 10; i++){
    content = document.createElement('p')
    content.innerText = 'hello world'
    container.append(content)
}
document.body.append(container)
container 변수에 div 요소를 만든 후 클래스 이름이 two인 클래스를 만들고 p태그의 hello world라는 내용을 담고있는 것을 container 변수에 <p>hello world</p>를 10번 담는다.
이렇게 만든 container를 body의 마지막에 붙여준다.
container.classList.remove('two')
container.classList.toggle('four')
container.classList.toggle('four')toggle은 요소가 있으면 해당 클래스를 제거하고, 없으면 추가한다.
container.getAttribute('class') // class 속성에 할당된 문자열 가져오기
container.hasAttribute('class') // class 속성을 가지고 있는지 T,F
container.setAttribute('class','five six') // class 속성에 five six를 할당 
- fetch
fetch('https://test.api.weniv.co.kr/mall')
.then(r => r.json())
.then(r => {
    console.log('data',r)
    for (const item of r) {
        const productName = document.createElement('h3')
        productName.innerText = item.productName
        const image = document.createElement('img')
        image.setAttribute('src', 'https://test.api.weniv.co.kr/' + item.thumbnailImg)

        const price = document.createElement('p')
        price.innerText = item.price
        document.body.append(productName)
        document.body.append(image)
        document.body.append(price)
    }
})

이런식으로 데이터들이 출력된다.
테오의 스프린트 16기 회고
