[스프링 부트와 AWS로 혼자 구현하는 웹 서비스]라는 책을 보며 생기는 문제나 궁금한 점을 조금씩만 적어보고자 한다.(제발 프로젝트도 틈 날때마다 좀 적자!)
문제 발생
chapter05에서 oauth를 통해 로그인 기능을 구현하는 과정에서 문제가 생겼다.
package com.jojoldu.book.springboot.config.auth;

import com.jojoldu.book.springboot.domain.user.Role;
import lombok.RequiredArgsConstructor;
import org.springframework.security.config.annotation.web.builders.HttpSecurity;
import org.springframework.security.config.annotation.web.configuration.EnableWebSecurity;
import org.springframework.security.config.annotation.web.configuration.WebSecurityConfigurerAdapter;

@RequiredArgsConstructor
@EnableWebSecurity
public class SecurityConfig extends WebSecurityConfigurerAdapter {

    private final CustomOAuth2UserService customOAuth2UserService;

    @Override
    protected void configure(HttpSecurity http) throws Exception {
        http
                .csrf().disable()
                .headers().frameOptions().disable()
                .and()
                    .authorizeRequests()
                    .antMatchers("/", "/css/**", "/images/**", "/js/**", "/h2-console/**", "/profile").permitAll()
                    .antMatchers("/api/v1/**").hasRole(Role.USER.name())
                    .anyRequest().authenticated()
                .and()
                    .logout()
                        .logoutSuccessUrl("/")
                .and()
                    .oauth2Login()
                        .userInfoEndpoint()
                            .userService(customOAuth2UserService);
    }
}
위 코드가 책에 나와있는 코드이다. 근데 여기서 문제점이 몇개 있다.
- WebSecurityConfigureAdapter가 deprecated되었다.
- authorizeRequests도 deprecated되었다.
따라서 위와 같이는 작동이 되지 않을 것이다.
해결
@RequiredArgsConstructor
@Configuration
@EnableWebSecurity
public class SecurityConfig{

    private final CustomOAuth2UserService customOAuth2UserService;

	@Bean
    public SecurityFilterChain filterChain(HttpSecurity httpSecurity)throws Exception {
        httpSecurity.csrf(csrf -> csrf.disable());
        httpSecurity.headers(headers -> headers.frameOptions(frameOptionsConfig -> frameOptionsConfig.disable()));

        httpSecurity.logout(httpSecurityLogoutConfigurer -> httpSecurityLogoutConfigurer.logoutSuccessUrl("/"));
        httpSecurity.oauth2Login(o -> o.userInfoEndpoint(e -> e.userService(customOAuth2UserService)));

        httpSecurity.authorizeHttpRequests(authorize-> authorize
                .requestMatchers(AntPathRequestMatcher.antMatcher("/"),
                        AntPathRequestMatcher.antMatcher("/css/**"),
                        AntPathRequestMatcher.antMatcher("/images/**"),
                        AntPathRequestMatcher.antMatcher("/js/**"),
                        AntPathRequestMatcher.antMatcher("/h2-console/**")).permitAll());
        httpSecurity.authorizeHttpRequests(r -> r.requestMatchers(AntPathRequestMatcher.antMatcher("/api/v1/**")).hasRole(Role.USER.name()));
        httpSecurity.authorizeHttpRequests(r -> r.anyRequest().authenticated());


        return httpSecurity.build();
    }
}
변한 점
- configuration annotation
- filterChain return value
- httpSecurity 메서드 사용 시 람다 사용
채굴
filter chain?
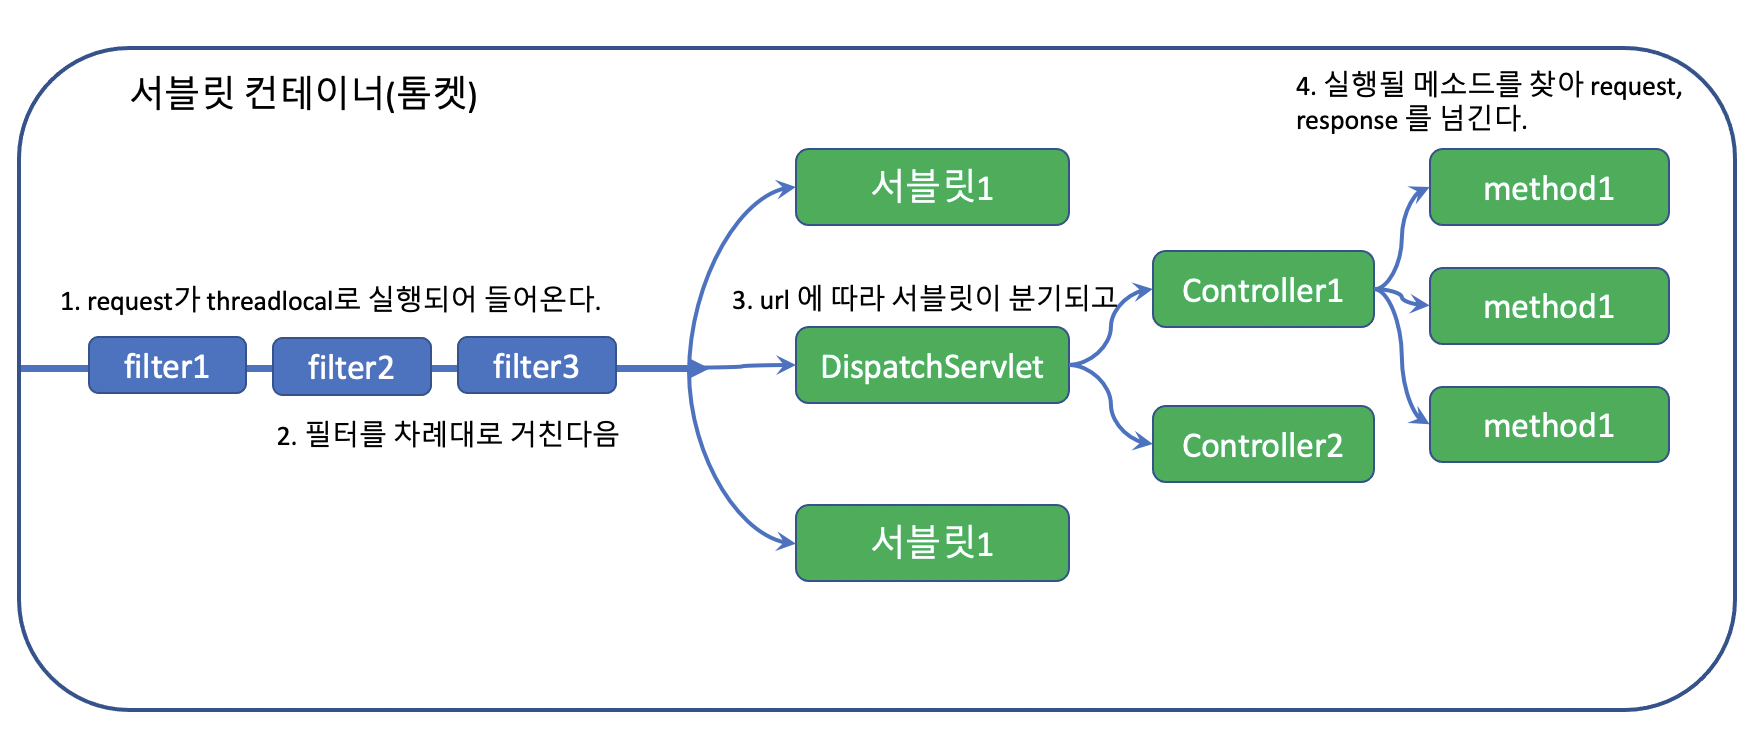
클라이언트가 url을 입력하면 HttpRequest가 survlet container로 전송한다. 위 사진은 서블릿 컨테이너인데, 여기서 filter가 여러개인 것을 볼 수 있다. 이를 filter chain이라고 한다.
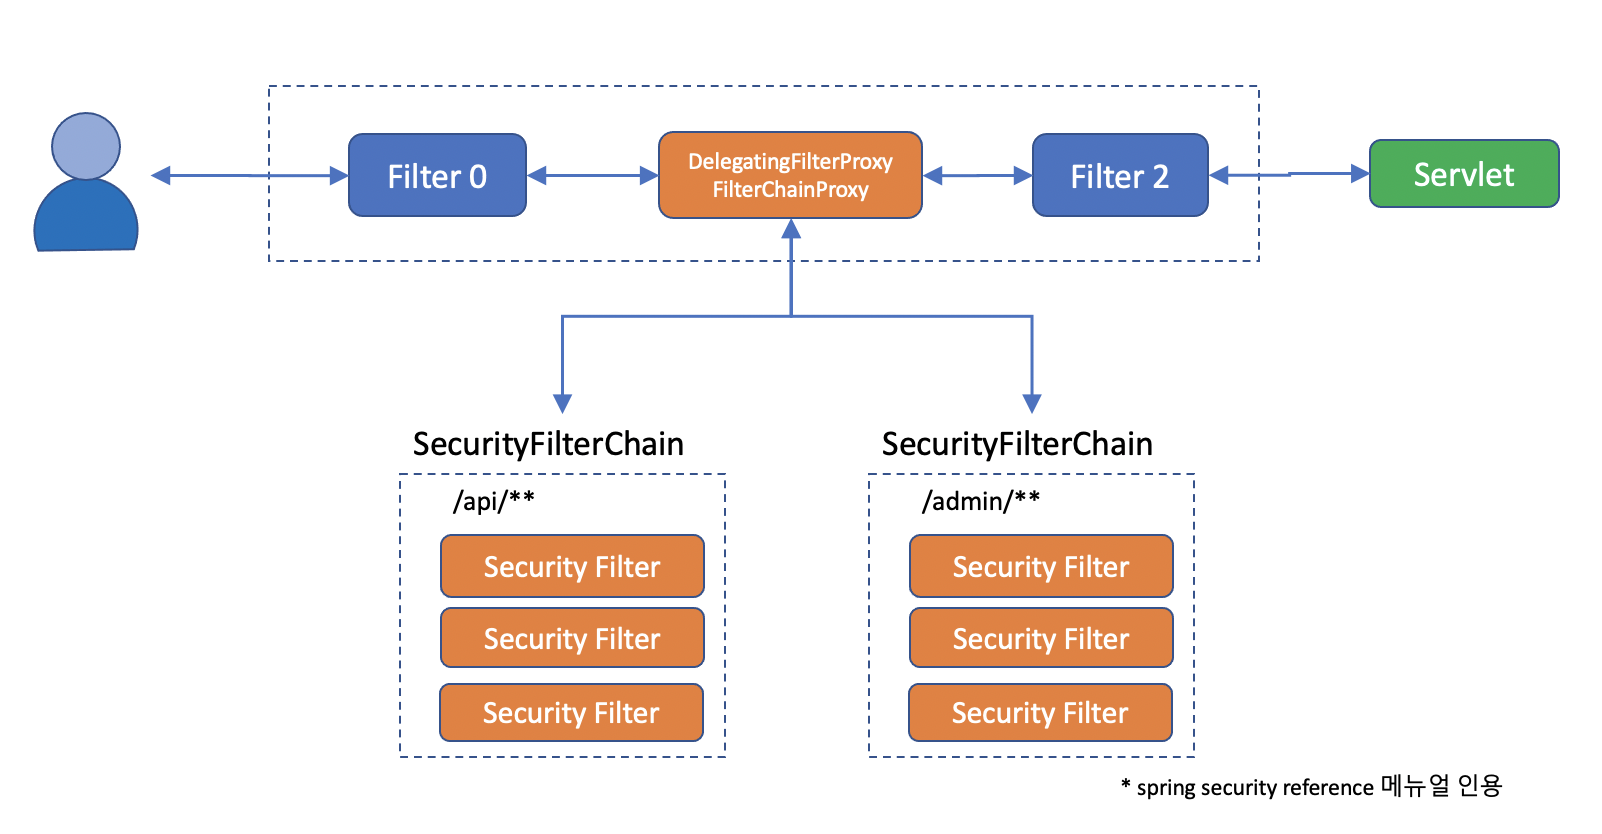
spring security는 DelegatingFilterProxy라는 필터를 만들어 Filter Chain에 끼워놓고, 그 아래 다시 SecurityFilterChain그룹에 등록한다. (구조가 filter chain내에서 똑같은 구조의 security filter chain 별도로 존재하는 듯?하다) 이렇게 하면 url에 따라 적용하는 filter를 다르게 적용할 수 있다.
DOCS
[버전이슈 해결1]
https://mingeonho1.tistory.com/entry/Spring-Security-%EB%B2%84%EC%A0%84-%EC%9D%B4%EC%8A%88%EB%A1%9C-%EC%9D%B8%ED%95%9C-%EC%98%A4%EB%A5%98-%ED%95%B4%EA%B2%B0
[버전이슈 해결2]
https://github.com/spring-projects/spring-security/issues/13609
[스프링 세큐리티 아키텍쳐]
https://docs.spring.io/spring-security/reference/servlet/architecture.html
[필터체인]
https://velog.io/@seongwon97/Spring-Security-Filter%EB%9E%80
->위의 [스프링 세큐리티 아키텍쳐]를 한글로 잘 설명해주었다.