5주차
💡 ‘테라폼으로 시작하는 IaC’ 책으로 진행하는 Terraform 스터디[T101] 5주차 정리내용입니다.워크플로
Terraform_remote_state
데이터 소스 중 하나로, 다른 Terraform state 파일의 값을 참조할 수 있게 해주는 기능이다. 한 Terraform 프로젝트의 출력 변수를 다른 Terraform 프로젝트에서 읽어올 수 있으며, 이를 통해 다양한 프로젝트나 환경 간의 종속성을 관리할 수 있게 된다.
여기서 network 코드와 ec2의 코드를 분리한 뒤, 각각 terraform cloud에 올리고 이를 terraform_remote_state을 통해 연결하는 것을 테스트해본다.
- network
- backend.tf
terraform { cloud { organization = "kane-org" # 생성한 ORG 이름 지정 hostname = "app.terraform.io" # default workspaces { name = "network" # 없으면 생성됨 } } required_providers { aws = { source = "hashicorp/aws" version = ">= 4.58" } } required_version = ">= 0.13" } - main.tf
locals { additional_tags = { Terraform = "true" Environment = "Network" } } resource "aws_vpc" "kane_vpc" { cidr_block = "10.10.0.0/16" enable_dns_support = true enable_dns_hostnames = true tags = { Name = "t101-study" } } resource "aws_subnet" "kane_subnet" { vpc_id = aws_vpc.kane_vpc.id cidr_block = "10.10.1.0/24" availability_zone = "ap-northeast-2a" tags = { Name = "t101-subnet" } } resource "aws_internet_gateway" "kane_igw" { vpc_id = aws_vpc.kane_vpc.id tags = { Name = "t101-igw" } } resource "aws_route_table" "kane_rt" { vpc_id = aws_vpc.kane_vpc.id tags = { Name = "t101-rt" } } resource "aws_route_table_association" "kane_rtassociation1" { subnet_id = aws_subnet.kane_subnet.id route_table_id = aws_route_table.kane_rt.id } resource "aws_route" "kane_defaultroute" { route_table_id = aws_route_table.kane_rt.id destination_cidr_block = "0.0.0.0/0" gateway_id = aws_internet_gateway.kane_igw.id } resource "aws_security_group" "kane_sg" { vpc_id = aws_vpc.kane_vpc.id name = "T101 SG" description = "T101 Study SG" } resource "aws_security_group_rule" "kane_sginbound" { type = "ingress" from_port = 80 to_port = 80 protocol = "tcp" cidr_blocks = ["0.0.0.0/0"] security_group_id = aws_security_group.kane_sg.id } resource "aws_security_group_rule" "kane_sgoutbound" { type = "egress" from_port = 0 to_port = 0 protocol = "-1" cidr_blocks = ["0.0.0.0/0"] security_group_id = aws_security_group.kane_sg.id } - output.tf
output "aws_vpc_id" {
  value = aws_vpc.kane_vpc.id
}
output "aws_subnet_id" {
  value = aws_subnet.kane_subnet.id
}
output "aws_security_group_id" {
  value = aws_security_group.kane_sg.id
}
- backend.tf
- ec2
- backend.tf
terraform { cloud { organization = "kane-org" # 생성한 ORG 이름 지정 hostname = "app.terraform.io" # default workspaces { name = "ec2" # 없으면 생성됨 } } required_providers { aws = { source = "hashicorp/aws" version = ">= 4.58" } } required_version = ">= 0.13" } - main.tf
locals { additional_tags = { Terraform = "true" Environment = "EC2" } } data "aws_ami" "amazonlinux2" { most_recent = true filter { name = "owner-alias" values = ["amazon"] } filter { name = "name" values = ["amzn2-ami-hvm-*-x86_64-ebs"] } owners = ["amazon"] } data "tfe_outputs" "network" { organization = "kane-org" workspace = "network" } resource "aws_instance" "kane_ec2" { ami = data.aws_ami.amazonlinux2.id associate_public_ip_address = true instance_type = "t2.micro" vpc_security_group_ids = ["${data.tfe_outputs.network.values.aws_security_group_id}"] subnet_id = data.tfe_outputs.network.values.aws_subnet_id user_data_replace_on_change = true } - output.tf
output "instance_id" {
  value       = aws_instance.kane_ec2.id
  description = "The ID of the App instance"
}
output "instance_public_ip" {
  value       = aws_instance.kane_ec2.public_ip
  description = "The public IP address of the App instance"
}
- backend.tf
먼저 network 모듈을 실행한다. network 모듈을 실행하면 다음과 같이 vpc, subnet, 보안그룹, igw 등이 생성되고 state 파일은 terraform cloud로 업로드된다.
...
aws_vpc.kane_vpc: Creating...
aws_vpc.kane_vpc: Still creating... [10s elapsed]
aws_vpc.kane_vpc: Creation complete after 11s [id=vpc-0611bde7af568db76]
aws_internet_gateway.kane_igw: Creating...
aws_subnet.kane_subnet: Creating...
aws_security_group.kane_sg: Creating...
aws_route_table.kane_rt: Creating...
aws_internet_gateway.kane_igw: Creation complete after 0s [id=igw-0a40a4d39738b4bf1]
aws_route_table.kane_rt: Creation complete after 0s [id=rtb-07685b8b451a260ed]
aws_route.kane_defaultroute: Creating...
aws_subnet.kane_subnet: Creation complete after 0s [id=subnet-08e6ad517434f1842]
aws_route_table_association.kane_rtassociation1: Creating...
aws_route_table_association.kane_rtassociation1: Creation complete after 0s [id=rtbassoc-0994211199a244a68]
aws_route.kane_defaultroute: Creation complete after 0s [id=r-rtb-07685b8b451a260ed1080289494]
aws_security_group.kane_sg: Creation complete after 1s [id=sg-0002c365bfa9ad634]
aws_security_group_rule.kane_sgoutbound: Creating...
aws_security_group_rule.kane_sginbound: Creating...
aws_security_group_rule.kane_sgoutbound: Creation complete after 0s [id=sgrule-1882620294]
aws_security_group_rule.kane_sginbound: Creation complete after 1s [id=sgrule-1795632479]

Apply complete! Resources: 9 added, 0 changed, 0 destroyed.

Outputs:

aws_security_group_id = "sg-0002c365bfa9ad634"
aws_subnet_id = "subnet-08e6ad517434f1842"
aws_vpc_id = "vpc-0611bde7af568db76"
이후 ec2 모듈을 실행한다. 아래의 코드를 통해 위에서 실행된 network 모듈의 state 파일을 읽어 참조할 수 있다.
data "tfe_outputs" "network" {
  organization = "kane-org"
  workspace    = "network"
}
데이터소스를 이용하여 EC2의 네트워크 관련 사항이 설정된다. 생성결과를 보면 데이터소스를 통해 가져오는 값들은 sensitive value로 표시되는 것을 확인할 수 있다.
...
+ secondary_private_ips = (known after apply)
+ security_groups = (known after apply)
+ source_dest_check = true
+ spot_instance_request_id = (known after apply)
+ subnet_id = (sensitive value)
+ tags_all = (known after apply)
+ tenancy = (known after apply)
+ user_data = (known after apply)
+ user_data_base64 = (known after apply)
+ user_data_replace_on_change = true
+ vpc_security_group_ids = (sensitive value)
...
Changes to Outputs:
+ instance_id = (known after apply)
+ instance_public_ip = (known after apply)
aws_instance.kane_ec2: Creating...
aws_instance.kane_ec2: Still creating... [10s elapsed]
aws_instance.kane_ec2: Still creating... [20s elapsed]
aws_instance.kane_ec2: Still creating... [30s elapsed]
aws_instance.kane_ec2: Still creating... [40s elapsed]
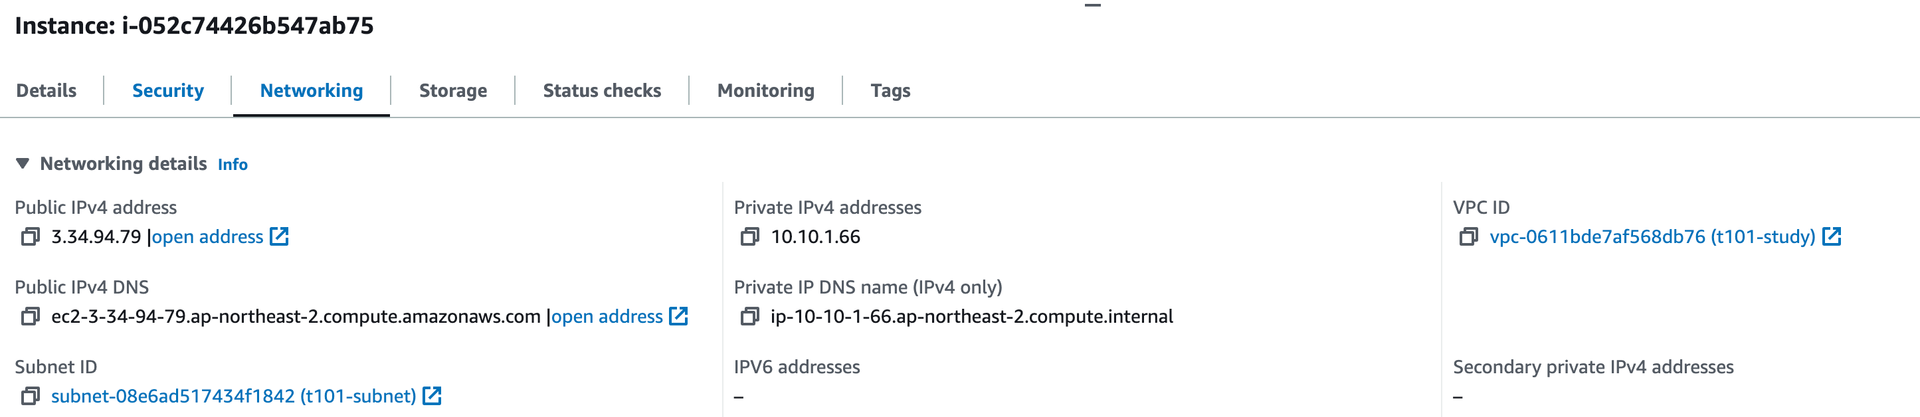
aws_instance.kane_ec2: Creation complete after 41s [id=i-052c74426b547ab75]
Apply complete! Resources: 1 added, 0 changed, 0 destroyed.
Outputs:
instance_id = "i-052c74426b547ab75"
instance_public_ip = "3.34.94.79"AWS 콘솔에서 확인해보면 VPC,Subnet 모두 정상적으로 네트워크 모듈에서 생성된 것을 가져왔다.
규모에 따른 워크플로
-
개인: 혼자서 테라폼으로 작업할 때는 기존과 같이 3가지 방식으로 작업한다.
- write: 테라폼 코드 작성
- plan: 리뷰
- apply: 프로비저닝, 성공한 경우 VCS에 코드를 병합한다.
-
단일 팀:
- write: 다른 브랜치 혹은 다른 작업환경에서 혼자 테라폼 코드를 테스트한다.
- plan(review): 테스트가 완료되면, plan을 통해 다른 팀원에게 리뷰받는다.
- apply(merge): 리뷰가 완료되면 코드를 병합하고 인프라를 프로비저닝한다.
-
여러 개의 팀
팀 별로 (2)번 과정을 수행한다. 이후
terraform_remote_state를 통해 다른 팀의 state 파일을 참조하여 인프라를 구성한다.
MSA
리소스가 적다면 모놀리식 방식으로 구성해도 좋지만 유지보수, 운영을 생각하면 프로비저닝 단위별로 분류하는 것이 좋다. 정보는 공유할 수 있지만 각 집합은 독립적으로 실행되며 다른 집합에 영향을 받지 않는 격리된 구조가 필요하다.
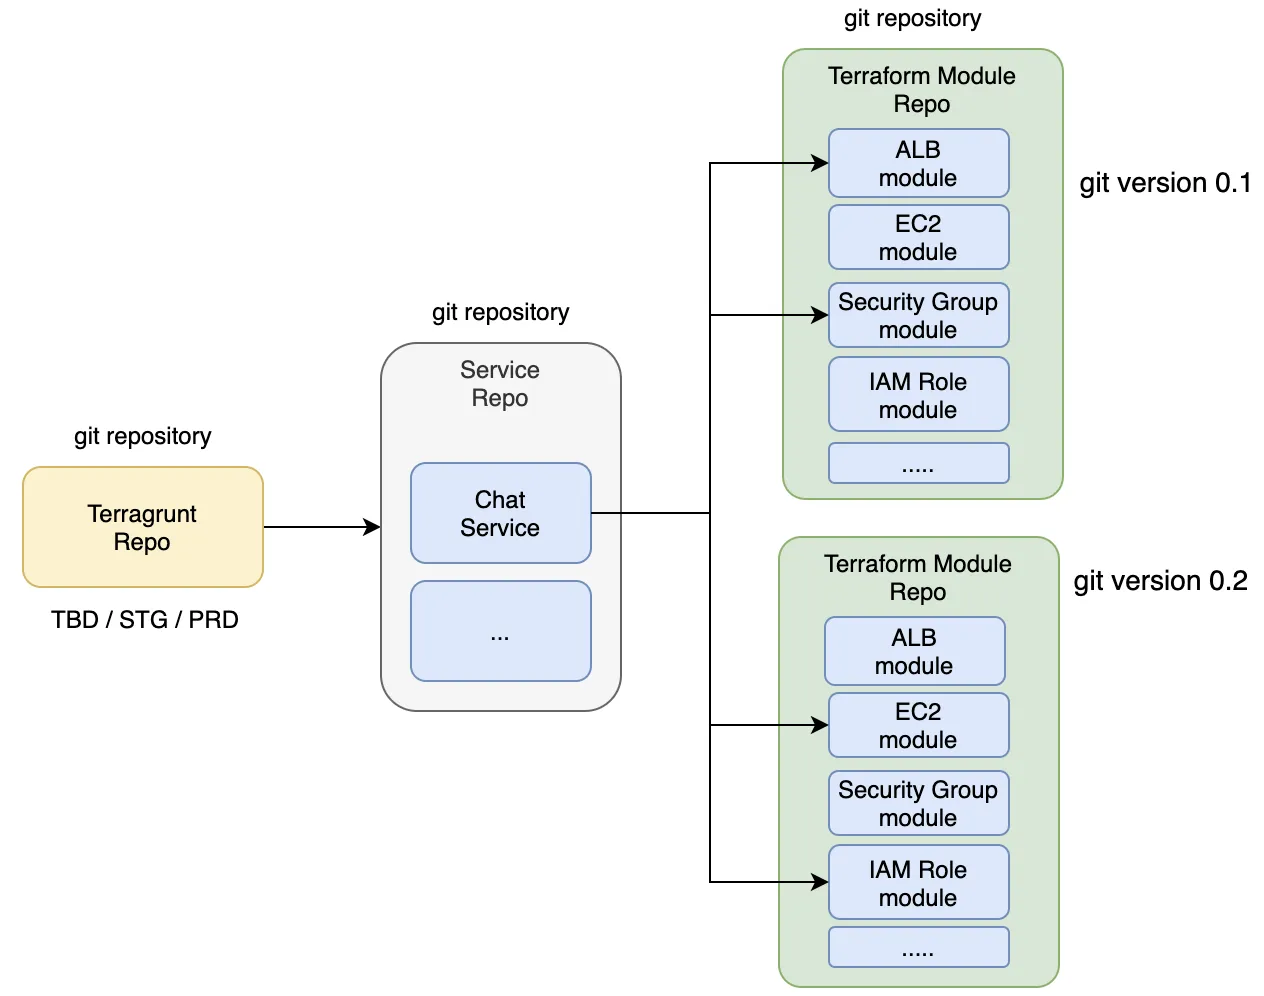
출처: https://medium.com/@dudwls96/terraform-통한-iac-infrastructure-as-code-365일간-운영-후기-500737e6c1e6
CI/CD
제공해주신 자료를 통해 GitHub Actions 실습을 진행했다.
https://github.com/terraform101/terraform-aws-github-action
actions.yaml 파일의 내용을 요약해보면
- TerraScan을 통해 스캔 결과를 얻고, 업로드한다.
- Terraform 워크플로 실행: 코드를 복사하고, fmt → init → validate → plan → apply 를 진행한다.
name: Terraform DEV

on:
  push:
    branches:
      - main
  pull_request:

env:
  MY_PREFIX: DEV
  TF_VERSION: 1.2.5

jobs:
  SCAN:
    name: SCAN
    runs-on: ubuntu-latest
    # env:
    #   working-directory: terraform
    #   TF_WORKSPACE: my-workspace
    steps:
      # - name: Configure AWS credentials
      #   uses: aws-actions/configure-aws-credentials@v1
      #   with:
      #     aws-region: eu-west-1

      - name: Check out code
        uses: actions/checkout@v3

      - name: Run Terrascan
        id: terrascan
        uses: tenable/terrascan-action@main
        with:
          iac_type: 'terraform'
          iac_version: 'v14'
          policy_type: 'aws'
          only_warn: true
          sarif_upload: true

      - name: Upload SARIF file
        uses: github/codeql-action/upload-sarif@v2
        with:
          sarif_file: terrascan.sarif
  Terraform:
    needs: SCAN
    name: Terraform
    runs-on: ubuntu-latest
    steps:
      - name: Check out code
        uses: actions/checkout@v3

      - uses: hashicorp/setup-terraform@v2
        with:
          terraform_version: $TF_VERSION
          cli_config_credentials_token: ${{ secrets.TF_API_TOKEN }}

      - name: Terraform Fmt
        id: fmt
        run: terraform fmt -recursive -check
        continue-on-error: true

      - name: Terraform init
        id: init
        run: terraform init -upgrade
        # working-directory: ${{ env.working-directory }}

      - name: Terraform validate
        id: validate
        run: terraform validate -no-color

      - name: Terraform plan
        id: plan
        run: terraform plan -no-color -var=prefix="$MY_PREFIX"
        # working-directory: ${{ env.working-directory }}
        env:
          AWS_ACCESS_KEY_ID: ${{ secrets.AWS_ACCESS_KEY_ID }}
          AWS_SECRET_ACCESS_KEY: ${{ secrets.AWS_SECRET_ACCESS_KEY }}
          TF_LOG: info

      - name: Plan output
        id: output
        uses: actions/github-script@v3
        if: github.event_name == 'pull_request'
        env:
          PLAN: "terraform\n${{ steps.plan.outputs.stdout }}"
        with:
          github-token: ${{ secrets.GITHUB_TOKEN }}
          script: |
            const output = `#### Terraform Format and Style 🖌\`${{ steps.fmt.outcome }}\`
            #### Terraform Initialization ⚙️\`${{ steps.init.outcome }}\`
            #### Terraform Plan 📖\`${{ steps.plan.outcome }}\`
            <details><summary>Show Plan</summary>
            \`\`\`hcl
            ${process.env.PLAN}
            \`\`\`
            </details>
            **Pusher**: @${{ github.actor }}
            **Action**: ${{ github.event_name }}
            `;
            github.issues.createComment({
              issue_number: context.issue.number,
              owner: context.repo.owner,
              repo: context.repo.repo,
              body: output
            })

      - name: Terraform apply
        id: apply
        if: github.ref == 'refs/heads/main' && github.event_name == 'push'
        run: terraform apply -auto-approve -var=prefix="$MY_PREFIX" -input=false
        env:
          AWS_ACCESS_KEY_ID: ${{ secrets.AWS_ACCESS_KEY_ID }}
          AWS_SECRET_ACCESS_KEY: ${{ secrets.AWS_SECRET_ACCESS_KEY }}
결과
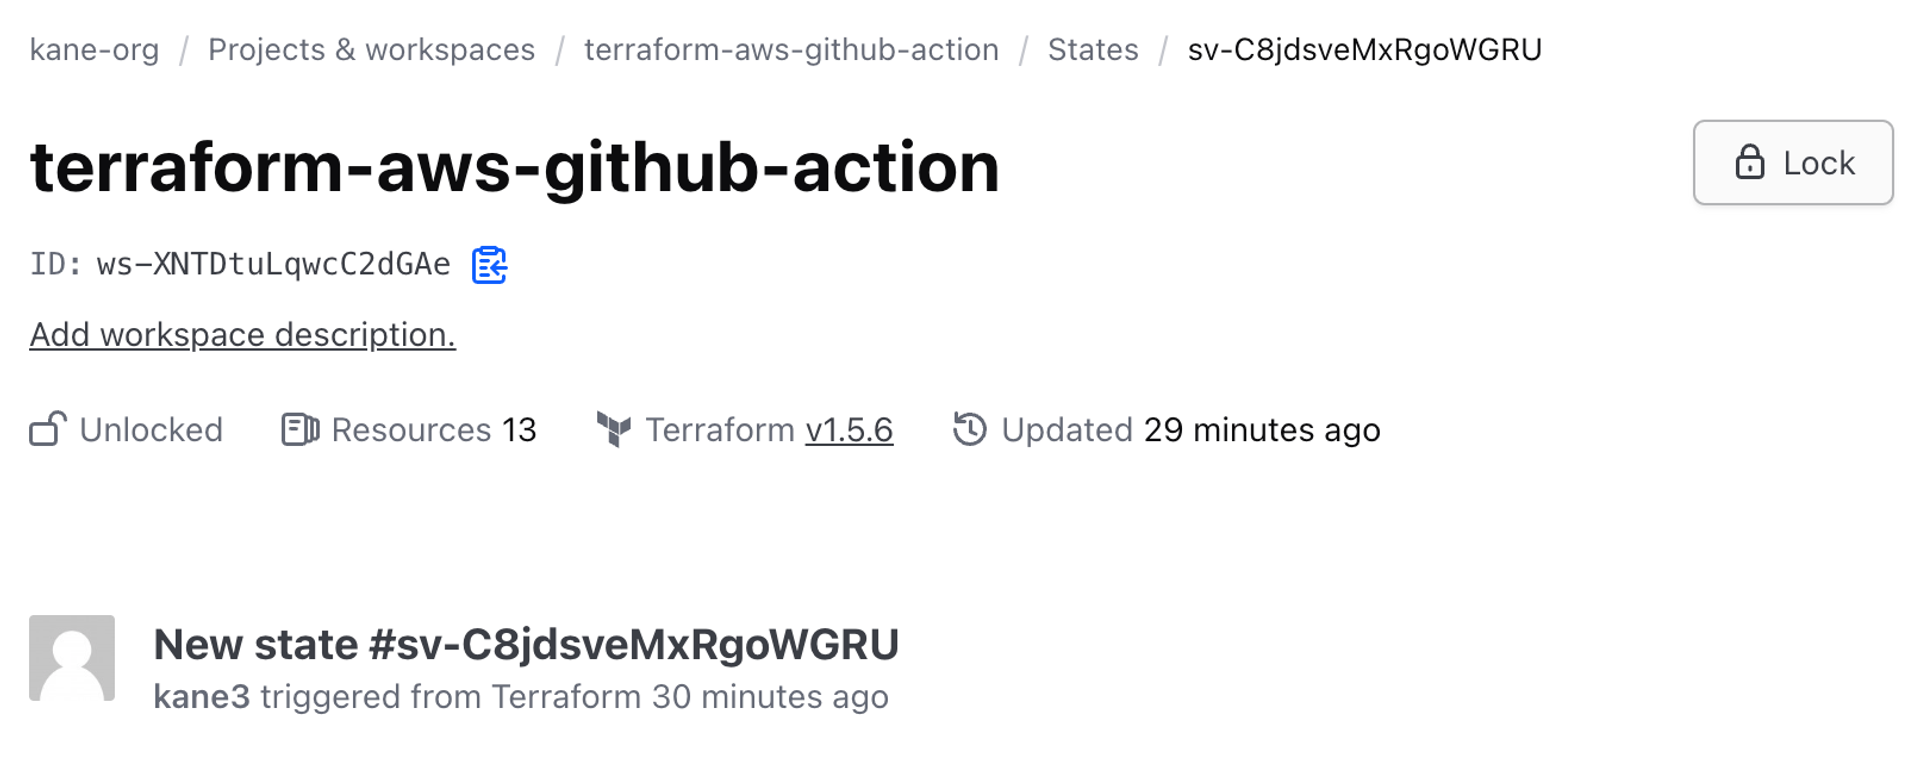
GitHub Actions, AWS, Terraform Cloud에 모두 정상적으로 반영되었다. Terrascan이 수행되고 코드가 실행돼 프로비저닝되었고, 결과를 AWS 콘솔과 테라폼 클라우드에서 모두 확인할 수 있었다.
- GitHub Actions

- AWS 콘솔
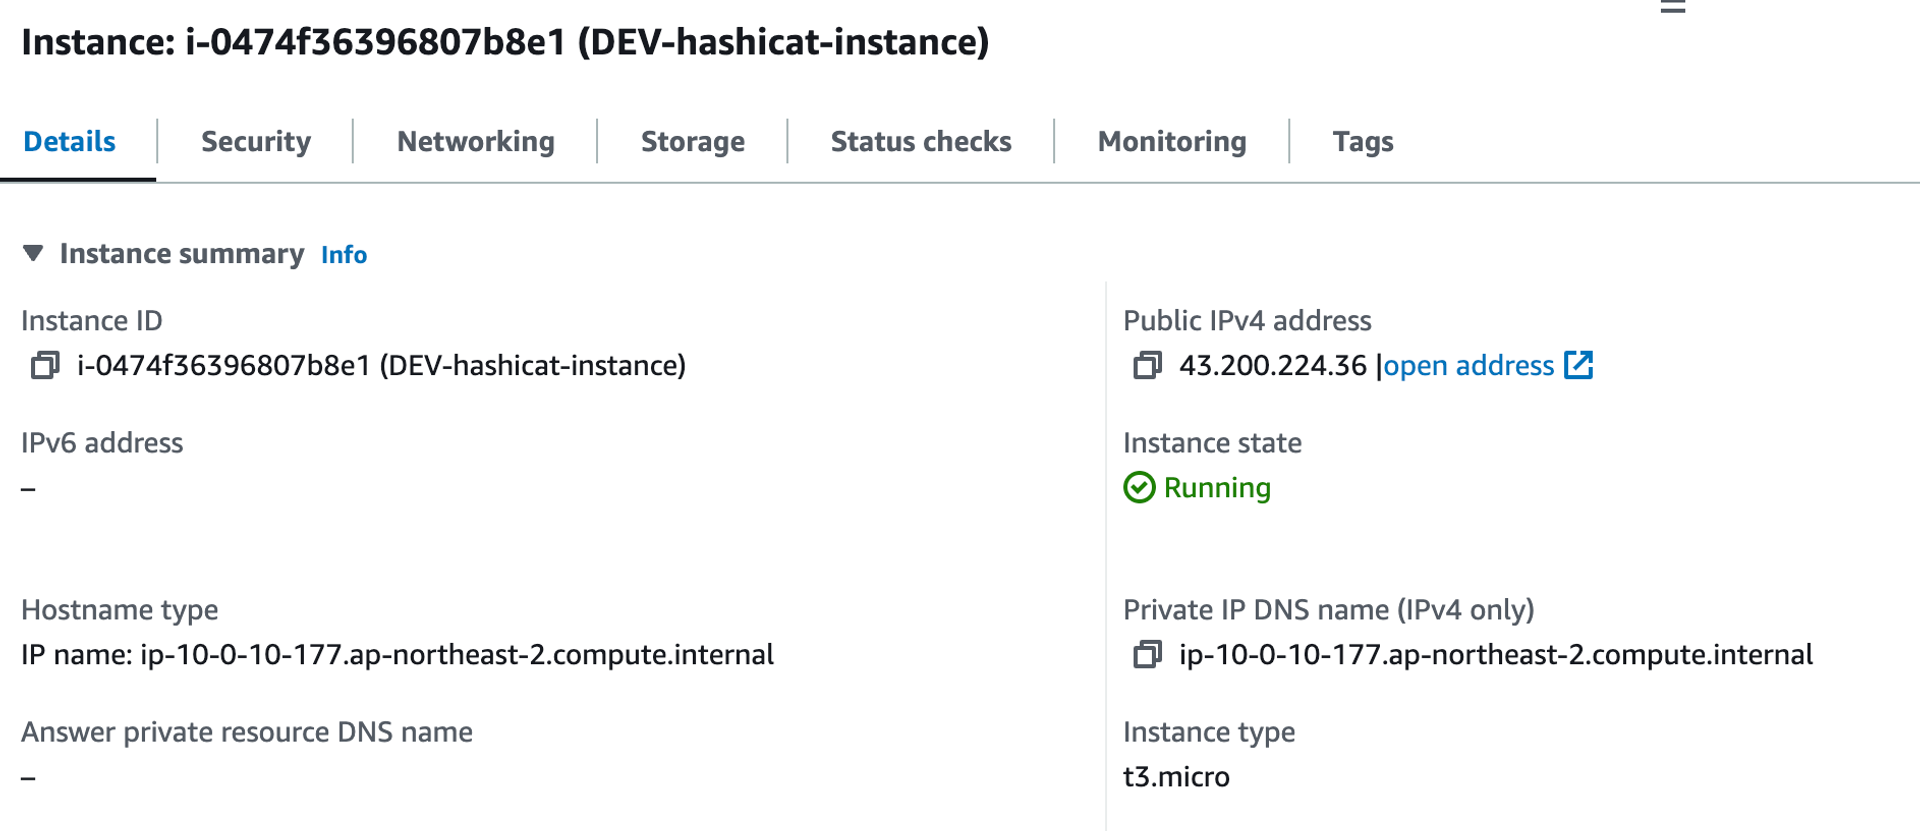
- Terraform Cloud
이제 로컬에서 terraform plan -destroy -out=destroy.tfplan 명령어를 실행하여 백엔드의 state값을 읽어와 인프라를 제거한다.
도전과제: Terrascan 설치 후 직접 검증 테스트 해보기
공식사이트에서 직접 설치한 후 테스트를 해본다. 아래는 macOS, 리눅스 전용 설치명령어다.
$ curl -L "$(curl -s https://api.github.com/repos/tenable/terrascan/releases/latest | grep -o -E "https://.+?_Darwin_x86_64.tar.gz")" > terrascan.tar.gz
$ tar -xf terrascan.tar.gz terrascan && rm terrascan.tar.gz
$ install terrascan /usr/local/bin && rm terrascan
$ terrascan version
version: v1.18.3
docker image도 제공하고 있어, gitlab 등 다른 플랫폼 파이프라인에 적용할 때 편하게 사용할 수 있다.
docker run --rm tenable/terrascan version이제 테라폼 디렉터리로 이동하여 명령어를 실행하면, 다음과 같이 검사를 실행할 수 있다.
$ terrascan init
$ terrascan scan
...
Scan Summary -
File/Folder : ...
IaC Type : terraform
Scanned At : 2023-09-30 02:36:12.552512 +0000 UTC
Policies Validated : 144
Violated Policies : 6
Low : 2
Medium : 1
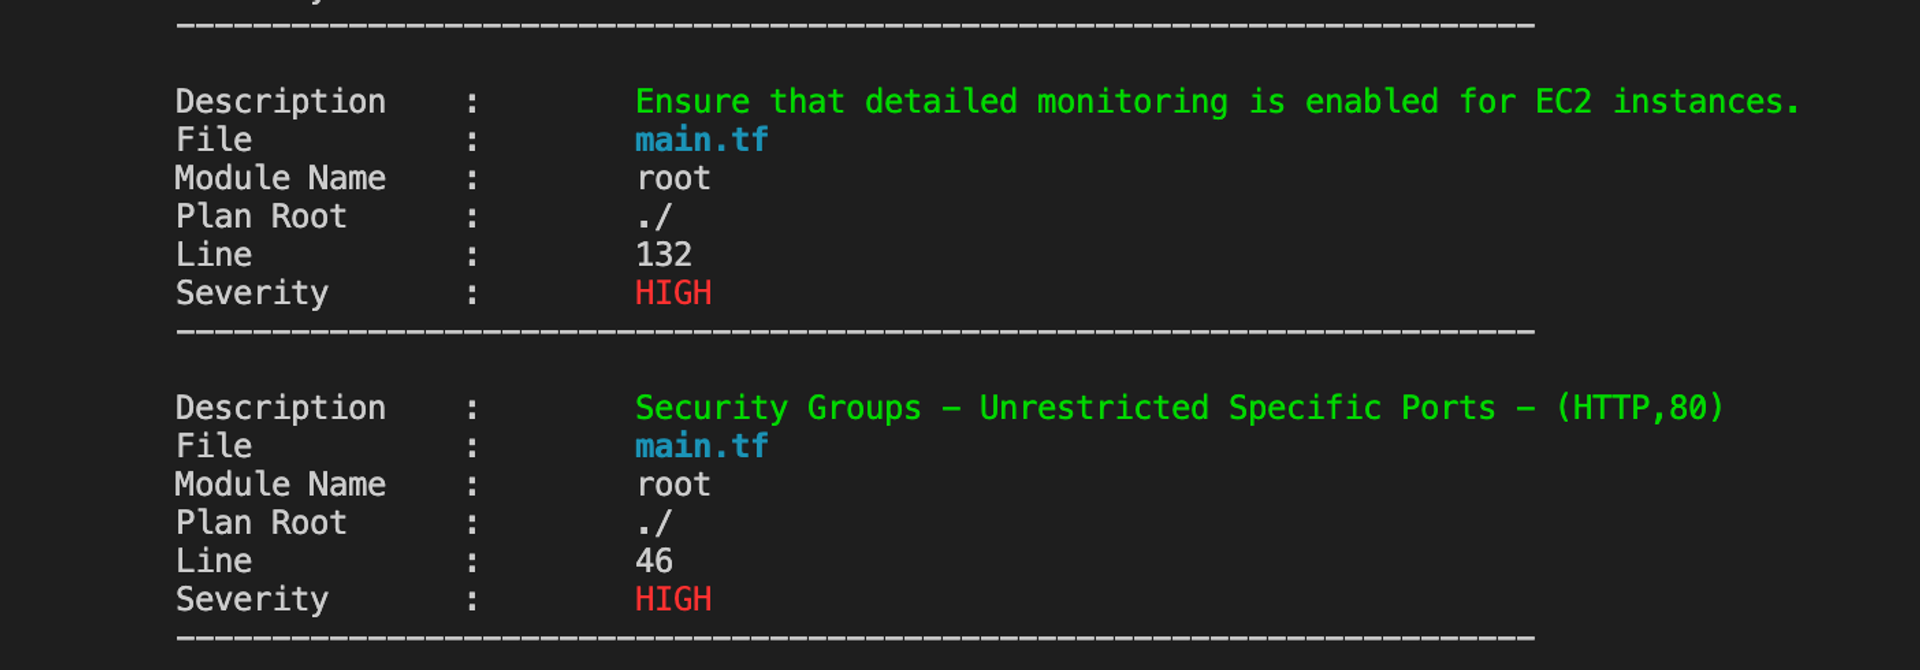
High : 3보안 그룹과 관련하여 High이 3개 있다. 3개의 포트를 열었는데 각각 취약점으로 검사되었다.
scan의 exit 코드는 다음과 같이 총 5개로 구분된다. GitHub 참고. Terraform Cloud Run task, CI/CD를 구성할 때 참고하여 코드를 작성해야 한다.
| Scenario | Exit Code |
|---|---|
| scan summary has errors and violations | 5 |
| scan summary has errors but no violations | 4 |
| scan summary has violations but no errors | 3 |
| scan summary has no violations or errors | 0 |
| scan command errors out due to invalid inputs | 1 |