
🤔생각해보기
1. 로그인 버튼을 누르면 입력 값에 대해 체크를 해야한다.
📁1_LoginPage
L logininput
L index.js
import { useState} from 'react'
import styled from 'styled-components'
import AuthService from '../../service/auth.service'

	const LoginInput = () => {
      const [email, setEmail] = useState('');
      const [password, setPassword] = useState('');

      const useHandleLogin =  () => {
         try {
            AuthService.Login(email, password)
          .then((response) => {
              window.location.reload();
            },
            (error) => {
              console.log('error', error.response);
              alert(" 아이디(로그인 전용 아이디) 또는 비밀번호를 잘못 입력했습니다.입력하신 내용을 다시 확인해주세요.");
            }
          );
        } catch (error) {
          console.log(error)
          };
      };

    return(
      <>
        <LoginForm>
          <div>
            <input
              type="email"
              placeholder="이메일을 입력하세요"
              autoComplete="on"
              value={email}
              onChange={(e) => {
                setEmail(e.target.value)}}
              />
          </div>
          <div>
            <input
              type="password"
              placeholder="비밀번호를 입력하세요"
              autoComplete="on"
              value={password}
              onChange={(e) => {
              setPassword(e.target.value)}}
              />
          </div>
        </LoginForm>
            <InerButton
            onClick={useHandleLogin}
              >로그인
            </InerButton>
      </>
    );
};

export default LoginInput;

const LoginForm = styled.div`
  max-width: 56rem;
  max-height: 18.75rem;
  width: 600px;
  height: 220px;
  text-align: center;
  right: 100px;
  position: relative;
  margin-top: 100px;

   & input {
    box-sizing: border-box;
    width: 410px;
    margin-bottom: 30px ;
    border: none;
    border-bottom: 4px solid #afafaf;
    font-size: 0.875rem;
    top:200px;
    height: 65px;
    background-color: white;
    border-radius: 20px;
  }

    & input::placeholder {
    font-size: 25px;
    color: #ccc;
  }

  & input:focus {
    outline: none;
    border: 1px solid #7784cc;
    box-shadow: 0 0 0 0.1rem rgb(59 65 99 / 25%);
  }
`


const InerButton = styled.button`
  width: 410px;
  height: 70px;
  border-radius: 15px;
  //background-color: #545454;
  background: rgb(247,150,192);
  background: radial-gradient(circle, rgba(247,150,192,1) 0%, rgba(118,174,241,1) 100%);
  line-height: 42px;
  padding: 0;
  border: none;
  color: white;
  text-align: center;
  font-size: 24px;
  cursor: pointer;
  margin: 0 auto;
`
e.target.value 란?
e.target은 특정 이벤트가 발생하는 태그
e.target.value는 input에 입력되는 값
-> input에 입력 되는 값을 setEmail 과 setPassword 를 이용해 상태값을 바꿔주었고,
로그인 버튼을 눌었을때, onClick 이벤트가 실행된다.
-> onClick={useHandleLogin}
const useHandleLogin = () => {
try {
AuthService.Login(email, password)
AuthService.Login 으로 email, password 값을 체크한다.
이부분의 함수를 따로 분리 해놓았다.
📁service
L auth.service.js
const Login = (id, password) => {
  return axios.post(API_URL + "/user/signin", {
   id,
   password,
  })
  .then((response) => {
    if (response.data.message === "successful") {
      localStorage.setItem( 'token', response.data.token);
      alert("로그인 되었습니다.")
    }
    return response.data;
  });
};

const AuthService = {
  Login,
};

export default AuthService;
-> id, password 값을 axios.post 로 지정된 api 주소에 보낸다. 보낸후 id, password 값이 일치하면 data의 message로 === "successful" 이라 응답이 온다.
응답이 오면 window.location.reload(); 되면서
토큰 값을 localStorage 에다가 저장하고 alert 창으로 "로그인이 되었습니다가 뜬다."
-> 일치 하지 않을 경우 console.log에 (error) 메세지를 받아오고
alert 창으로 "아이디 또는 비밀번호가" 잘못되었다고 알려준다.
로그인이 된후 , 로그인이 되었때 로그인을 한 사람에게만
보여지는 페이지로 넘어가게 된다.
이 기능을 구현하기 위해 < PrivateRoute> 를 이용하였으며, app.js 에다가 지정해 놓았다. 이부분은 다음 글에 설명 하도록 하겠다.
✅ 결과
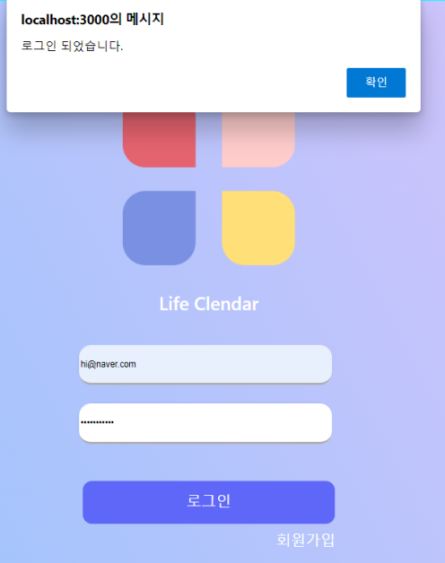
-> 로그인이 되었다는 alert 창이 뜨는것을 볼수 있다.