로그인을 할 때 그 로그인한 고유 유저를 위한 토큰을 생성해야 하는데 그 토큰을 생성할 때 JWT라는 모듈을 사용
JWT (JSON Web Token)
- 당사자간에 정보를 JSON 개체로 안전하게 전송하기 위한 컴팩트하고 독립적인 방식을 정의하는 개방형 표준(RFC 7519)
- 이 정보는 디지털 서명이 되어 있으므로 확인하고 신뢰할 수 있음
- 정보를 안전하게 전할 때 혹은 유저의 권한 같은 것을 체크를 하기 위해서 사용하는데 유용한 모듈
JWT의 구조
Header
- 토큰에 대한 메타 데이터를 포함하고 있음
(타입, 해싱 알고리즘 SHA256, RSA ....)
Payload
- 유저 정보(issuer), 만료 기간(expiration time), 주제(subject) 등등..
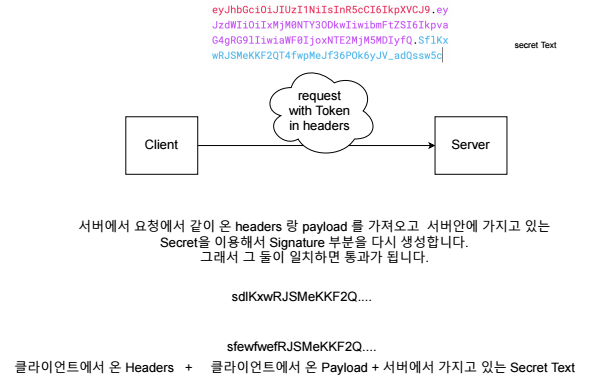
Verify Signature
- JWT의 마지막 세그먼트는 토큰이 보낸 사람에 의해 서명되었으며 어떤 식으로든 변경되지 않았는지 확인하는 데 사용되는 서명
- 서명은 헤더 및 페이로드 세그먼트, 서명 알고리즘, 비밀 또는 공개 키를 사용하여 생성됨
JWT 사용 흐름
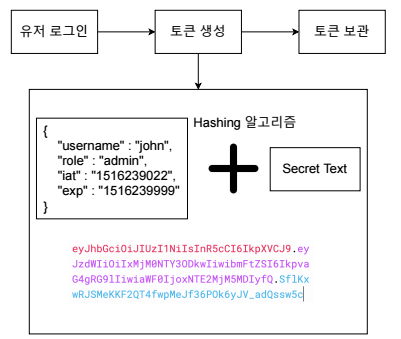
- 토큰을 생성할 떄
payload+Verify Signature의secret key를 해시 알고리즘을 통해 생성한다.
- admin만 볼 수 있는 글을 admin 유저가 보고자 했을 경우
- 요청을 보낼 때 보관하고 있던 token을 header에 넣어 같이 보냄
- 서버에서는 JWT를 이용해서 token을 다시 생성한 후 두 개를 비교
- 통과가 되면 admin 유저가 원하는 글을 볼 수 있게 됨
JWT를 이용해서 토큰 생성하기
jwt모듈과passport모듈을 함께 사용해서 토큰 생성passport는jwt를 이용하여 인증 처리하는 과정을 쉽게 만들어줌
모듈 생성 @nestjs/jwt @nestjs/passport passport passport-jwt
npm install @nestjs/jwt @nestjs/passport passport passport-jwt --save애플리케이션에 JWT 모듈 등록하기
auth.module.ts
JwtModule.register({
      secret: 'Secret1234',
      signOptions: {
        expiresIn: 60 * 60,
      },
}),
애플리케이션에 Passport 모듈 등록하기
auth.module.ts
PassportModule.register({ defaultStrategy: 'jwt' }),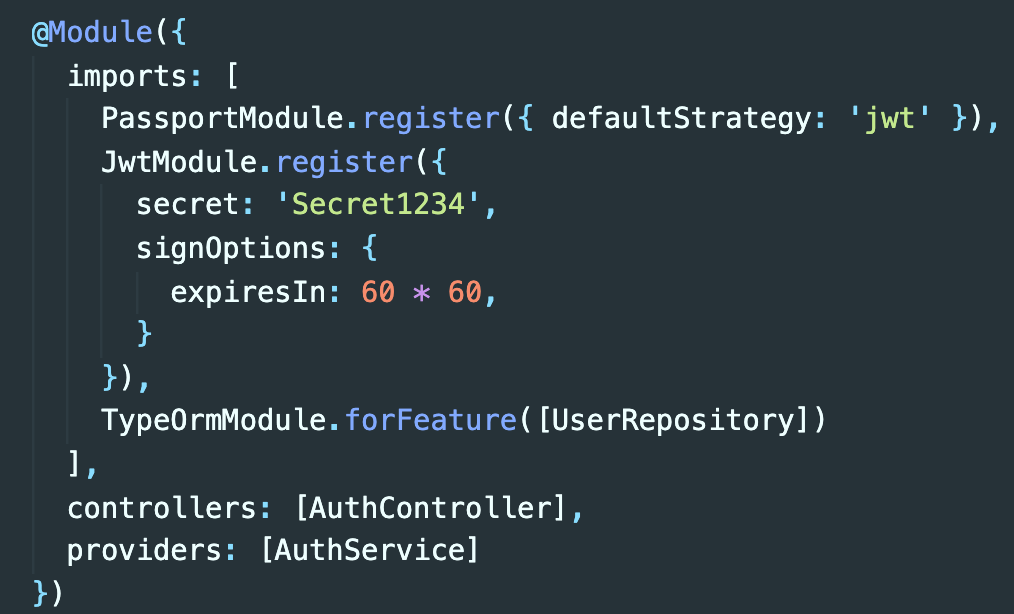
로그인 성공 시 JWT를 이용해서 토큰 생성해주기
- auth 모듈에 jwt를 등록해주었기 때문에 service에서 jwt를 가져올 수 있음
auth.service.ts
private jwtService: JwtService,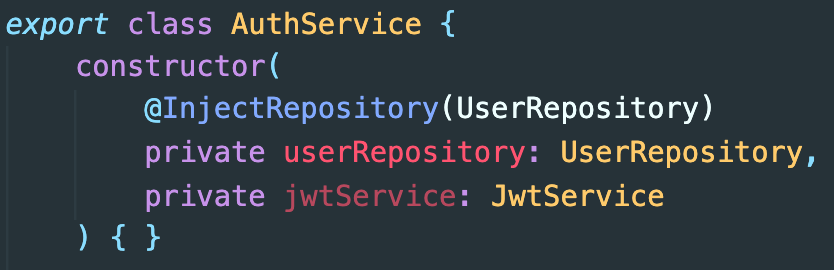
-
Token을 만드려면
Secret과Payload가 필요 -
Payload에는 자신이 전달하고자 하는 정보를 넣어줌
ex)Role,유저 이름,이메일....단, 민감한 정보는 넣으면 안됨 -
Payload를 이용해서 JWT에서 토큰을 만들 때 사용하는
Sign메소드를 이용해서 토큰을 생성
async signIn(
    authCredentialsDto: AuthCredentialsDto,
  ): Promise<{ accessToken: string }> // 추가

// 유저 토큰 생성 (Secret + Payload)
const payload = { username };
const accessToken = await this.jwtService.sign(payload);

return { accessToken };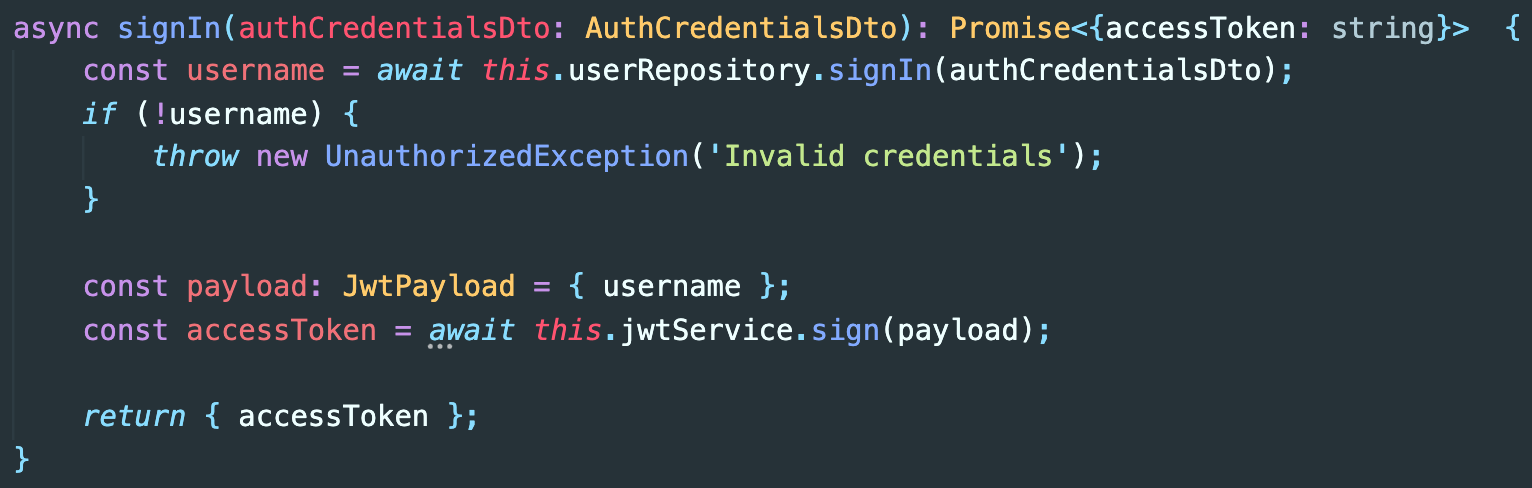
auth.controller.ts
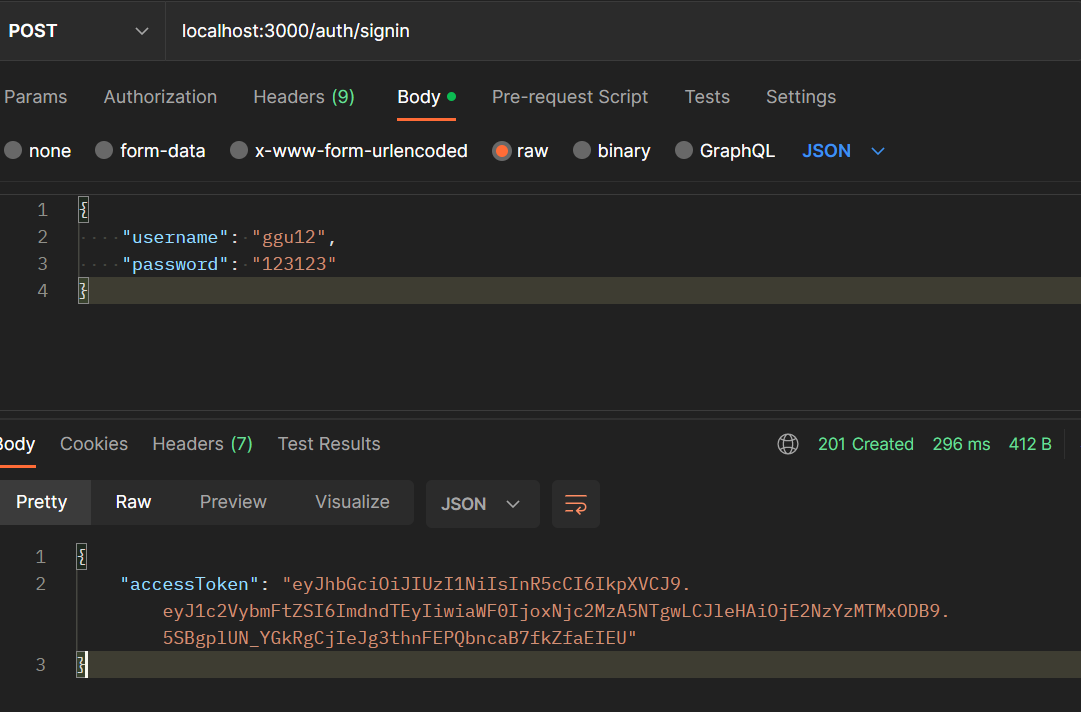
@Post('/signin')
  signIn(
    @Body(ValidationPipe) authCredentialsDto: AuthCredentialsDto,
  ): Promise<{ accessToken: string }> { // 추가
    return this.authService.signIn(authCredentialsDto);
  }
Passport, Jwt 이용해서 토큰 인증 후 유저 정보 가져오기
1-4번=> 지난 시간 /5-6번=> 오늘 해야할 부분
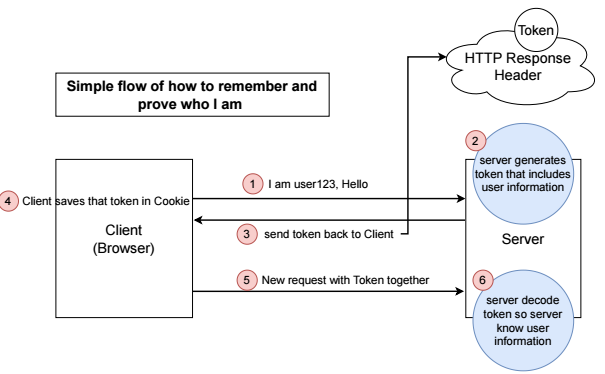
1) 클라이언트가 요청을 보냄
auth.controller.ts
@Post('/signin')
  signIn(
    @Body(ValidationPipe) authCredentialsDto: AuthCredentialsDto,
  ): Promise<{ accessToken: string }> {
    return this.authService.signIn(authCredentialsDto);
  }
2) 토큰 생성
auth.service.ts
const accessToken = await this.jwtService.sign(payload);3) 토큰을 클라이언트에게 다시 보냄
auth.service.ts
return { accessToken };4) 클라이언트가 쿠키를 저장
5, 6) 토큰을 가지고 요청을 보냄
i)
서버에서 그 토큰이 유효(valid)한 것인지 체크
ii)
만약 유효한 것이면payload안에 들어있는username을 이용해서 데이터베이스에 있는 유저인지 체크
iii)
있는 유저라면 유저 객체를 데이터베이스에서 가져오고, 없는 유저라면 에러를 보냄
구현 순서
1) 모듈 생성 @types/passport-jwt
npm i @types/passport-jwt --save2) jwt.strategy.ts 파일 생성
import { Injectable } from '@nestjs/common';
import { UnauthorizedException } from '@nestjs/common/exceptions';
import { PassportStrategy } from '@nestjs/passport';
import { InjectRepository } from '@nestjs/typeorm';
import { ExtractJwt, Strategy } from 'passport-jwt';
import { User } from './user.entity';
import { UserRepository } from './user.repository';

@Injectable() // 어디에서나 주입해서 사용 가능하게 하기 위함
export class JwtStrategy extends PassportStrategy(Strategy) {
  constructor(
    @InjectRepository(UserRepository)
    private userRepository: UserRepository,
  ) {
    super({
      // 부모 컨포넌츠를 사용하기 위함
      secretOrKey: 'Secret1234', // 토큰이 유효한지 체크, authmodule에 있는 값과 같음
      jwtFromRequest: ExtractJwt.fromAuthHeaderAsBearerToken(),
      // 토큰을 어디서 가져와서 검증을 하는지
      // bearer 토큰 타입으로 가져옴
    });
  }
  // 인증 성공 후
  async validate(payload) {
    // 토큰에 payload가 들어옴
    const { username } = payload;
    const user: User = await this.userRepository.findOneBy({ username });

    if (!user) {
      throw new UnauthorizedException();
    }

    return user;
  }
}@Injectable(): 어디에서나 주입해서 사용 가능하게 하기 위함super: 부모 컨포넌츠를 사용하기 위함secretOrKey: 'Secret1234'
: 토큰이 유효한지 체크, authmodule에 있는 값과 같음jwtFromRequest: ExtractJwt.fromAuthHeaderAsBearerToken()
: 토큰을 어디서 가져와서 검증을 하는지
: bearer 토큰 타입으로 가져옴
3) 모듈 추가 auth.module.ts
providers: [AuthService, JwtStrategy],
exports: [JwtStrategy, PassportModule],
providers: [AuthService, JwtStrategy]
: JwtStrategy를 이 auth 모듈에서 사용할 수 있게 등록exports: [JwtStrategy, PassportModule]
: 다른 모듈에서도 사용할 수 있도록 함
4) req에 user 정보가 들어가는지 테스트
auth.controller.ts
@Post('/test')
  test(@Req() req) {
    console.log('req', req);
  }
결과 ===> 실패
5) UseGuards 미들웨어 사용
UseGuards안에@nestjs/passport에서 가져온AuthGuard()를 이용하면 요청안에 유저 정보를 넣어줄 수 있다.
@Post('/test')
  @UseGuards(AuthGuard())
  test(@Req() req) {
    console.log('req', req);
  }
미들웨어
Nest JS에는 여러가지 미들웨어가 있다.
(Pipes, Filters, Guards, Interceptors 등)
1) Pipes
- 파이프는 요청 유효성 검사 및 페이로드 변환을 위해 만들어짐
- 데이터를 예상한 대로 직렬화함
2) Filters
- 오류 처리 미들웨어
- 특정 오류 처리기를 사용할 경로와 각 경로 주변의 복잡성을 관리하는 방법을 알 수 있음
3) Guards
- 인증 미들웨어
- 지정된 경로로 통과할 수 있는 사람과 허용되지 않는 사람을 서버에 알려줌
4) Interceptors (인터셉터)
- 응답 매핑 및 캐시 관리와 함께 요청 로깅과 같은 전후 미들웨어
- 각 요청 전후에 이를 실행하는 기능은 매우 강력하고 유용함
각각의 미들웨어가 불러지는(called) 순서
middleware -> guard -> interceptor (before) -> pipe
-> controller -> service -> controller -> interceptor (after)
-> filter (if applicable) -> client
커스텀 데코레이터 생성하기
- 커스텀 데코레이터를 이용하면
req.user가 아닌 바로user라는 파라미터로 가져올 수 있다.
get-user.decorator.ts
import { createParamDecorator, ExecutionContext } from '@nestjs/common';
import { User } from './user.entity';

export const GetUser = createParamDecorator(
  (data, ctx: ExecutionContext): User => {
    const req = ctx.switchToHttp().getRequest();
    return req.user;
  },
);
auth.controller.ts
@Post('/test')
  @UseGuards(AuthGuard())
  test(@GetUser() user: User) {
    console.log('user', user);
  }
인증된 유저만 게시물 보고 쓸 수 있게 만들기
유저에게 게시물 접근 권한 주기
- 인증에 관한 모듈을
board모듈에서 쓸 수 있어야 하기에boardmodule에서 인증 모듈 imports 해오기 - 이렇게 되면
authmodule에서 export 하는 어떠한 것이든boardmodule에서 사용 가능
board.module.ts
@Module({
  imports: [
  TypeOrmExModule.forCustomRepository([BoardRepository]),
  AuthModule // 추가
],-
UseGuards(AuthGuard())를 이용해서 이 사람이 요청을 줄 때 올바른 토큰을 가지고 요청을 주는지 본 후에 게시물에 접근 할 권한을 줌 -
AuthGuard는 각각의 라우트 별로 줄 수도 있고 한번에 하나의 컨트롤러 안에 들어있는 모든 라우트에 줄 수도 있다. -
현재는
board컨트롤러 안에 있는 모든 라우트에AuthGuard를 적용
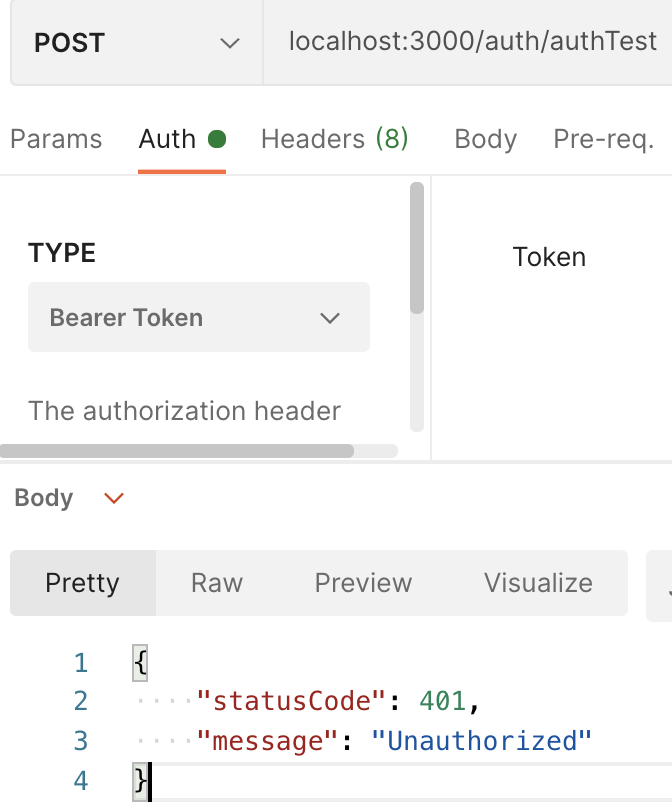
board.controller.ts
@Controller('boards')
@UseGuards(AuthGuard()) // 추가
올바른 토큰을 넣어서 요청을 주지 않았을 경우