react query의 다른 기능 적용하기 - 프로필 유저 데이터(닉네임/프로필이미지)
react query의 무한스크롤 이후로 다른 옵션, 다른 기능들도 적용해보기로 하였다.
가장 기초적인 부분인 페칭을 하기로 하였는데,
  const [postNickname, setPostNickname] = useState<string | null>(null)
  const [postProfileImage, setPostProfileImage] = useState<string | null>(null)

  // 사용자 프로필 정보를 가져오는 함수 예시
  const fetchPostUserData = async (userId: string) => {
    try {
      const response = await fetch(`/api/auth/user-data?userId=${userId}`, {
        method: "GET",
      })

      const data = await response.json()

      if (response.ok && data) {
        setPostNickname(data.nickname)
        setPostProfileImage(data.profile_image)
      } else {
        throw new Error(data.error?.message || "Failed to fetch user data")
      }
    } catch (error: unknown) {
      handleError(error) // 헬퍼 함수 호출
    }
  }
최초 직접 supabase 메서드 활용해서 데이터 불러오기
이후 api 짜서 api요청해서 서버 데이터 불러오기
이번엔 이 useState로 불러온 데이터 넣어서 상태 관리하던걸
react query를 활용하여 useState없이 데이터를 관리할 예정이다
두 차이를 비교하자면
데이터 페칭
useState
- 상태 수동 관리, 데이터 가져오고 업데이트하는 로직 직접 구현
- api 호출 후 setState사용하여 상태 업데이트
- 상태 변경 시 컴포넌트 재렌더링
useQuery
- 데이터 자동으로 패칭하고 캐싱, 상태 관리 위한 복잡한 로직 필요 없음
- 서버에서 데이터를 가져오는 동안 로딩 상태와 에러 상태 자동으로 관리
- 데이터가 변경될 때 자동으로 재요청하거나 갱신할 수 있는 기능 제공
상태 관리의 간편함
useState
- API 호출 결과 useState로 관리할 경우, 에러 핸들링, 로딩 상태, 캐싱 등을 수동으로 처리해야 해서 코드가 복잡해짐
useQuery - 상태 관리가 내장, 로딩 및 에러 상태 손쉽게 처리
- 데이터가 이미 캐싱되어 있을 경우 네트워크 요청 없이 빠르게 응답
재사용성과 유지보수
useState
- 상태 관리 로직이 각 컴포넌트에 중복될 수 있으며, 상태 업데이트 하는 방식이 복잡해질 수 있음
useQuery - 데이터 패칭 로직 쉽게 재사용, API 호출과 관련된 모든 로직을 훅으로 분리하여 코드 가독성 높아짐
- 전역적 데이터 관리할 수 있어, 여러 컴포넌트에서 동일한 데이터 공유하기 쉬워짐
성능 최적화
useState
- 상태가 업데이트될 때마다 컴포넌트가 다시 렌더링되며, 모든 상태 업데이트가 UI를 업데이트해야 하므로 비효율적일 수 있음
useQuery - 상태 변경이 발생해도, 조건에 따라 재요청 최적화하고, 캐시된 데이터 사용하여 불필요한 네트워크 요청 줄임
결론
useState는 간단한 상태 관리 위한 훅, 수동 상태 관리
useQuery는 데이터 패칭 간소화, 상태 관리 자동화, 더 나은 성능과 유지보수성 제공
그래서 상단에 있는 코드를
  const fetchPostUserData = async (userId: string) => {
    const response = await fetch(`/api/auth/user-data?userId=${userId}`, {
      method: "GET",
    })

    const data = await response.json()

    if (!response.ok) {
      throw new Error(data.error?.message || "Failed to fetch user data")
    }
    return data
  }

  // useQuery를 사용하여 사용자 데이터를 가져옵니다.
  const {
    data: userData,
    isSuccess: isUserDataSuccess,
    isError: isUserDataError,
    isLoading: isUserDataLoading,
  } = useQuery({
    queryKey: ["postUserData", id],
    queryFn: () => fetchPostUserData(id), // fetchPostUserData를 호출할 때 id를 전달합니다.
    enabled: !!id, // id가 있을 때만 쿼리를 활성화합니다.
    staleTime: 10 * 60 * 1000, // 5분 동안 신선한 데이터로 유지
    refetchInterval: false, // 자동 갱신 비활성화
    gcTime: 10 * 60 * 1000, // cacheTime임 10분동엔 메모리 유지
  })

  if (isUserDataLoading) {
    return <div>Loading...</div>
  }

  if (isUserDataError) {
    return <div>Error loading user data.</div>
  }
이렇게 성공했을때 실패했을때 그리고 패칭된 데이터 불러와서 쉽게 데이터를 관리할 수 있게 되었다.
여러 옵션이 있지만 staleTime - 어차피 유저 프로필페이지에 머무는 시간동안 유저의 닉네임과 프로필이미지가 바뀔일은 없으므로 10분으로 설정해놨다.
gcTime은 메모리 성능 고려하고 캐시 데이터를 메모리에 10분동안 유지하면 그 안에 새로 요청해도 캐시된 데이터 요청받을 수 있게 처리
refetchInterval은 자동갱신이 필요없는 데이터들이여서 굳이 필요없겠다 싶었다.
terser-webpack-plugin 도입 js코드 축소 확인법
기존 이력서엔 빌드시간 9초->4초로 개선만 적어놨지만 실제로 js코드축소가 얼마나 되었는지도 기재하면 좋다고 해서 그 방법을 찾아보았다
webpack bundle analyzer를 사용해보라는데
pnpm add -D webpack-bundle-analyzer일단 설치하고~
import TerserPlugin from "terser-webpack-plugin"
import { BundleAnalyzerPlugin } from "webpack-bundle-analyzer"

const isProduction = process.env.NODE_ENV === "production"

/** @type {import('next').NextConfig} */
const nextConfig = {
  images: {
    domains: ["jouopgwghtzpozglsrxw.supabase.co"], // 이미지 도메인 설정
  },
  webpack(config) {
    if (isProduction) {
      config.optimization = {
        ...config.optimization,
        minimize: true,
        minimizer: [
          new TerserPlugin({
            parallel: true,
            terserOptions: {
              format: {
                comments: false, // 주석 제거
              },
              compress: {
                drop_console: true, // console.* 구문 제거
                pure_funcs: ["console.log"], // 특정 함수 호출 제거
                unused: true, // 사용하지 않는 코드 제거
                dead_code: true, // 도달할 수 없는 코드 제거
                reduce_vars: true, // 변수의 크기를 줄여서 최적화
              },
              mangle: true,
            },
            extractComments: false, // 주석을 별도의 파일로 추출하지 않음
          }),
        ],
      }
    }

    // Bundle Analyzer 추가
    if (process.env.ANALYZE) {
      config.plugins.push(
        new BundleAnalyzerPlugin({
          analyzerMode: "server",
          openAnalyzer: true,
        }),
      )
    }
    return config
  },
}

export default nextConfig
terser 옵션을 주석/콘솔제거 뿐만 아니라 추가적인 세팅을 해준 후,
bundle analyzer를 추가해서
실행을 한 후에
ANALYZE=true pnpm run build 명령어로 실행하면
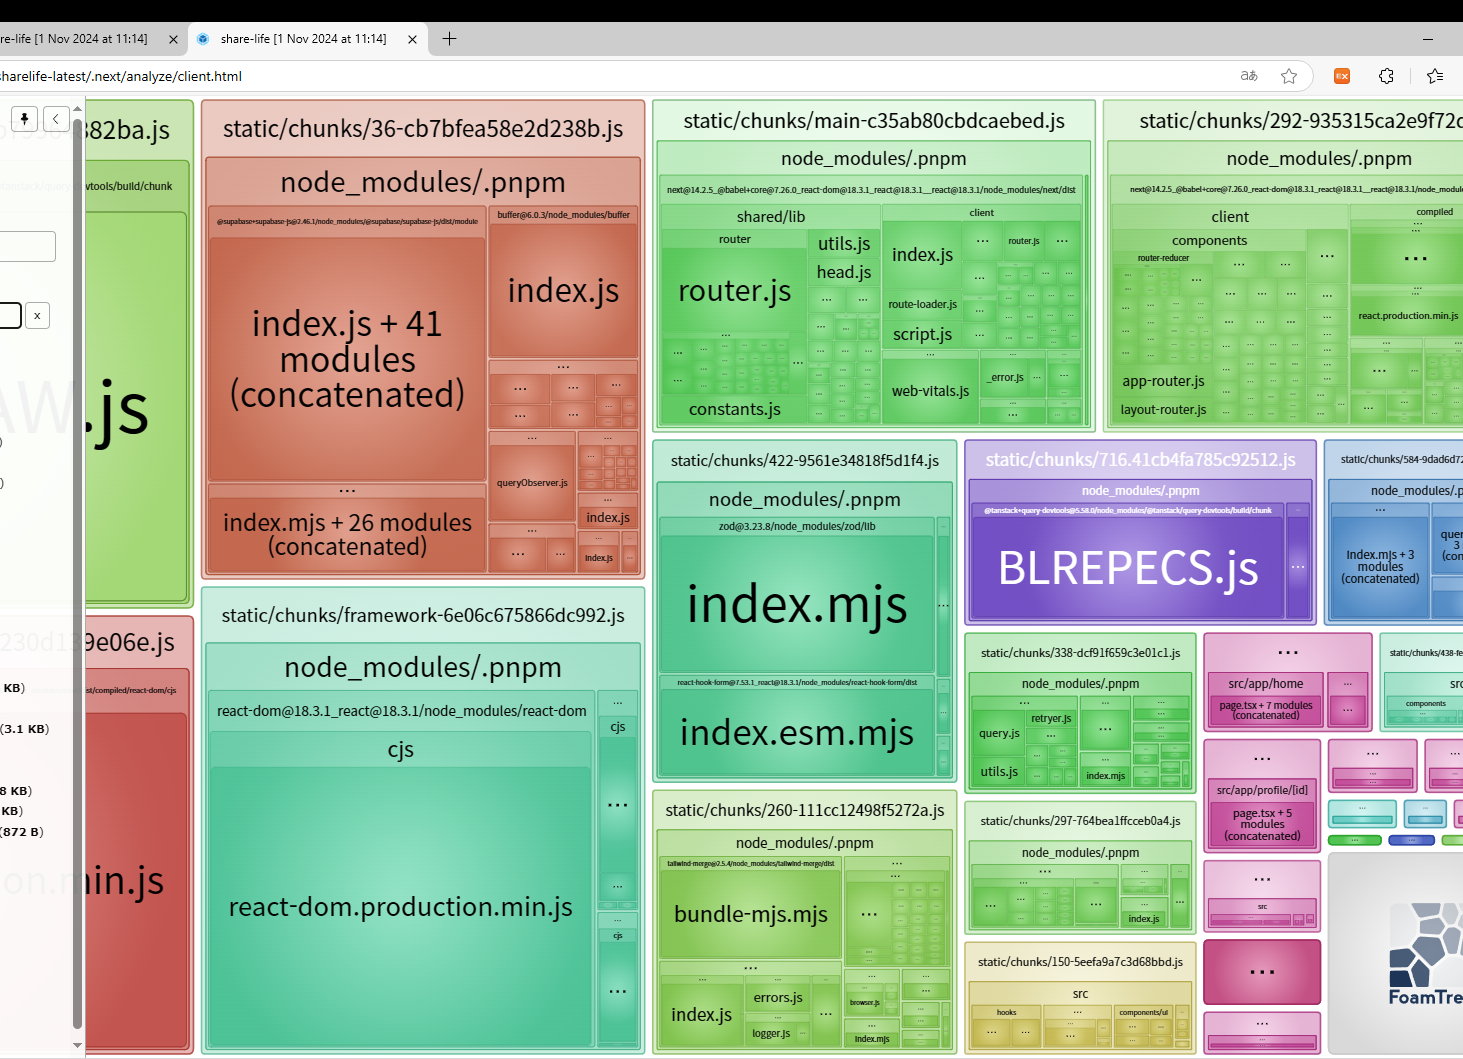
이런식으로 뜨게 된다
그래서 gzipped의 전체용량을 terser를 활성화했을 때 안했을 때를 비교하면 되는데,
총 595.61KB에서 592.17KB로 감소(0.58% 줄어듦)
이런 결론이 나왔다 어쨋든 3.44KB를 줄였다는 사실!!
이미지 최적화(sharp) -> webP변환
기존엔 next/image 컴포넌트 태그만 활용해서 이미지 최적화를 진행했는데,
실질적으로 파일 크기를 줄여줄 png->webp변환 시켜주는 sharp라이브러리를 적용하기로 하였다.
이미지 포맷 변환이 쉽고 간단한 api를 제공받아 처리 작업이 쉽다고 들었다.
import { supabase } from "@/lib/supabase"
import { NextResponse } from "next/server"
import sharp from "sharp"

export async function POST(request: Request) {
  // FormData로 요청을 받기
  const formData = await request.formData()

  const fileName = formData.get("fileName") as string
  const file = formData.get("file") as File

  // Buffer로 변환
  const buffer = await file.arrayBuffer()

  // WebP로 변환
  const webpBuffer = await sharp(Buffer.from(buffer))
    .toFormat("webp")
    .toBuffer()

  const { error: uploadError } = await supabase.storage
    .from("images")
    .upload(fileName, buffer)

  if (uploadError) {
    return NextResponse.json({ error: uploadError.message }, { status: 400 })
  }

  // WebP 이미지 업로드
  const webpFileName = fileName.replace(/\.(jpg|jpeg|png)$/, ".webp") // 파일 확장자 변경
  const { error: webpUploadError } = await supabase.storage
    .from("images")
    .upload(webpFileName, webpBuffer)

  if (webpUploadError) {
    return NextResponse.json(
      { error: webpUploadError.message },
      { status: 400 },
    )
  }

  // 이미지 URL 생성
  const imageUrl = `${process.env.NEXT_PUBLIC_SUPABASE_URL}/storage/v1/object/public/images/${fileName}`
  const webpImageUrl = `${process.env.NEXT_PUBLIC_SUPABASE_URL}/storage/v1/object/public/images/${webpFileName}`

  // 원본 이미지와 WebP 이미지의 크기 비교
  const originalSize = buffer.byteLength
  const webpSize = webpBuffer.byteLength

  console.log(`Original Image Size: ${originalSize} bytes`)
  console.log(`WebP Image Size: ${webpSize} bytes`)

  return NextResponse.json({ imageUrl, webpImageUrl, originalSize, webpSize })
}
두 이미지 파일 크기를 비교하려고 둘다 넣어봤고
실제 504353 bytes 에서 309454 bytes로 감소되었고 39% 정도의 크기 감소 효과를 볼 수 있었다.
이제 비교는 끝났고 webp로만 업로드해주면 끝
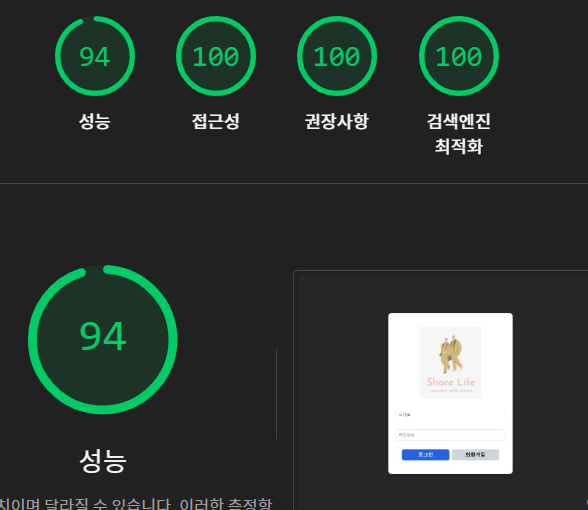
SEO 향상시키기
기존 SEO 향상을 목적으로 Head 태그, robot, title, description 등등 다양한 태그의 설명을 넣었지만 결과적으로는 82점이였다.
원인은 use client컴포넌트에서 선언한건 결국엔 서버에서 html을 생성하고 보여주는 방식이 아니였기 때문에 소용이 없었던 것인데,
메타 태그를 클라이언트 환경이 아닌 곳에서 선언해서 불러오는 방식으로 개선해보고자 한다.
근데 다른 곳에서
import { Metadata } from "next"

export const registerMetadata = {
  title: "회원가입 - Share Life",
  description: "새 계정을 만들고 Share Life에서 다양한 사람들과 소통하세요.",
  robots: "noindex, nofollow", // 검색엔진 색인 방지
  canonical: "https://www.sharelife.shop/register",
}

export const metadata: Metadata = {
  title: "로그인 - Share Life",
  description:
    "계정에 로그인하여 Share Life를 통해 다양한 사람들과 소통하세요.",
  robots: "noindex, nofollow", // 검색엔진 색인 방지
  alternates: {
    canonical: "https://www.sharelife.shop/login",
  },
}

export const homeMetadata = {
  title: "Share Life - 새로운 소셜 네트워크",
  description:
    "다양한 사람들과 공유하고 소통하는 SNS, Share Life에 오신 것을 환영합니다.",
  keywords: ["SNS", "소셜 미디어", "공유 플랫폼"],
  robots: "index, follow",
  openGraph: {
    title: "Share Life - 새로운 소셜 네트워크",
    description:
      "다양한 사람들과 공유하고 소통하는 SNS, Share Life에 오신 것을 환영합니다.",
    url: "https://www.sharelife.shop/main",
    images: [
      {
        url: "/mainpageimage.webp", // 대표 이미지
        width: 800,
        height: 600,
      },
    ],
    type: "website",
  },
}

export const userProfileMetadata = {
  title: "사용자 프로필 - Share Life",
  description: "사용자의 프로필과 게시물을 확인하고 팔로우해 보세요.",
  keywords: ["프로필", "SNS 사용자", "소셜 미디어", "팔로우"],
  robots: "index, follow",
  openGraph: {
    title: "사용자 프로필 - Share Life",
    description: "사용자의 프로필과 게시물을 확인하고 팔로우해 보세요.",
    images: [
      {
        url: "/userpageimage.webp",
        width: 800,
        height: 600,
      },
    ],
    type: "profile",
  },
}
이런식으로 선언하고 불러오는 방식으로 하여도 여전히 SEO는 82점으로 오르지 않으면서 title같은 페이지에 대한 설명이 없다고 나오고 있었다.
그래서 next 공홈 찾아보니
향상된 SEO 및 웹 공유성을 위한 메타데이터 api가 있었다.
정적 metadata 객체 or 동적 generateMetadata함수를 활용하면 되었는데,
페이지 or layout.ts에서 사용하라는걸 보니
use client 즉, 클라이언트 컴포넌트 환경이 아닌 곳에서 사용해야 된다 판단하였다.
그래서 기존 login 페이지를 예로 들면,
app router 구조 상
src/app/login/page.tsx 에서 모든 코드를 짰었는데,
클라이언트 컴포넌트는 login 폴더 안 컴포넌트 폴더 안에서 구현해서 불러오고
import LoginPage from "./_components/LoginPage"
import { Metadata } from "next"

export const metadata: Metadata = {
  title: "로그인 - Share Life",
  description:
    "계정에 로그인하여 Share Life를 통해 다양한 사람들과 소통하세요.",
  robots: {
    index: false,
    follow: false,
  },
  alternates: {
    canonical: "https://www.sharelife.shop/login",
  },
}

const page = () => {
  return <LoginPage />
}

export default page
이런식으로 서버 환경에서 직접 metadata를 넣어줬다.
물론 로그인, 회원가입 페이지는 검색 노출이 의미가 없다고 해서 index와 follow는 false처리해놨지만 true로 하고 테스트 해본 결과
맛깔나게 SEO향상 시킴 ㅎㅎ
그리고 컴포넌트 자체도 좀 더 분리하면 재사용성 목적도 있지만 유지보수하기 좋을 것 같아서 lib/metadata.ts에서
export const loginMetadata: Metadata = {
  title: "로그인 - Share Life",
  description:
    "계정에 로그인하여 Share Life를 통해 다양한 사람들과 소통하세요.",
  robots: "index, follow", // 검색엔진 색인 방지
  alternates: {
    canonical: "https://www.sharelife.shop/login",
  },
}
이런 식으로 선언 한 후
import { loginMetadata } from "@/lib/metadata"
import LoginPage from "./_components/LoginPage"

export const metadata = loginMetadata

const page = () => {
  return <LoginPage />
}

export default page
가지고 오기만 하여서 훨씬 깔끔한 컴포넌트가 되었다.
그리고 실제 use client 컴포넌트에선 Head태그를 없애주었다.
그리고 추가적으로
Head 태그보다 Metadata API를 권장하는 이유
- SEO 및 SSR 최적화
서버에서 HTML 생성할 때 메타데이터를 포함해 SEO 최적화에 도움.
이를 통해 페이지가 로드될 때 메타데이터가 head에 바로 적용됨 - 자동화 및 구조화
Metadata API는 next가 페이지 메타정보를 쉽게 관리하고 자동으로 head 태그에 삽입하도록 도움. 동적 생성 기능도 있어서 유저 아이디를 url로 사용하는 유저프로필페이지에서도 쉽게 설정 가능 - 퍼포먼스
Head태그 사용시 CSR로 메타데이터가 업데이트 될 수 있어서, 이 방식은 SEO 크롤러가 페이지를 인덱싱 하기 전 메타데이터 누락될 수 있는 위험 있음(딱 내 사례같음)
근데 내 홈페이지는 SNS인데 로그인 없이는 메인, 프로필 페이지 접근이 불가능하다.
그래도 검색엔진이 로그인과 회원가입 페이지의 색인과 팔로우를 비활성화 하는게 좋다는데,
로그인, 회원가입 페이지에서 noindex, nofollow인 이유
- 접근 제한 페이지의 보안
- 중복 컨텐츠 방지
- 검색 결과 품질 유지
- 사용자 경험 최적화
메타데이타 API를 적용하는건 어렵지 않았지만 이제 나에게 중요한건 유저 아이디를 url로 사용하는 동적 url을 가진 유저프로필페이지의 메타데이터였다.
import type { Metadata, ResolvingMetadata } from 'next'

type Props = {
  params: { id: string }
  searchParams: { [key: string]: string | string[] | undefined }
}

export async function generateMetadata(
  { params, searchParams }: Props,
  parent: ResolvingMetadata
): Promise<Metadata> {
  // read route params
  const id = (await params).id

  // fetch data
  const product = await fetch(`https://.../${id}`).then((res) => res.json())

  // optionally access and extend (rather than replace) parent metadata
  const previousImages = (await parent).openGraph?.images || []

  return {
    title: product.title,
    openGraph: {
      images: ['/some-specific-page-image.jpg', ...previousImages],
    },
  }
}

export default function Page({ params, searchParams }: Props) {}
이런식의 예제를 통해 id를 뽑아와서 metadata에 넣어줄 수 있었는데,
일단 코드 분석을 좀 해야 내 프로젝트에 적용할 수 있을 것 같은 느낌
generateMetadata를 적용한 유저프로필 메타데이터
import React from "react"
import UserProfile from "../_components/UserProfilePage"
import { userProfileMetadata } from "@/lib/metadata"
import { Metadata } from "next"

type Props = {
  params: { id: string }
}

export async function generateMetadata({ params }: Props): Promise<Metadata> {
  const id = (await params).id

  // 사용자 프로필 페이지 메타데이터를 복사하여 URL을 동적으로 설정
  const dynamicMetadata: Metadata = {
    ...userProfileMetadata,
    alternates: {
      canonical: `https://www.sharelife.shop/profile/${id}`,
    },
    openGraph: {
      ...userProfileMetadata.openGraph,
      url: `https://www.sharelife.shop/profile/${id}`, // 동적 URL 설정
    },
  }

  return dynamicMetadata
}

const page = ({ params }: { params: { id: string } }) => {
  return <UserProfile params={params} />
}

export default page
generateMetadata함수를 이용해서 params에서 id를 가져오고,
기존에 세팅해놓은 userProfileMetadata를 복사하고 openGraph와 alternates의 canonical의 url에 id를 추가하여서 동적 url도 처리해줄 수 있게되었다 굿굿
유저 프로필 페이지 스켈레톤 수정
react query를 적용하면서 유저 데이터 로딩상태일 대 그저 글씨로 loading..만 적어놨더니 초기 데이터이다보니 다른 로딩 상태를 무시하고 가장 먼저 떴다.
그래서
  // useQuery를 사용하여 사용자 데이터를 가져옵니다.
  const {
    data: userData,
    isSuccess: isUserDataSuccess,
    isError: isUserDataError,
    isLoading: isUserDataLoading,
  } = useQuery({
    queryKey: ["postUserData", id],
    queryFn: () => fetchPostUserData(id), // fetchPostUserData를 호출할 때 id를 전달합니다.
    enabled: !!id, // id가 있을 때만 쿼리를 활성화합니다.
    staleTime: 10 * 60 * 1000, // 5분 동안 신선한 데이터로 유지
    refetchInterval: false, // 자동 갱신 비활성화
    gcTime: 10 * 60 * 1000, // cacheTime임 10분동엔 메모리 유지
  })

  if (isUserDataLoading) {
    return (
      <div className="bg-neutral-800 min-h-screen text-white">
        <Header />
        <main className="max-w-[935px] my-5 mx-auto pt-16 pb-8 px-4">
          <ProfileSkeleton />
          <PostsSkeleton />
        </main>
      </div>
    )
  }
아예 스켈레톤을 여기에 입혀줘서 조치해서 해결해주었다.
깃 허스키 미적용된거 재적용
분명 세팅할때만해도 잘되던 깃허스키가 어느순간 사라져있었다.
그래서 결론적으로 그동안 커밋하면서 규칙도없이 나만의 규칙만 유지한 채 진행하고 있었다 후...
원인을 찾아보니 한번 supabase 프로젝트 다시 재생성하면서 git clone하여서 코드를 그대로 가져오냐고 .husky쪽 내용이 누락되었었다.
그 이후로도 안되길래 원인을 찾아보니
//이전 코드
  "extends": [
    "next",
    "next/core-web-vitals",
    "plugin:prettier/recommended",
    "prettier",
    "plugin:@typescript-eslint/recommended",
    "plugin:react/recommended",
    "plugin:react-hooks/recommended",
    "plugin:@tanstack/eslint-plugin-query/recommended"
  ]

//수정 코드
  "extends": [
    "next",
    "next/core-web-vitals",
    "plugin:@typescript-eslint/recommended",
    "plugin:react/recommended",
    "plugin:react-hooks/recommended",
    "plugin:@tanstack/eslint-plugin-query/recommended",
    "plugin:prettier/recommended"
  ],
여기 부분때문에 에러가 발생했었는데 원인은
extends 배열은 여러 플러그인을 확장하여 구성된 설정이여서
우선순위나 규칙 충돌이 발생할 수 있음.
Prettier 와 ESLint 관련 설정이 충돌할 가능성이 큼.
그래서 prettier와 plugin:prettier/recomended의 위치를 조정하거나 plugin:prettier/recommended만 남기는게 좋다고함
그래서 plugin:prettier/recommended만 넣어서 Prettier와 ESLint가 함꼐 작동하도록 조취함
그리고 오랜만에 다시 설정하는김에
ESLint와 git husky의 장점을 정리하자면
- 자동 코드 품질 유지
- lint-staged: 커밋 시 변경된 파일만 ESLint,Prettier 도구 자동 실행하여 코드 품질 유지
- 커밋 전 코드 자동 린트, 포맷팅되어 코드 스타일이나 간단한 문법적 오류 방지
- 효율적 커밋 관리
- husky: git 훅 사용하여, 커밋 전/후 다양한 작업 자동화 ex-커밋 시도때마다 lint-staged통해 코드 품질 체크, commit-msg훅 통해 커밋 메시지 규칙 검사
- 자동 커밋 메시지 규칙 강제, 변경 사항 코드 스타일 준수하도록 강제
- 팀 협업 효율성 향상
이정도 장점을 알고 가면 될 것 같다. 추후 디벨롭할 때 CI/CD와도 연관성이 있을지도?? ㅎㅎ
<type>:커밋 종류(feat,fix,chore,docs 등)
<scope>:변경된 범위(선택사항)
<subject>:변경의 간단한 설명
[optional body]: 변경 상세 설명(선택사항)
[optional footer(s)]:추가 정보(선택사항)
=========================================
style: 코드의 포맷팅, 스타일링 수정 (기능에 영향 없음)
refactor: 코드 리팩토링, 기능에 변화 없이 코드 구조 개선
test: 테스트 코드 추가, 수정
perf: 성능을 개선하기 위한 변경 사항
docs (Documentation)의미: 문서 작업과 관련된 변경 사항
chore (기타 작업)
의미: 코드와 기능에는 직접적인 영향을 미치지 않는 설정, 빌드 과정, 패키지 업데이트 등 기타 작업
fix (Bug Fix)
의미: 버그를 수정하는 변경 사항
feat (Feature)
의미: 새로운 기능이나 기능 추가와 관련된 변경 사항
배포환경에서 여러번 생성되는 댓글, 게시글 발견
항상 dev환경에서만 구현하다보니 이번에 우연히 주변 개발자에게 배포환경에서 테스트를 시켜봤는데 댓길과 게시글에서 생성시 여러번 빨리 클릭하면 여러개가 생성이 되었다.
아주 기본을 망각하여서 debouncing의 300ms를 적용하여 0.3초안에 추가 버튼 누르지않으면 마지막 버튼 클릭으로 서버 요청하도록 조치를 취하였다.
  // 디바운스된 createPost 함수
  const debouncedCreatePost = debounce(handleCreatePost, 300)
이런식으로 함수만 한번 더 추가해줘서 해결! 전체적으로 동일하다 해결 과정은
그런데 추가적으로 렌더링 방지시킬 목적으로 함수에 useMemo도 추가해주었다.
  // 디바운스된 createPost 함수
  const debouncedCreatePost = useMemo(
    () => debounce(handleCreatePost, 300),
    [handleCreatePost],
  )
그래서 렌더링도 최소화시키고 서버 호출도 최소화한 좋은 코드가 된것같다
좋아요 배포환경에서 count오르지 않던 부분
dev환경에서만 작업하니까 몰랐는데 배포환경에서는 count가 오르지 않고 하트 색상만 바뀌면서도 실제로 수파베이스의 likes 테이블엔 데이터가 담기고 삭제되는 기이한 현상이 발견되었다.
아주 아주 피곤한 문제였었는데, 한두군데, react query의 invalidate, stale time 0으로 바꾸는 등 다양한 코드를 테스트 해보았지만 실패하였다.
그래서 결국 다 버리고 follows의 코드를 참고해서 다시 구현하였다.
냉정하게 내 지금 실력으로는 어디쪽에 문제가 있어서 dev에서는 되는데 배포에서는 안되는지 캐시쪽 문제일거라 지레짐작은 했지만 그래도 원인해결을 못하였기 때문에, 챗봇으로 코드 분석을 했는데, 그전에 나만의 분석을 해보자면
1. likecount fetch하는 함수의 매서드 차이
- 에러
기존 코드는 try catch문 없이 그저 api 응답 없으면 error문 보여주고 끝냈다.
그러나 변경 코드는 예외 처리를 명확히 해줌(디버깅 더 쉬워짐) - 데이터 처리
forEach 메서드로 api받아온 데이터를 가진 배열을 순회하면서 어떤 게시글에 count가 몇개인지 업데이트 해줬음
이후엔
reduce 메서드로 count관련 배열을 key:value형태인 객체로 변환시킴reduce메서드란
배열의 각 요소에 대해 반복하며 누적된 값을 계산해 하나의 결과값을 반환하는 메서드
const numbers = [1, 2, 3, 4, 5];
const sum = numbers.reduce((acc, cur) => acc + cur, 0);
console.log(sum); // 15
acc -> 이전 단계에서 반환된 값 전달, 초기 값은 ,뒤에 있는 0
cur -> 현재 값, 즉 현재 반복 중인 배열의 요소
그러면 0초기값부터 요소 다 돌면서 1+2+3+4+5 해서 결과로 15를 나타냄
즉 기존에 예를들어 데이터가 {postId:1,count:0} 이런식으로 하나의 객체를 하나의 요소로 인식하는 배열 상태였다면, 조금 덜 복잡하게 count={1:0} 이렇게 만들어낸것이라고 볼 수 있다.
그 과정에서 type에 Record타입을 처음 적용해봤는데
Record 타입
type Record<K extends keyof any, T> = {
[P in K]: T;
}
유틸리티 타입 중 하나로, 객체의 키와 값의 타입을 명확하게 정의할 때 사용.
즉 키:number, 값:number타입이라고 알려주기 위해 사용
예제에서
K: 객체의 키의 타입
T: 각 키에 매칭되는 값의 타입
결국 Record 타입을 거쳐 객체의 키와 값의 타입을 강력하게 제어할 수 있게 됨.
reduce는 중첩된 값을 반환해주고 forEach는 그런부분이 없어서 어차피 postId와 count가 나뉘어져있는 배열에선 둘다 뭘 써도 상관이 없지만 reduce는 초기값이 누락되거나, 데이터 구조가 예상과 다르면 바로 error를 발생시킬 수 있는 장점이 있는 것 같다. 결론적으로 여기 코드에선 문제가 없다고 판단!!
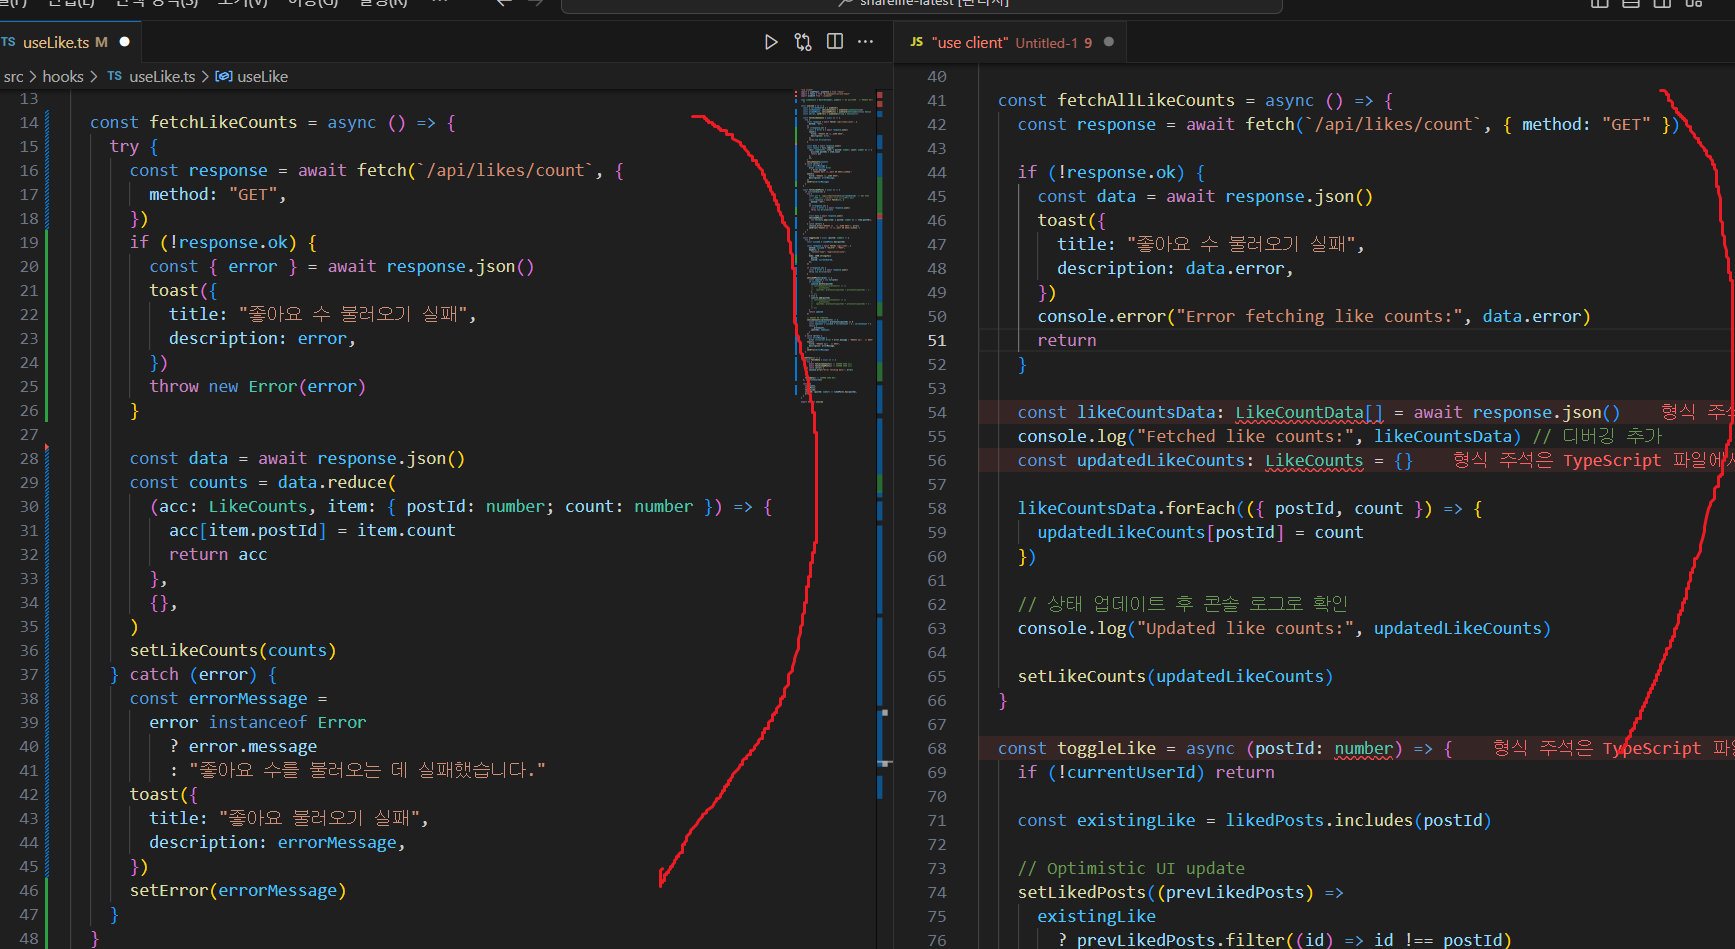
<왼쪽이 수정한 코드>
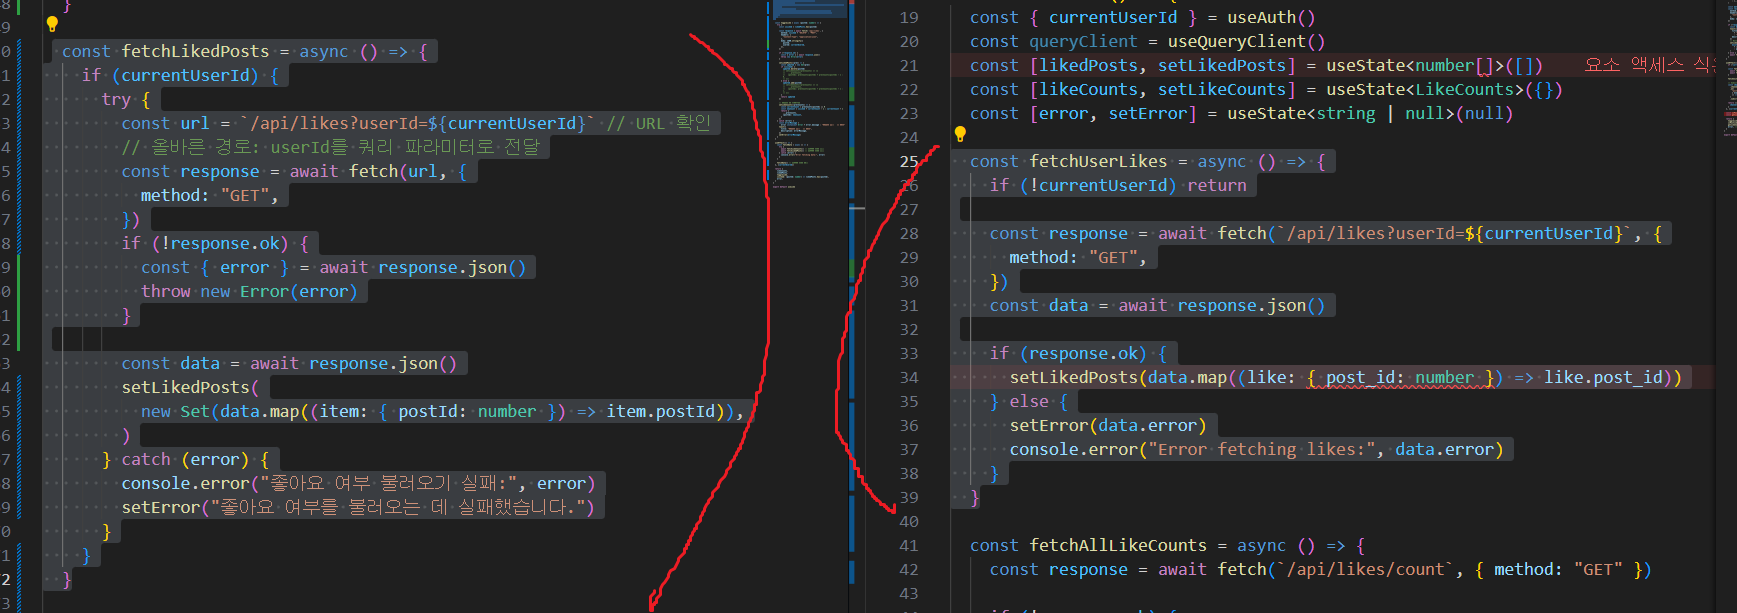
2. 로그인한 유저가 좋아요 누른걸 실행하는 함수 비교
likes api호출에서 GET 즉 기존 좋아요 했던걸 받아와서 setLikedPosts useState에 저장해서 현재 사용자가 좋아요를 누른 게시물의 ID목록을 넣음
여기서 Set을 넣긴했지만 굳이 빼도됨 ->중복 항목이 없음
결과적으로 이 상태가 좋아요 버튼 혹은 개수의 ui변화가 있어야하는지 결정하게 됨
그래서 결국 조회할때 Set은 .has 배열은 .includes를 사용하는데 조회할때 Set이 훨씬 빠름(시간 복잡도 O(1))
3. toggle해주는 함수 비교
- Optimistic UI 업데이트 방식
<이전 코드>
배열에 includes 메서드를 사용하여 postId가 포함되어 있는지 확인 후 배열 업데이트
좋아요 토글할 때, 배열 수정하는 방식
<이후 코드>
Set에서 has 메서드 사용해 postId 포함되어 있는지 확인 후 Set 객체 추가 or 삭제
중복없이 likedPosts 관리 - 좋아요 수 업데이트 방식
<이전 코드>
API 요청 실패 시 setLikedPosts 사용하여 optimistic UI 업데이트를 롤백하지만, 좋아요 수를 업데이트하지 않음
성공 시 fetchAllLikeCounts()를 호출하여 모든 좋아요 수를 새로 불러옴
문제점 : 서버에서 전체 좋아요 수를 새로 가져옴. 배포 환경에선 네트워크 지연이나 다른 문제가 있을 경우, UI가 즉시 업데이트 되지 않을 수 있음
<이후 코드>
setLikeCounts 사용하여 좋아요 수 즉시 업데이트.
prevCounts를 기반으로 좋아요가 추가되거나 삭제될 떄 likeCounts를 즉각적으로 조정
API 요청 실패 시 좋아요 수 다시 롤백할 로직이 없음
즉 여기 코드가 문제일 가능성 多!!
모든 전체 좋아요 수를 다시 불러오는게 너무 비효율적이였음
성능도 최악이였음
추가 원인
이게 더 정확한 것 같다.
"use client"
import { useEffect, useState } from "react"
import { supabase } from "@/lib/supabase"
import { toast } from "@/components/ui/use-toast"
import useAuth from "./useAuth"
import { method } from "lodash"
import { useQueryClient } from "@tanstack/react-query"

type LikeCounts = {
  [postId: number]: number
}

type LikeCountData = {
  postId: number // 또는 string, 데이터 타입에 맞게 조정
  count: number
}

const useLike = () => {
  const { currentUserId } = useAuth()
  const queryClient = useQueryClient()
  const [likedPosts, setLikedPosts] = useState<number[]>([])
  const [likeCounts, setLikeCounts] = useState<LikeCounts>({})
  const [error, setError] = useState<string | null>(null)

  const fetchUserLikes = async () => {
    if (!currentUserId) return

    const response = await fetch(/api/likes?userId=${currentUserId}, {
      method: "GET",
    })
    const data = await response.json()

    if (response.ok) {
      setLikedPosts(data.map((like: { post_id: number }) => like.post_id))
    } else {
      setError(data.error)
      console.error("Error fetching likes:", data.error)
    }
  }

  const fetchAllLikeCounts = async () => {
    const response = await fetch(/api/likes/count, { method: "GET" })

    if (!response.ok) {
      const data = await response.json()
      toast({
        title: "좋아요 수 불러오기 실패",
        description: data.error,
      })
      console.error("Error fetching like counts:", data.error)
      return
    }

    const likeCountsData: LikeCountData[] = await response.json()
    console.log("Fetched like counts:", likeCountsData) // 디버깅 추가
    const updatedLikeCounts: LikeCounts = {}

    likeCountsData.forEach(({ postId, count }) => {
      updatedLikeCounts[postId] = count
    })

    // 상태 업데이트 후 콘솔 로그로 확인
    console.log("Updated like counts:", updatedLikeCounts)

    setLikeCounts(updatedLikeCounts)
  }

  const toggleLike = async (postId: number) => {
    if (!currentUserId) return

    const existingLike = likedPosts.includes(postId)

    // Optimistic UI update
    setLikedPosts((prevLikedPosts) =>
      existingLike
        ? prevLikedPosts.filter((id) => id !== postId)
        : [...prevLikedPosts, postId],
    )

    const method = existingLike ? "DELETE" : "POST"
    const response = await fetch(/api/likes, {
      method,
      headers: {
        "Content-Type": "application/json",
      },
      body: JSON.stringify({ postId, userId: currentUserId }),
    })

    if (!response.ok) {
      const data = await response.json()
      toast({
        title: existingLike
          ? "좋아요 삭제 중 오류가 발생했습니다."
          : "좋아요 추가 중 오류가 발생했습니다.",
        description: data.error,
      })
      // Rollback optimistic update on error
      setLikedPosts((prevLikedPosts) =>
        existingLike
          ? [...prevLikedPosts, postId]
          : prevLikedPosts.filter((id) => id !== postId),
      )
    } else {
      await fetchAllLikeCounts() // Update like count
    }
  }

  useEffect(() => {
    if (!currentUserId) return

    const fetchInitialData = async () => {
      await fetchUserLikes()
      await fetchAllLikeCounts()
    }

    fetchInitialData()

    // Subscribe to real-time updates
    const channel = supabase
      .channel("likes")
      .on(
        "postgres_changes",
        { event: "*", schema: "public", table: "likes" },
        () => fetchAllLikeCounts(),
      )
      .subscribe()

    return () => {
      channel.unsubscribe()
    }
  }, [currentUserId])

  const isPostLikedByUser = (postId: number) => likedPosts.includes(postId)
  const getLikeCountForPost = (postId: number) => likeCounts[postId] || 0

  return {
    toggleLike,
    isPostLikedByUser,
    getLikeCountForPost,
    error, // Return error state
  }
}

export default useLike
여기 코드를 살펴보면 toggle함수에서 setLikedPosts만 업데이트 시키지 count에 대한 업데이트는 없었다.
코드가 길어서 분석하기 어려웠는데, 이게 맞는걸로.. 정정!!
