
👏 Hacker News API를 받아와서 JS로 클라이언트 앱을 만들어 보며 학습해보자!! - (이전 게시물에 이어서!!)
5) 페이징 구현하기
const container = document.getElementById('root');
const ajax = new XMLHttpRequest();
const content = document.createElement('div');
const NEWS_URL = 'https://api.hnpwa.com/v0/news/1.json';
const CONTENT_URL='https://api.hnpwa.com/v0/item/@id.json';
// 공유하는 값 따로 빼서 생성
const store ={
    currentPage:1,

};

function getData(url){

// 데이터 가져오기
    ajax.open('GET', url, false);
    ajax.send();

    return JSON.parse(ajax.response);
}


function newsFeed(){
const newsFeed = getData(NEWS_URL);
const newsList=[];

newsList.push('<ul>');
// 방어코드 작성
for (let i = (store.currentPage - 1) * 10; i < store.currentPage * 10; i++) {
    newsList.push(
        `
        <li>
            <a href="#/show/${newsFeed[i].id}">
            ${newsFeed[i].title} (${newsFeed[i].comments_count})
            </a>
        </li>
    `
    );

}

newsList.push('</ul>');
newsList.push(`
<div>
    <a href="#/page/${store.currentPage>1?store.currentPage -1:1}">이전 페이지</a>
    <a href="#/page/${store.currentPage +1}">다음 페이지</a>
</div>
`); // /page/ 삽입으로 구분하는 구조 만들기
container.innerHTML = newsList.join('');
}

function newsDetail(){
    const id =location.hash.substr(7);
    const newsContent = getData(CONTENT_URL.replace('@id',id));

    container.innerHTML=`
    <h1>${newsContent.title}</h1>

    <div>
    <a href="#/page/${store.currentPage}">목록으로</a>
    </div>
    `;
}

function router(){
    // 해시값 전체 가져오기
    const routePath = location.hash;

    if(routePath ===''){
        newsFeed();
    }else if(routePath.indexOf('#/page/')>=0){ //routePath 앞단에 page가 들어가 있으면 -> 페이징. routePath라고하는 문자열 안에 문자열 확인 메소드 indexOf
                                     // indexOf() : 입력으로 주어지는 문자열을 찾아서 있다면 0 이상의 위치 값을 리턴하게 되고 없다면 -1을 리턴하는 함수. (0보다 작은 값이면 입력으로 주어진 문자열 없다는 뜻)
    store.currentPage = Number(routePath.substr(7));  // substr는 문자열이기 때문에 연산이 되지 않음. 그래서 Number함수 사용해서 숫자로 바꿔줘야함
                                                      // Number(): 문자열형태의 숫자를 실제 숫자로 바꾸는 함수
    newsFeed();
    }else{
        newsDetail();
    }

}


// 해시체인지에 router연결
window.addEventListener('hashchange', router);


// 라우터 호출
router();
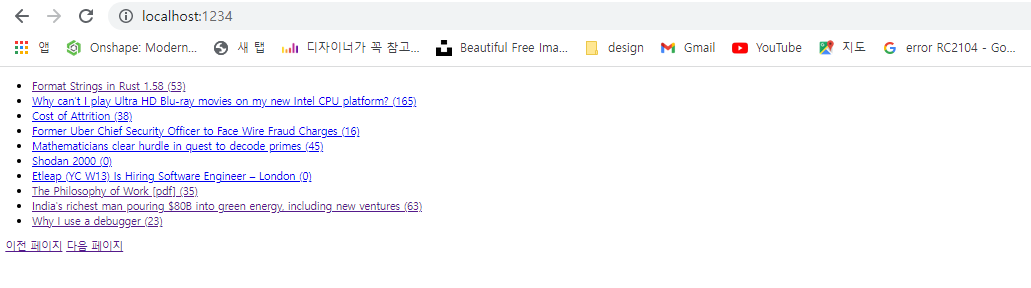
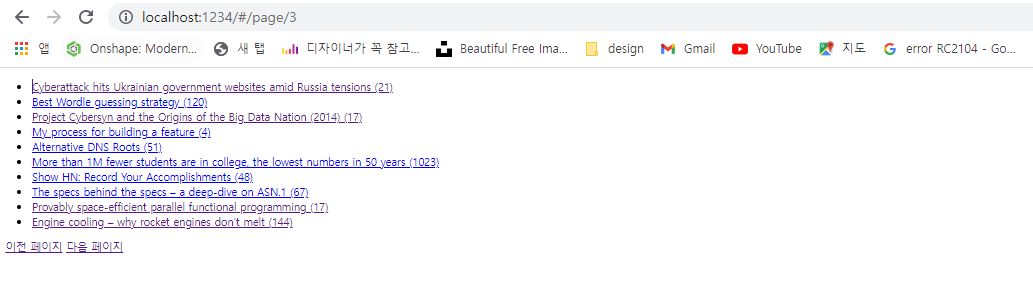
1. 페이징하기 위해 글 목록 리스트 10개씩으로 수정!
2. 현재 페이지 몇 번째 인지 URL로 확인 가능함
3. title 클릭 후 '목록으로'를 클릭하면, 바로 전 페이지 글 목록으로 이동!
4. 방어코드를 작성해서 page가 1일때 이전페이지 누르면 0으로 이동 안되도록 함. 1페이지 이전페이지는 없으므로!
6) 복잡한 UI 구현 준비
const container = document.getElementById('root');
const ajax = new XMLHttpRequest();
const content = document.createElement('div');
const NEWS_URL = 'https://api.hnpwa.com/v0/news/1.json';
const CONTENT_URL='https://api.hnpwa.com/v0/item/@id.json';
const store ={
    currentPage:1,

};

function getData(url){

// 데이터 가져오기
    ajax.open('GET', url, false);
    ajax.send();

    return JSON.parse(ajax.response);
}


function newsFeed(){
const newsFeed = getData(NEWS_URL);
const newsList=[];
let template =`
    <div>
        <h1>Hacker News</h1>
        <ul>
            {{__news_feed__}}
        </ul>
        <div>
            <a href="#/page/{{__prev_page__}}">이전 페이지</a>
            <a href="#/page/{{__next_page__}}">다음 페이지</a>
        </div>
    </div>
`;


for (let i = (store.currentPage - 1) * 10; i < store.currentPage * 10; i++) {
    newsList.push(
        `
        <li>
            <a href="#/show/${newsFeed[i].id}">
            ${newsFeed[i].title} (${newsFeed[i].comments_count})
            </a>
        </li>
    `
    );
}
template=template.replace('{{__news_feed__}}', newsList.join(''));
template=template.replace('{{__prev_page__}}', store.currentPage>1?store.currentPage-1:1);
template=template.replace('{{__next_page__}}', store.currentPage+1);

container.innerHTML = template;
}

function newsDetail(){
    const id =location.hash.substr(7);
    const newsContent = getData(CONTENT_URL.replace('@id',id));

    container.innerHTML=`
    <h1>${newsContent.title}</h1>

    <div>
    <a href="#/page/${store.currentPage}">목록으로</a>
    </div>
    `;
}

function router(){
    // 해시값 전체 가져오기
    const routePath = location.hash;

    if(routePath ===''){
        newsFeed();
    }else if(routePath.indexOf('#/page/')>=0){
    store.currentPage = Number(routePath.substr(7));

    newsFeed();
    }else{
        newsDetail();
    }

}


// 해시체인지에 router연결
window.addEventListener('hashchange', router);


// 라우터 호출
router();
1. 디자인 입히는 작업 전, 사전 작업
=> 디자인을 입힌다는 것 = 필연적으로 마크업의 구조가 엄청나게 복잡해진다는 것을 뜻함
( HTML,CSS의 구조적인 형태때문 )
2. 마크업이 복잡해지면 코드도 복잡해지므로 코드 양이 늘어나기 전에, 복잡도 늘어나지 않고 코드 양만 늘어날 수 있도록 구사 ( = 좋은 코드 🎀)
3. 이런 측면에서 템플릿 코드 작성해서 적용했음!
📍 기존 방식, 템플릿 방식 차이 : DOM API를 사용하다가 문자열을 사용하는 것과 비슷한 느낌! 템플릿 봤을 때 UI가 어떻게 생겼는지 명확하게 구조를 살펴볼 수 있다👍!! 또한, 어떤데이터가 들어가는지 마킹된 위치도 정확히 볼 수 있어서for문,currentPage,nextPage를 계산하기 위한 코드와 뒤섞여 있지 않기에 구조를 명확하게 볼 수 있음!
실제로 코드와 UI가 성격이 다르기 때문에 분리가 가능하여 해준다면, 복잡도를 훨씬 더 줄일 수 있는 효과를 누릴 수 있음.
7) tailwindcss 적용해서 UI만들기
const container = document.getElementById('root');
const ajax = new XMLHttpRequest();
const content = document.createElement('div');
const NEWS_URL = 'https://api.hnpwa.com/v0/news/1.json';
const CONTENT_URL='https://api.hnpwa.com/v0/item/@id.json';
const store ={ // 공유하는 값
    currentPage:1,

};

function getData(url){

// 데이터 가져오기
    ajax.open('GET', url, false);
    ajax.send();

    return JSON.parse(ajax.response);
}


function newsFeed(){
const newsFeed = getData(NEWS_URL);
const newsList=[];
let template =`
<div class="bg-gray-600 min-h-screen">
    <div class="bg-white text-xl">
        <div class="mx-auto px-4">
            <div class="flex justify-between items-center py-6">
                <div class="flex justify-start">
                    <h1 class="font-extrabold">Hacker News</h1>
                </div>
                <div class="items-center justify-end">
                    <a href="#/page/{{__prev_page__}}" class="text-gray-500">
                        Previous
                    </a>
                    <a href="#/page/{{__next_page__}}" class="text-gray-500 ml-4">
                        Next
                    </a>
                </div>
            </div>
        </div>
    </div>
    <div class="p-4 text-2xl text-gray-700">
        {{__news_feed__}}
    </div>
</div>
`;


for(let i = (store.currentPage - 1) * 10; i < store.currentPage * 10; i++) {
    newsList.push(`
        <div class="p-6 bg-white mt-6 rounded-lg shadow-md transition-colors duration-500 hover:bg-green-100">
            <div class="flex">
                <div class="flex-auto">
                    <a href="#/show/${newsFeed[i].id}">${newsFeed[i].title}</a>
                </div>
                <div class="text-center text-sm">
                    <div class="w-10 text-white bg-green-300 rounded-lg px-0 py-2">${newsFeed[i].comments_count}</div>
                </div>
            </div>
            <div class="flex mt-3">
                <div class="grid grid-cols-3 text-sm text-gray-500">
                    <div><i class="fas fa-user mr-1"></i>${newsFeed[i].user}</div>
                    <div><i class="fas fa-heart mr-1"></i>${newsFeed[i].points}</div>
                    <div><i class="far fa-clock mr-1"></i>${newsFeed[i].time_ago}</div>
                </div>
            </div>
        </div>
    `);
}

template=template.replace('{{__news_feed__}}', newsList.join(''));
template=template.replace('{{__prev_page__}}', store.currentPage>1?store.currentPage-1:1);
template=template.replace('{{__next_page__}}', store.currentPage+1);

container.innerHTML = template;
}

function newsDetail(){
    const id =location.hash.substr(7);
    const newsContent = getData(CONTENT_URL.replace('@id',id));
    let template = `
    <div class="bg-gray-600 min-h-screen pb-8">
        <div class="bg-white text-xl">
            <div class="mx-auto px-4">
                <div class="flex justify-between items-center py-6">
                    <div class="flex justify-start">
                        <h1 class="font-extrabold">Hacker News</h1>
                    </div>
                    <div class="items-center justify-end">
                        <a href="#/page/${store.currentPage}" class="text-gray-500">
                            <i class="fa fa-times"></i>
                        </a>
                    </div>
                </div>
            </div>
        </div>

        <div class="h-full border rounded-xl bg-white m-6 p-4 ">
            <h2>${newsContent.title}</h2>
        <div class="text-gray-400 h-20">
            ${newsContent.content}
        </div>

        {{__comments__}}

        </div>
    </div>
`;
function makeComment(comments, called = 0){
    const commentString=[];

    for(let i=0;i<comments.length;i++){
        commentString.push(`
        <div style="padding-left: ${called * 40}px;" class="mt-4">
            <div class="text-gray-400">
                <i class="fa fa-sort-up mr-2"></i>
                <strong>${comments[i].user}</strong> ${comments[i].time_ago}
            </div>
            <p class="text-gray-700">${comments[i].content}</p>
        </div>
        `);
        // 대 댓글 확인
        if (comments[i].comments.length > 0) {
            commentString.push(makeComment(comments[i].comments, called + 1)); // 재귀 호출 (끝을 알 수 없는 경우 자주 사용되는 테크닉)
        }
    }
    return commentString.join('');
}
container.innerHTML = template.replace('{{__comments__}}', makeComment(newsContent.comments));

}

function router(){
    // 해시값 전체 가져오기
    const routePath = location.hash;

    if(routePath ===''){
        newsFeed();
    }else if(routePath.indexOf('#/page/')>=0){
    store.currentPage = Number(routePath.substr(7));
    newsFeed();
    }else{
        newsDetail();
    }

}


// 해시체인지에 router연결
window.addEventListener('hashchange', router);


// 라우터 호출
router();
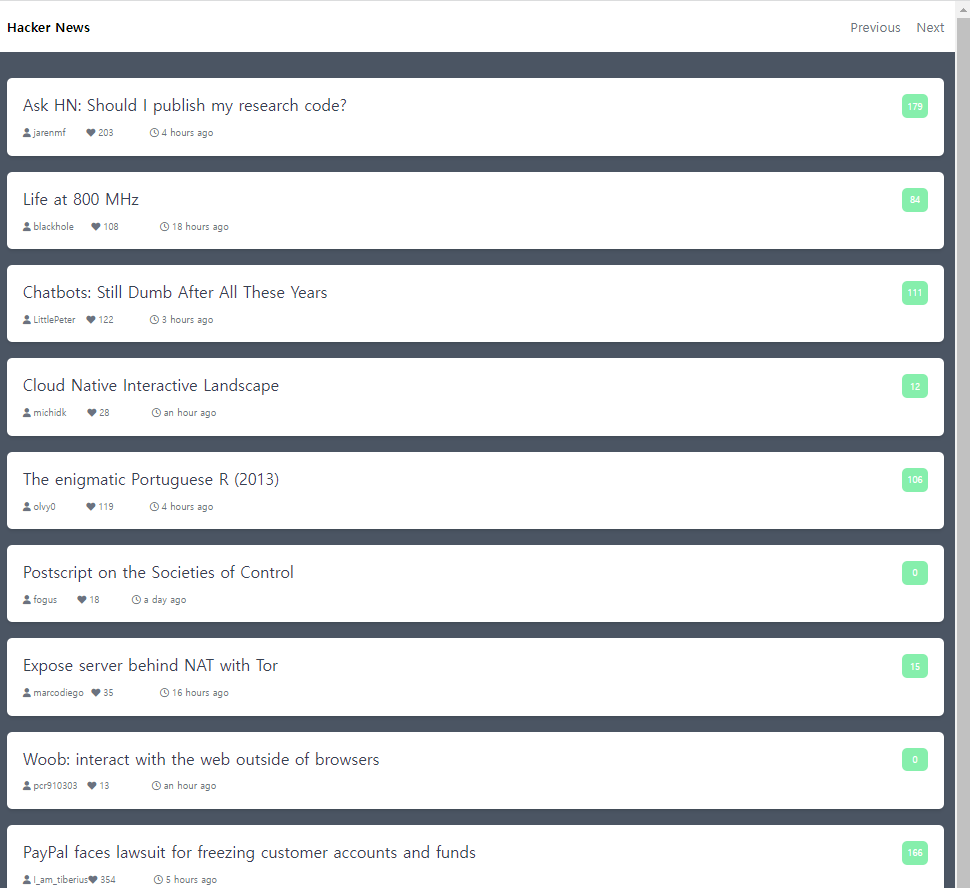
1. tailwindcss설치법 매우 다양 (프론트엔드 프로젝트 구성에 따라 다양한 방식으로 사용할 수 있게끔 지원)
-> 나는 간단한 유형인 CDN을 사용하는 법을 택했다!
-> 링크 태그를 복사해서 index.html파일의 title밑에 넣어주었음.
<script src="https://cdn.tailwindcss.com"></script>
-> tailwindcss로 디자인 완성!
2. 아이콘은 FontAwesome 적용 (FontAwesome: 아이콘을 폰트 방식으로 제공)
3. user이름, 좋아요 수, 몇시간 전에 작성했는가를 추가
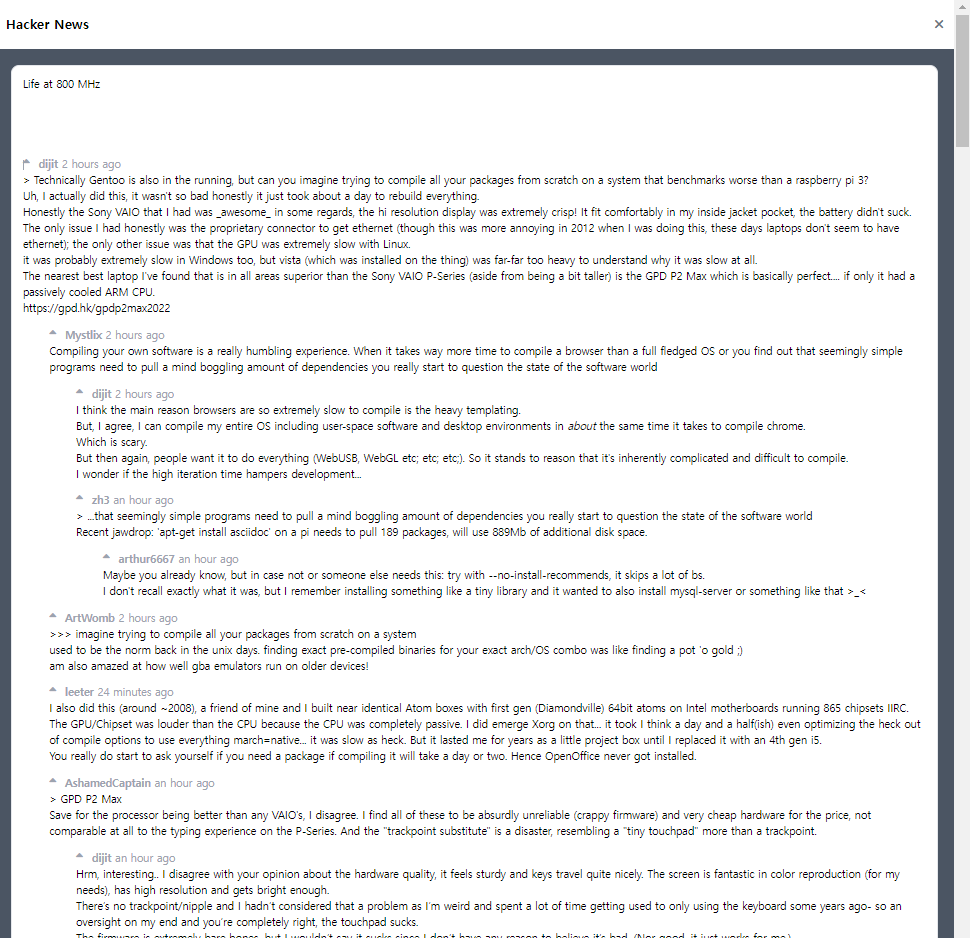
4. 댓글 페이지에 대댓글까지 싹 들고옴~!
8) 상태 가져오기! - 읽은 글 표시 ✔
const container = document.getElementById('root');
const ajax = new XMLHttpRequest();
const content = document.createElement('div');
const NEWS_URL = 'https://api.hnpwa.com/v0/news/1.json';
const CONTENT_URL='https://api.hnpwa.com/v0/item/@id.json';
const store ={ // 공유하는 값
    currentPage:1,
    feeds:[],

};

function getData(url){

// 데이터 가져오기
    ajax.open('GET', url, false);
    ajax.send();

    return JSON.parse(ajax.response);
}

function makeFeeds(feeds) {
    for (let i = 0; i < feeds.length; i++) {
        feeds[i].read = false; // 처음엔 다 안읽은 글이라서
        }
    return feeds;
    }

function newsFeed(){
let newsFeed = store.feeds;
const newsList=[];
let template =`
<div class="bg-gray-600 min-h-screen">
    <div class="bg-white text-xl">
        <div class="mx-auto px-4">
            <div class="flex justify-between items-center py-6">
                <div class="flex justify-start">
                    <h1 class="font-extrabold">Hacker News</h1>
                </div>
                <div class="items-center justify-end">
                    <a href="#/page/{{__prev_page__}}" class="text-gray-500">
                        Previous
                    </a>
                    <a href="#/page/{{__next_page__}}" class="text-gray-500 ml-4">
                        Next
                    </a>
                </div>
            </div>
        </div>
    </div>
    <div class="p-4 text-2xl text-gray-700">
        {{__news_feed__}}
    </div>
</div>
`;
if (newsFeed.length === 0) { // 최초에 읽어오는 글
    newsFeed = store.feeds = makeFeeds(getData(NEWS_URL));
}


for(let i = (store.currentPage - 1) * 10; i < store.currentPage * 10; i++) {
    newsList.push(`
        <div class="p-6 ${newsFeed[i].read ?'bg-orange-500':'bg-white'} mt-6 rounded-lg shadow-md transition-colors duration-500 hover:bg-green-100">
            <div class="flex">
                <div class="flex-auto">
                    <a href="#/show/${newsFeed[i].id}">${newsFeed[i].title}</a>
                </div>
                <div class="text-center text-sm">
                    <div class="w-10 text-white bg-green-300 rounded-lg px-0 py-2">${newsFeed[i].comments_count}</div>
                </div>
            </div>
            <div class="flex mt-3">
                <div class="grid grid-cols-3 text-sm text-gray-500">
                    <div><i class="fas fa-user mr-1"></i>${newsFeed[i].user}</div>
                    <div><i class="fas fa-heart mr-1"></i>${newsFeed[i].points}</div>
                    <div><i class="far fa-clock mr-1"></i>${newsFeed[i].time_ago}</div>
                </div>
            </div>
        </div>
    `);
}

template=template.replace('{{__news_feed__}}', newsList.join(''));
template=template.replace('{{__prev_page__}}', store.currentPage>1?store.currentPage-1:1);
template=template.replace('{{__next_page__}}', store.currentPage+1);

container.innerHTML = template;
}

function newsDetail(){
    const id =location.hash.substr(7);
    const newsContent = getData(CONTENT_URL.replace('@id',id));
    let template = `
    <div class="bg-gray-600 min-h-screen pb-8">
        <div class="bg-white text-xl">
            <div class="mx-auto px-4">
                <div class="flex justify-between items-center py-6">
                    <div class="flex justify-start">
                        <h1 class="font-extrabold">Hacker News</h1>
                    </div>
                    <div class="items-center justify-end">
                        <a href="#/page/${store.currentPage}" class="text-gray-500">
                            <i class="fa fa-times"></i>
                        </a>
                    </div>
                </div>
            </div>
        </div>

        <div class="h-full border rounded-xl bg-white m-6 p-4 ">
            <h2>${newsContent.title}</h2>
        <div class="text-gray-400 h-20">
            ${newsContent.content}
        </div>

        {{__comments__}}

        </div>
    </div>
    `;

    for(let i=0; i < store.feeds.length; i++) {
        if (store.feeds[i].id === Number(id)) {
        store.feeds[i].read = true;
        break;
        }
    }
    function makeComment(comments, called = 0){
        const commentString=[];

        for(let i=0;i<comments.length;i++){
            commentString.push(`
            <div style="padding-left: ${called * 40}px;" class="mt-4">
                <div class="text-gray-400">
                    <i class="fa fa-sort-up mr-2"></i>
                    <strong>${comments[i].user}</strong> ${comments[i].time_ago}
                </div>
                <p class="text-gray-700">${comments[i].content}</p>
            </div>
            `);

        // 대 댓글 확인
        if (comments[i].comments.length > 0) {
            commentString.push(makeComment(comments[i].comments, called + 1)); // 재귀 호출 (끝을 알 수 없는 경우 자주 사용되는 테크닉)
        }
    }
    return commentString.join('');
}
container.innerHTML = template.replace('{{__comments__}}', makeComment(newsContent.comments));

}

function router(){
    // 해시값 전체 가져오기
    const routePath = location.hash;

    if(routePath ===''){
        newsFeed();
    }else if(routePath.indexOf('#/page/')>=0){
        store.currentPage = Number(routePath.substr(7));
    newsFeed();
    }else{
        newsDetail();
    }

}


// 해시체인지에 router연결
window.addEventListener('hashchange', router);


// 라우터 호출
router();
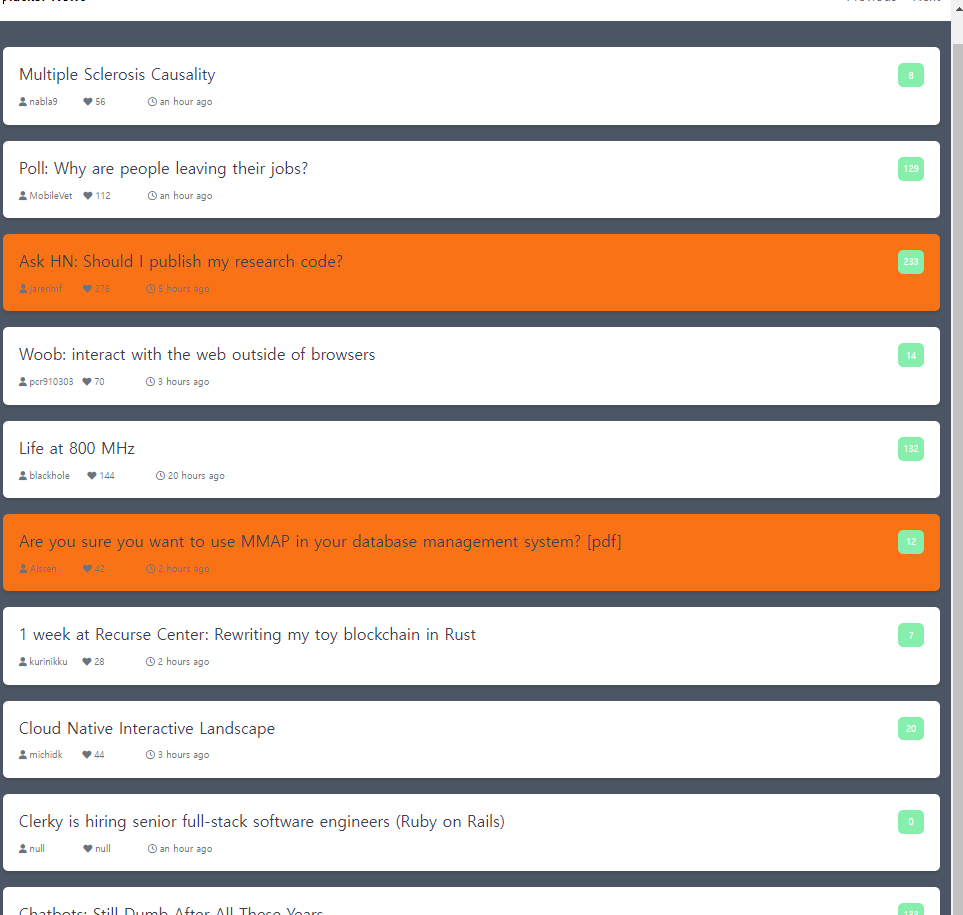
1. 글 목록을 사용자가 클릭했다는 표시 처리
(1) id를 가지고 읽은 표시하는 데이터구조 만들어서 따로 저장하는 방식.
(2) 네트워크를 통해서 데이터 가져온(newsFeed)데이터에다가 새로운 속성 추가
=> (2)를 선택!
2. 읽은 글은 주황색으로 표시!
🤗 마무리하며 🤗
현재 작성된 템플릿 방식은 배우는 과정에 작성한 코드이기 때문에 실제로는 단점이 많다!
newsFeed의 함수를 보면 UI구조를 선명하게 볼 수 있는 장점이 있는 반면,
여전히 for문으로 li는 따로 만들고 있고, .replace 영역을 보면 마킹된 값의 개수만큼 작성되고 있다. ( = 템플릿 안에 마킹된 데이터가 많을수록 반복적으로 써야함을 알 수 있음.)
템플릿 작성이 완벽하게 되려면 꽤 여러가지 기능들이 추가되어야 한다!
그래서 다음 번엔 만들어진 템플릿 라이브러리중 하나를 골라서 적용하여 코드를 바꿔보도록 해야겠다~👻👻
(-> handlebars 템플릿 라이브러리...)
