tsconfig 설정을 고쳐 에러를 해결했더니,
또 다른 오류를 만났다.

tsconfig.json 설정상의 문제인 것 같아서 계속해서 살펴봤었는데, 여러 스택오버플로우의 문의글 중 하나가 눈에 들어왔다.
First try to import firebase modules from google server using CDN. see down here :

 import { initializeApp } from
 	"https://www.gstatic.com/firebasejs/9.4.0/firebase-app.js";
 import { getFirestore, doc, getDoc, getDocs, collection } from
 	"https://www.gstatic.com/firebasejs/9.4.0/firebase-firestore.js";

this works very well. but for efficiency, I guess you want to load firebase modules
on your computer using npm.
in that case you absolutely need module Bundlers like Webpack, Rollup, Parcel, Snowpack,...
I used Webpack, they are alot of tutorials about it.

In case you are using a module bundler,
it will compile your main.js file into another file,
let's call it bundle.js.
아마도 번들링의 문제일 수 있을 것 같다.
웹팩에 대해 간단히 알아보긴 했지만, 그래서 정작 어떻게 사용하는지는 전혀 알지 못했는데, 이번 기회에 직접 사용해보면서 익혀보기로 했다.
webpack, tsconfig 설정하기
일단 firebase를 이용하기 위해, js 모듈을 번들링 해주기로 했다.
1. npm init
npm init 명령어로 현재 디렉토리에 npm 기반으로 프로젝트를 생성해주었다.
npm init -y으로 package.json파일을 생성해주었다.
굳이 -y 명령어를 붙인 이유는, npm project에 대한 기본양식을 일일히 입력해주지 않고 기본 설정값을 사용하고자 했기 때문이다.
2. 웹팩 설치
npm i -D webpack
웹팩 설치 후 index.js파일을 만들어 코드를 작성한 후,
- npx webpack으로 웹팩을 실행하자.
CLI for webpack must be installed.
  webpack-cli (https://github.com/webpack/webpack-cli)

We will use "npm" to install the CLI via "npm install -D webpack-cli".
Do you want to install 'webpack-cli' (yes/no): yes- webpack-cli도 설치해준다.
webpack은 번들러 모듈이고,
webpack-cli는 webpack 명령어를 사용할 수 있게해주는 모듈이다.
처음 마주하는 것은 직접 에러를 마주하며 하나씩 해결해가는 것이 하나하나의 의미에 대해 알 수 있어 좋은 것 같다.
그런 의미에서 ~~! 설정 과정에서 마주한 에러들도 함께 정리해두었다.
can't resolve '.src' in...: src 내부로 파일 위치시키기
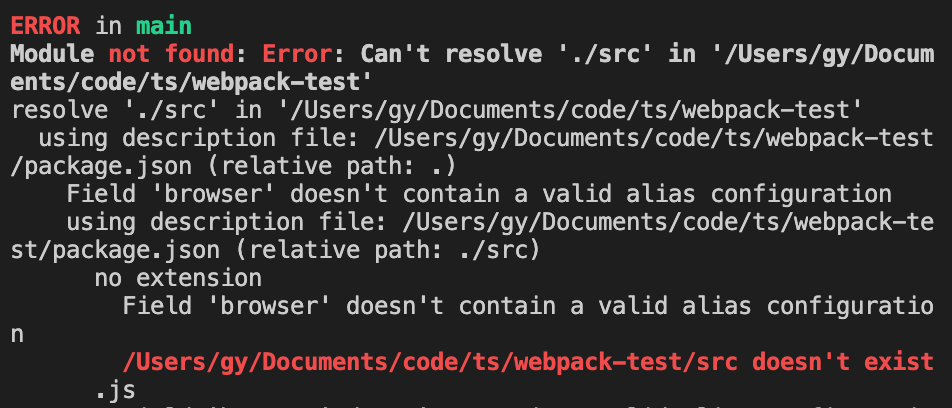
Module not found: Error: Can't resolve './src' in '/Users...'
resolve './src' in '/Users/gy/Documents/code/ts/webpack-test'
  using description file: /Users.../package.json (relative path: .)
    Field 'browser' doesn't contain a valid alias configuration
    using description file: /Users.../package.json (relative path: ./src)
      no extension
        Field 'browser' doesn't contain a valid alias configuration
해당 파일이 src 하위에 위치하지 않아 생기는 오류로, 파일을 옮겨주면 된다.
mode option has not been set,...
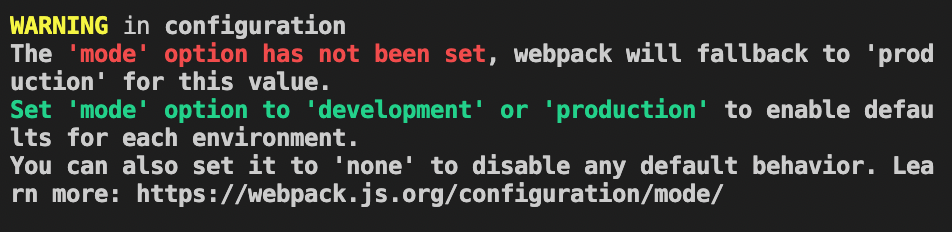
에러는 아니고 경고문구인데, 웹팩에서는 개발과 배포 모드를 지정해줄 것을 권하고 있다.
webpack.config.json에서 mode: 'development' 혹은'production'을 지정해주면 된다.
각 모드는 어떤 차이점이 있을까?
development 모드는 빠르게 빌드하기 위해 빌드 시 최적화를 하지 않지만,
production 모드는 빌드 시 최적화 작업을 해 파일 용량을 줄여준다.
3. 웹팩 설정 - webpack.config.js파일 만들기
module.exports = {
	module: {
		rules: [
			{
				test: /\.ts$/,
				exclude: /node_modules/,
				use: {
					loader: 'ts-loader',
				},
			},
		],
	},
	resolve: {
		extensions: ['.ts', '.js'],
	},
};
ts 확장자명인 파일을 검사하되, node_modules는 제외하도록 설정해주었다.
build 설정
package.json에서 build 명령어를 webpack으로 설정해주었다.
	"scripts": {
		"build": "webpack",
		"build:watch": "webpack --watch",
build:watch 명령어를 하나 더 추가해 webpack --watch명령어를 실행할 수 있도록 했는데, 이를 이용하면 매번 빌드 명령을 내리지 않아도 자동으로 빌드가 된다.
그리고 빌드해보면 다음과 같은 오류가 뜬다.
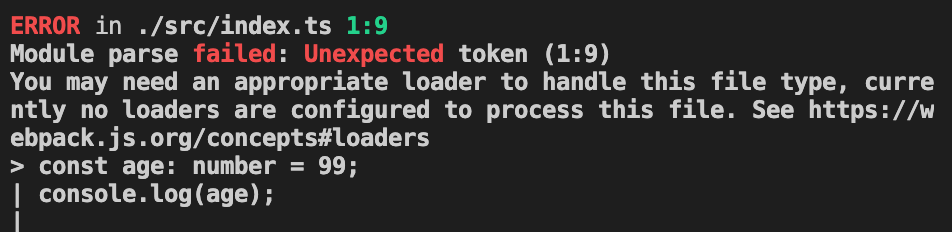
ERROR in ./src/index.ts 1:9
Module parse failed: Unexpected token (1:9)
You may need an appropriate loader to handle this file type, currently no loaders are configured to process this file. See https://webpack.js.org/concepts#loaders
> const age: number = 99;
| console.log(age);
|
웹팩이 src하위에 위치한 index.ts파일을 번들링하기 시작할 때, 코드가 웹팩이 이해할 수 없는 문법으로 쓰여있어 발생하는 에러이다. 메시지대로 loader를 설치해 문법을 트랜스파일링해주면 된다.
4. ts-loader 설치
어떤 loader를 사용해야할까?
Typescript 공식문서에서 찾아보니 ts-loader를 사용하면 추가적인 webpack 기능을 ts와 통합하여 사용할 수 있도록 만들어준다고 한다.
그럼 babel-loader는 뭐지?
babel-loader도 사용할 수는 있다.
@babel/preset-typescript를 사용해주면 되는데, 단점은 ts-loader와 달리 기본 @babel/plugin-transform-typescript 플러그인은 어떠한 타입검사도 수행하지 않는다고 한다.
npm i -D ts-loader
다시 빌드해보면 이렇게 뜬다.
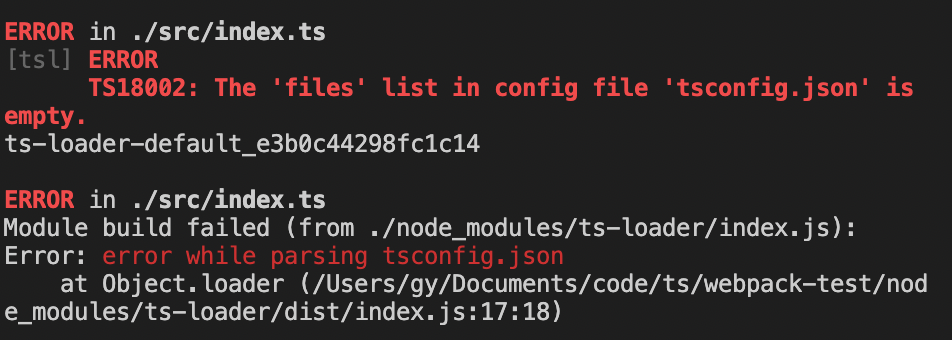
[tsl] ERROR
      TS18002: The 'files' list in config file 'tsconfig.json' is empty.
이제 tsconfig.json 파일을 만들어 내용을 작성해주자!
5. tsconfig.json
npm i -D typescript
npx tsc --init
tsconfig.json 파일이 생성되었다.
html, css 번들링 하기
플러그인 설치
HtmlWebpackPlugin
npm install -D html-webpack-plugin
HTmlWebpackkPlugin은 webpack 번들을 제공하는 HTML 파일 생성을 단순화한다.
스크립트 태그를 사용해 본문에 있는 모든 웹팩 번들을 포함하는 HTML5 파일을 생성한다.
즉, 따로 분리해 번들링한 css와 js파일을 각각 html파일에 link, script 태그로 추가해주었던 기존 작업을 자동화해주는 것이다.
CleanWebpackPlugin
npm install -D clean-webpack-plugin
빌드 이전 결과물을 제거하는 플러그인이다.
MiniCssExtractPlugin
npm install mini-css-extract-plugin
styles태그 대신 css 파일로 만들고 싶은 경우 사용한다.
번들 결과에서 CSS를 별도의 파일로 추출하는 플러그인으로, JS파일 당 CSS 파일을 작성한다.
브라우저에서는 큰 파일을 하나 내려받는 것보다 작은 파일을 여러개 다운로드하는 것이 더 빨라 배포 환경에서는 분리하는 것이 더 효과적이다.
loader 설치
style-loader
읽은 css파일들을 style태그로 만들어 head태그 안에 넣어준다.
css-loader
css 파일들을 읽어준다
css 에러
ERROR in ./src/styles/style.scss
Module build failed (from ./node_modules/css-loader/dist/cjs.js):
CssSyntaxError

(2:7) /Users/gy/Documents/code/ts/webpack-test/src/styles/style.scss Unknown word

  1 |
> 2 |       import API from "!../../node_modules/style-loader/dist/runtime/injectStylesIntoStyleTag.js";
    |       ^
  3 |       import domAPI from "!../../node_modules/style-loader/dist/runtime/styleDomAPI.js";
  4 |       import insertFn from "!../../node_modules/style-loader/dist/runtime/insertBySelector.js";
js와 html에서 동시에 css를 import해와서 발생하는 오류로, 지우고 빌드하면 html에 자동으로 link태그가 생성되며 문제가 해결된다.
Failed to load resource: the server responded with a status of 404 () 오류와

because its MIME type ('text/html') is not a supported stylesheet MIME type, and strict MIME checking is enabled.
경로를 잘못 입력했을 때 생기는 오류이다. 빌드시마다 자동으로 잘못된 css파일을 html에 넣어주고 있었다.
어이없는 실수 ...ㅎ
평소하던 것처럼 html에 script와 link태그를 넣어 필요한 css파일과 js파일을 연결한 다음 빌드하면 이런 에러가 발생한다. 따로 연결해주지 않아도 이미 웹팩 설정과 플러그인을 사용했기 때문에 알아서 빌드했을 때 자동으로 번들링된다.
js파일에서만 필요한 css파일을 import 해주면 된다!
전체 웹팩 설정 코드
const path = require('path/posix');
const HtmlWebpackPlugin = require('html-webpack-plugin');
const MiniCssExtractPlugin = require('mini-css-extract-plugin');
const { CleanWebpackPlugin } = require('clean-webpack-plugin');

module.exports = {
	mode: 'development',
	entry: './src/index.ts',
	output: {
		path: path.resolve('./dist'),
	},
	module: {
		rules: [
			{
				test: /\.ts$/,
				exclude: /node_modules/,
				use: {
					loader: 'ts-loader',
				},
			},
			{
				test: /\.css$/,
				use: [
					'css-loader',
					MiniCssExtractPlugin.loader,
					{
						loader: 'css-loader',
					},
				],
			},
		],
	},
	devtool: false,
	resolve: {
		extensions: ['.ts', '.js'],
	},
	plugins: [
		new HtmlWebpackPlugin({
			template: './src/index.html',
		}),
		new CleanWebpackPlugin(),
		new MiniCssExtractPlugin({
			filename: '[name].css',
		}),
	],
};
Reference
-
Typescript 공식문서 - 웹팩/로더: https://webpack.kr/guides/typescript/
-
stackoverflow - uncaught typeerror: failed to resolve module specifier firebase app relative... : https://stackoverflow.com/questions/66644782/uncaught-typeerror-failed-to-resolve-module-specifier-firebase-app-relative
-
웹팩 설정: 1분코딩 https://www.youtube.com/watch?v=pzHMT9Jxce0
-
firebase 9 tutorial - firebase9: https://www.youtube.com/watch?v=vK2NoOoqyRo
-
Webpack 5 and Typescript Project Setup Walkthrough : https://www.youtube.com/watch?v=4lpmVZdj12g&t=224s
-
React 개발 환경을 구축하면서 배우는 웹팩(Webpack) 기초 - 웹팩 빌드모드 나누기: https://velog.io/@jeff0720/React-%EA%B0%9C%EB%B0%9C-%ED%99%98%EA%B2%BD%EC%9D%84-%EA%B5%AC%EC%B6%95%ED%95%98%EB%A9%B4%EC%84%9C-%EB%B0%B0%EC%9A%B0%EB%8A%94-Webpack-%EA%B8%B0%EC%B4%88
-
css 번들링: https://www.zerocho.com/category/Webpack/post/58ac2d6f2e437800181c1657
-
css module build failed: https://stackoverflow.com/questions/64952866/module-build-failed-from-node-modules-css-loader-dist-cjs-js-csssyntaxerror
-
failed to load resource: https://csy7792.tistory.com/244