.gif)
🎨 setting
🖌 getContext
var canvas = document.getElementById('tutorial');
var ctx = canvas.getContext('2d');
첫 번째 줄의 스크립트는 document.getElementById() 메서드를 호출하여 <canvas> 요소를 표시할 DOM을 검색한다. 요소가 있으면 getContext() 메서드를 사용하여 드로잉 컨텍스트에 액세스 할 수 있다.
🖌 canvas 크기
$canvas.width = window.innerHeight;
$canvas.height = window.innerHeight;
🖌 line
ctx.strokeStyle = '#BADA55';
ctx.lineJoin = 'round';
ctx.lineCap = 'round';
ctx.lineWidth = 100;
CanvasRenderingContext2D.strokeStyle
모양 주위의 획(윤곽선)에 사용할 색상, 그라디언트 또는 패턴을 지정한다. 기본값은 #000(검정색)이다
CanvasRenderingContext2D.lineJoin
Canvas 2D API
만나는 두 개의 선분을 연결하는 데 사용되는 모양을 결정
- "round" :연결된 세그먼트의 공통 끝점 중앙에 디스크의 추가 섹터를 채워 모양의 모서리를 반올림한다. 이 둥근 모서리의 반경은 선 너비와 같다.
CanvasRenderingContext2D.lineCap
선의 끝점을 그리는 데 사용되는 모양을 결정
- "round" : 선의 끝 둥글게 설정
beginPath
새로운 경로 지정
moveTo()
시작점을 원하는 위치로 새롭게 지정
lineTo()
lineTo(x, y) (en-US)
현재의 드로잉 위치에서 x와 y로 지정된 위치까지 선 그리기
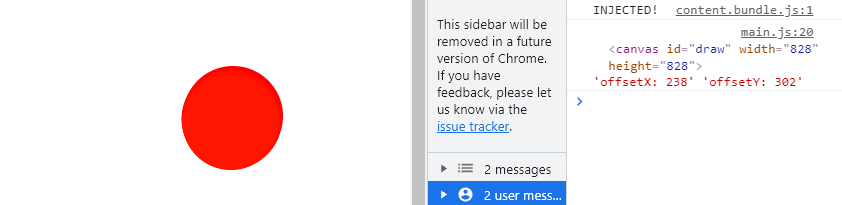
🖌 offsetX, offsetY
$canvas.addEventListener('mousedown', (e) => {
  console.log(e.target,
              'offsetX: '+e.offsetX,
              'offsetY: '+e.offsetY)
canvas에 이벤트를 등록했기 때문에 event의 target은 canvas이고, mousedown 즉 클릭해 그림을 그리기 시작한 지점은 캔버스를 기준으로 한 좌표 값 (e.offsetX, e.offsetY)이다.
🖌 드래그 할 때마다 선 그리기
- mousedown일 때만 그려지도록 isDrawing = true 설정
- beginPath()으로 경로 시작
- moveTo(x,y)로 시작 지점 설정
- lineTo(x,Y)로 끝 지점 설정
let isDrawing = false;
let lastX = 0;
let lastY = 0;

$canvas.addEventListener('mousemove', draw);
$canvas.addEventListener('mousedown', () => isDrawing = true);
$canvas.addEventListener('mouseup', () => isDrawing = false);
$canvas.addEventListener('mouseout', () => isDrawing = false);

function draw(e) {
  if (!isDrawing) return;

  ctx.beginPath();
  ctx.moveTo(lastX, lastY);
  ctx.lineTo(e.offsetX, e.offsetY);
  ctx.stroke();
}
🖌 CanvasRenderingContext2D.stroke()
현재 strokeStyle로 주어진 경로를 그린다.
🎨 선 그리기
mousedown 시 시작지점을 클릭한 지점으로 지정한다.
mosemove 시 ctx.stroke()로 경로를 그리면서 시작지점을 클릭한 지점으로 지정한다.
$canvas.addEventListener('mousedown', (e) => {
  isDrawing = true;
  [lastX, lastY] =[e.offsetX, e.offsetY];
});

function draw(e) {
  if (!isDrawing) return;
  console.log(e)
  ctx.beginPath();
  ctx.moveTo(lastX, lastY);
  ctx.lineTo(e.offsetX, e.offsetY);
  ctx.stroke();

  [lastX, lastY] =[e.offsetX, e.offsetY];

}
🎨 선 색상 변경하기
let hue = 0;
function draw(e) {
if (!isDrawing) return;
ctx.strokeStyle = `hsl(${hue}, 100%, 50%)`;
hue++
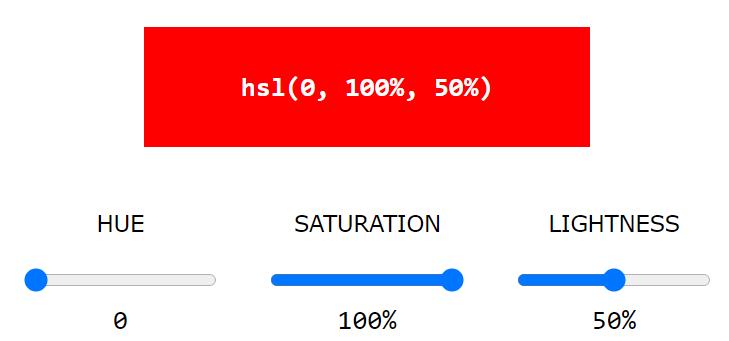
}🖌 hsl(hue, saturation, lightness)
색조, 채도 및 명도 (HSL)를 사용하여 색상을 지정하는 방식
-
색조: 0에서 360 사이의 색상환 각도. 0은 빨간색, 120은 녹색, 240은 파란
-
채도: 백분율 값. 0 %는 회색 음영, 100 %는 풀 컬러
-
밝기: 백분율. 0 %는 검은 색, 100 %는 흰색

🎨 선 넓이 변경하기
mousemove가 일어날 때마다 hue를 +1하고, 이 hue로 lineWidth와 strokeStyle - hsl을 지정해 색상과 선 넓이를 변경시킨다.
function draw(e) {
  if (!isDrawing) return;

  ctx.strokeStyle = `hsl(${hue}, 100%, 50%)`;
  ctx.lineWidth = hue;

  hue++;

  if(hue >= 360) {
    hue = 0;
  }
}
여기까지 하면, hue는 360이후에 0이 되므로 선 넓이도 가장 넓었다가 가장 얇아진다. 서서히 얇아지도록 만들어보자.
🎨 점차 두꺼워졌다가 얇아지게 만들기
let direction = true;

function draw(e) {

  ctx.strokeStyle = `hsl(${hue}, 100%, 50%)`;
  ctx.lineWidth = hue;

  hue++;
  if(hue >= 360) {
    hue = 0;
  }

  if(ctx.lineWidth >= 100 || ctx.lineWidth <= 1) {
    direction = !direction;
  }

  if(direction) {
    ctx.lineWidth++;
  } else {
    ctx.lineWidth--;
  }

}
선의 두께가 100보다 커지거나 1보다 작아지면 다시 반대로 점점얇아지거나 두꺼워지도록 하기 위해, direction을 반대로 설정해준다.
이 direction에 따라 lineWidth 를 증감시킨다.
Reference
https://developer.mozilla.org/ko/docs/Web/API/Canvas_API/Tutorial/Basic_usage
https://developer.mozilla.org/en-US/docs/Web/API/CanvasRenderingContext2D/strokeStyle
https://developer.mozilla.org/en-US/docs/Web/API/CanvasRenderingContext2D/lineCap
https://developer.mozilla.org/en-US/docs/Web/API/CanvasRenderingContext2D/lineJoin
http://jun.hansung.ac.kr/CWP/htmls/html%20hsl%20colors.html