
마크다운?
마크다운(Markdown)은 일반 텍스트 기반의 경량 마크업 언어입니다. 일반 텍스트로 서식이 있는 문서를 작성하는 데 사용되며, HTML과 리치 텍스트(RTF) 등 서식 문서로 쉽게 변환되기 때문에 README 파일이나 온라인 게시물 등에 많이 사용됩니다.
- 위키백과 -
마크다운 요소
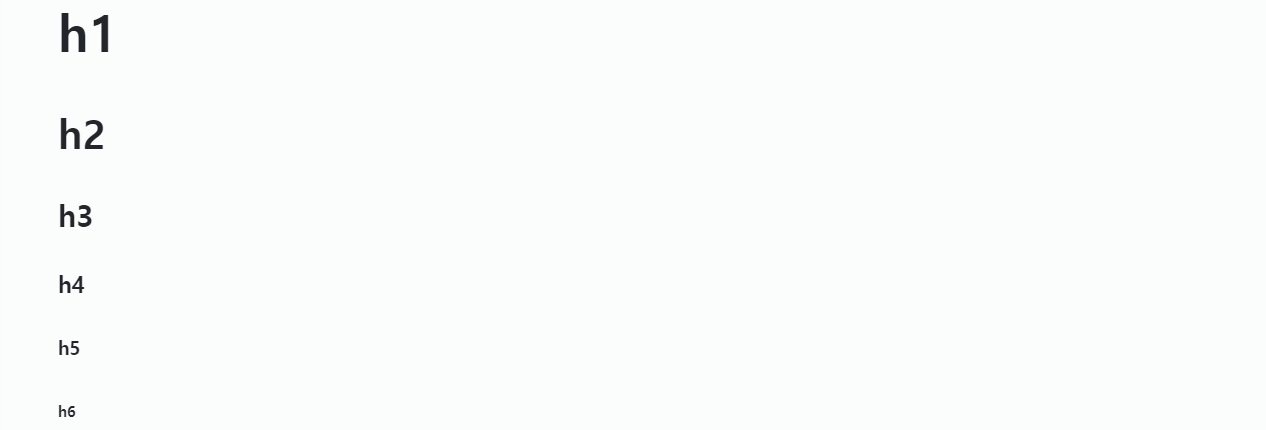
1. 헤더(Headers)
제목에 해당하는 요소로 #의 개수에 따라 h1부터 h6까지 표현할 수 있습니다.
h1,h2의 경우 각각=,-를 사용해 표현할 수도 있습니다.
1.1 제목, 부제목
✏ Example
h1
=

h2
-
👀 Result

1.2 글머리
✏ Example
# h1
## h2
### h3
#### h4
##### h5
###### h6
👀 Result
2. 폰트 스타일(Font Style)
HTML의 font-style과 유사한 역할로 굵게, 기울이기, 취소선, 언더라인 등의 스타일을 폰트에 적용합니다.
2.1 굵게(Bold)
✏ Example
**bold text**
__bold text__
👀 Result
bold text
bold text
2.2 기울이기(Italic)
✏ Example
*italicized text*
_italicized text_
👀 Result
italicized text
italicized text
2.3 굵게, 기울이기 모두 적용(Bord And Italic)
✏ Example
***bold and italic text***
___bold and italic text___
👀 Result
bold and italic text
bold and italic text
2.4 취소선(Italic)
✏ Example
~~strikethrough text~~👀 Result
strikethrough text
2.4 언더라인(Underline)
✏ Example
<u>underline text</u>👀 Result
underline text
3. 인용문(Blockquote)
인용문 작성시 사용되는 요소입니다.
- 인용문 안에서 다른 마크다운 요소를 사용할 수 있습니다.
✏ Example
> blockquote 1
>> blockquote 2
>>> **blockquote 3 - 다른 마크다운 요소 사용**
👀 Result
blockquote 1
blockquote 2
blockquote 3 - 다른 마크다운 요소 사용
4. 목록
4.1 순서있는 목록(Ordered List)
숫자.의 형태로 사용하며 순서있는 목록으로 표시합니다.
- 두번 줄바꿈 하면 연속으로 순서있는 목록을 사용할 수 있습니다.
- 중간에 한번 줄바꿈 하면 간격이 넓은 순서있는 목록을 사용할 수 있습니다.
- 순서있는 목록이 끝나지 않으면 숫자에 상관 없이 목록의 순서가 유지됩니다.
✏ Example
1. First item
2. Second item
3. Third item


1. First item
2. Second item
3. Third item

4. Fourth item


1. First item
1. Second item
2. Third item
👀 Result
- First item
- Second item
- Third item
-
First item
-
Second item
-
Third item
-
Fourth item
- First item
- Second item
- Third item
4.2 순서없는 목록(Unordered List)
*, +, - 기호를 사용하여 작성하고 순서없는 목록으로 표시합니다.
- 목록 안에서 다른 마크다운 요소를 사용할 수 있으며
Tab,Space Bar키를 이용해 들여쓰기가 가능합니다. *,+,-기호에 상관없이 동일한 기능을 하며 혼합해서 사용해도 됩니다.
✏ Example
* First item
* Second item
* Third item
  * Fourth item


* First item
  + Second item
    - Third item
👀 Result
- First item
- Second item
- Third item
- Fourth item
- First item
- Second item
- Third item
- Second item
4.3 정의 목록(Definition Lists)
사전처럼 용어를 설명하는 정의 목록을 표시할때 사용합니다.
✏ Example
First Term // Velog 에서는 적용되지 않습니다.
: This is the definition of the first term.

Second Term // Velog 에서는 적용되지 않습니다.
: This is one definition of the second term.
: This is another definition of the second term.

<dl>
<dt>First Term</dt>
<dd>This is the definition of the first term.</dd>
<dt>Second Term</dt>
<dd>This is one definition of the second term. </dd>
<dd>This is another definition of the second term.</dd>
</dl>
👀 Result
First Term
: This is the definition of the first term.
Second Term
: This is one definition of the second term.
: This is another definition of the second term.
5. 코드(Code)
코드를 중간에 삽입하거나 여러줄의 코드를 블럭으로 작성하기 위한 요소입니다.
5.1 인라인 코드(Inline Code)
글 중간에 코드를 강조해서 삽입할 수 있습니다
- 코드 내부에서는 다른 마크다운 요소를 사용할 수 없습니다.
✏ Example
`inline code`
`**inline code**`
👀 Result
inline code
**inline code**
5.2 코드블럭(Code Block)
여러줄의 코드를 블럭으로 작성할 수 있으며 언어 종류를 명시해주면 문법강조(Syntax Highlighting) 효과를 얻을 수 있습니다.
- 띄어쓰기 네번으로 코드블럭을 작성할 수 있습니다.
<pre><code>내용</code></pre>를 사용하여 코드블럭을 작성할 수 있습니다.
✏ Example
  ```
  console.log('Hello World 1!!');
  ```

  ```typescript
  console.log('Hello World 2!!');
  ```

      console.log('Hello World 3!!');

  <pre>
  <code>
  console.log('Hello World 4!!');
  </code>
  </pre>
👀 Result
console.log('Hello World 1!!');console.log('Hello World 2!!');console.log('Hello World 3!!');
console.log('Hello World 4!!');
6. Horizontal
수평선을 만드는 요소로 *, - 기호을 한줄에 세번 쓰는것으로 사용 가능하며, 단락을 분리할 때 주로 사용합니다.
- 기호 중간에 띄어쓰기가 있어도 사용 가능합니다.
✏ Example
---
----
----------
- -  -
***
**********
* *  *
👀 Result
7. Link
인라인 링크, URL 링크, 참조 링크 형태로 사용할 수 있으며 클릭시 지정한 URL로 이동합니다.
7.1 인라인 링크
클릭시 지정한 URL로 이동할 수 있는 링크를 생성하며 alt값을 추가로 설정할 수 있습니다.
- URL 대신에
#id를 사용하면id가 부여된 요소로 이동할 수 있습니다.
✏ Example
[Go Velog 1](https://velog.io)
[Go Velog 2](https://velog.io/, "velog link") // alt값 설정

### My Great Heading 1 {#custom-id-1} // id 지정, Velog 에서는 적용되지 않습니다.

[Go Velog 3](#custom-id-1)

<h3 id="custom-id-2">My Great Heading 2</h3>

[Go Velog 4](#custom-id-2)
👀 Result
Go Velog 1
Go Velog 2
Go Velog 3
Go Velog 4
7.2 URL 링크
✏ Example
<https://velog.io>👀 Result
7.3 참조 링크
✏ Example
Velog Link: [Go Velog][veloglink]
[veloglink]:https://google.com "velog link"
👀 Result
Velog Link: Go Velog
8. Image
이미지를 출력할 수 있는 요소로 ![]() 형태로 사용하며 alt값을 추가로 설정할 수 있습니다.
<img>태그를 사용해width,height,title,alt속성을 적용할 수 있습니다.
✏ Example

<img src="image.jpg" width="100px" height="80px" title="(px)크기 적용" alt="Markdown" />
<img src="image.jpg" width="20%" height="15%" title="(%)크기 적용" alt="Markdown" />👀 Result

9. 줄바꿈(Line Break)
인위적으로 줄바꿈을 적용할때 사용하며 여러번 사용하면 횟수만큼 줄바꿈이 적용됩니다.
✏ Example
First Line<br />Second Line👀 Result
First Line
Second Line
10. 표(Table)
인위적으로 줄바꿈을 적용할때 사용하며 여러번 사용하면 횟수만큼 줄바꿈이 적용됩니다.
- 각 셀의 구분은 파이프
|기호를 사용하고 Header 셀 아랫줄에|---|을 입력하여 구분합니다. -기호는 하나만 입력해도 사용 가능하며 여려개 입력해도 동일하게 적용됩니다.(|-|,|---|,|-----|)- 정렬 기능은
:기호를|-|좌, 우측에 넣어 사용 가능합니다.|:--|왼쪽 정렬|:-:|가운데 정렬|--:|오른쪽 정렬
✏ Example
| 정렬 없음 | 왼쪽 정렬 | 가운데 정렬 | 오른쪽 정렬 |
| - | ----------- |
| Header | Title |
| Paragraph | Text |
👀 Result
| 정렬 없음 | 왼쪽 정렬 | 가운데 정렬 | 오른쪽 정렬 |
|---|---|---|---|
| Content 1 | Left | center | right |
| Content 2 | Left | center | right |
11. 할일(Task Lists)
체크박스 형태로 할일을 표시하는데 사용합니다.
✏ Example
- [x] Write the press release
- [ ] Update the website
- [ ] Contact the media
👀 Result
- Write the press release
- Update the website
- Contact the media
12. 하이라이트(Highlight)
체크박스 형태로 할일을 표시하는데 사용하는 요소입니다.
✏ Example
강조를 해봅시다 ==매우 강조!!== // Velog 에서는 적용되지 않습니다.
강조를 해봅시다 <mark>매우 강조!!</mark>
👀 Result
강조를 해봅시다 ==매우 강조!!==
강조를 해봅시다 매우 강조!!
13. 첨자(Superscript, Subscript)
위 첨자, 아래 첨자를 표시하는데 사용하는 요소입니다.
13.1 위 첨자(Superscript)
✏ Example
X^2^ // Velog 에서는 적용되지 않습니다.

X<sup>2</sup>
👀 Result
X^2^
X2
13.2 아래 첨자(Subscript)
✏ Example
H~2~O // Velog 에서는 적용되지 않습니다.

H<sub>2</sub>O
👀 Result
H~2~O
H2O
14. 이모지(Emoji)
여러 종류의 이모지를 사용할 수 있습니다.🙂
- 특정 Markdown에서는
:이모지명칭:형태로 이모지를 사용할 수 있습니다. - Twitter Emoji
- EMOJIALL Emoji
✏ Example
That is so funny! :joy: // Velog 에서는 적용되지 않습니다.

🙂
👀 Result
That is so funny! :joy:
🙂

제가 봤던 마크다운 작성법중에 가장 정리가 잘 되어있는 것 같습니다. 감탄중.. 근데 이미지 사이즈는 왜 안되는걸까요? ㅠ