RecyclerView란 무엇인가
ListView는 항목이 갱신될 때 새로 뷰를 생성해야하는 단점 존재
ListView의 단점을 보완하기 위해 나온 View
마지막에 사용했던 객체를 다시 사용하여 효율성을 높음
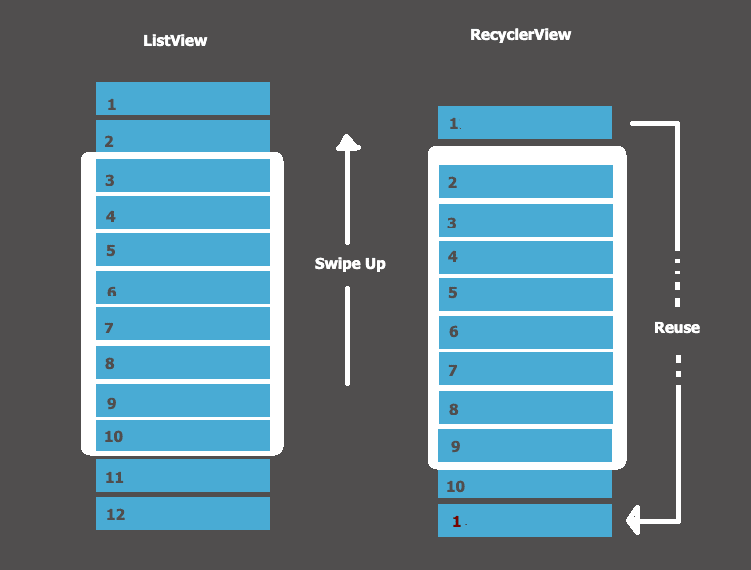
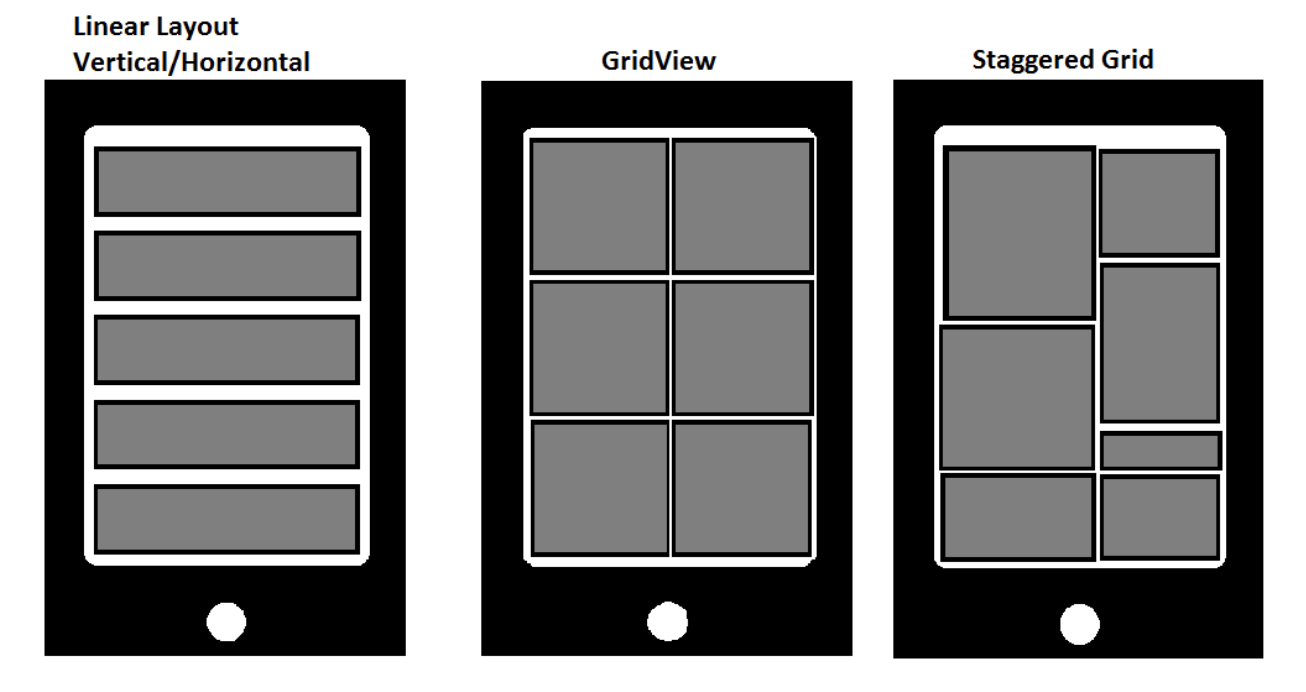
위의 그림을 보면 보다 이해하기 쉽다.
만약 100개의 뷰가 생성된다면 ListView는 100개의 객체를 생성해야하지만
RecyclerView는 이전에 사용했던 객체를 재사용함으로써 자원을 더 효율적으로 사용할 수 있다.
RecyclerView 구성 요소
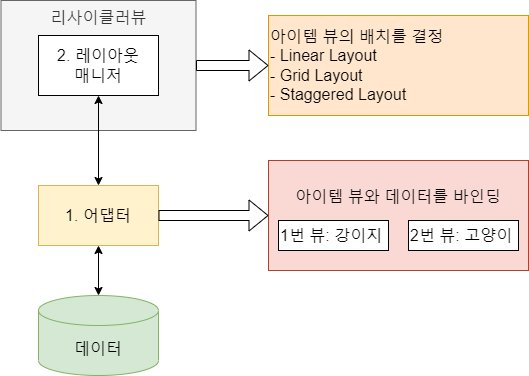
1. 어댑터는 아이템뷰를 생성하고 데이터를 바인딩해줌
2. 레이아웃 매니저는 어댑터에 생성한 아이템뷰의 배치를 결정함
RecyclerView를 사용해보자
ListView 예제와 마찬가지로 더하기 버튼을 눌렀을 때 아이템 추가, 빼기 버튼을 눌렀을 때 아이템 삭제를 할 수 있도록 만들어 볼 예정이다.
먼저 레이아웃을 구성해보자
activity_main.xml
<?xml version="1.0" encoding="utf-8"?>
<androidx.constraintlayout.widget.ConstraintLayout xmlns:android="http://schemas.android.com/apk/res/android"
    xmlns:app="http://schemas.android.com/apk/res-auto"
    xmlns:tools="http://schemas.android.com/tools"
    android:layout_width="match_parent"
    android:layout_height="match_parent"
    tools:context=".MainActivity">

    <androidx.recyclerview.widget.RecyclerView
        android:id="@+id/recyclerView"
        android:layout_width="match_parent"
        android:layout_height="0dp"
        app:layout_constraintBottom_toBottomOf="parent"
        app:layout_constraintTop_toTopOf="parent" />

    <Button
        android:id="@+id/plus_btn"
        android:layout_width="0dp"
        android:layout_height="wrap_content"
        app:layout_constraintStart_toStartOf="parent"
        app:layout_constraintEnd_toStartOf="@id/minus_btn"
        app:layout_constraintBottom_toBottomOf="parent"
        android:layout_marginStart="10dp"
        android:layout_marginEnd="10dp"
        android:text="PLUS"/>

    <Button
        android:id="@+id/minus_btn"
        android:layout_width="0dp"
        android:layout_height="wrap_content"
        app:layout_constraintStart_toEndOf="@id/plus_btn"
        app:layout_constraintEnd_toEndOf="parent"
        app:layout_constraintBottom_toBottomOf="parent"
        android:layout_marginStart="10dp"
        android:layout_marginEnd="10dp"
        android:text="MINUS"/>


</androidx.constraintlayout.widget.ConstraintLayout>
리스트를 보여줄 REcyclerview를 추가
더하기와 빼기 버튼 추가
item_viwe.xml
<?xml version="1.0" encoding="utf-8"?>
<androidx.constraintlayout.widget.ConstraintLayout xmlns:android="http://schemas.android.com/apk/res/android"
    android:layout_width="match_parent"
    android:layout_height="100dp"
    xmlns:app="http://schemas.android.com/apk/res-auto">

    <TextView
        android:id="@+id/title"
        android:layout_width="50dp"
        android:layout_height="50dp"
        android:background="@color/black"
        app:layout_constraintStart_toStartOf="parent"
        app:layout_constraintTop_toTopOf="parent"
        app:layout_constraintBottom_toBottomOf="parent"
        android:layout_marginStart="20dp"
        android:text="title"
        android:textColor="@color/white"
        android:gravity="center"/>

    <TextView
        android:id="@+id/content"
        android:layout_width="0dp"
        android:layout_height="wrap_content"
        android:background="@color/white"
        android:text="content"
        android:textColor="@color/black"
        android:gravity="center"
        app:layout_constraintStart_toEndOf="@id/title"
        app:layout_constraintTop_toTopOf="parent"
        app:layout_constraintEnd_toEndOf="parent"
        app:layout_constraintBottom_toBottomOf="parent"
        android:layout_marginEnd="20dp"
        android:layout_marginStart="10dp" />

</androidx.constraintlayout.widget.ConstraintLayout>
아이템 뷰로 쓰일 레이아웃 파일
숫자를 표시할 title과 content만 간단하게 추가함
그 다음Activity를 수정한다.
class MainActivity : AppCompatActivity() {

    private val binding by lazy { ActivityMainBinding.inflate(layoutInflater) }

    //어댑터 객체 생성
    private val adapter by lazy { RecyclerViewAdapter(itemList) }
    private var itemList = mutableListOf<RecyclerViewItem>()

    var count: Int = 0

    override fun onCreate(savedInstanceState: Bundle?) {
        super.onCreate(savedInstanceState)
        setContentView(binding.root)
        binding.recyclerView.adapter = adapter
        //레이아웃 선택
        binding.recyclerView.layoutManager = LinearLayoutManager(this)

		// 더하기 버튼 눌렀을 시
        binding.plusBtn.setOnClickListener {
            addList()
        }

        // 빼기 버튼 눌렀을 시
        binding.minusBtn.setOnClickListener {
            removeList()
        }
    }

    private fun addList() {
        count++
        itemList.add(RecyclerViewItem("$count", "$count"))

    }

    private fun removeList() {
        if (count != 0) {
            itemList.removeAt(--count)
        }

    }
}
어댑터 객체를 생성
레이아웃은 LinearLayout으로 구성
아이템을 추가, 삭제하고 그 리스트를 어댑터에 넘기고 화면에 뿌려준다.
RecyclerViewAdapter
class RecyclerViewAdapter(private val itemList: MutableList<RecyclerViewItem>) : RecyclerView.Adapter<RecyclerViewAdapter.MyViewHolder>(){

        class MyViewHolder(binding: ItemViewBinding) : RecyclerView.ViewHolder(binding.root) {
            val title = binding.title
            val content = binding.content
        }

    override fun onCreateViewHolder(parent: ViewGroup, viewType: Int): MyViewHolder {
        val binding: ItemViewBinding = ItemViewBinding.inflate(LayoutInflater.from(parent.context), parent, false)
        return MyViewHolder(binding)
    }

    override fun onBindViewHolder(holder: MyViewHolder, position: Int) {
        val data = itemList[position]
        holder.title.text = data.title
        holder.content.text = data.content
    }

    override fun getItemCount(): Int {
        return itemList.size
    }
}
아이템뷰를 생성하고 데이터를 뷰와 바인딩해줌
itemList를 인수를 받고 RecyclerView.Adapter를 상속함
MyViewHolder 클래스를 생성함, RecyclerView.ViewHolder를 상속받음
onCreateViewHolder 함수는 MyViewHolder에서 만든 뷰홀더 객체를 생성함
onBindViewHolder 함수는 인수로 받아온 itemList를 MyViewHolder 클래스에 넣어줌
getItemCount() 함수는 데이터가 몇 개인지 반환해줌
아이템을 저장할 데이터 클래스도 만들어 준다.
data class RecyclerViewItem(
    var title: String?,
    var content: String?
)
결과 확인